前言:最近在搞这个板子,由于也是新手,走了很多弯路,尤其是在网上查到的许多资料都是几年前的,对于新系统不是很适用,甚至有些文件目录都不相同,所以重新写一下这个。
一.升级系统
首先下载新的镜像

这是目前最新的镜像, 后缀LXQT表示带桌面的,IoT不带,但是实际上这个桌面真没啥用,不能进行各种系统配置,只能跑跑浏览器之类的应用。
下载之后,再下载制作工具etcher ,这是官方链接,比较慢,也可以自行百度。
安装和制作过程基本都只需按照流程下一步即可,不用特殊配置。只需注意SD卡内存大于2G。
接下来,就是装系统了。先把SD卡插进去,然后一直按住POWER键,再上电,然后可能开始灯不会亮,过几秒或者十几秒后会亮,然后就可以松手了,可能会亮的没有规律,这是正常的,我装了几次发现的。过几十分钟就装好了,这时灯可能全亮或全灭。
装完之后,系统在SD卡里面,开机必须用SD卡。
正常开机,机器启动后会弹出一个盘符
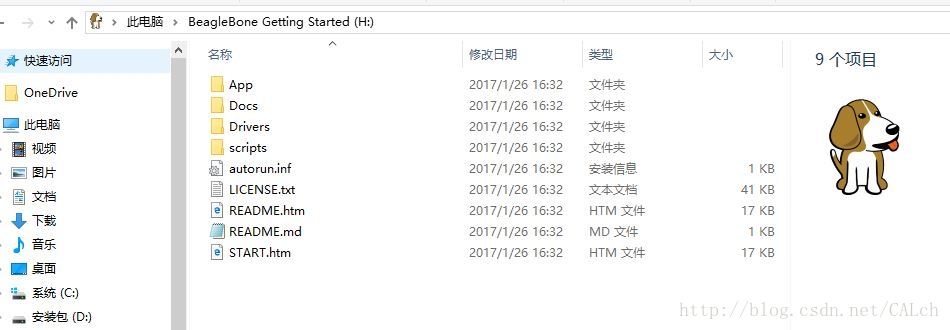
里面就是在浏览器里输入192.168.7.2(别用IE或EDGE)打开的网页的内容。
192.168.7.2就是BBB自己的IP了,它自身也是一个DHCP服务器,会给你的USB的主机分配一个192.168.7.1的IP,这个可以在网络共享中心看到。
接下来,可以通过PUTTY或者XSHELL连接BBB了,连接方法都差不多,但注意系统更新后,不能用root账户登录了,root账户每次开机都会分配一个随机的密码。它提供了一个debian的账户,密码是temppwd。
以XSHELL为例,建立新连接
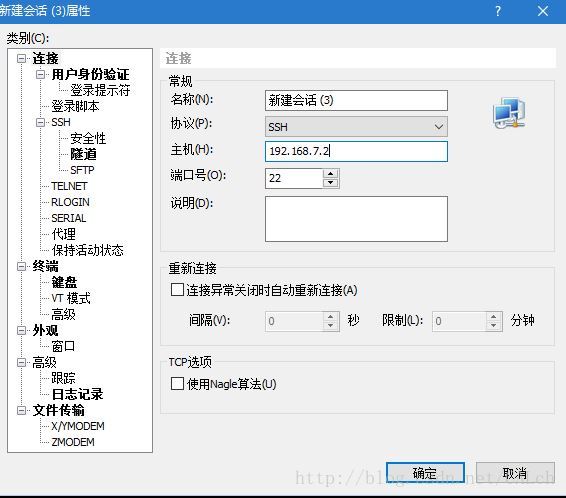
点击确定
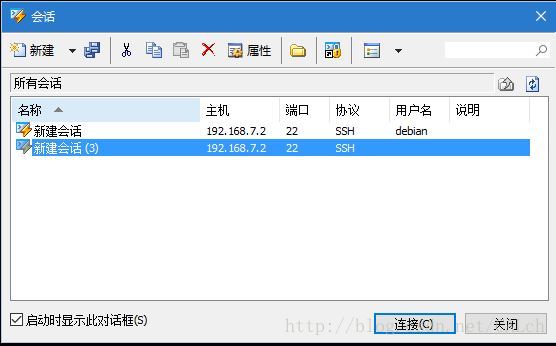
选中刚刚建立的会话,点连接
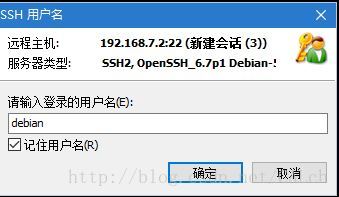
输入名字debian,勾选记住,点确定
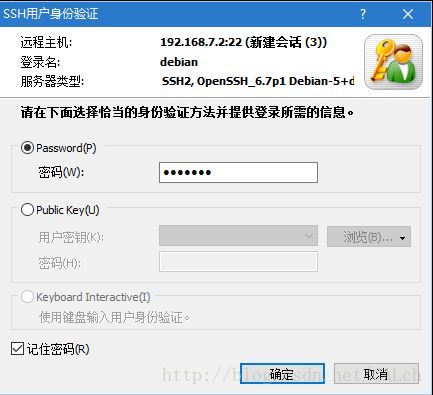
输入temppwd,勾选记住,点确定
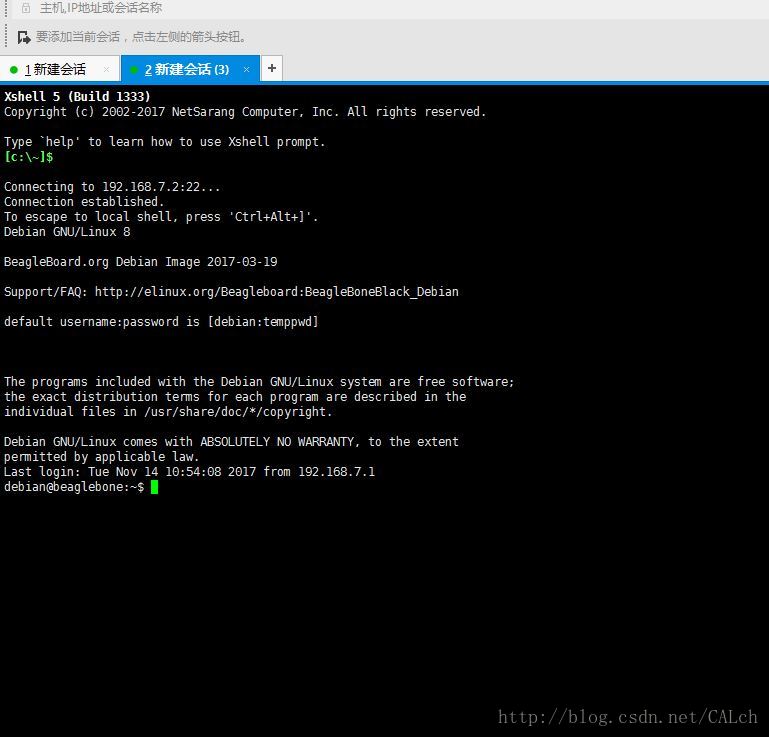
就进来了。
这里我们先修改文件,重启,把系统烧进内部EMMC里面,等开机之后,下次开机就可以取下SD卡了。
sudo vi /boot/uEnv.txt
把下面这句取消注释
#cmdline=init=/opt/scripts/tools/eMMC/init-eMMC-flasher-v3.sh
这个脚本就是烧写系统的。我们只是让他执行一下而已。
另外uEnv.txt这个文件也是开机后被调用,相当于开机自启动。
之后重启就好了。
重启之后,可以配置一下网络共享。
首先打开主机的网络共享中心
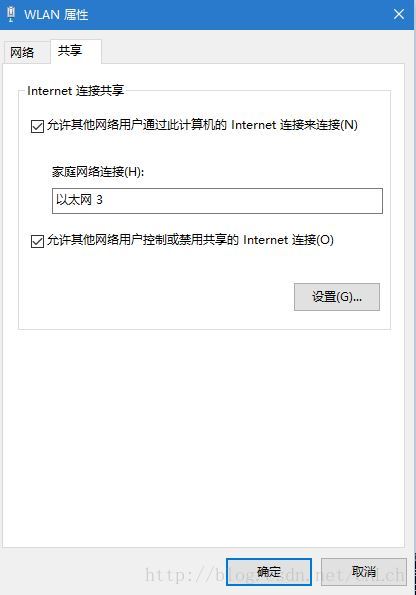
打开网络属性,勾选共享,选中BBB所在的网络连接即可,点确定。
注意这样操作后,WINDOW会将原来自己的192.168.7.1IP改成192.168.137.1,这样不在一个子网下,ssh也连不上BBB了,那么把IP改回来就好了
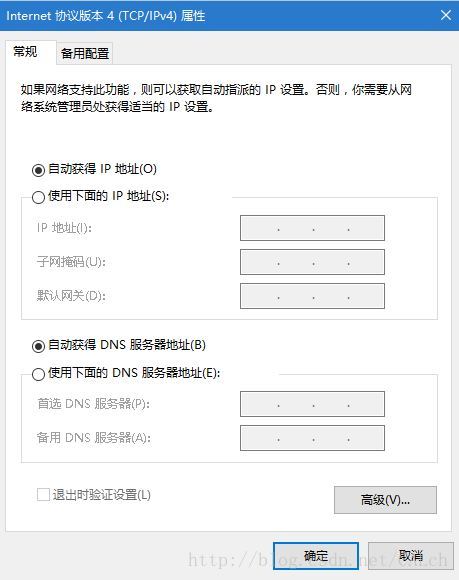
打开BBB所在网络的属性,打开IPV4配置,可以看到IP被改成了192.168.137.1,由于BBB自身也是一个DHCP服务器,所以我们可以改成自动获取IP和DNS。
这时ssh又能连上BBB了,但是BBB还是不能上网。
首先配置路由
sudo route add default gw 192.168.7.1
然后配置DNS服务器
sudo vi /etc/resolv.conf
添加
    nameserver 127.0.0.1
    nameserver 8.8.8.8
    nameserver 202.117.0.20
其中202.117.0.20是我的主机的DNS,你们按照自己的配置即可。
然后就可以上网了,使用ping xxx 的方法有些不适用,我发现ping www.baidu.com 不通。在我的windows下也不行。使用
sudo apt-get update
如果看到更新了,那么就成功了。
由于配置在重启后会失效,我们可以把这些加入开机选项。
sudo vi /etc/rc.local
添加
route add default gw 192.168.7.1
echo "nameserver 202.117.0.20" > /etc/resolv.conf
exit 0
好了,重启之后网络还在。
关于远程桌面,在我用了真的桌面后感觉真的没啥用处。
官方说法是先输入vncserver ,然后再windows下用远程桌面输192.168.7.2,选择vnc模式连接即可。不过我没有联通,在ubuntu下也连不上,很奇怪。
接下来,进行了uart和spi接口的配置。
新系统的slots目录:/sys/devices/platform/bone_capemgr/slots
可以把这个东西编成一个环境变量,方便调用。我编成了$SLOTS.
添加设备:
echo BB-UART4 > $SLOTS
发现失败了,找了很久发现,是端口已经被占用了。还是在/boot/uEnv.txt里面,有一个cape设备设置成了开机加载的。把它注释掉就行,没啥用处。下面是我的
debian@beaglebone:~$ cat /boot/uEnv.txt
#Docs: http://elinux.org/Beagleboard:U-boot_partitioning_layout_2.0

uname_r=4.4.54-ti-r93
#uuid=
#dtb=

##BeagleBone Black/Green dtb's for v4.1.x (BeagleBone White just works..)

##BeagleBone Black: HDMI (Audio/Video) disabled:
#dtb=am335x-boneblack-emmc-overlay.dtb

##BeagleBone Black: eMMC disabled:
#dtb=am335x-boneblack-hdmi-overlay.dtb

##BeagleBone Black: HDMI Audio/eMMC disabled:
#dtb=am335x-boneblack-nhdmi-overlay.dtb

##BeagleBone Black: HDMI (Audio/Video)/eMMC disabled:
#dtb=am335x-boneblack-overlay.dtb

##BeagleBone Black: wl1835
#dtb=am335x-boneblack-wl1835mod.dtb

##BeagleBone Green: eMMC disabled
#dtb=am335x-bonegreen-overlay.dtb

###U-Boot Overlays###
###Documentation: http://elinux.org/Beagleboard:BeagleBoneBlack_Debian#U-Boot_Overlays
###Master Enable
#enable_uboot_overlays=1
###Overide capes with eeprom
#uboot_overlay_addr0=/lib/firmware/<file0>.dtbo
#uboot_overlay_addr1=/lib/firmware/<file1>.dtbo
#uboot_overlay_addr2=/lib/firmware/<file2>.dtbo
#uboot_overlay_addr3=/lib/firmware/<file3>.dtbo
###Custom Cape
#dtb_overlay=/lib/firmware/<file4>.dtbo
###Disable auto loading of virtual capes (emmc/video/wireless)
#disable_uboot_overlay_emmc=1
#disable_uboot_overlay_video=1
#disable_uboot_overlay_audio=1
#disable_uboot_overlay_wireless=1
###Cape Universal Enable
#enable_uboot_cape_universal=1
###U-Boot fdt tweaks...
#uboot_fdt_buffer=0x60000
###U-Boot Overlays###

#cmdline=coherent_pool=1M net.ifnames=0 quiet cape_universal=enable

#In the event of edid real failures, uncomment this next line:
#cmdline=coherent_pool=1M net.ifnames=0 quiet cape_universal=enable video=HDMI-A-1:1024x768@60e

##Example v3.8.x
#cape_disable=capemgr.disable_partno=
#cape_enable=capemgr.enable_partno=

##Example v4.1.x
#cape_disable=bone_capemgr.disable_partno=
#cape_enable=bone_capemgr.enable_partno=

##enable Generic eMMC Flasher:
##make sure, these tools are installed: dosfstools rsync
#cmdline=init=/opt/scripts/tools/eMMC/init-eMMC-flasher-v3.sh

uuid=1fd1147a-663e-4019-b520-4971cc6c0081
注释掉后,我们就可以加载设备了,设备也可以设成开机加载,用旧的方法在上面的文件中添加capemgr.enable_partno=XXX已经不支持了,新的做法是在/etc/default/capemgr添加设备,下面是我的配置:
debian@beaglebone:~$ cat /etc/default/capemgr
# Default settings for capemgr. This file is sourced by /bin/sh from
# /etc/init.d/capemgr.sh

# Options to pass to capemgr
CAPE=BB-UART4,BB-SPIDEV0
如果使用写$SLOTS文件的方法来添加设备的话比较麻烦,需要chmod添加文件的写权限。
下面是UART和SPI的测试代码,我都成功用了的。
debian@beaglebone:~/uart_test$ cat uart.c
#include<stdio.h>
#include<fcntl.h>
#include<unistd.h>
#include<termios.h> // using the termios.h library


int main()
{
      int fd, count_r,count_t,i;
      unsigned char buff[60];  // the reading & writing buffer
      struct termios opt;       //uart  confige structure

      //open the UART1: read&write, No block and doesn't serve as an terminal
      if ((fd = open("/dev/ttyO4", O_RDWR | O_NOCTTY | O_NDELAY)) < 0)
      {
          perror("UART: Failed to open the UART device:ttyO1.\n");
          return -1;
      }


      tcgetattr(fd, &opt); // get the configuration of the UART

      // config UART

      opt.c_cflag = B115200 | CS8 | CREAD | CLOCAL;
      // 9600 baud, 8-bit, enable receiver, no modem control lines
      opt.c_iflag = IGNPAR | ICRNL;
      // ignore partity errors, CR -> newline
      opt.c_iflag &= ~(IXON | IXOFF | IXANY);
      //turn off software stream control
      opt.c_lflag &= ~(ICANON | ECHO | ECHOE | ISIG);
      //关闭回显功能,关闭经典输入 改用原始输入
      tcflush(fd,TCIOFLUSH);        // 清理输入输出缓冲区

      tcsetattr(fd, TCSANOW, &opt); // changes occur immmediately
      if ((count_t = write(fd, "Hello BeagleBone\n",18))<0)
      {
          perror("ERR:Failed to write to the Device\n");
          return -1;
      }

      for(;;)
      {
          if ((count_r = read(fd,(void*)buff,sizeof(buff)))>0)
          {
              buff[count_r] = 0;
              printf("The following was read in [%d]:\n %s\n",count_r,buff);
          }
          else
          {
              printf("ERR:No data is ready to be read\n");
          }
          usleep(500000); // 延时 5s
      }
      close(fd);
      return 0;
}
SPI代码
debian@beaglebone:~/spi_test$ cat spi.c
/*
 * SPI testing utility (using spidev driver)
 *
 * Copyright (c) 2007  MontaVista Software, Inc.
 * Copyright (c) 2007  Anton Vorontsov <[email protected]>
 *
 * This program is free software; you can redistribute it and/or modify
 * it under the terms of the GNU General Public License as published by
 * the Free Software Foundation; either version 2 of the License.
 *
 * Cross-compile with cross-gcc -I/path/to/cross-kernel/include
 */

#include <stdint.h>
#include <unistd.h>
#include <stdio.h>
#include <stdlib.h>
#include <getopt.h>
#include <fcntl.h>
#include <sys/ioctl.h>
#include <linux/types.h>
#include <linux/spi/spidev.h>

#define ARRAY_SIZE(a) (sizeof(a) / sizeof((a)[0]))

static void pabort(const char *s)
{
    perror(s);
    abort();
}

static const char *device = "/dev/spidev1.1";
static uint8_t mode;
static uint8_t bits = 8;
static uint32_t speed = 500000;
static uint16_t delay;

static void transfer(int fd)
{
    int ret;
    uint8_t tx[] = {
        0xFF, 0x00, 0xFF, 0xFF, 0xFF, 0xFF,
        0x40, 0x00, 0x00, 0x00, 0x00, 0x95,
        0xFF, 0xFF, 0xFF, 0xFF, 0xFF, 0xFF,
        0xFF, 0xFF, 0xFF, 0xFF, 0xFF, 0xFF,
        0xFF, 0xFF, 0xFF, 0xFF, 0xFF, 0xFF,
        0xDE, 0xAD, 0xBE, 0xEF, 0xBA, 0xAD,
        0xF0, 0x0D,
    };
    uint8_t rx[ARRAY_SIZE(tx)] = {0, };
    struct spi_ioc_transfer tr = {
        .tx_buf = (unsigned long)tx,
        .rx_buf = (unsigned long)rx,
        .len = ARRAY_SIZE(tx),
        .delay_usecs = delay,
        .speed_hz = speed,
        .bits_per_word = bits,
    };

    ret = ioctl(fd, SPI_IOC_MESSAGE(1), &tr);
    if (ret < 1)
        pabort("can't send spi message");

    for (ret = 0; ret < ARRAY_SIZE(tx); ret++) {
        if (!(ret % 6))
            puts("");
        printf("%.2X ", rx[ret]);
    }
    puts("");
}

static void print_usage(const char *prog)
{
    printf("Usage: %s [-DsbdlHOLC3]\n", prog);
    puts("  -D --device   device to use (default /dev/spidev1.1)\n"
         "  -s --speed    max speed (Hz)\n"
         "  -d --delay    delay (usec)\n"
         "  -b --bpw      bits per word \n"
         "  -l --loop     loopback\n"
         "  -H --cpha     clock phase\n"
         "  -O --cpol     clock polarity\n"
         "  -L --lsb      least significant bit first\n"
         "  -C --cs-high  chip select active high\n"
         "  -3 --3wire    SI/SO signals shared\n");
    exit(1);
}

static void parse_opts(int argc, char *argv[])
{
    while (1) {
        static const struct option lopts[] = {
            { "device",  1, 0, 'D' },
            { "speed",   1, 0, 's' },
            { "delay",   1, 0, 'd' },
            { "bpw",     1, 0, 'b' },
            { "loop",    0, 0, 'l' },
            { "cpha",    0, 0, 'H' },
            { "cpol",    0, 0, 'O' },
            { "lsb",     0, 0, 'L' },
            { "cs-high", 0, 0, 'C' },
            { "3wire",   0, 0, '3' },
            { "no-cs",   0, 0, 'N' },
            { "ready",   0, 0, 'R' },
            { NULL, 0, 0, 0 },
        };
        int c;

        c = getopt_long(argc, argv, "D:s:d:b:lHOLC3NR", lopts, NULL);

        if (c == -1)
            break;

        switch (c) {
        case 'D':
            device = optarg;
            break;
        case 's':
            speed = atoi(optarg);
            break;
        case 'd':
            delay = atoi(optarg);
            break;
        case 'b':
            bits = atoi(optarg);
            break;
        case 'l':
            mode |= SPI_LOOP;
            break;
        case 'H':
            mode |= SPI_CPHA;
            break;
        case 'O':
            mode |= SPI_CPOL;
            break;
        case 'L':
            mode |= SPI_LSB_FIRST;
            break;
        case 'C':
            mode |= SPI_CS_HIGH;
            break;
        case '3':
            mode |= SPI_3WIRE;
            break;
        case 'N':
            mode |= SPI_NO_CS;
            break;
        case 'R':
            mode |= SPI_READY;
            break;
        default:
            print_usage(argv[0]);
            break;
        }
    }
}

int main(int argc, char *argv[])
{
    int ret = 0;
    int fd;

//  parse_opts(argc, argv);

    fd = open(device, O_RDWR);
    if (fd < 0)
        pabort("can't open device");

    /*
     * spi mode
     */
    ret = ioctl(fd, SPI_IOC_WR_MODE, &mode);
    if (ret == -1)
        pabort("can't set spi mode");

    ret = ioctl(fd, SPI_IOC_RD_MODE, &mode);
    if (ret == -1)
        pabort("can't get spi mode");

    /*
     * bits per word
     */
    ret = ioctl(fd, SPI_IOC_WR_BITS_PER_WORD, &bits);
    if (ret == -1)
        pabort("can't set bits per word");

    ret = ioctl(fd, SPI_IOC_RD_BITS_PER_WORD, &bits);
    if (ret == -1)
        pabort("can't get bits per word");

    /*
     * max speed hz
     */
    ret = ioctl(fd, SPI_IOC_WR_MAX_SPEED_HZ, &speed);
    if (ret == -1)
        pabort("can't set max speed hz");

    ret = ioctl(fd, SPI_IOC_RD_MAX_SPEED_HZ, &speed);
    if (ret == -1)
        pabort("can't get max speed hz");

    printf("spi mode: %d\n", mode);
    printf("bits per word: %d\n", bits);
    printf("max speed: %d Hz (%d KHz)\n", speed, speed/1000);

    transfer(fd);

    close(fd);

    return ret;
}
SPI测试的时候可以把收发接在一起,可以看到结果。
附一些常用操作
如何查看BBB当前的引脚功能呢?
cat /sys/kernel/debug/pinctrl/44e10800.pinmux/pins
功能引脚表可以百度到。
卸载cape,假设要卸载第8个cape,按照官方的说法:
echo -8 > $SLOTS
查看cape的挂接情况
dmesg | grep -i cape
附上官方配置链接,里面还有很多包括修改root密码等配置,可以根据需要使用。