Context是什么
context在日常的开发中经常被用到,扮演着一个很重要的角色,因为Context会返回一些全局对象(例如Resources类等)让我们获取一些信息,context被叫做作“上下文“。
Context的作用
- 启动Activity
- 启动和停止Service
- 发送广播消息(Intent)
- 注册广播消息(Intent)接收者
- 可以访问APK中各种资源(如Resources)
- 可以访问Package的相关信息
- APK的各种权限管理等等等等。
Context的继承关系
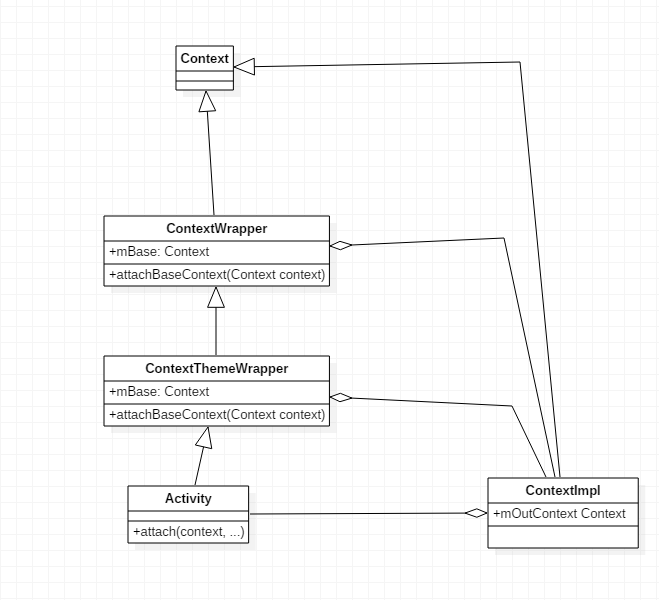
Context的一个抽象类。
定义了ContextWrapper类继承与Context。从名字看这个是一个包装类。
定义了ContextThemeWrapper类继承于Context Wrapper,该内部包含了主题相关的接口,可以在清单文件的android:theme属性指定主题。
只有Activity需要主题,因为Service是执行后台的计算没有界面不需要主题,因此直接继承于ContextWrapper。
ContextImpl类真正的实现Context中的所有函数,应用程序调用Context的方法的实现细节都在ContextImpl类中。
从继承图可以看到,Activity和Service也是Context 。
其实Application也是继承与ContextWrapper类:
public class Application extends ContextWrapper implements ComponentCallbacks2 {......}
因此一个应用程序包含的Context的数量有:
App 的Context数量 = Application对象(1个) + Activity数量 + Service数量
Context创建的时机
我们只看Activity的Context对象的创建的时机。
在分析Activity的运行过程文章中,在performLaunchActivity()方法中做了几个重要的操作,其中一个就是创建ContextImpl对象。进入performLaunchActivity()方法:
private Activity performLaunchActivity(ActivityClientRecord r, Intent customIntent) {
        ......

        Activity activity = null;
       ......
            java.lang.ClassLoader cl = r.packageInfo.getClassLoader();
            activity = mInstrumentation.newActivity(
                    cl, component.getClassName(), r.intent);

.....

            Application app = r.packageInfo.makeApplication(false, mInstrumentation);

......

                Context appContext = createBaseContextForActivity(r, activity);

......

                activity.attach(appContext, this, getInstrumentation(), r.token,
                        r.ident, app, r.intent, r.activityInfo, title, r.parent,
                        r.embeddedID, r.lastNonConfigurationInstances, config,
                        r.referrer, r.voiceInteractor);

......

  if (r.isPersistable()) {
                    mInstrumentation.callActivityOnCreate(activity, r.state, r.persistentState);
                } else {
                    mInstrumentation.callActivityOnCreate(activity, r.state);
                }

       ......

        return activity;
    }
从代码中看到,调用了createBaseContextForActivity(r, activity);方法创建了Context对象。进入该方法:
private Context createBaseContextForActivity(ActivityClientRecord r,
final Activity activity) {
        ContextImpl appContext = ContextImpl.createActivityContext(this, r.packageInfo, r.token);
        appContext.setOuterContext(activity);
        Context baseContext = appContext;

final DisplayManagerGlobal dm = DisplayManagerGlobal.getInstance();
try {
final int displayId = ActivityManagerNative.getDefault().getActivityDisplayId(r.token);
if (displayId > Display.DEFAULT_DISPLAY) {
                Display display = dm.getRealDisplay(displayId, r.token);
                baseContext = appContext.createDisplayContext(display);
            }
        } catch (RemoteException e) {
        }

// For debugging purposes, if the activity's package name contains the value of
// the "debug.use-second-display" system property as a substring, then show
// its content on a secondary display if there is one.
        String pkgName = SystemProperties.get("debug.second-display.pkg");
if (pkgName != null && !pkgName.isEmpty()
                && r.packageInfo.mPackageName.contains(pkgName)) {
for (int displayId : dm.getDisplayIds()) {
if (displayId != Display.DEFAULT_DISPLAY) {
                    Display display = dm.getRealDisplay(displayId, r.token);
                    baseContext = appContext.createDisplayContext(display);
break;
                }
            }
        }
return baseContext;
    }
在这个方法中,两个重要的操作:
创建ContextImpl对象
   static ContextImpl createActivityContext(ActivityThread mainThread,
                                             LoadedApk packageInfo, IBinder activityToken) {
if (packageInfo == null) throw new IllegalArgumentException("packageInfo");
if (activityToken == null) throw new IllegalArgumentException("activityInfo");
return new ContextImpl(null, mainThread,
                packageInfo, activityToken, null, false, null, null);
    }
很简单,其实就是new 了一个ContextImpl对象。
在ContextImpl内部保存Activity对象。
    private Context mOuterContext;

final void setOuterContext(Context context) {
        mOuterContext = context;
    }
从上述代码中可以看到Activity对象保存在mOuterContext成员变量中,以便操作Activity组件。
当Context对象创建出来了,Activity应该把这个对象保存起来才对。而这个保存的操作在Activity的attch方法中保存了,进入该方法看看:
final void attach(Context context, ActivityThread aThread,
            Instrumentation instr, IBinder token, int ident,
            Application application, Intent intent, ActivityInfo info,
            CharSequence title, Activity parent, String id,
            NonConfigurationInstances lastNonConfigurationInstances,
            Configuration config, String referrer, IVoiceInteractor voiceInteractor) {

        attachBaseContext(context);

...
...
 }
调用了attachBaseContext方法,这个是父类ContextThemeWrapper的方法。
 @Override
protected void attachBaseContext(Context newBase) {
super.attachBaseContext(newBase);
    }
又调用了父类ContextWrapper的attachBaseContext方法:
  protected void attachBaseContext(Context base) {
if (mBase != null) {
throw new IllegalStateException("Base context already set");
        }
        mBase = base;
    }
其实就是把创建出来的Context对象保存在mBase成员变量中。Activity可以通过ContextImpl对象获取Resouces,发送广播,启动Service等功能了。
可以看出每一Activity都会关联一个Context。
END。
转载请注明本文地址: Context对象创建详解