既然要打造一个完整健壮扩展性高的网络框架,自然我们要先学习别人的优秀成果。预计写10篇博文刨根问底的去打造一个wangl本篇博文主要介绍下,谷歌在2013年开发者大会发布的http框架volly。虽然年代有些久远,也无法胜任大文件请求,以及文件断点续传的需求,但优秀的设计永远不会过时。
我嚓,你哔哔个毛线啊,别啰嗦了赶快开始吧,好的好的,小弟马上开始
首先来看张图:
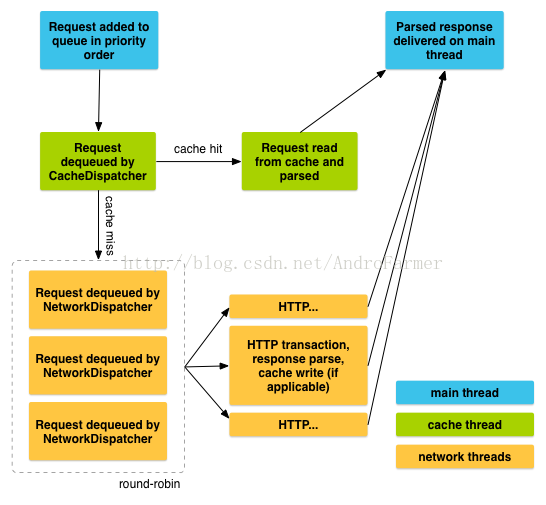
神马 我裤子都脱了,你就给我这个。
各位老司机别着急,听我慢慢道来。首页当我第一次看到这张图我是拒绝的,因为没有特效,然后dung我也看蒙圈了,但是当我分析完源码后其实就很清楚啦。我简单先说下下,蓝色代表主线程,绿色代表缓存线程,黄色代表网络请求线程,当把一个request请求加入请求队列时,首先缓存线程会检测有没有缓存,如果有的话,Delivery传递数据,切换到主线程,如果没有缓存则执行网络请求,并且将结果写入缓存,最后切换主线程。我们来通过源码分析
首先看下volley创建默认队列的代码
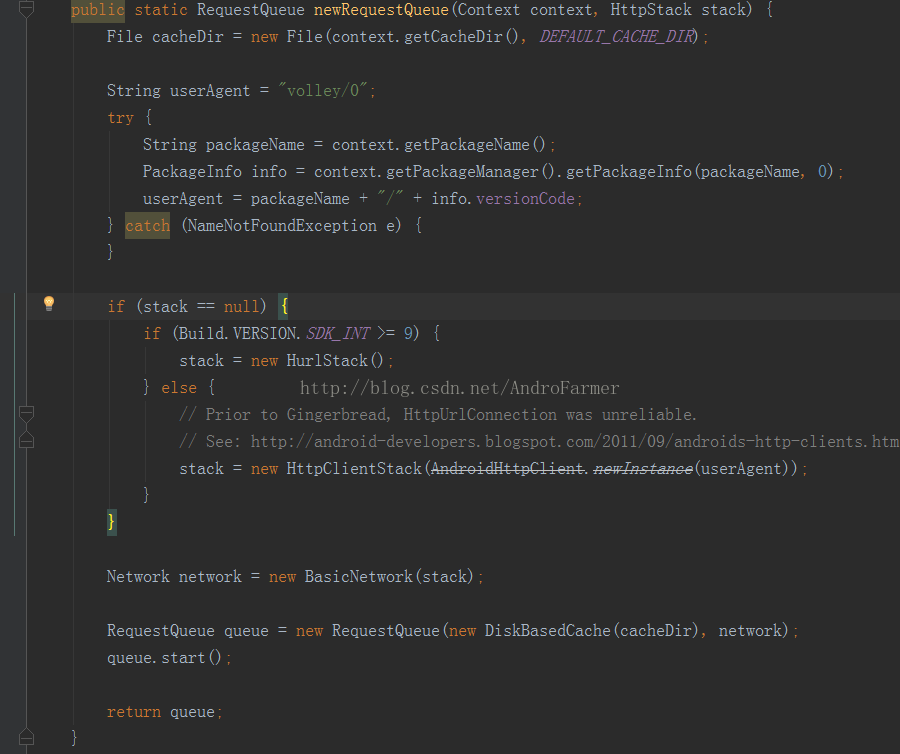
首先不同系统版本使用不同的系统版本选择不同的http实现方式 其实hurlstart 和 httpclientstart 分别是对HttpURLConnection和HttpClient的封装, network是个接口,bascinetwork是他的实现类,主要是网络请求的具体细节,我们暂时不讨论。创建完RequestQueue之后就立马执行start。Ok看下RequestQueue的start都做了什么
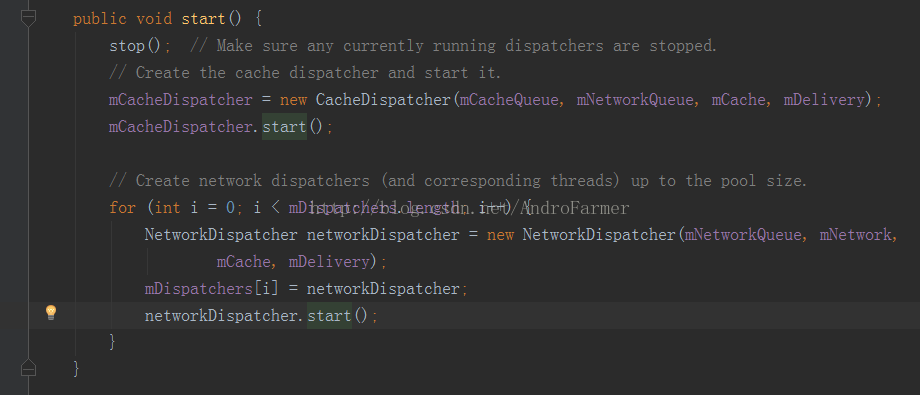
这里创建了1个缓存线程,4个网路请求线程。并且让这个几个线程都跑起来,内部执行死循环
那我们分别看下CacheDispatcher缓存线程 和NetworkDispatcher网路线程。
CacheDispatcher的run方法
@Override
public void run() {
    if (DEBUG) VolleyLog.v("start new dispatcher");
    Process.setThreadPriority(Process.THREAD_PRIORITY_BACKGROUND);

    // Make a blocking call to initialize the cache.
    mCache.initialize();

    while (true) {
        try {
            // Get a request from the cache triage queue, blocking until
            // at least one is available.
            final Request<?> request = mCacheQueue.take();
            request.addMarker("cache-queue-take");

            // If the request has been canceled, don't bother dispatching it.
            if (request.isCanceled()) {
                request.finish("cache-discard-canceled");
                continue;
            }

            // Attempt to retrieve this item from cache.
            Cache.Entry entry = mCache.get(request.getCacheKey());
            if (entry == null) {
                request.addMarker("cache-miss");
                // Cache miss; send off to the network dispatcher.
                mNetworkQueue.put(request);
                continue;
            }

            // If it is completely expired, just send it to the network.
            if (entry.isExpired()) {
                request.addMarker("cache-hit-expired");
                request.setCacheEntry(entry);
                mNetworkQueue.put(request);
                continue;
            }

            // We have a cache hit; parse its data for delivery back to the request.
            request.addMarker("cache-hit");
            Response<?> response = request.parseNetworkResponse(
                    new NetworkResponse(entry.data, entry.responseHeaders));
            request.addMarker("cache-hit-parsed");

            if (!entry.refreshNeeded()) {
                // Completely unexpired cache hit. Just deliver the response.
                mDelivery.postResponse(request, response);
            } else {
                // Soft-expired cache hit. We can deliver the cached response,
                // but we need to also send the request to the network for
                // refreshing.
                request.addMarker("cache-hit-refresh-needed");
                request.setCacheEntry(entry);

                // Mark the response as intermediate.
                response.intermediate = true;

                // Post the intermediate response back to the user and have
                // the delivery then forward the request along to the network.
                mDelivery.postResponse(request, response, new Runnable() {
                    @Override
                    public void run() {
                        try {
                            mNetworkQueue.put(request);
                        } catch (InterruptedException e) {
                            // Not much we can do about this.
                        }
                    }
                });
            }

        } catch (InterruptedException e) {
            // We may have been interrupted because it was time to quit.
            if (mQuit) {
                return;
            }
            continue;
        }
    }
}
缓存线程中首先会把Request从缓存队列中取出来,如果,Request已经被设置标识cancle,则跳过后面的操作,执行下一次循环。
然后取缓存,如果缓存不存在,或者缓存已过期,则交给网络线程队列去处理。如果这些情况都不成立则通过mDelivery传递数据切换到主线程
这里的mDelivery其实是我们在第一步创建RequestQuese是传递进来的
看下RequestQueue的构造函数
public RequestQueue(Cache cache, Network network, int threadPoolSize) {
this(cache, network, threadPoolSize,
new ExecutorDelivery(new Handler(Looper.getMainLooper())));
}
这里ExecutorDelivery就是我们这里的mDelivery 他是ResponseDelivery的一个实现类。
下一步再来看下
NetworkDispatcher网络线程run都干了些啥
@Override
public void run() {
    Process.setThreadPriority(Process.THREAD_PRIORITY_BACKGROUND);
    while (true) {
        long startTimeMs = SystemClock.elapsedRealtime();
        Request<?> request;
        try {
            // Take a request from the queue.
            request = mQueue.take();
        } catch (InterruptedException e) {
            // We may have been interrupted because it was time to quit.
            if (mQuit) {
                return;
            }
            continue;
        }

        try {
            request.addMarker("network-queue-take");

            // If the request was cancelled already, do not perform the
            // network request.
            if (request.isCanceled()) {
                request.finish("network-discard-cancelled");
                continue;
            }

            addTrafficStatsTag(request);

            // Perform the network request.
            NetworkResponse networkResponse = mNetwork.performRequest(request);
            request.addMarker("network-http-complete");

            // If the server returned 304 AND we delivered a response already,
            // we're done -- don't deliver a second identical response.
            if (networkResponse.notModified && request.hasHadResponseDelivered()) {
                request.finish("not-modified");
                continue;
            }

            // Parse the response here on the worker thread.
            Response<?> response = request.parseNetworkResponse(networkResponse);
            request.addMarker("network-parse-complete");

            // Write to cache if applicable.
            // TODO: Only update cache metadata instead of entire record for 304s.
            if (request.shouldCache() && response.cacheEntry != null) {
                mCache.put(request.getCacheKey(), response.cacheEntry);
                request.addMarker("network-cache-written");
            }

            // Post the response back.
            request.markDelivered();
            mDelivery.postResponse(request, response);
        } catch (VolleyError volleyError) {
            volleyError.setNetworkTimeMs(SystemClock.elapsedRealtime() - startTimeMs);
            parseAndDeliverNetworkError(request, volleyError);
        } catch (Exception e) {
            VolleyLog.e(e, "Unhandled exception %s", e.toString());
            VolleyError volleyError = new VolleyError(e);
            volleyError.setNetworkTimeMs(SystemClock.elapsedRealtime() - startTimeMs);
            mDelivery.postError(request, volleyError);
        }
    }
}
看try-catch里面,前面跟CacheDispatcher一样 如果,Request已经被设置标识cancle,则跳过后面的操作,执行下一次循环。
NetworkResponse networkResponse = mNetwork.performRequest(request);
这里是执行具体的网络请求,并拿到返回结果,对结果进行分析进行不同得操作,最终将解析的结果通过mDelivery传递数据切换到主线程。这里就完成了一个完整的网络请求过程。暂时先写到这,先对volley源码有个大致的了解,后面几遍文章会对volley进行刨祖坟系列的剖析。