OpenStack镜像服务Glance介绍
创建虚拟机我们需要有glance的支持,因为glance是提供镜像服务 glance有两个比较重要的服务 Glance-api接受云系统镜像的构建、删除、读取请求 Glance-Registry云系统的镜像注册服务 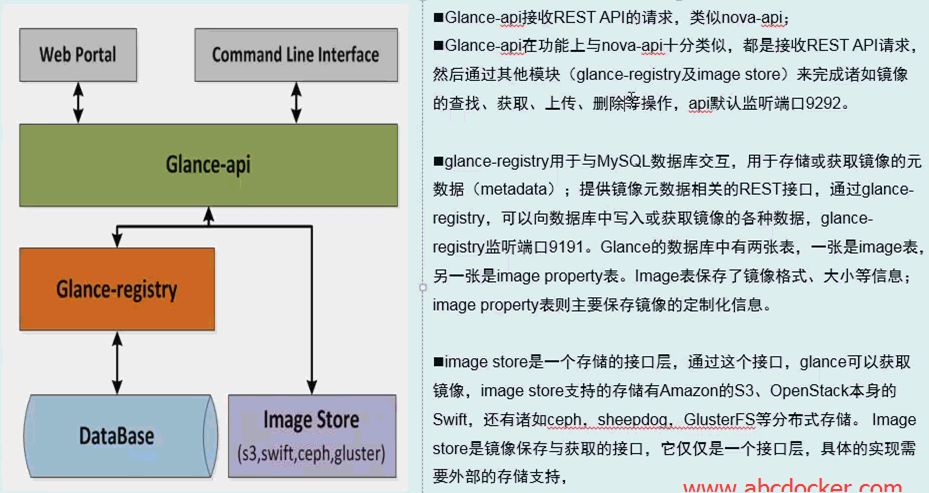
我们需要配置glance-api的配置文件和glance-registry配置文件
glance不需要配置消息队列,但是glance需要配置keystone(认证中心)
提示:默认情况下上传镜像存放在/var/lib/glance/images下
安装glance
创建数据库和在keystone上创建glance用户我们已经创建完成
安装软件包
[root@linux-node1 ~]# yum install openstack-glance -y
修改数据库地址
[root@linux-node1 ~]# vim /etc/glance/glance-api.conf[database]…connection = mysql+pymysql://glance:[email protected]/glance…[root@linux-node1 ~]# vim /etc/glance/glance-registry.conf[database]…connection = mysql+pymysql://glance:[email protected]/glance…#打开注释,写mysql地址,注意是在database默认下
修改完之后我们需要同步数据库
[root@linux-node1 ~]# su -s /bin/sh -c "glance-manage db_sync" glance#替我们去创建表结构,openstack有警告没有关系,只要不是error就可以
同步完数据库之后我们进行检查
[root@linux-node1 ~]# mysql -h 192.168.56.11 -u glance -pglance -e "use glance;show tables;"+----------------------------------+| Tables_in_glance |+----------------------------------+| artifact_blob_locations || artifact_blobs || artifact_dependencies || artifact_properties || artifact_tags || artifacts || image_locations || image_members || image_properties || image_tags || images || metadef_namespace_resource_types || metadef_namespaces || metadef_objects || metadef_properties || metadef_resource_types || metadef_tags || migrate_version || task_info || tasks |+----------------------------------+
我们要确保数据库可以进行同步
设置keystone
在[keystone_authtoken]进行设置
[root@linux-node1 ~]# vim /etc/glance/glance-api.conf…[keystone_authtoken]auth_uri = http://192.168.56.11:5000auth_url = http://192.168.56.11:35357memcached_servers = 192.168.56.11:11211auth_type = password #验证类型为密码project_domain_name = default #默认域user_domain_name = default #用户默认域project_name = service #项目名称username = glance #用户password = glance #密码
提示:必须复制在[keystone_authtoken]模块下,否则不生效
还需要设置[paste_deploy]模块
[paste_deploy]flavor = keystone#去掉注释并修改为keystone
设置registry,和api的设置一样
[root@linux-node1 ~]# vim /etc/glance/glance-registry.conf…[keystone_authtoken]auth_uri = http://192.168.56.11:5000auth_url = http://192.168.56.11:35357memcached_servers = 192.168.56.11:11211auth_type = passwordproject_domain_name = defaultuser_domain_name = defaultproject_name = serviceusername = glancepassword = glance…[paste_deploy]flavor = keystone
配置镜像路径
在glance-api配置本地文件系统存储和镜像文件位置
[root@linux-node1 ~]# vim /etc/glance/glance-api.conf…[glance_store]stores = file,httpdefault_store = filefilesystem_store_datadir = /var/lib/glance/images#以上配置都是打开注释就可以
检查
glance-api配置文件配置小结:
[root@linux-node1 ~]# grep '^[a-z]' /etc/glance/glance-api.confconnection = mysql+pymysql://glance:[email protected]/glancestores = file,httpdefault_store = filefilesystem_store_datadir = /var/lib/glance/imagesauth_uri = http://192.168.56.11:5000auth_url = http://192.168.56.11:35357memcached_servers = 192.168.56.11:11211auth_type = passwordproject_domain_name = defaultuser_domain_name = defaultproject_name = serviceusername = glancepassword = glanceflavor = keystone
registry配置如下
[root@linux-node1 ~]# grep '^[a-z]' /etc/glance/glance-registry.confconnection = mysql+pymysql://glance:[email protected]/glanceauth_uri = http://192.168.56.11:5000auth_url = http://192.168.56.11:35357memcached_servers = 192.168.56.11:11211auth_type = passwordproject_domain_name = defaultuser_domain_name = defaultproject_name = serviceusername = glancepassword = glanceflavor = keystone提示:registry和api的配置跟我一样现在我们就可以启动了
设置开启启动并开启服务
[root@linux-node1 ~]# systemctl enable openstack-glance-api.service[root@linux-node1 ~]# systemctl enable openstack-glance-registry.service[root@linux-node1 ~]# systemctl start openstack-glance-api.service[root@linux-node1 ~]# systemctl start openstack-glance-registry.service
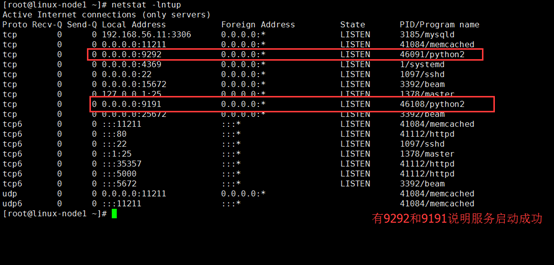
提示:9292是glance-api的端口,9191是glance-registry的端口
在keystone上设置服务注册
1.创建服务
[root@linux-node1 ~]# source admin-openstack.sh[root@linux-node1 ~]# openstack service create --name glance --description "OpenStack Image" image+-------------+----------------------------------+| Field | Value |+-------------+----------------------------------+| description | OpenStack Image || enabled | True || id | c9fd28645efe45faa2a9cf2f2cce623e || name | glance || type | image |+-------------+----------------------------------+
2.创建镜像服务的API端点
[root@linux-node1 ~]# openstack endpoint create --region RegionOne \> image public http://192.168.56.11:9292+--------------+----------------------------------+| Field | Value |+--------------+----------------------------------+| enabled | True || id | cabb8016fef74b438a341866ef10917f || interface | public || region | RegionOne || region_id | RegionOne || service_id | c9fd28645efe45faa2a9cf2f2cce623e || service_name | glance || service_type | image || url | http://192.168.56.11:9292 |+--------------+----------------------------------+[root@linux-node1 ~]# openstack endpoint create --region RegionOne image internal http://192.168.56.11:9292+--------------+----------------------------------+| Field | Value |+--------------+----------------------------------+| enabled | True || id | 0bafb4e5d90745d789a16c97fc3f5688 || interface | internal || region | RegionOne || region_id | RegionOne || service_id | c9fd28645efe45faa2a9cf2f2cce623e || service_name | glance || service_type | image || url | http://192.168.56.11:9292 |+--------------+----------------------------------+[root@linux-node1 ~]# openstack endpoint create --region RegionOne image admin http://192.168.56.11:9292+--------------+----------------------------------+| Field | Value |+--------------+----------------------------------+| enabled | True || id | 911d06d783094d62bf2cf97e4dd3fed6 || interface | admin || region | RegionOne || region_id | RegionOne || service_id | c9fd28645efe45faa2a9cf2f2cce623e || service_name | glance || service_type | image || url | http://192.168.56.11:9292 |+--------------+----------------------------------+
测试
我们可以使用openstack list或者glance list进行查看
[root@linux-node1 ~]# openstack image list[root@linux-node1 ~]# glance image-list+----+------+| ID | Name |+----+------++----+------+
提示:如果此处没有出现空,那么这时候就需要看日志了。
最后我们可以上传一个镜像进行测试
[root@linux-node1 ~]# wget http://download.cirros-cloud.net/0.3.4/cirros-0.3.4-x86_64-disk.img
我们下载上面的镜像进行测试
[root@linux-node1 ~]# openstack image create "cirros" \> --file cirros-0.3.4-x86_64-disk.img \> --disk-format qcow2 --container-format bare \> --public+------------------+------------------------------------------------------+| Field | Value |+------------------+------------------------------------------------------+| checksum | ee1eca47dc88f4879d8a229cc70a07c6 || container_format | bare || created_at | 2016-11-17T10:34:14Z || disk_format | qcow2 || file | /v2/images/fc67361d-ad30-40b2-9d96-941e50fc17f5/file || id | fc67361d-ad30-40b2-9d96-941e50fc17f5 || min_disk | 0 || min_ram | 0 || name | cirros || owner | 026a58f98402437fa95ef4a21fbd4d1a || protected | False || schema | /v2/schemas/image || size | 13287936 || status | active || tags | || updated_at | 2016-11-17T10:34:14Z || virtual_size | None || visibility | public |+------------------+------------------------------------------------------+
#提示:如果没有环境变量还需要source一下
检查是否上传成功
[root@linux-node1 ~]# openstack image list+--------------------------------------+--------+--------+| ID | Name | Status |+--------------------------------------+--------+--------+| fc67361d-ad30-40b2-9d96-941e50fc17f5 | cirros | active |+--------------------------------------+--------+--------+[root@linux-node1 ~]# glance image-list+--------------------------------------+--------+| ID | Name |+--------------------------------------+--------+| fc67361d-ad30-40b2-9d96-941e50fc17f5 | cirros |+--------------------------------------+--------+[root@linux-node1 ~]# ls /var/lib/glance/images/fc67361d-ad30-40b2-9d96-941e50fc17f5镜像存放在/var/lib/glance/images下
[M版本]
官方中文文档:http://docs.openstack.org/mitaka/zh_CN/install-guide-rdo/keystone-install.html