spring boot集成web service框架
题记: 本篇博客讲的spring boot如何集成 spring web service,如果您想用Apache CXF集成,那么可能不适合您。为什么使用spring web servce 项目地址 呢?因为spring boot存在的目的就是一个微服务框架,结果又搞个soap框架进去,显得特别不伦不类。正是因为有这么多老项目的重构才会有这么不伦不类的集成。综上,我就选了spring家族的spring web service能够很好的跟spring boot进行集成。
那么如何集成呢?我这里讲一个demo,照葫芦画瓢就行
先建一个maven 项目
然后加入spring boot的依赖(截止目前最新是1.5.2版本)
<dependency>
      <groupId>org.springframework.boot</groupId>
      <artifactId>spring-boot-starter-web</artifactId>
      <version>1.5.2.RELEASE</version>
</dependency>- 1
- 2
- 3
- 4
- 5
加入spring-web-service的依赖
<dependency>
      <groupId>org.springframework.boot</groupId>
      <artifactId>spring-boot-starter-web-services</artifactId>
      <version>1.5.2.RELEASE</version>
</dependency>- 1
- 2
- 3
- 4
- 5
加入wsdl的依赖
<dependency>
      <groupId>wsdl4j</groupId>
      <artifactId>wsdl4j</artifactId>
      <version>1.6.3</version>
</dependency>- 1
- 2
- 3
- 4
- 5
所以可能完整的pom.xml是这样的
<project xmlns="http://maven.apache.org/POM/4.0.0" xmlns:xsi="http://www.w3.org/2001/XMLSchema-instance"
  xsi:schemaLocation="http://maven.apache.org/POM/4.0.0 http://maven.apache.org/xsd/maven-4.0.0.xsd">
  <modelVersion>4.0.0</modelVersion>

  <groupId>com.itar</groupId>
  <artifactId>springWSTest</artifactId>
  <version>1.0-SNAPSHOT</version>
  <packaging>jar</packaging>

  <name>springWSTest</name>
  <url>http://maven.apache.org</url>

  <properties>
    <project.build.sourceEncoding>UTF-8</project.build.sourceEncoding>
  </properties>

  <dependencies>
    <dependency>
      <groupId>junit</groupId>
      <artifactId>junit</artifactId>
      <version>4.12</version>
      <scope>test</scope>
    </dependency>

    <!-- spring boot的包 -->
    <dependency>
      <groupId>org.springframework.boot</groupId>
      <artifactId>spring-boot-starter-web</artifactId>
      <version>1.5.2.RELEASE</version>
    </dependency>

    <!--spring web Service的包-->
    <dependency>
      <groupId>org.springframework.boot</groupId>
      <artifactId>spring-boot-starter-web-services</artifactId>
      <version>1.5.2.RELEASE</version>
    </dependency>

    <!--spring web service wsdl包-->
    <dependency>
      <groupId>wsdl4j</groupId>
      <artifactId>wsdl4j</artifactId>
      <version>1.6.3</version>
    </dependency>

  </dependencies>
</project>
- 1
- 2
- 3
- 4
- 5
- 6
- 7
- 8
- 9
- 10
- 11
- 12
- 13
- 14
- 15
- 16
- 17
- 18
- 19
- 20
- 21
- 22
- 23
- 24
- 25
- 26
- 27
- 28
- 29
- 30
- 31
- 32
- 33
- 34
- 35
- 36
- 37
- 38
- 39
- 40
- 41
- 42
- 43
- 44
- 45
- 46
- 47
- 48
我们来写wsdl描述文件(这里不一定要手写,通过工具类自动生成也可以的)
<xs:schema xmlns:xs="http://www.w3.org/2001/XMLSchema" xmlns:tns="http://www.yourcompany.com/webservice"
           targetNamespace="http://www.yourcompany.com/webservice" elementFormDefault="qualified">

    <xs:element name="getCountryRequest">
        <xs:complexType>
            <xs:sequence>
                <xs:element name="name" type="xs:string"/>
            </xs:sequence>
        </xs:complexType>
    </xs:element>

    <xs:element name="getCountryResponse">
        <xs:complexType>
            <xs:sequence>
                <xs:element name="country" type="tns:country"/>
            </xs:sequence>
        </xs:complexType>
    </xs:element>

    <xs:complexType name="country">
        <xs:sequence>
            <xs:element name="name" type="xs:string"/>
            <xs:element name="population" type="xs:int"/>
            <xs:element name="capital" type="xs:string"/>
            <xs:element name="currency" type="tns:currency"/>
        </xs:sequence>
    </xs:complexType>

    <xs:simpleType name="currency">
        <xs:restriction base="xs:string">
            <xs:enumeration value="GBP"/>
            <xs:enumeration value="EUR"/>
            <xs:enumeration value="PLN"/>
        </xs:restriction>
    </xs:simpleType>
</xs:schema>- 1
- 2
- 3
- 4
- 5
- 6
- 7
- 8
- 9
- 10
- 11
- 12
- 13
- 14
- 15
- 16
- 17
- 18
- 19
- 20
- 21
- 22
- 23
- 24
- 25
- 26
- 27
- 28
- 29
- 30
- 31
- 32
- 33
- 34
- 35
- 36
具体的应该怎么写,请看下官方文档这里
然后用工具生成实体类,这里比较关键
对coruntries.xds右键,然后选中web service那一项,generate java code from xml schema using jaxb
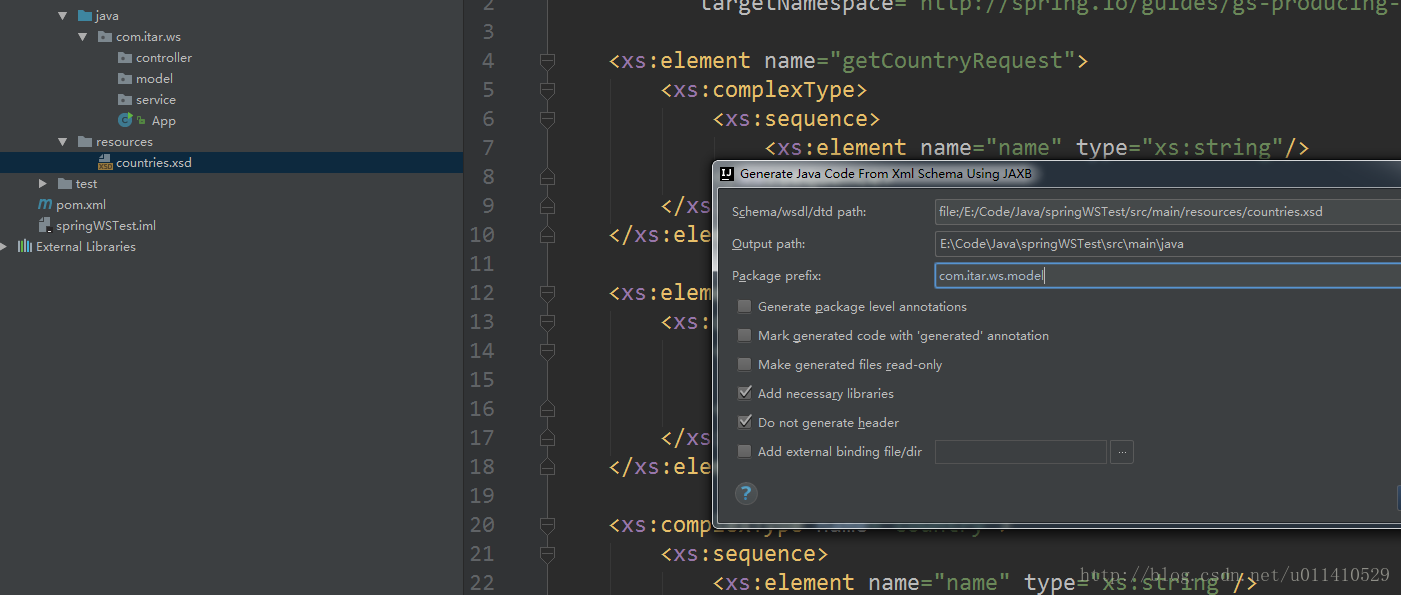
选生成代码的地方。OK
然后编写webserviceconfig文件,指定url什么的。
package com.itar.ws.config;

import org.springframework.boot.web.servlet.ServletRegistrationBean;
import org.springframework.context.ApplicationContext;
import org.springframework.context.annotation.Bean;
import org.springframework.context.annotation.Configuration;
import org.springframework.core.io.ClassPathResource;
import org.springframework.ws.config.annotation.EnableWs;
import org.springframework.ws.config.annotation.WsConfigurerAdapter;
import org.springframework.ws.transport.http.MessageDispatcherServlet;
import org.springframework.ws.wsdl.wsdl11.DefaultWsdl11Definition;
import org.springframework.xml.xsd.SimpleXsdSchema;
import org.springframework.xml.xsd.XsdSchema;

@EnableWs
@Configuration
public class WebServiceConfig extends WsConfigurerAdapter {
    @Bean
    public ServletRegistrationBean messageDispatcherServlet(ApplicationContext applicationContext) {
        MessageDispatcherServlet servlet = new MessageDispatcherServlet();
        servlet.setApplicationContext(applicationContext);
        servlet.setTransformWsdlLocations(true);
        return new ServletRegistrationBean(servlet, "/ws/*");
    }

    @Bean(name = "countries")
    public DefaultWsdl11Definition defaultWsdl11Definition(XsdSchema countriesSchema) {
        DefaultWsdl11Definition wsdl11Definition = new DefaultWsdl11Definition();
        wsdl11Definition.setPortTypeName("CountriesPort");
        wsdl11Definition.setLocationUri("/ws");
        wsdl11Definition.setTargetNamespace("http://www.yourcompany.com/webservice");
        wsdl11Definition.setSchema(countriesSchema);
        return wsdl11Definition;
    }

    @Bean
    public XsdSchema countriesSchema() {
        return new SimpleXsdSchema(new ClassPathResource("countries.xsd"));
    }
}
- 1
- 2
- 3
- 4
- 5
- 6
- 7
- 8
- 9
- 10
- 11
- 12
- 13
- 14
- 15
- 16
- 17
- 18
- 19
- 20
- 21
- 22
- 23
- 24
- 25
- 26
- 27
- 28
- 29
- 30
- 31
- 32
- 33
- 34
- 35
- 36
- 37
- 38
- 39
- 40
- 41
然后编写endpoint,类似于controller,然后我就丢在controller里面了
package com.itar.ws.controller;

import com.itar.ws.model.GetCountryRequest;
import com.itar.ws.model.GetCountryResponse;
import com.itar.ws.service.CountryRepository;
import org.springframework.beans.factory.annotation.Autowired;
import org.springframework.ws.server.endpoint.annotation.Endpoint;
import org.springframework.ws.server.endpoint.annotation.PayloadRoot;
import org.springframework.ws.server.endpoint.annotation.RequestPayload;
import org.springframework.ws.server.endpoint.annotation.ResponsePayload;

@Endpoint
public class CountryEndpoint {
    private static final String NAMESPACE_URI = "http://www.yourcompany.com/webservice";

    private CountryRepository countryRepository;

    @Autowired
    public CountryEndpoint(CountryRepository countryRepository) {
        this.countryRepository = countryRepository;
    }

    @PayloadRoot(namespace = NAMESPACE_URI, localPart = "getCountryRequest")
    @ResponsePayload
    public GetCountryResponse getCountry(@RequestPayload GetCountryRequest request) {
        GetCountryResponse response = new GetCountryResponse();
        response.setCountry(countryRepository.findCountry(request.getName()));

        return response;
    }
}
- 1
- 2
- 3
- 4
- 5
- 6
- 7
- 8
- 9
- 10
- 11
- 12
- 13
- 14
- 15
- 16
- 17
- 18
- 19
- 20
- 21
- 22
- 23
- 24
- 25
- 26
- 27
- 28
- 29
- 30
- 31
- 32
然后写spring boot启动文件
package com.itar.ws;

import org.springframework.boot.SpringApplication;
import org.springframework.boot.autoconfigure.SpringBootApplication;

@SpringBootApplication
public class Application {

    public static void main(String[] args) {
        SpringApplication.run(Application.class, args);
    }
}
- 1
- 2
- 3
- 4
- 5
- 6
- 7
- 8
- 9
- 10
- 11
- 12
- 13
启动即可
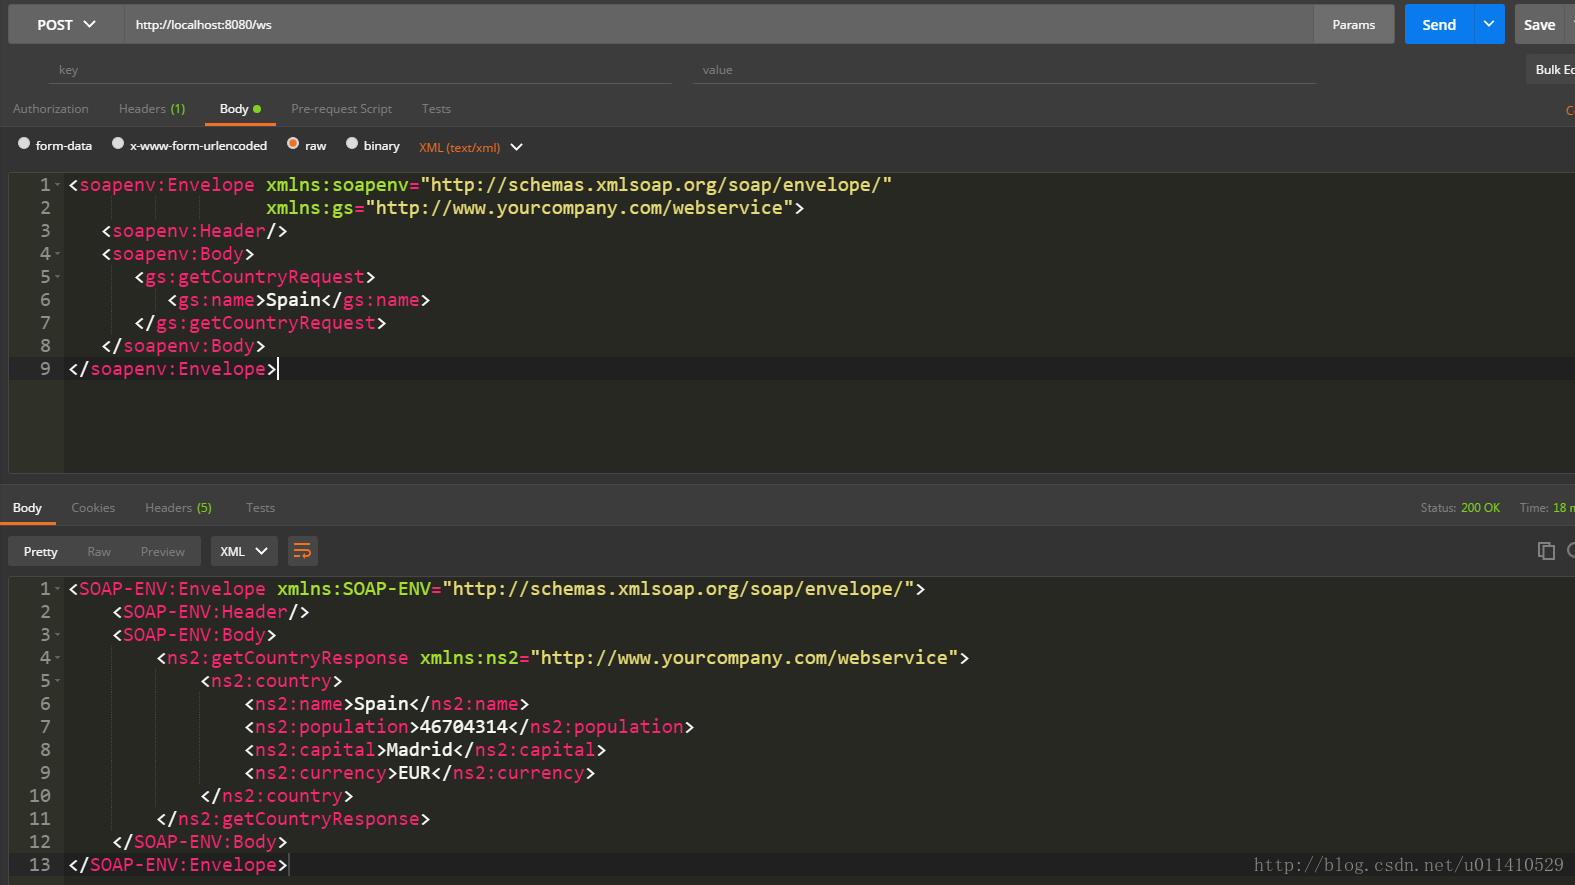
访问这个http://localhost:8080/ws/countries.wsdl 可以看到项目启动成功
请求
这是body里面的,用post
<soapenv:Envelope xmlns:soapenv="http://schemas.xmlsoap.org/soap/envelope/"
                  xmlns:gs="http://www.yourcompany.com/webservice">
   <soapenv:Header/>
   <soapenv:Body>
      <gs:getCountryRequest>
         <gs:name>Spain</gs:name>
      </gs:getCountryRequest>
   </soapenv:Body>
</soapenv:Envelope>- 1
- 2
- 3
- 4
- 5
- 6
- 7
- 8
- 9
提问时间
1. 我要改request里面某些字段名称怎么办?
可以在生成的实体文件里面,用注解XMLElement里面的一个属性name来标识
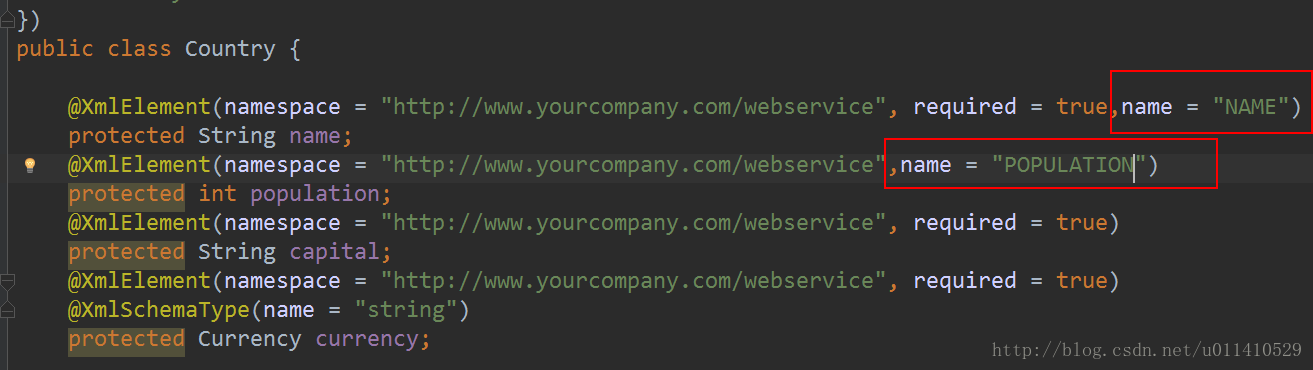
- response也是一样的做法