Glide 是基于 Picasso 的一套android图片缓存框架,它在 Picasso 的基础上做了大量优化与改进。
Glide 默认的 Bitmap 格式是 RGB_565 格式,而 Picasso 默认的是 ARGB_8888 格式,这个内存开销要小一半。
Glide的特点是能和activity、fragment的生命周期保持一致,这样应用退出后可以停止图片加载
Glide缓存分为MemoryCache和DiskCache,加载的时候可以设置,Glide整体框架如下图:
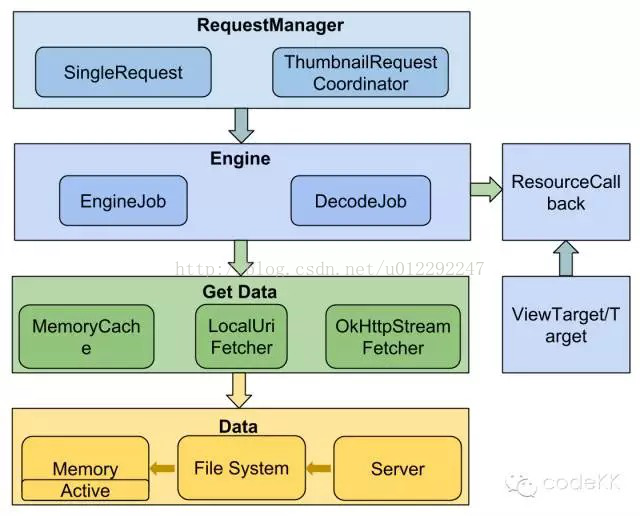
可以看到所有加载图片的请求统一由RequestManager分发,Engine负责加载图片,接下来由实际的代码来分析这个开源框架:
String internetUrl = "http://i.imgur.com/DvpvklR.png";
Glide.with(context)
        .load(internetUrl)
        .thumbnail(0.1f)//用原图的十分之一作为缩略图
        .error(R.mipmap.ic_launcher)
.into(targetImageView);dependencies {
compile 'com.github.bumptech.glide:glide:3.5.2'
}然后mainfest.xml中声明权限:
<uses-permission android:name="android.permission.INTERNET" />
<uses-permission android:name="android.permission.READ_EXTERNAL_STORAGE" />
<uses-permission android:name="android.permission.WRITE_EXTERNAL_STORAGE" />使用就像上面这样就行了,那Glide整个加载流程是怎样的呢,虽然它只要一行代码就能加载好图片,但是中间的过程还是蛮多的
1、 Glide.with(context),看一下源码:
public static RequestManager with(FragmentActivity activity) {
    RequestManagerRetriever retriever = RequestManagerRetriever.get();
    return retriever.get(activity);
}

public RequestManager get(FragmentActivity activity) {
    if (Util.isOnBackgroundThread()) {
        return get(activity.getApplicationContext());
    } else {
        assertNotDestroyed(activity);
        FragmentManager fm = activity.getSupportFragmentManager();
        return supportFragmentGet(activity, fm);
    }
}可以看到Glide.with(context)的作用是获取到一个针对这个context的RequestManager,这里又分成两种情况,一个是当前线程是主线程,另一个是非主线程,分别来看一下两种情况下的处理:
1) 非主线程:
public RequestManager get(Context context) {
    if (context == null) {
        throw new IllegalArgumentException("You cannot start a load on a null Context");
    } else if (Util.isOnMainThread() && !(context instanceof Application)) {
        if (context instanceof FragmentActivity) {
            return get((FragmentActivity) context);
        } else if (context instanceof Activity) {
            return get((Activity) context);
        } else if (context instanceof ContextWrapper) {
            return get(((ContextWrapper) context).getBaseContext());
        }
    }

    return getApplicationManager(context);
}

private RequestManager getApplicationManager(Context context) {
    // Either an application context or we're on a background thread.
    if (applicationManager == null) {
        synchronized (this) {
            if (applicationManager == null) {
                // Normally pause/resume is taken care of by the fragment we add to the fragment or activity.
                // However, in this case since the manager attached to the application will not receive lifecycle
                // events, we must force the manager to start resumed using ApplicationLifecycle.
                applicationManager = new RequestManager(context.getApplicationContext(),
                        new ApplicationLifecycle());
            }
        }
    }

    return applicationManager;
}上面这种是加载图片的操作放在异步线程的情况,因为不是主线程所以无法监听onResume这种事件,只能在创建RequestManager的时候手动调用它的onStart来启动,接着看一下主线程情况下的处理:
RequestManager supportFragmentGet(Context context, final FragmentManager fm) {
    SupportRequestManagerFragment current = (SupportRequestManagerFragment) fm.findFragmentByTag(TAG);
    if (current == null) {
        current = pendingSupportRequestManagerFragments.get(fm);
        if (current == null) {
            current = new SupportRequestManagerFragment();
            pendingSupportRequestManagerFragments.put(fm, current);
            fm.beginTransaction().add(current, TAG).commitAllowingStateLoss();
            handler.obtainMessage(ID_REMOVE_SUPPORT_FRAGMENT_MANAGER, fm).sendToTarget();
        }
    }
    RequestManager requestManager = current.getRequestManager();
    if (requestManager == null) {
        requestManager = new RequestManager(context, current.getLifecycle());
        current.setRequestManager(requestManager);
    }
    return requestManager;
}这种就能明显看出Glide和activity生命周期绑定的原理了,通过FragmentManger里面添加一个Fragment实例,这个实例在fragment的生命周期上调用RequestManager对应的生命周期处理方法,fragment的生命周期又和context所在的activity同步,因此实现了生命周期绑定
注意:每个context对应的RequestManager都是单实例的
2、 Glide.with(context).load(internetUrl),首先入口函数:
public DrawableTypeRequest<String> load(String string) {
    return (DrawableTypeRequest<String>) fromString().load(string);
}上面的DrawableTypeRequest是其中一种Request,我们拿它来举例,接着往下看:
@Override
public DrawableRequestBuilder<ModelType> load(ModelType model) {
    super.load(model);
    return this;
}
public GenericRequestBuilder<ModelType, DataType, ResourceType, TranscodeType> load(ModelType model) {
    this.model = model;
    isModelSet = true;
    return this;
}从上面可以看出最终返回一个DrawableTypeRequest,它继承DrawableRequestBuilder,DrawableRequestBuilder又继承GenericRequestBuilder,所以这个函数还是比较简单的
3、 Glide.with(context).load(internetUrl).into(targetImageView),还是先看一下入口函数:
@Override
public Target<GlideDrawable> into(ImageView view) {
    return super.into(view);
}

public Target<TranscodeType> into(ImageView view) {
    Util.assertMainThread();
    if (view == null) {
        throw new IllegalArgumentException("You must pass in a non null View");
    }

    if (!isTransformationSet && view.getScaleType() != null) {
        switch (view.getScaleType()) {
            case CENTER_CROP:
                applyCenterCrop();
                break;
            case FIT_CENTER:
            case FIT_START:
            case FIT_END:
                applyFitCenter();
                break;
            //$CASES-OMITTED$
            default:
                // Do nothing.
        }
    }

    return into(glide.buildImageViewTarget(view, transcodeClass));
}

public <Y extends Target<TranscodeType>> Y into(Y target) {
    Util.assertMainThread();
    if (target == null) {
        throw new IllegalArgumentException("You must pass in a non null Target");
    }
    if (!isModelSet) {
        throw new IllegalArgumentException("You must first set a model (try #load())");
    }

    Request previous = target.getRequest();

    if (previous != null) {
        previous.clear();
        requestTracker.removeRequest(previous);
        previous.recycle();
    }

    Request request = buildRequest(target);
    target.setRequest(request);
    lifecycle.addListener(target);
    requestTracker.runRequest(request);

    return target
}可以看出最终调用了GenericRequestBuilder类的into方法,主要方法就是最后的runRequest方法了,来看一下:
public void runRequest(Request request) {
    requests.add(request);
    if (!isPaused) {
        request.begin();
    } else {
        pendingRequests.add(request);
    }
}这里又调用了begin方法,这个是接口,真正实现在GenericRequest里:
@Override
public void begin() {
    startTime = LogTime.getLogTime();
    if (model == null) {
        onException(null);
        return;
    }

    status = Status.WAITING_FOR_SIZE;
    if (Util.isValidDimensions(overrideWidth, overrideHeight)) {
        onSizeReady(overrideWidth, overrideHeight);
    } else {
        target.getSize(this);
    }

    if (!isComplete() && !isFailed() && canNotifyStatusChanged()) {
        target.onLoadStarted(getPlaceholderDrawable());
    }
    if (Log.isLoggable(TAG, Log.VERBOSE)) {
        logV("finished run method in " + LogTime.getElapsedMillis(startTime));
    }
}主要函数是onSizeReady,再看一下:
@Override
public void onSizeReady(int width, int height) {
    if (Log.isLoggable(TAG, Log.VERBOSE)) {
        logV("Got onSizeReady in " + LogTime.getElapsedMillis(startTime));
    }
    if (status != Status.WAITING_FOR_SIZE) {
        return;
    }
    status = Status.RUNNING;

    width = Math.round(sizeMultiplier * width);
    height = Math.round(sizeMultiplier * height);

    ModelLoader<A, T> modelLoader = loadProvider.getModelLoader();
    final DataFetcher<T> dataFetcher = modelLoader.getResourceFetcher(model, width, height);

    if (dataFetcher == null) {
        onException(new Exception("Got null fetcher from model loader"));
        return;
    }
    ResourceTranscoder<Z, R> transcoder = loadProvider.getTranscoder();
    if (Log.isLoggable(TAG, Log.VERBOSE)) {
        logV("finished setup for calling load in " + LogTime.getElapsedMillis(startTime));
    }
    loadedFromMemoryCache = true;
    loadStatus = engine.load(signature, width, height, dataFetcher, loadProvider, transformation, transcoder,
            priority, isMemoryCacheable, diskCacheStrategy, this);
    loadedFromMemoryCache = resource != null;
    if (Log.isLoggable(TAG, Log.VERBOSE)) {
        logV("finished onSizeReady in " + LogTime.getElapsedMillis(startTime));
    }
}看到这边我们才看到Glide加载图片的异步性体现在哪里,可以看到调用了engine.load这个函数,我们继续往下看:
public <T, Z, R> LoadStatus load(Key signature, int width, int height, DataFetcher<T> fetcher,
        DataLoadProvider<T, Z> loadProvider, Transformation<Z> transformation, ResourceTranscoder<Z, R> transcoder,
        Priority priority, boolean isMemoryCacheable, DiskCacheStrategy diskCacheStrategy, ResourceCallback cb) {
    Util.assertMainThread();
    long startTime = LogTime.getLogTime();

    final String id = fetcher.getId();
    EngineKey key = keyFactory.buildKey(id, signature, width, height, loadProvider.getCacheDecoder(),
            loadProvider.getSourceDecoder(), transformation, loadProvider.getEncoder(),
            transcoder, loadProvider.getSourceEncoder());

    EngineResource<?> cached = loadFromCache(key, isMemoryCacheable);
    if (cached != null) {
        cb.onResourceReady(cached);
        if (Log.isLoggable(TAG, Log.VERBOSE)) {
            logWithTimeAndKey("Loaded resource from cache", startTime, key);
        }
        return null;
    }

    EngineResource<?> active = loadFromActiveResources(key, isMemoryCacheable);
    if (active != null) {
        cb.onResourceReady(active);
        if (Log.isLoggable(TAG, Log.VERBOSE)) {
            logWithTimeAndKey("Loaded resource from active resources", startTime, key);
        }
        return null;
    }

    EngineJob current = jobs.get(key);
    if (current != null) {
        current.addCallback(cb);
        if (Log.isLoggable(TAG, Log.VERBOSE)) {
            logWithTimeAndKey("Added to existing load", startTime, key);
        }
        return new LoadStatus(cb, current);
    }

    EngineJob engineJob = engineJobFactory.build(key, isMemoryCacheable);
    DecodeJob<T, Z, R> decodeJob = new DecodeJob<T, Z, R>(key, width, height, fetcher, loadProvider, transformation,
            transcoder, diskCacheProvider, diskCacheStrategy, priority);
    EngineRunnable runnable = new EngineRunnable(engineJob, decodeJob, priority);
    jobs.put(key, engineJob);
    engineJob.addCallback(cb);
    engineJob.start(runnable);

    if (Log.isLoggable(TAG, Log.VERBOSE)) {
        logWithTimeAndKey("Started new load", startTime, key);
    }
    return new LoadStatus(cb, engineJob);
}看到这边就真相大白了,EngineRunnable是一个实现Runnable的线程类,engineJob.start(runnable)会把runnable放到线程池里面执行,执行过程就是调用decodeJob内的函数,执行完毕会调用回调函数在ui上显示
4、图片缓存机制
Glide在每次应用退出后会判断是否需要缓存,需要的话就会把图片资源放到cache里面,这个cache里面的对象都是弱引用对象,也就是垃圾回收扫描到立刻回收,但是回收的对象会被放到引用队列里,为了处理引用队列里被回收的对象,Glide为引用队列添加了一个listener:
private ReferenceQueue<EngineResource<?>> getReferenceQueue() {
        if (resourceReferenceQueue == null) {
            resourceReferenceQueue = new ReferenceQueue<EngineResource<?>>();
            MessageQueue queue = Looper.myQueue();
            queue.addIdleHandler(new RefQueueIdleHandler(activeResources, resourceReferenceQueue));
        }
        return resourceReferenceQueue;
 }
private static class RefQueueIdleHandler implements MessageQueue.IdleHandler {
private final Map<Key, WeakReference<EngineResource<?>>> activeResources;
private final ReferenceQueue<EngineResource<?>> queue;
public RefQueueIdleHandler(Map<Key, WeakReference<EngineResource<?>>> activeResources,
ReferenceQueue<EngineResource<?>> queue) {
this.activeResources = activeResources;
this.queue = queue;
}
@Override
public boolean queueIdle() {
ResourceWeakReference ref = (ResourceWeakReference) queue.poll();
if (ref != null) {
activeResources.remove(ref.key);
}
return true;
}
}总结
经过上面的分析可以看到Glide一行代码加载图片,中间的流程却是一个完整的MVC过程,这个过程实现了
1、 获取context对应的全局唯一的RequestManager实例
2、 主线程内RequestManager和activity等ui的生命周期保持一致,非主线程和application一致
3、 通过RequestManager分发request给Engine,Engine把每个request扔到线程池里运行,结束后回调
4、 RequestManager还会监听网络变化,网络连接恢复时会自动执行那些执行失败但是没有被取消的任务