参照《UC20&EC20 Linux GobiNet User Guide》和网上一些资料,根据自己的理解,总结出海思3531添加移远EC20模块的详细过程。
UC20是3g通信模块,EC20是4g通信模块;
1. 介绍
根据USB规范的规定,所有的USB设备都有供应商ID(VID)和产品识别码(PID),主机通过不同的VID和PID来区别不同的设备,VID和PID都是两个字节长,其中,供应商ID(VID)由供应商向USB执行论坛申请,每个供应商的VID是唯一的,PID由供应商自行决定(理论上来说,不同的产品、相同产品的不同型号、相同型号的不同设计的产品最好采用不同的PID,以便区别相同厂家的不同设备。)
VID和PID其实就相当于USB硬件的识别ID系统,也是通过他们来找到UC20/EC20设备的。
Product |
PID |
VID |
UC20 |
0x9003 |
0x05c6
扫描二维码关注公众号,回复:
1824243 查看本文章

|
EC20 |
0x9215 |
0x05c6 |
2. 在Linux中集成GobiNet
为了在Linux中为Quectel模块使用NDIS接口(Network Driver InterfaceSpecification,即网络驱动接口规范),必须集成GobiNet驱动程序。
2.1 在内核中添加驱动源码
l 找到海思3531的内核源代码版本并解压它。
l 将GobiNet驱动程序源代码(ec20/DriveRSourceCode/src下的.c和.h文件)放入($_KERNELROOT)/ drivers / net / usb目录中。($ _KERNELROOT)应该内核源代码的根目录。
2.2 解除USB串口驱动对NDIS接口的绑定
NDIS不是串口设备,因此要在串口驱动中去掉这个端口。在集成GobiNet驱动程序之前,先解除USB串口驱动对NDIS接口的绑定。(使用option驱动和usb-serial驱动修改的位置不同)
l 打开源代码根目录中的文件:($_KERNELROOT)/drivers/usb/serial/option.c
然后修改option_probe函数中的源代码。注意到指导书给的修改示例和源代码使用的变量名是不一样的,把变量名也修改成一样。
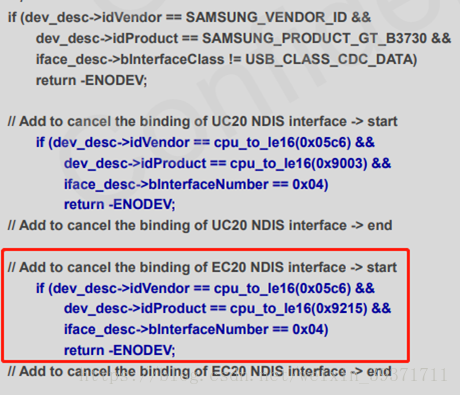
网上还有增加PID&VID这一步(对着两个不了解的,建议去找找资料来看看,这个的意思可以简单理解为这个设备的唯一标识),不过指导书里没有,还是加上了


代码如下:
f (serial->dev->descriptor.idVendor== cpu_to_le16(0x05c6) &&
serial->dev->descriptor.idProduct== cpu_to_le16(0x9215) &&
serial->interface->cur_altsetting->desc.bInterfaceClass== 0x04)
return-ENODEV;
2.3 将GobiNet添加到内核树中
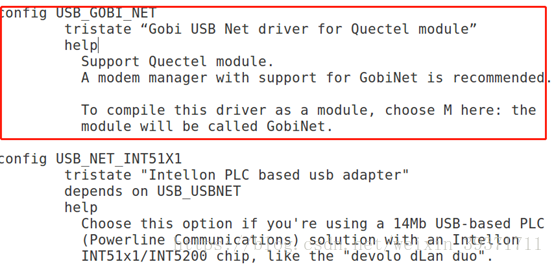
l Kconfig文件定义了Linux内核配置菜单,将“config USB_GOBI_NET”添加到($_KERNELROOT)/drivers/net/usb/Kconfig中。
代码如下:
config USB_GOBI_NET
tristate “Gobi USB Netdriver for Quectel module”
help
Support Quectel module.
A modem manager withsupport for GobiNet is recommended.
To compile this driver as amodule, choose M here: the module will be called GobiNet.
l 修改($_KERNELROOT)/driver/net/usb/Makefile
在Makefile文件的末尾添加两行代码。

2.4 编译内核并编译驱动程序
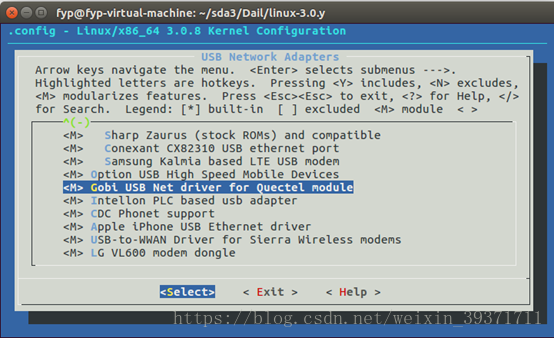
在宿主机的Linux内核源码根目录执行以下指令,配置内核。添加GobiNet驱动:
host$make ARCH=arm menuconfig
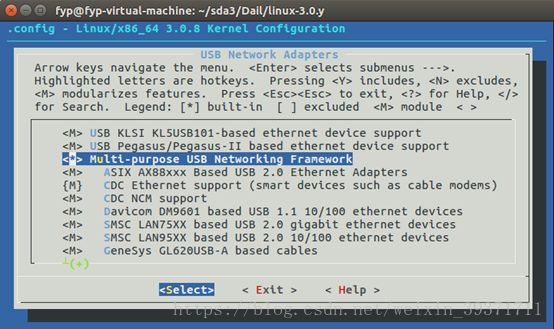
Kernel Configuration 界面,依次选择:
DeviceDrivers --->
Network device support --->
USB Network Adapters --->
<*>Gobi USB Netdriver for Quectel module
如图3-27所示:Save anAlternate Configuration File
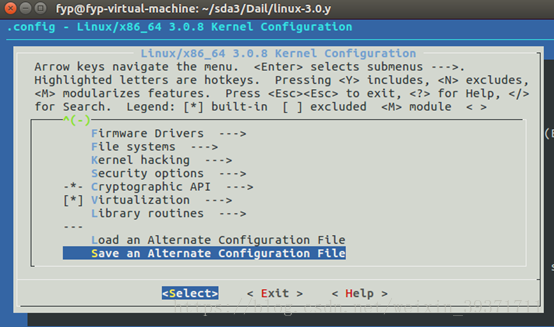
按照卖家提供的内核依赖资料,选中Multi-purpose USB Networking Framework这一选项。
step.1 make menuconfig
出错:


解决方案:换成 make ARCH=arm CROSS_COMPILE= arm-hisiv100-linux- menuconfig
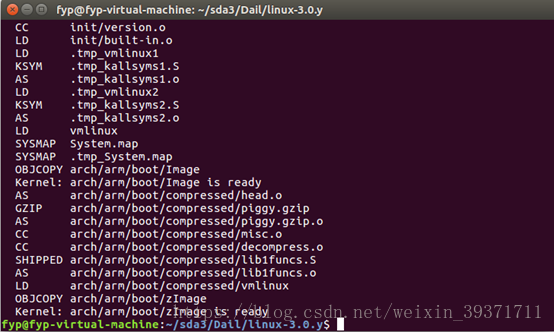
step.2 make bzImage
makeARCH=arm CROSS_COMPILE= arm-hisi100-linux- bzImage 应该是成功了。
step.3 make modules
make ARCH=armCROSS_COMPILE=arm-hisiv100-linux- modules时出现各种错误
错误1
drivers/ata/ahci_platform.c:251: error: 'CONFIG_HI_SATA_IOBASE' undeclared here (not in a function)
drivers/ata/ahci_platform.c:253: error: 'CONFIG_HI_SATA_IOSIZE' undeclared here (not in a function)
drivers/ata/ahci_platform.c:257: error: 'CONFIG_HI_SATA_IRQNUM' undeclared here (not in a function)
scripts/Makefile.build:311: recipe for target 'drivers/ata/ahci_platform.o' failed
make[2]: *** [drivers/ata/ahci_platform.o] Error 1
scripts/Makefile.build:441: recipe for target 'drivers/ata' failed
make[1]: *** [drivers/ata] Error 2
Makefile:945: recipe for target 'drivers' failed
make: *** [drivers] Error 2
解决方案
进入内核的drivers/ata/目录,打开Makefile,看到“obj-$(CONFIG_SATA_AHCI_PLATFORM) +=ahci_platform.o libahci.o”;
             打开drivers/ata/目录下的Kconfig,搜索ATA_AHCI_PLATFORM,然后将这个下面的几行代码注释掉;

在内核目录下重新make menuconfig配置保存刚才修改的内核(只需要进入menuconfig,然后保存退出)
之后再make内核,这样能够去掉之前出现的错误
错误2
drivers/gpio/janz-ttl.c: In function 'ttl_set_value':
drivers/gpio/janz-ttl.c:107: error: implicit declaration of function 'iowrite16be'
scripts/Makefile.build:311: recipe for target 'drivers/gpio/janz-ttl.o' failed
make[2]: *** [drivers/gpio/janz-ttl.o] Error 1
scripts/Makefile.build:441: recipe for target 'drivers/gpio' failed
make[1]: *** [drivers/gpio] Error 2
Makefile:945: recipe for target 'drivers' failed
make: *** [drivers] Error 2
解决方案
在drivers/gpio/janz-ttl.c的前面加上下述定义
#define iowrite16be(v, addr) iowrite16(be16_to_cpu(v), (addr))
错误3
drivers/input/touchscreen/eeti_ts.c: In function 'eeti_ts_irq_active':
drivers/input/touchscreen/eeti_ts.c:65: error: implicit declaration of function 'irq_to_gpio'
scripts/Makefile.build:311: recipe for target 'drivers/input/touchscreen/eeti_ts.o' failed
make[3]: *** [drivers/input/touchscreen/eeti_ts.o] Error 1
scripts/Makefile.build:441: recipe for target 'drivers/input/touchscreen' failed
make[2]: *** [drivers/input/touchscreen] Error 2
scripts/Makefile.build:441: recipe for target 'drivers/input' failed
make[1]: *** [drivers/input] Error 2
Makefile:945: recipe for target 'drivers' failed
make: *** [drivers] Error 2
解决方案
更改的地方总共包括三个文件
arch/arm/mach-pxa/raumfeld.c
static struct eeti_ts_platform_data eeti_ts_pdata = {
.irq_active_high = 1,
.gpio = GPIO_TOUCH_IRQ,//添加
};
/drivers/input/touchscreen/eeti_ts.c
struct eeti_ts_priv {
struct input_dev *input;
struct work_struct work;
struct mutex mutex;
int irq, irq_active_high;//删除
int irq, gpio, irq_active_high;//添加
};
static inline int eeti_ts_irq_active(struct eeti_ts_priv *priv)
{
return gpio_get_value(irq_to_gpio(priv->irq)) == priv->irq_active_high;//删除
return gpio_get_value(priv->gpio) == priv->irq_active_high;//添加
}
if (pdata)
priv->irq_active_high = pdata->irq_active_high;
替换为
if (pdata) {
priv->gpio = pdata->gpio;
priv->irq_active_high = pdata->irq_active_high;
}
/include/linux/input/eeti_ts.h
struct eeti_ts_platform_data {
unsigned int irq_active_high;
unsigned int gpio;//添加
};
/include/linux/input/eeti_ts.h
struct eeti_ts_platform_data {
unsigned int irq_active_high;
unsigned int gpio;//添加
};到后面还是有错误,我想开了,不编译模块了,直接烧写内核好了
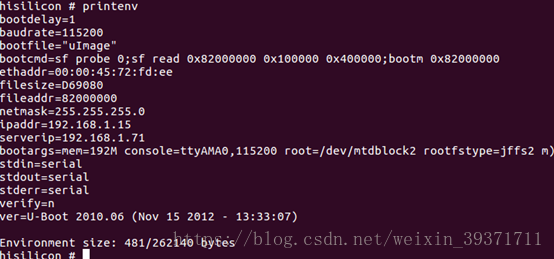
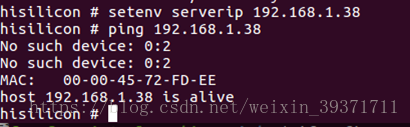
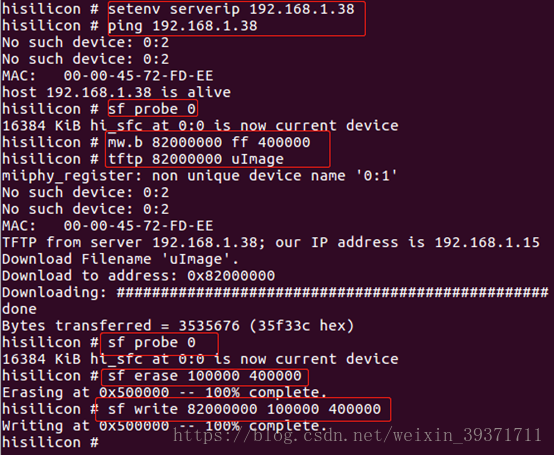
0.设置地址
setenv serverip 192.168.1.50
1.烧写内核
sf probe 0
mw.b 82000000 ff 400000
tftp 82000000 uImage
sf probe 0
sf erase 100000 400000
sf write 82000000 100000 400000
用hisiv100和hisiv200编译出来的一直处于Starting kernel ...状态,

100ntpl干脆无法开机。网上说修改这个很麻烦,前面这些已经折腾了一天了,看来烧写内核是行不通了,再次放弃,只编译GobiNet.ko 模块试试。点击打开链接 点击打开链接
编译驱动源码:注意修改你得内核路径和交叉编译器,编译好后是GobiNet.ko,拷贝到板子上 insmod GobiNet.ko 就好
编译拨号联网程序,注意修改makefile里得交叉编译器,编译好后 quectel-CM,拷贝到板子上运行即可 ./quectel-CM&
然后ping www.baidu.com ping通证明就成功了
Linux Kernel 2.6要求你编译模块之前,必须先在内核源代码目录下执行make,换言之,你必须先配置过内核,执行过make,然后才能make你自己的模块。(一开始指明的路径是内核源代码目录,结果出现了许多错误)
经过层层苦难终于出现了GobiNet.ko,拷贝到板子上 insmod GobiNet.ko时出现了错误:
GobiNet: version magic '3.0.8 mod_unload ARMv5 ' should be '3.0.8 SMP mod_unload ARMv7 '
insmod: can't insert 'GobiNet.ko': invalid module format 这下彻底放弃了,开发板的“kernel”版本与编译驱动模块的kernel版本不一致,范老师给的kernel源代码不匹配,折磨了我这么久,I quit.
!