在计算机图形学发展史中,真实感绘制一直是主旋律。不过从20实际90年代中期开始,非真实感图像绘制(Non-Photorealistic Rendering,NPR)逐渐成为一个研究热点。说白了,真实感绘制目标是像照片般真实地再现客观世界,而非真实感图像绘制专注于图形个性化和艺术化的表达,它主要用来表现图形的艺术特质,以及模拟艺术作品(甚至包括作品中的缺陷)。
在介绍完非真实感图像绘制之后,我们再来提及一下PIL——Python Imaging Library(官方网址)。相信使用python的朋友们都不会陌生,因为在web应用中我们常常用它来生成缩略图。从名字也可以看出,PIL主要用来处理图片,它支持多种图片格式,并提供强大的图片和图像处理能力。详细的关于PIL的内容大家可以参阅手册。
这个系列,我们就主要使用PIL来进行滤镜方面的处理,包括素描、铅笔画、油画等等滤镜效果的实现。在以后我会把代码托管出来。
我们从素描效果开始。在PIL中,基础的类是Image类,首先有必要讲一下图片的mode。它有以下几种:
- 1 (1-bit pixels, black and white, stored with one pixel per byte)
- L (8-bit pixels, black and white):用来表示灰度图
- P (8-bit pixels, mapped to any other mode using a colour palette)
- RGB (3x8-bit pixels, true colour)
- RGBA (4x8-bit pixels, true colour with transparency mask)
- CMYK (4x8-bit pixels, colour separation)
- YCbCr (3x8-bit pixels, colour video format)
- I (32-bit signed integer pixels)
- F (32-bit floating point pixels)
在开始素描效果之前,我们需要首先进行灰度图像预处理。所幸的是,用PIL非常容易实现。设img是Image类的实例,我们只要用convert函数强制转换为L模式即可。
|
1
|
img
=
img.convert(
"L"
)
|
不过还是有必要讲一下灰度预处理。何谓图像灰度化呢?图像灰度化即是使色彩的三种颜色分量的R,G,B的分量值相等,由于R,G,B的取值范围是[0, 255],所以灰度图像能够表示256种灰度颜色******像灰度法主要有三种算法:
- 最大值法(Maximum):使R、G、B的值等于三个色彩分量中的最大的一个分量值,即:R=G=B=Max(R,G,B)。
- 平均值法(Average):使R、G、B的值等于三个色彩分量的三个色彩分量的平均值,即:R=G=B= (R+G+B)/3。
- 加权平均值法(Weight Average):在这里我给R、G、B三分量分别附上不同的权值,表示为:R=G=B=WR*R+WG*G+WB*B ,其中WR,WG,WB分别是R、G、B的权值。在这里考虑由于人眼对绿色的敏感度最高,红色次之,对蓝色的敏感度最低,因此,当权值 WG > WR > WB时,所产生的灰度图像更符合人眼的视觉感受。PIL库使用ITU-R 601-2 luma transform:
L = R * 299/1000 + G * 587/1000 + B * 114/1000
即 WR=29.9%,WG=58.7%,WB=11.4%。
素描滤镜的处理关键是对边缘的查找。通过对边缘的查找可以得到物体的线条感。在对图像进行灰度化处理后,我们首先定义一个阈值(threshold)。我们知道素描主要强调的是明暗度的变化,绘制时是斜向方向,通过经验,我们将每个像素点的灰度值与其右下角的灰度值进行比较,当大于这个阈值时,就判断其是轮廓并绘制。
以下是素描滤镜的主函数:
|
1
2
3
4
5
6
7
8
9
10
11
12
13
14
15
16
17
18
19
20
21
22
23
24
25
26
27
28
29
30
31
|
from
PIL
import
Image
def
sketch(img, threshold):
'''
素描
param img: Image实例
param threshold: 介于0到100
'''
if
threshold <
0
: threshold
=
0
if
threshold >
100
: threshold
=
100
width, height
=
img.size
img
=
img.convert(
'L'
)
# convert to grayscale mode
pix
=
img.load()
# get pixel matrix
for
w
in
xrange
(width):
for
h
in
xrange
(height):
if
w
=
=
width
-
1
or
h
=
=
height
-
1
:
continue
src
=
pix[w, h]
dst
=
pix[w
+
1
, h
+
1
]
diff
=
abs
(src
-
dst)
if
diff >
=
threshold:
pix[w, h]
=
0
else
:
pix[w, h]
=
255
return
img
|
接着,我们写一个测试部分来看看效果:
|
1
2
3
4
5
6
7
8
9
10
11
12
13
14
15
16
17
18
|
if
__name__
=
=
"__main__"
:
import
sys, os
path
=
os.path.dirname(__file__)
+
os.sep.join(['
', '
images
', '
lam.jpg'])
threshold
=
15
if
len
(sys.argv)
=
=
2
:
try
:
threshold
=
int
(sys.argv[
1
])
except
ValueError:
path
=
sys.argv[
1
]
elif
len
(sys.argv)
=
=
3
:
path
=
sys.argv[
1
]
threshold
=
int
(sys.argv[
2
])
img
=
Image.
open
(path)
img
=
sketch(img, threshold)
img.save(os.path.splitext(path)[
0
]
+
'.sketch.jpg'
,
'JPEG'
)
|
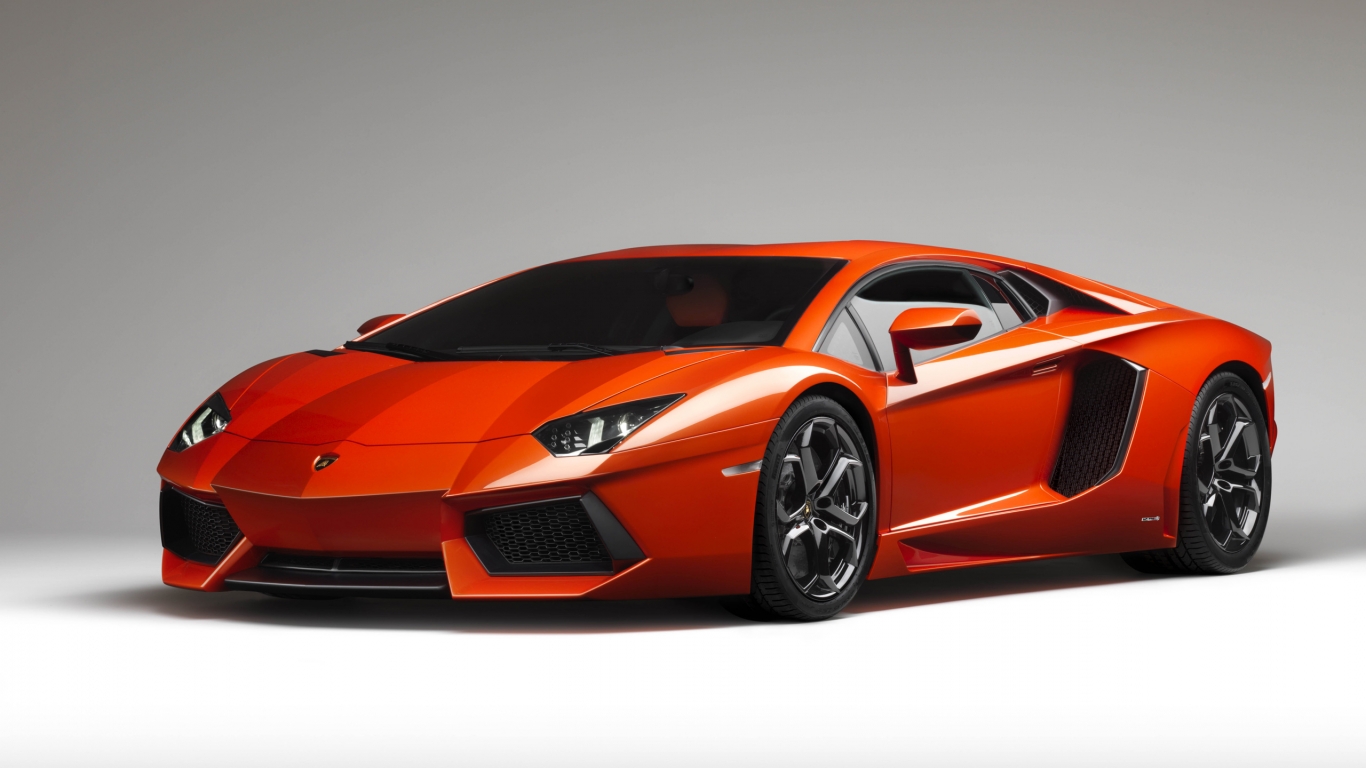
可以在命令行中指定文件名和阈值,或者只指定阈值,或者不带参数。我的测试图片为:
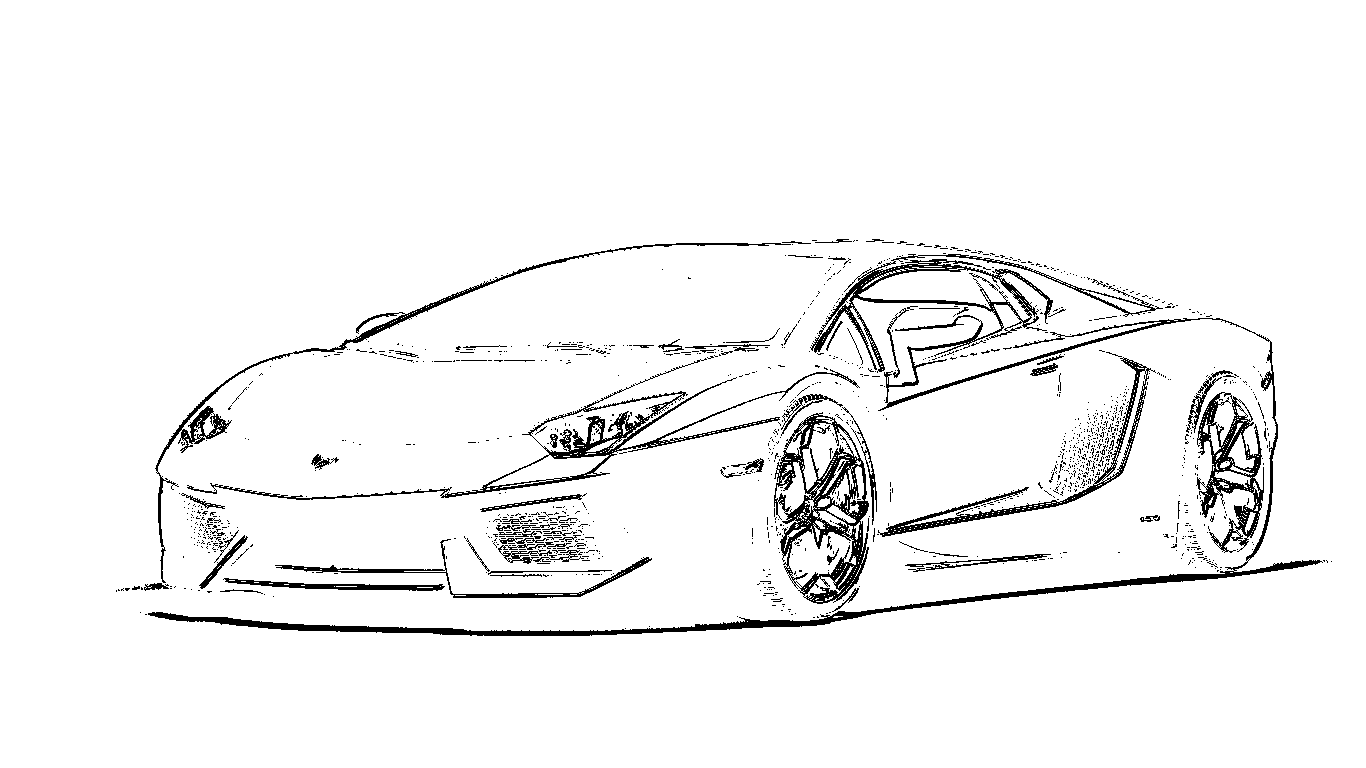
效果图片:

不同的阈值,生成的效果不同。阈值越小,绘制的像素点就越多。
对于铅笔画来说,原理和素描十分相似,但是大家学过画画的就知道,素描强调的是阴影的效果,是斜向作画,而铅笔画主要是勾勒轮廓。因此在对每个像素点的处理上,就和素描产生变化。对于任意一个像素点,求出这个像素点的R、G、B三个分量与周围8个点的相应分量的平均值的差,如果这三个差都大于或者等于某个阈值,就画出线条。最后,铅笔画的作画不是单调的一种颜色,因此加入Alpha分量,大小等于对应点的alpha分量即可。于是,代码如下;
|
1
2
3
4
5
6
7
8
9
10
11
12
13
14
15
16
17
18
19
20
21
22
23
24
25
26
27
28
29
30
31
32
33
34
35
36
37
38
39
40
41
|
def
pencil(img, threshold):
'''
铅笔画
param img: instance of Image
param threshold
'''
if
threshold <
0
: threshold
=
0
if
threshold >
100
: threshold
=
100
width, height
=
img.size
dst_img
=
Image.new(
"RGBA"
, (width, height))
if
img.mode !
=
"RGBA"
:
img
=
img.convert(
"RGBA"
)
pix
=
img.load()
dst_pix
=
dst_img.load()
for
w
in
xrange
(width):
for
h
in
xrange
(height):
if
w
=
=
0
or
w
=
=
width
-
1
\
or
h
=
=
0
or
h
=
=
height
-
1
:
continue
# 包括当前像素周围共9个像素点
around_wh_pixels
=
[pix[i, j][:
3
]
for
j
in
xrange
(h
-
1
, h
+
2
)
for
i
in
xrange
(w
-
1
, w
+
2
)]
# 排除当前像素点
exclude_wh_pixels
=
tuple
(around_wh_pixels[:
4
]
+
around_wh_pixels[
5
:])
# 把各个像素点的各个分量求平均值
RGB
=
map
(
lambda
l:
int
(
sum
(l)
/
len
(l)),
zip
(
*
exclude_wh_pixels))
cr_p
=
pix[i, j]
# 当前像素点
cr_draw
=
all
([
abs
(cr_p[i]
-
RGB[i]) >
=
threshold
for
i
in
range
(
3
)])
if
cr_draw:
dst_pix[w, h]
=
0
,
0
,
0
, cr_p[
3
]
else
:
dst_pix[w, h]
=
255
,
255
,
255
, cr_p[
3
]
return
dst_img
|
效果如图:
来自:http://qinxuye.me/article/implement-sketch-and-pencil-with-pil/