1.SOFABoot源码解析
1.1 模块化开发
1.1.1 简述
关于SOFABoot模块化开发的文档来自于Alipay开源社区Wiki,链接地址为:
https://github.com/alipay/sofa-boot/wiki/Modular-Development
此处直接引用该文档内容,主要是便于大家理解源码解析部分。
1.1.1.1 模块化开发简述
SOFABoot从 2.4.0 版本开始支持基于 Spring 上下文隔离的模块化开发能力。为了更好的理解 SOFABoot 模块化开发的概念,我们来区分几个常见的模块化形式:
1). 基于代码组织上的模块化:这是最常见的形式,在开发期,将不同功能的代码放在不同 Java 工程下,在编译期被打进不同 jar 包,在运行期,所有 Java 类都在一个 classpath 下,没做任何隔离;
2). 基于 Spring 上下文隔离的模块化:借用 Spring 下文来做不同功能模块的隔离,在开发期和编译期,代码和配置也会分在不同Java 工程中,但在运行期,不同的 Spring Bean 相互不可见,IoC 只在同一个上下文内部发生,但是所有的 Java 类还是在一个 ClassLoader 下;
3). 基于 ClassLoader 隔离的模块化:借用 ClassLoader 来做隔离,每个模块都有独立的 ClassLoader,模块与模块之间的 classpath 不同,SOFAArk 就是这种模块化的实践方式。
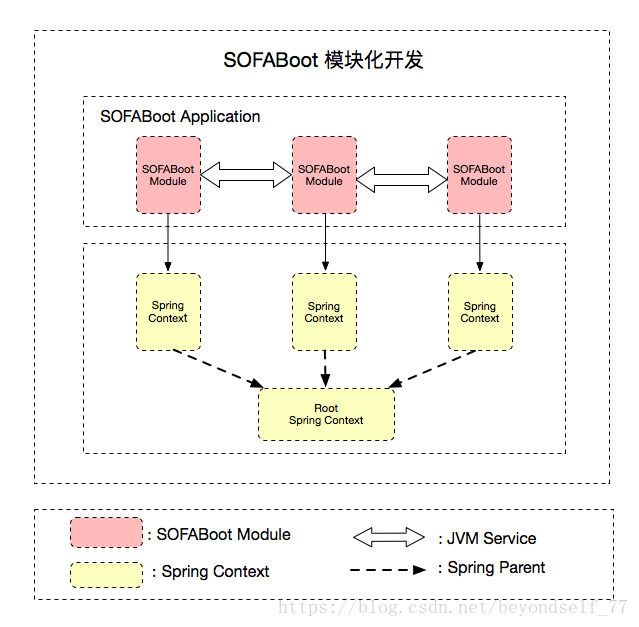
SOFABoot模块化开发属于第二种模块化形式,基于 Spring 上下文隔离的模块化。每个 SOFABoot 模块使用独立的 Spring 上下文,避免不同 SOFABoot 模块间的 BeanId 冲突,有效降低企业级多模块开发时团队间的沟通成本。
1. SOFABoot模块
SOFABoot框架定义了 SOFABoot 模块的概念,一个 SOFABoot 模块是一个包括 Java 代码、Spring 配置文件、SOFABoot 模块标识等信息的普通 Jar 包,一个 SOFABoot 应用可以包含多个 SOFABoot 模块,每个 SOFABoot 模块都含有独立的 Spring 上下文。
以 SOFABoot模块为单元的模块化方式为开发者提供了以下功能:
1) 运行时,每个SOFABoot模块的 Spring 上下文是隔离的,模块间定义的 Bean 不会相互影响。
2) 每个 SOFABoot 模块是功能完备且自包含的,可以很容易在不同的 SOFABoot 应用中进行模块迁移和复用,只需将 SOFABoot 模块整个拷贝过去,调整 Maven 依赖,即可运行。
2. SOFABoot模块间通信
上下文隔离后,模块与模块间的 Bean 无法直接注入,模块间需要通过 SOFA 服务进行通信,目前SOFABoot 提供了两种形式的服务发布和引用,用于解决不同级别的模块间调用的问题:
1) JVM 服务发布和引用:解决一个 SOFABoot 应用内部各个SOFABoot 模块之间的调用问题。
2) RPC 服务发布和引用:解决多个 SOFABoot 应用之间的远程调用问题,RPC服务发布与引用。
3. 模块并行化启动
每个 SOFABoot 模块都是独立的 Spring 上下文,多个 SOFABoot 模块支持并行化启动,与 Spring Boot 的单 Spring 上下文模式相比,模块并行化启动能够加快应用的启动速度。
4. RootApplication Context
SOFABoot应用运行时,本身会产生一个Spring Context,我们把它叫做 Root Application Context,它是每个 SOFABoot 模块创建的 Spring Context 的 Parent。这样设计的目的是为了保证每个 SOFABoot 模块的 Spring Context 都能发现 Root ApplicationContext 中创建的 Bean,这样当应用新增Starter 时,不仅 Root Application Context 能够使用 Starter 中新增的 Bean,每个 SOFABoot 模块的 Spring Context 也能使用这些 Bean。
1.1.1.2 SOFABoot模块简述
SOFABoot 模块是一个普通的 Jar 包加上一些 SOFABoot 特有的配置,这些 SOFABoot 特有的配置,让一个 Jar 包能够被 SOFABoot 识别,使之具备模块化的能力。
一个完整的 SOFABoot 模块和一个普通的 Jar 包有两点区别:
1) SOFABoot 模块包含一份 sofa-module.properties 文件,这份文件里面定义了 SOFABoot模块的名称以及模块之间的依赖关系。
2) SOFABoot 模块的 META-INF/spring 目录下,可以放置任意多的 Spring 配置文件,SOFABoot 会自动把它们作为本模块的 Spring 配置加载起来。
1. sofa-module.properties 文件详解
先来看一份完整的 sofa-module.properties 文件:
1. Module-Name=com.alipay.test.biz.service.impl
2. Spring-Parent=com.alipay.test.common.dal
3. Require-Module=com.alipay.test.biz.shared
4. Module-Profile=dev
1) Module-Name
Module-Name 是SOFABoot 模块的名称,也是 SOFABoot 模块的唯一标示符。在一个 SOFABoot 应用中,一个 SOFABoot 模块的 Module-Name 必须和其他的 SOFABoot 模块的 Module-Name 不一样。需要注意的一点是,一个 SOFABoot 应用运行时的 SOFABoot 模块,不仅仅只包含本应用的模块,还包括依赖了其他应用的SOFABoot 模块,确定是否唯一的时候需要把这些 SOFABoot 模块也考虑进去。
2) Require-Module
Require-Module 用于定义模块之间的依赖顺序,值是以逗号分隔的 SOFABoot 模块名列表,比如上面的配置中,就表示本模块依赖于com.alipay.test.biz.shared 模块。对于这种依赖关系的处理,SOFABoot 会将 com.alipay.test.biz.shared 模块在本模块之前启动,即com.alipay.test.biz.shared模块将先启动 Spring 上下文。
一般情况下,是不需要为模块定义 Require-Module 的,只有当模块的 Spring 上下文的启动依赖于另一个模块的 Spring 上下文的启动时,才需要定义 Require-Module。举一个例子,如果你在 A 模块中发布了一个 SOFA JVM Service。在 B 模块的某一个 Bean 的 init 方法里面,需要使用 SOFA Reference 调用这个 JVM Service。假设 B 模块在 A 模块之前启动了,那么B 模块的 Bean 就会因为 A 模块的 JVM Service 没有发布而 init 失败,导致 Spring 上下文启动失败。这个时候,我们就可以使用 Require-Module 来强制 A 模块在 B 模块之前启动。
3) Spring-Parent
在 SOFABoot 应用中,每一个 SOFABoot 模块都是一个独立的 Spring 上下文,并且这些 Spring 上下文之间是相互隔离的。虽然这样的模块化方式可以带来诸多好处,但是,在某些场景下还是会有一些不便,这个时候,你可以通过 Spring-Parent 来打通两个 SOFABoot 模块的 Spring 上下文。Spring-Parent 属性可以配置一个模块的名称,比如上面的配置中,就将 com.alipay.test.common.dal 的 Spring 上下文设置为当前模块的 Spring 上下文的父 Spring 上下文。
由于 Spring 的限制,一个模块的 Spring-Parent 只能有一个模块。
关于 Spring 的父上下文的作用可以看 Spring 的 BeanFactory 的说明:http://docs.spring.io/spring/docs/current/javadoc-api/org/springframework/beans/factory/BeanFactory.html
4) Module-Profile
支持 SOFABoot Profile 能力。
1.1.1.3 模块并发启动
SOFABoot 会根据Require-Module 计算模块依赖树,例如以下依赖树表示模块B 和模块C 依赖模块A,模块E 依赖模块D,模块F 依赖模块E:
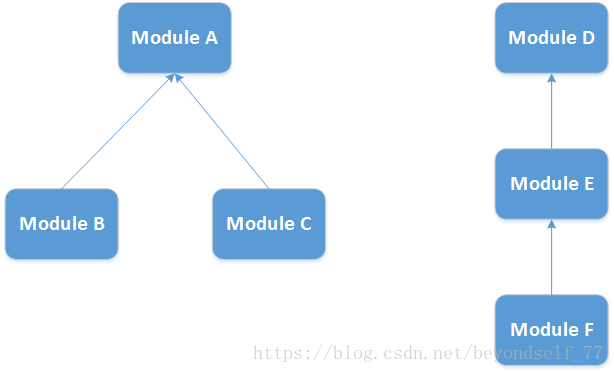
该依赖树会保证模块A 必定在模块B 和模块C 之前启动,模块D 在模块E 之前启动,模块E 在模块F 之前启动,但是依赖树没有定义模块B 与模块C,模块B、C与模块D、E、F之间的启动顺序,这几个模块之间可以串行启动,也可以并行启动。
SOFABoot 默认会并行启动模块,在使用过程中,如果希望关闭并行启动,可以在 application.properties 中增加以下参数:
1. com.alipay.sofa.boot.module-start-up-parallel=false
1.1.1.4 SOFABoot Profile
Spring 框架从3.1.X 版本开始提供了 profile 功能: BeanDefinition Profiles,SOFABoot 支持模块级 profile 能力,即在各个模块启动的时候决定模块是否能够启动。
1. 使用Module-Profile激活module
使用 SOFABoot 的profile 功能,需要在 application.properties 文件增加 com.alipay.sofa.boot.active-profiles 字段,该字段的值为逗号分隔的字符串,表示允许激活的 profile 列表,指定该字段后,SOFABoot 会为每个可以激活的模块指定此字段表示的 profile 列表。
SOFABoot 模块的sofa-module.properties 文件支持 Module-Profile 字段,该字段的值为逗号分隔的字符串,表示当前模块允许在哪些 profile 激活。Module-Profile 支持取反操作, !dev 表示com.alipay.sofa.boot.active-profiles 不包含 dev 时被激活。
当应用未指定com.alipay.sofa.boot.active-profiles 参数时,表示应用所有模块均可启动。SOFABoot模块未指定 Module-Profile 时,表示当前SOFABoot 模块可以在任何 profile 启动。
2. 使用例子
1) 激活 dev SOFABoot 模块
application.properties 中增加配置如下:
1. com.alipay.sofa.boot.active-profiles=dev
该配置表示激活 profile 为 dev 的模块。
在每个需要限定为 dev profile 被激活模块的 sofa-module.properties 文件中增加如下配置:
1. Module-Profile=dev
2) 配置多个激活 profile
application.properties 中增加配置如下:
1. com.alipay.sofa.boot.active-profiles=dev,test
该配置表示激活 profile 为 dev 或者 test 的模块。
在 SOFABoot 模块的 sofa-module.properties 文件中增加如下配置:
1. Module-Profile=test,product
该配置表示当 com.alipay.sofa.boot.active-profiles包含 test 或者 product 时激活模块,由于当前指定的 com.alipay.sofa.boot.active-profiles 为dev,test ,此模块将被激活。
3) Module-Profile 取反
application.properties 中增加配置如下:
1. com.alipay.sofa.boot.active-profiles=dev
该配置表示激活 profile 为 dev 的模块。
在 SOFABoot 模块的 sofa-module.properties 文件中增加如下配置:
1. Module-Profile=!product
该配置表示当com.alipay.sofa.boot.active-profiles 不包含 product 时激活模块,由于当前指定的 com.alipay.sofa.boot.active-profiles 为 dev ,此模块将被激活。
4) 设置激活模块 Spring 上下文的 spring.profiles.active 属性
application.properties 中增加配置如下:
1. com.alipay.sofa.boot.active-profiles=dev,test
该配置表示激活 profile 为 dev 或者 test 的模块,当一个模块满足上面的激活条件时,这个模块就会被启动,同时 Spring 上下文的环境信息 spring.profiles.active 也被设置为了 dev,test ,这样如下的配置 beanId 为 devBeanId 和 testBeanId 的bean都会被激活。
1. <?xml version="1.0"encoding="UTF-8"?>
2. <beansxmlns="http://www.springframework.org/schema/beans"
3. xmlns:xsi="http://www.w3.org/2001/XMLSchema-instance"
4. xmlns:jdbc="http://www.springframework.org/schema/jdbc"
5. xmlns:jee="http://www.springframework.org/schema/jee"
6. xsi:schemaLocation="http://www.springframework.org/schema/beans
7. http://www.springframework.org/schema/beans/spring-beans-3.2.xsd
8. http://www.springframework.org/schema/context
9. http://www.springframework.org/schema/context/spring-context.xsd"
10. default-autowire="byName">
11.
12. <beans profile="dev">
13. <bean id="devBeanId"class="com.alipay.cloudenginetest.sofaprofilesenv.DemoBean">
14. <propertyname="name">
15. <value>demoBeanDev</value>
16. </property>
17. </bean>
18. </beans>
19.
20. <beans profile="test">
21. <bean id="testBeanId"class="com.alipay.cloudenginetest.sofaprofilesenv.DemoBean">
22. <propertyname="name">
23. <value>demoBeanTest</value>
24. </property>
25. </bean>
26. </beans>
27. </beans>
1.1.2 源码解析
以SOFABoot自带的模块化案例sofaboot-sample-with-isle为例,详细描述SOFABoot模块化启动原理。
在此提前说明,源码分析主要分析主流程,以及本人认为比较重要的一些内容,对于其它部分,大家可以基于本文档,自行研读。
sofaboot-sample-with-isle项目主要包括:
1. sofa-boot-run:主模块;
2. service-facade:服务接口模块
3. service-provider:服务提供者模块;
4. service-consumer:服务消费者模块;
由于项目基于SpringBoot框架开发,所以运行主模块sofa-boot-run中ApplicationRun类main方法,通过SpringApplication.run方法启动应用。
1. @SpringBootApplication
2. public class ApplicationRun {
3. public static void main(String[] args) {
4. SpringApplication.run(ApplicationRun.class,args);
5. }
6. }
刷新Spring应用上下文时,在invokeBeanFactoryPostProcessors(beanFactory)方法执行过程中,自动加载和注册SOFABoot的isle-sofa-boot-starter模块中META-INF/spring.factories文件中配置的自动配置相关的类:
1. org.springframework.boot.autoconfigure.EnableAutoConfiguration=\
2. com.alipay.sofa.isle.spring.configuration.SofaModuleAutoConfiguration
在SofaModuleAutoConfiguration类中,主要定义了以下几个自动配置的类:
1. SofaModuleProperties
2. SofaModuleBeanFactoryPostProcessor
3. SofaModuleContextRefreshedListener
4. SofaModuleHealthIndicator
5. SofaModuleHealthChecker
其中,SofaModuleContextRefreshedListener类监听根Spring应用上下文(AnnotationConfigEmbeddedWebApplicationContext)刷新完成以后发布的ContextRefreshedEvent事件,进行子模块的加载,后面详述。
Spring应用上下文刷新过程中的其它步骤基本与SOFABoot的启动执行过程相同,详细说明参考《启动原理部分》。
在finishRefresh()方法执行过程中,发布ContextRefreshedEvent事件,表示根Spring应用上下文刷新完成。
1. protectedvoid finishRefresh() {
2. super.finishRefresh();
3. EmbeddedServletContainerlocalContainer = startEmbeddedServletContainer();
4. if(localContainer != null) {
5. publishEvent(
6. newEmbeddedServletContainerInitializedEvent(this, localContainer));
7. }
8. }
调用AbstractApplicationContext的finishRefresh方法发布ContextRefreshedEvent事件:
1. protected void finishRefresh() {
2. ……略
3. //Publish the final event.
4. publishEvent(new ContextRefreshedEvent(this));
5.
6. ……略
7. }
SofaModuleContextRefreshedListener实例监听到ContextRefreshedEvent事件,开始执行子模块的加载:
1. public voidonApplicationEvent(ContextRefreshedEvent event) {
2. if (INIT.compareAndSet(false, true)) {
3. DefaultPipelineContext pipelineContext = newDefaultPipelineContext();
4. pipelineContext.appendStage(newModelCreatingStage((AbstractApplicationContext) event
5. .getApplicationContext()));
6. pipelineContext.appendStage(newSpringContextInstallStage(
7. (AbstractApplicationContext)event.getApplicationContext()));
8. pipelineContext.appendStage(newModuleLogOutputStage((AbstractApplicationContext) event
9. .getApplicationContext()));
10. try {
11. pipelineContext.process();
12. } catch (Throwable t) {
13. SofaLogger.error(t,"process pipeline error");
14. throw new RuntimeException(t);
15. }
16. }
17. }
通过原子操作CAS设置全局变量INIT为true,保证只有一个线程在执行子模块的加载工作,并且只执行一次。
创建DefaultPipelineContext实例,含有一个有序的ArrayList的属性,用于存储多个PipelineStage接口的实现,每个PipelineStage代表一个阶段,多个PipelineStage可以按照增加到数组列表中的顺序依次执行。
创建ModelCreatingStage实例,参数为根Spring应用上下文AnnotationConfigEmbeddedWebApplicationContext,并增加到DefaultPipelineContext的ArrayList中。
创建SpringContextInstallStage实例,参数为根Spring应用上下文AnnotationConfigEmbeddedWebApplicationContext,并增加到DefaultPipelineContext的ArrayList中。
创建ModuleLogOutputStage实例,参数为根Spring应用上下文AnnotationConfigEmbeddedWebApplicationContext,并增加到DefaultPipelineContext的ArrayList中。
调用DefaultPipelineContext的process方法,按照进入数组列表的顺序依次执行每个PipelineStage的process方法。
一、 执行ModelCreatingStage的process方法:
1. protected void doProcess() throws Exception{
2. ApplicationRuntimeModel application = newApplicationRuntimeModel();
3. application.setAppName(appName);
4. application.setModuleDeploymentValidator(newDefaultModuleDeploymentValidator());
5. getAllDeployments(application);
6. applicationContext.getBeanFactory().registerSingleton(
7. SofaModuleFrameworkConstants.APPLICATION,application);
8. }
创建ApplicationRuntimeModel实例application,该实例存储应用所有的模块部署信息。
然后调用getAllDeployments方法加载所有的SOFABoot模块:
1. private voidgetAllDeployments(ApplicationRuntimeModel application) throws IOException {
2. Enumeration<URL> urls = appClassLoader
3. .getResources(SofaModuleFrameworkConstants.SOFA_MODULE_FILE);
4. if (urls == null ||!urls.hasMoreElements())
5. return;
6.
7. while (urls.hasMoreElements()) {
8. URL url = urls.nextElement();
9. UrlResource urlResource = newUrlResource(url);
10. Properties props = newProperties();
11. props.load(urlResource.getInputStream());
12. DeploymentDescriptorConfigurationdeploymentDescriptorConfiguration = new DeploymentDescriptorConfiguration(
13. Collections.singletonList(SofaModuleFrameworkConstants.MODULE_NAME),
14. Collections.singletonList(SofaModuleFrameworkConstants.REQUIRE_MODULE));
15. DeploymentDescriptor dd =DeploymentBuilder.build(url, props,
16. deploymentDescriptorConfiguration,appClassLoader);
17.
18. if (application.isModuleDeployment(dd)) {
19. if(SofaModuleProfileUtil.acceptProfile(applicationContext, dd)) {
20. application.addDeployment(dd);
21. } else {
22. application.addInactiveDeployment(dd);
23. }
24. }
25. }
26. }
使用应用的类加载器加载classpath路径上的sofa-module.properties文件(涉及项目本身及所依赖的Jar包)。此时,类加载器为sun.misc.Launcher$AppClassLoader的一个实例。在此案例中,主要包括两个sofa-module.properties文件。出于调试目的,本项目采用项目依赖方式,而非Jar包依赖,所以sofa-module.properties文件分别位于service-provider和service-consumer项目的编译输出目录中,如file:/D:/SOFA_Workspace/sofa-boot-master/sofaboot-samples/sofaboot-sample-with-isle/service-provider/target/classes/sofa-module.properties(如果采用Jar包依赖方式,则位于service-provider和service-consumer的Jar包)。
根据每个模块的sofa-module.properties文件,依次为每个模块创建模块的部署描述实例FileDeploymentDescriptor(如果采用Jar包模式部署,则创建JarDeploymentDescriptor),基本过程如下:
1. 创建sofa-module.properties文件对应的UrlResource实例;
2. 读取sofa-module.properties文件内容,置入Properties实例;
3. 创建DeploymentDescriptorConfiguration实例;
4. 通过DeploymentBuilder的build方法创建SOFABoot模块的DeploymentDescriptor实例dd;
5. 如果dd的Module-Name为空,则处理下一个模块的sofa-module.properties文件;
6. 如果dd的Module-Name不为空,并且本模块的profile 在项目允许激活的profile列表内(本模块未指定 Module-Profile 时,表示当前本模块可以在任何 profile 启动),则把dd增加到application的deploys数组列表、deployRegistry注册中心、springPowered。否则,把dd增加到application的inactiveDeploys数组列表。
处理完所有SOFABoot模块的配置文件以后,以单例模式把application实例注册到根Spring应用上下文,名字为SOFABOOT-APPLICATION。
二、 执行SpringContextInstallStage的process方法:
1. protected void doProcess() throws Exception{
2. ApplicationRuntimeModel application =applicationContext.getBean(
3. SofaModuleFrameworkConstants.APPLICATION,ApplicationRuntimeModel.class);
4.
5. try {
6. doProcess(application);
7. } catch (Throwable e) {
8. ……略
9. }
10. }
从根Spring应用上下文中获取名字为SOFABOOT-APPLICATION的ApplicationRuntimeModel实例application,然后处理该application:
1. private voiddoProcess(ApplicationRuntimeModel application) throws Exception {
2. outputModulesMessage(application);
3. SpringContextLoader springContextLoader= new DynamicSpringContextLoader(applicationContext);
4. installSpringContext(application, springContextLoader);
5.
6. if(applicationContext.getBean(SofaModuleFrameworkConstants.SOFA_MODULE_PROPERTIES_BEAN_ID,
7. SofaModuleProperties.class).isModuleStartUpParallel()){
8. refreshSpringContextParallel(application);
9. } else {
10. refreshSpringContext(application);
11. }
12. }
(一) 输出SOFABoot模块信息:
1. private voidoutputModulesMessage(ApplicationRuntimeModel application)
2. throwsDeploymentException {
3. StringBuilder stringBuilder = newStringBuilder();
4. ……略
5. writeMessageToStringBuilder(stringBuilder,application.getResolvedDeployments(),
6. "Modules that couldinstall");
7. ……略
8. }
此处,调用application的getResolvedDeployments()方法,解析并获取所有模块对应的DeploymentDescriptor实例:
1. public List<DeploymentDescriptor>getResolvedDeployments() {
2. ……略
3. resolvedDeployments = deployRegistry.getResolvedObjects();
4. ……略
5. return resolvedDeployments;
6. }
调用DeployRegistry的getResolvedObjects方法,获取所有在SOFABoot模块创建阶段时增加到application中的DeploymentDescriptor。
1. public List<DeploymentDescriptor>getResolvedObjects() {
2. if (!deployments.isEmpty()) {
3. commitDeployments();
4. }
5. return super.getResolvedObjects();
6. }
调用commitDeployments方法:
1. private void commitDeployments() {
2. for (DeploymentDescriptor fd :deployments.values()) {
3. add(fd.getModuleName(), fd,fd.getRequiredModules());
4. }
5. deployments.clear();
6. }
依次遍历所有模块对应的DeploymentDescriptor,以模块命名、模块实例、模块依赖的模块集合为参数,调用add方法,在Map中注册DeploymentDescriptor,并更新DeploymentDescriptor的依赖关系。
1. public void add(K key, T object,Collection<K> requires) {
2. Entry<K, T> entry =registry.get(key);
3. if (entry == null) {
4. entry = new Entry<>(key,object);
5. registry.put(key, entry);
6. } else if (entry.object == null) {
7. entry.object = object;
8. } else {
9. return;
10. }
11. updateDependencies(entry, requires);
12. // resolve it if no pendingrequirements
13. if (entry.isResolved()) {
14. resolve(entry);
15. }
16. }
更新模块的依赖性:
1. protected voidupdateDependencies(Entry<K, T> entry, Collection<K> requires) {
2. if (requires != null) {
3. for (K req : requires) {
4. Entry<K, T> reqEntry =registry.get(req);
5. if (reqEntry != null) {
6. if (reqEntry.isResolved()){
7. // requirementsatisfied -> continue
8. reqEntry.addDependsOnMe(entry);
9. entry.addDependency(reqEntry);
10. continue;
11. }
12. } else {
13. reqEntry = newEntry<>(req, null);
14. registry.put(req,reqEntry);
15. }
16. // dependencies not satisfied
17. reqEntry.addDependsOnMe(entry);
18. entry.addDependency(reqEntry);
19. entry.addWaitingFor(reqEntry);
20. }
21. }
22. }
在此,根据sofa-module.properties文件中Require-Module属性,设置模块的依赖属性,主要包括本模块所依赖的其它模块、依赖与本模块的其它模块等。其中,本模块所依赖的模块的集合在并行刷新模块的Spring应用上下文时,被作为模块是否具备刷新的条件(如果dependencies集合为空或size为0,则表示本模块不依赖其它模块,或所依赖的模块已经刷新完成,本模块具体刷新条件。否则,等待所依赖的模块刷新完成)。
(二) 以根Spring应用上下文作为参数,创建DynamicSpringContextLoader实例;
(三) 调用installSpringContext方法创建Spring应用上下文:
1. private voidinstallSpringContext(ApplicationRuntimeModel application,
2. SpringContextLoaderspringContextLoader) {
3. ClassLoader oldClassLoader =Thread.currentThread().getContextClassLoader();
4.
5. for (DeploymentDescriptor deployment :application.getResolvedDeployments()) {
6. if(deployment.isSpringPowered()) {
7. ……略
8. try {
9. Thread.currentThread().setContextClassLoader(deployment.getClassLoader());
10. springContextLoader.loadSpringContext(deployment,application);
11. } catch (Throwable e) {
12. SofaLogger.error(e, "Install module{0} got an error!", deployment.getName());
13. application.addFailed(deployment);
14. } finally {
15. Thread.currentThread().setContextClassLoader(oldClassLoader);
16. }
17. }
18. }
19. }
首先,保存当前线程的上下文类加载器,此时为sun.misc.Launcher$AppClassLoader实例。然后,遍历application中加载的每个模块的DeploymentDescriptor实例,并根据DeploymentDescriptor实例依次为每个SOFABoot模块创建Spring应用上下文。
针对每个DeploymentDescriptor实例,主要处理逻辑如下:
1) 判断SOFABoot模块是否为基于Spring的模块,判断条件为SOFABoot 模块的META-INF\spring目录下是否存在Spring的XML配置文件,如D:\SOFA_Workspace\sofa-boot-master\sofaboot-samples\sofaboot-sample-with-isle\service-provider\target\classes\META-INF\spring目录。如果springResources为null,则调用loadSpringXMLs方法,把META-INF/目录下的所有SpringXML配置文件增加到springResources中,待后面加载模块的Spring应用上下文时,把springResources中所有SpringXML配置文件中的Bean注册到Spring上下文。初始化完springResources,判断springResources是否为空,如果为空,则表示此模块不是Spring模块,直接跳过处理下一个SOFABoot 模块。如果不为空,则表示此模块为Spring模块,继续处理:
2) 设置当前线程的上下文类加载器为DeploymentDescriptor中的类加载器,此处为sun.misc.Launcher$AppClassLoader实例。
3) 调用DynamicSpringContextLoader的loadSpringContext方法,创建SOFABoot 模块对应的Spring应用上下文。
1. public voidloadSpringContext(DeploymentDescriptor deployment,
2. ApplicationRuntimeModelapplication) throws Exception {
3. SofaModulePropertiessofaModuleProperties = rootApplicationContext
4. .getBean(SofaModuleFrameworkConstants.SOFA_MODULE_PROPERTIES_BEAN_ID,
5. SofaModuleProperties.class);
6. BeanLoadCostBeanFactory beanFactory =new BeanLoadCostBeanFactory(
7. sofaModuleProperties.getBeanLoadCost());
8. beanFactory.setParameterNameDiscoverer(newLocalVariableTableParameterNameDiscoverer());
9. beanFactory
10. .setAutowireCandidateResolver(newQualifierAnnotationAutowireCandidateResolver());
11.
12. GenericApplicationContext ctx =sofaModuleProperties.isPublishEventToParent() ? new GenericApplicationContext(
13. beanFactory) : newSofaModuleApplicationContext(beanFactory);
14. String activeProfiles =sofaModuleProperties.getActiveProfiles();
15. if(StringUtils.hasText(activeProfiles)) {
16. String[] profiles = activeProfiles
17. .split(SofaModuleFrameworkConstants.PROFILE_SEPARATOR);
18. ctx.getEnvironment().setActiveProfiles(profiles);
19. }
20. setUpParentSpringContext(ctx,deployment, application);
21. final ClassLoader moduleClassLoader =deployment.getClassLoader();
22. ctx.setClassLoader(moduleClassLoader);
23. CachedIntrospectionResults.acceptClassLoader(moduleClassLoader);
24.
25. // set allowBeanDefinitionOverriding
26. ctx.setAllowBeanDefinitionOverriding(rootApplicationContext.getBean(
27. SofaModuleProperties.class).isAllowBeanDefinitionOverriding());
28.
29. ctx.getBeanFactory().setBeanClassLoader(moduleClassLoader);
30. ctx.getBeanFactory().addPropertyEditorRegistrar(newPropertyEditorRegistrar() {
31.
32. public voidregisterCustomEditors(PropertyEditorRegistry registry) {
33. registry.registerCustomEditor(Class.class,new ClassEditor(moduleClassLoader));
34. registry.registerCustomEditor(Class[].class,
35. newClassArrayEditor(moduleClassLoader));
36. }
37. });
38. deployment.setApplicationContext(ctx);
39.
40. XmlBeanDefinitionReader beanDefinitionReader =new XmlBeanDefinitionReader(ctx);
41. beanDefinitionReader.setValidating(true);
42. beanDefinitionReader.setNamespaceAware(true);
43. beanDefinitionReader
44. .setBeanClassLoader(deployment.getApplicationContext().getClassLoader());
45. beanDefinitionReader.setResourceLoader(ctx);
46.
47. for (Map.Entry<String, Resource>entry : deployment.getSpringResources().entrySet()) {
48. String fileName = entry.getKey();
49. beanDefinitionReader.loadBeanDefinitions(entry.getValue());
50. deployment.addInstalledSpringXml(fileName);
51. }
52. addPostProcessors(beanFactory);
53. }
loadSpringContext方法主要处理逻辑如下:
1) 从根Spring应用上下文AnnotationConfigEmbeddedWebApplicationContext中获取名为sofaModuleProperties的SofaModuleProperties实例。
2) 创建BeanLoadCostBeanFactory实例,此类继承DefaultListableBeanFactory,增加了记录创建指定Bean时间的功能。可以设置Bean加载的下限时限,默认100MS,创建Bean的时间超过这个时限时,则把Bean增加到beanCostList数组列表中,供后续使用。
3) 设置BeanLoadCostBeanFactory实例的属性,主要包括:setParameterNameDiscoverer、setAutowireCandidateResolver。
4) 根据SofaModuleProperties实例中publishEventToParent属性值,创建不同类型的ApplicationContext。如果publishEventToParent为true,表示事件需要发布给父Spring应用上下文,则创建org.springframework.context.support.GenericApplicationContext.GenericApplicationContext(DefaultListableBeanFactorybeanFactory)实例。否则,创建com.alipay.sofa.isle.spring.context.SofaModuleApplicationContext.SofaModuleApplicationContext(DefaultListableBeanFactorybeanFactory)实例。此处为false,所以创建SofaModuleApplicationContext实例。
5) 获取SofaModuleProperties实例中activeProfiles属性值,如果不为空,则SofaModuleApplicationContext实例中Enviroment属性的ActiveProfiles。
6) 设置SofaModuleApplicationContext的父Spring应用上下文。如果sofa-module.properties文件设置了Spring-Parent属性,则父Spring应用上下文为Spring-Parent属性指定的SOFABoot模块的Spring应用上下文。如果没有设置Spring-Parent属性,则父Spring应用上下文为根Spring应用上下文AnnotationConfigEmbeddedWebApplicationContext。
7) 设置SofaModuleApplicationContext类加载器为DeploymentDescriptor中的类加载器。
8) 设置SofaModuleApplicationContext类的属性allowBeanDefinitionOverriding;
9) 设置SofaModuleApplicationContext中BeanFactory的beanClassLoader为模块的类加载器;
10) 设置SofaModuleApplicationContext中BeanFactory的propertyEditorRegistrar为PropertyEditorRegistrar;
11) 设置DeploymentDescriptor的应用上下文为SofaModuleApplicationContext;
12) 创建并设置XmlBeanDefinitionReader实例beanDefinitionReader;
13) 依次遍历SOFABoot模块中META-INF/spring目录下所有spring的XML配置文件,并使用beanDefinitionReader加载XML文件中配置的Bean。此时表明模块的Spring应用上下文只加载模块META-INF/spring下Spring XML配置文件中的Bean。此处需要注意的是,如果在模块中采用自动配置的方式,即通过@Configuration、@Bean注解某个配置类,并在该模块的META-INF/spring.factories文件中配置org.springframework.boot.autoconfigure.EnableAutoConfiguration项,则这些Bean会被加载到根Spring应用上下文,而不是模块对应的Spring应用上下文。
14) 从根Spring应用上下文AnnotationConfigEmbeddedWebApplicationContext中获取名为PROCESSORS_OF_ROOT_APPLICATION_CONTEXT的Bean,该Bean为一个Map,缓存了根Spring应用上下文中的所有Post Processors,本项目主要包括:
1. org.springframework.boot.context.properties.ConfigurationBeanFactoryMetaData
2. org.springframework.boot.autoconfigure.web.ErrorMvcAutoConfiguration
3. org.springframework.boot.autoconfigure.PropertyPlaceholderAutoConfiguration
4. com.alipay.sofa.runtime.spring.ServiceAnnotationBeanPostProcessor
5. com.alipay.sofa.isle.spring.listener.SofaModuleBeanFactoryPostProcessor
6. com.alipay.sofa.runtime.spring.SofaRuntimeContextAwareProcessor
7. com.alipay.sofa.runtime.spring.ClientFactoryBeanPostProcessor
8. org.springframework.scheduling.annotation.ScheduledAnnotationBeanPostProcessor
9. org.springframework.boot.web.servlet.ErrorPageRegistrarBeanPostProcessor
10. org.springframework.context.annotation.ConfigurationClassPostProcessor
11. org.springframework.boot.context.embedded.EmbeddedServletContainerCustomizerBeanPostProcessor
至此,创建完一个SOFABoot模块对应的Spring应用上下文,然后恢复当前线程的上下文类加载器。
(四) 创建完所有SOFABoot模块对应的Spring应用上下文以后,应该刷新Spring应用上下文。
SOFABoot支持两种刷新SOFABoot模块Spring应用上下文方式:
1. 串行刷新:
遍历所有模块级别的Spring应用上下文,依次调用每个Spring应用上下文的refresh方法,完成刷新操作。此模式只适用于模块之间没有依赖的情况。该模式在模块比较多的情况下,刷新时间比较长,性能较低;
2. 并行刷新:
利用Java线程池,采用多线程并行刷新模块的Spring应用上下文。此模式适用于所有模块刷新情况,即模块之间存在依赖关系和模块之间不存在依赖关系。此模式性能较高;
根据SofaModuleProperties实例中moduleStartUpParallel属性值,选择刷新SOFABoot模块Spring应用上下文的方式。在application.properties文件中,com.alipay.sofa.boot.module-start-up-parallel=true,所以此处采用并行刷新方式。
1. private voidrefreshSpringContextParallel(ApplicationRuntimeModel application) {
2. ClassLoader oldClassLoader =Thread.currentThread().getContextClassLoader();
3. List<DeploymentDescriptor>coreRoots = new ArrayList<>();
4. ThreadPoolExecutor executor = newThreadPoolExecutor(CPU_COUNT + 1, CPU_COUNT + 1, 60,
5. TimeUnit.MILLISECONDS, newSynchronousQueue<Runnable>(), new NamedThreadFactory(
6. "sofa-module-start"),new ThreadPoolExecutor.CallerRunsPolicy());
7. try {
8. for (DeploymentDescriptor deployment :application.getResolvedDeployments()) {
9. DependencyTree.Entry entry =application.getDeployRegistry().getEntry(
10. deployment.getModuleName());
11. if (entry != null &&entry.getDependencies() == null) {
12. coreRoots.add(deployment);
13. }
14. }
15. refreshSpringContextParallel(coreRoots,application.getResolvedDeployments().size(),
16. application, executor);
17.
18. } finally {
19. executor.shutdown();
20. Thread.currentThread().setContextClassLoader(oldClassLoader);
21. }
22. }
创建执行线程池executor,此时需要注意以下几个参数:
1) 核心线程数与最大可用线程数相同:创建线程池时初始化核心线程,运行过程中不在创建线程,避免不必要的线程创建与回收,提高性能;
2) 阻塞队列为SynchronousQueue:当提交Spring应用上下文刷新任务时,如果此时线程池中所有线程已经都被占用,则阻塞在提交任务处,等待其它刷新任务完成,有空闲的线程接受新提交的任务;
3) 拒绝执行策略为CallerRunsPolicy,即由调用者线程来执行被拒绝的任务:这样当刷新任务比较多时,可以利用调用线程本身执行刷新任务,提高性能;
依次遍历ApplicationRuntimeModel实例application中每个DeploymentDescriptor实例(每个实例代表一个模块),判断DeploymentDescriptor实例的dependencies属性是否为空,为空表示此模块不依赖其它模块或所依赖的模块已经刷新完成,本模块可以刷新了,则把DeploymentDescriptor实例加入数组列表coreRoots,等待下一步刷新操作。否则,表示此模块所依赖的模块还没有刷新,本模块不可用刷新。
调用refreshSpringContextParallel方法,刷新已具备刷新条件的模块的Spring应用上下文。
1. private voidrefreshSpringContextParallel(List<DeploymentDescriptor> rootDeployments,
2. inttotalSize,
3. finalApplicationRuntimeModel application,
4. finalThreadPoolExecutor executor) {
5. ……略
6.
7. final CountDownLatch latch = newCountDownLatch(totalSize);
8. List<Future> futures = newCopyOnWriteArrayList<>();
9.
10. for (final DeploymentDescriptor deployment :rootDeployments) {
11. refreshSpringContextParallel(deployment,application, executor, latch, futures);
12. }
13.
14. try {
15. latch.await();
16. } catch (InterruptedException e) {
17. throw newRuntimeException("Wait for Sofa Module Refresh Fail", e);
18. }
19.
20. for (Future future : futures) {
21. try {
22. future.get();
23. } catch (Throwable e) {
24. throw new RuntimeException(e);
25. }
26. }
27.
28. }
refreshSpringContextParallel方法主要处理逻辑如下:
1) 以所有已经解析完成的模块数为初始值,创建CountDownLatch实例latch。在此主刷新线程把所有刷新任务提交给执行线程池executor以后,执行await操作,等待所有的刷新线程完成操作。而每个刷新Spring应用上下文的线程结束时,latch执行countDown操作,通知调用线程此刷新线程执行完成。
2) 提交刷新任务到线程池executor。
3) 依次遍历futures中代表刷新任务的future,执行每个future的get方法,阻塞主刷新线程,等待所有的刷新任务的完成。
其中,提交刷新任务到线程池的代码如下:
1. private voidrefreshSpringContextParallel(final DeploymentDescriptor deployment,
2. finalApplicationRuntimeModel application,
3. finalThreadPoolExecutor executor,
4. finalCountDownLatch latch, final List<Future> futures) {
5. futures.add(executor.submit(new Runnable() {
6. @Override
7. public void run() {
8. String oldName =Thread.currentThread().getName();
9. try {
10. ……略
11. if(deployment.isSpringPowered()) {
12. doRefreshSpringContext(deployment,application);
13. }
14. DependencyTree.Entry<String,DeploymentDescriptor> entry = application
15. .getDeployRegistry().getEntry(deployment.getModuleName());
16. if (entry != null&& entry.getDependsOnMe() != null) {
17. for (final DependencyTree.Entry<String,DeploymentDescriptor> child : entry
18. .getDependsOnMe()) {
19. child.getDependencies().remove(entry);
20. if (child.getDependencies().size() == 0) {
21. refreshSpringContextParallel(child.get(),application, executor,
22. latch,futures);
23. }
24. }
25. }
26. } catch (Throwable e) {
27. ……略
28. } finally {
29. latch.countDown();
30. Thread.currentThread().setName(oldName);
31. }
32. }
33. }));
34. }
refreshSpringContextParallel方法主要处理逻辑如下:
1) 创建匿名的刷新任务,并提交到线程池,然后把代表该任务执行结果的future增加到futures列表,供后续查询刷新结果。
2) 在刷新任务中,首先判断模块是否为Spring模块,如果是则调用doRefreshSpringContext方法执行Spring上下文刷新操作。否则,不刷新本模块。
3) 执行完本模块的Spring应用上下文刷新以后,获取所有依赖本模块的其它模块。依次把其它模块的依赖集合dependencies中去掉本模块。如果去掉以后,dependencies的size为0,表示所依赖的模块已经刷新完成,自己可以被刷新了,则调用refreshSpringContextParallel方法,提交模块刷新任务到线程池。
4) 提交完其它模块的刷新任务,则调用countDown方法,通知主线程本模块刷新任务完成,把执行线程返回线程池,供其它刷新任务使用。
依次循环,直至所有模块的Spring应用上下文刷新完成。针对每个Spring应用上下文,其刷新工作在doRefreshSpringContext方法完成:
1. private voiddoRefreshSpringContext(DeploymentDescriptor deployment,
2. ApplicationRuntimeModelapplication) {
3. ……略
4. ConfigurableApplicationContext ctx =(ConfigurableApplicationContext) deployment.getApplicationContext();
5. if (ctx != null) {
6. try {
7. deployment.startDeploy();
8. ctx.refresh();
9. application.addInstalled(deployment);
10. } catch (Throwable t) {
11. ……略
12. } finally {
13. deployment.deployFinish();
14. }
15. } else {
16. application.addFailed(deployment);
17. ……略 }
18. }
看到ctx.refresh()这段代码,大家就应该比较熟悉了,就是具体的执行Spring应用上下文刷新操作,这个大家都比较熟悉了,在此就不详述了。
三、 执行ModuleLogOutputStage的process方法:
所有SOFABoot模块的Spring应用上下文刷新完成以后,执行ModuleLogOutputStage的process方法,记录模块加载过程中相关的日志。
1. protected void doProcess() throws Exception{
2. ApplicationRuntimeModel application =applicationContext.getBean(
3. SofaModuleFrameworkConstants.APPLICATION,ApplicationRuntimeModel.class);
4.
5. StringBuilder stringBuilder = newStringBuilder();
6. logInstalledModules(stringBuilder,application.getInstalled());
7. logFailedModules(stringBuilder,application.getFailed());
8. logInfoBeanCost(stringBuilder,application.getInstalled());
9.
10. SofaLogger.info(stringBuilder.toString());
11. }
此处主要记录如下内容:
1) 加载成功的模块;
2) 加载失败的模块;
3) 加载成功的模块中Bean加载时间超过指定加载时限(此处:100MS)的Bean。
到此为止,SOFABoot应用启动完成。