第一准备图片:
在try/
wetland/
wood/
各十张图片。
要点:
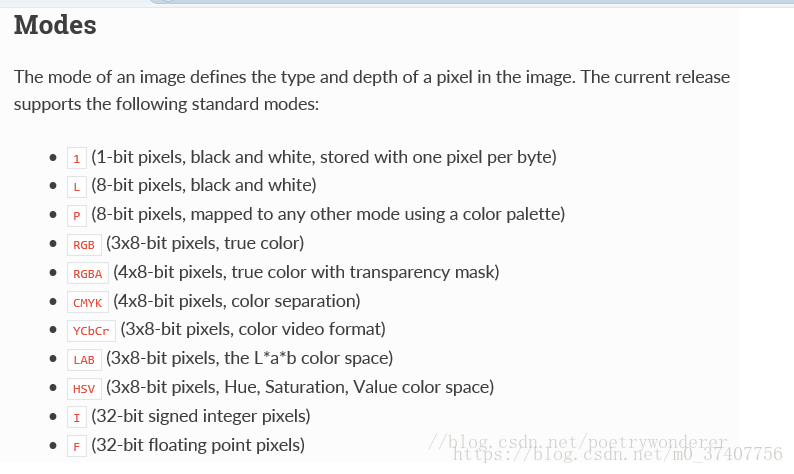
1.图像大小、分辨率、位深之间的关系
以BMP图像为例说明计算方法:
  1、大小=分辨率*位深/8;
  2、分辨率=宽*高(如:1024*768,640*480);
  3、位深:如24位,16位,8位;
  4、/8计算的是字节数。
特别地,在制作数据集时,若同时存在不同位深的图像时,最好先统一化,利用PS即可
制作TFRECORD文件
代码:
import os
import tensorflow as tf
from PIL import Image  #注意Image,后面会用到
import matplotlib.pyplot as plt
import numpy as np

cwd='F:/project/python/didi/try/'
classes={'wetland','wood'} #人为 设定 2 类
writer= tf.python_io.TFRecordWriter("pic_train.tfrecords") #要生成的文件

for index, name in enumerate(classes):
    class_path = cwd + name + '\\'
    for img_name in os.listdir(class_path):
        img_path = class_path + img_name  # 每一个图片的地址
        img = Image.open(img_path)
        img = img.resize((128, 128))
        img_raw = img.tobytes()  # 将图片转化为二进制格式
        example = tf.train.Example(features=tf.train.Features(feature={
            "label": tf.train.Feature(int64_list=tf.train.Int64List(value=[index])),
            'img_raw': tf.train.Feature(bytes_list=tf.train.BytesList(value=[img_raw]))
        }))  # example对象对label和image数据进行封装
        writer.write(example.SerializeToString())  # 序列化为字符串

writer.close()
运行完这段代码后,会生成

tf.train.Example 协议内存块包含了Features字段,通过feature将图片的二进制数据和label进行统一封装, 然后将example协议内存块转化为字符串, tf.python_io.TFRecordWriter 写入到TFRecords文件中。
读取TFRECORD文件
def read_and_decode(filename):  # 读入tfrecords
    filename_queue = tf.train.string_input_producer([filename])  # 生成一个queue队列
    reader = tf.TFRecordReader()
    _, serialized_example = reader.read(filename_queue)  # 返回文件名和文件
    features = tf.parse_single_example(serialized_example,
                                       features={
                                           'label': tf.FixedLenFeature([], tf.int64),
                                           'img_raw': tf.FixedLenFeature([], tf.string),
                                       })  # 将image数据和label取出来
    img = tf.decode_raw(features['img_raw'], tf.uint8)
    img = tf.reshape(img, [128, 128, 3])  # reshape为128*128的3通道图片
    img = tf.cast(img, tf.float32) * (1. / 255) - 0.5  # 在流中抛出img张量
    label = tf.cast(features['label'], tf.int32)  # 在流中抛出label张量
    return img, label
注意,feature的属性“label”和“img_raw”名称要和制作时统一 ,返回的img数据和label数据一一对应。返回的img和label是2个 tf 张量。
显示tfrecord格式的图片
import os
import tensorflow as tf
from PIL import Image  #注意Image,后面会用到
import matplotlib.pyplot as plt
import numpy as np

cwd='F:/project/python/didi/try/'
filename_queue = tf.train.string_input_producer(["pic_train.tfrecords"]) #读入流中
reader = tf.TFRecordReader()
_, serialized_example = reader.read(filename_queue)   #返回文件名和文件
features = tf.parse_single_example(serialized_example,
                                   features={
                                       'label': tf.FixedLenFeature([], tf.int64),
                                       'img_raw' : tf.FixedLenFeature([], tf.string),
                                   })  #取出包含image和label的feature对象
image = tf.decode_raw(features['img_raw'], tf.uint8)
image = tf.reshape(image, [128, 128, 3])
label = tf.cast(features['label'], tf.int32)
with tf.Session() as sess: #开始一个会话
    init_op = tf.initialize_all_variables()
    sess.run(init_op)
    coord=tf.train.Coordinator() #创建一个协调器,管理线程
    threads= tf.train.start_queue_runners(coord=coord)#启动QueueRunner, 此时文件名队列已经进队
    for i in range(20):
        example, l = sess.run([image,label])#在会话中取出image和label
        img=Image.fromarray(example, 'RGB')#这里Image是之前提到的
        img.save( cwd +str(i)+'_''Label_'+str(l)+'.jpg')#存下图片
        print(example, l)
    coord.request_stop()
    coord.join(threads)
读取tfrecord格式到图片时,根据之前保存的原图片的通道数(一般channels=3或1),选择'RGB'或者'L'
example, l = sess.run([image,label])#在会话中取出image和label
img=Image.fromarray(example, 'RGB')#这里Image是之前提到的结果:
RGB:
结果:
