cpu虚拟:
- 宿主机:按时间切割
- 虚拟机:用软件虚拟cpu,主要模拟环0(接口,运行在真正cpu上程序)
硬件技术:缓存通过tagged tlb区分虚拟机和宿主机
虚拟化:cpu模拟环0,保持环3 (模拟环0并不高效)
- 完全虚拟化: 宿主机运行于环-1 虚拟机运行于环0
- 半(准)虚拟化 (para-virt):cpu不用环-1 环0部分虚拟化(区分宿主机跟虚拟机) 环3全部能用
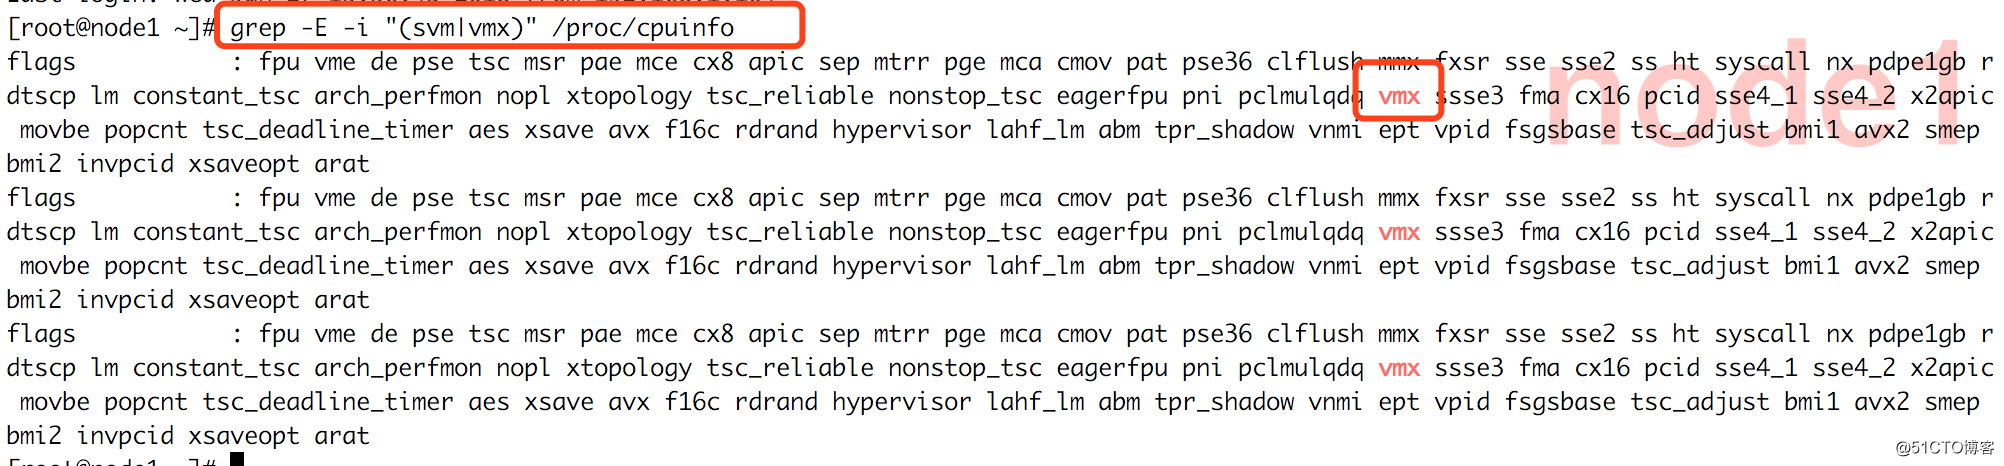
硬件虚拟化cpu 支持(AMD-V/inter-VT):通过环 -1 实现,宿主机的内核运行在环-1,虚拟机的内核运行在环0上
内存:
1.宿主机:通过MMU 技术映射内存 ,MMU是硬件技术
2.虚拟机: 内存映射需要 shadowMMU 技术来映射虚拟内存地址到真正内存地址,shadowMMU是软件技术
硬件:Intel: EPT, Extended Page Table,AMD: NPT, Nested Page Table 代替shadowMMU映射
硬盘:
1.宿主机:分区,文件系统模式。
2.虚拟机:用文件模拟磁盘,半虚拟化,提升效率,告诉自己的文件系统说当前不是真正意义的磁盘,通过二次转发存到宿主机磁盘。
网络:
1.宿主机:按时间分割。
2.虚拟机:略复杂,不光虚拟网络接口,还要虚拟网络。半虚拟化加速。(透传最快,但是不适合迁移,所以一般都是用半虚拟化)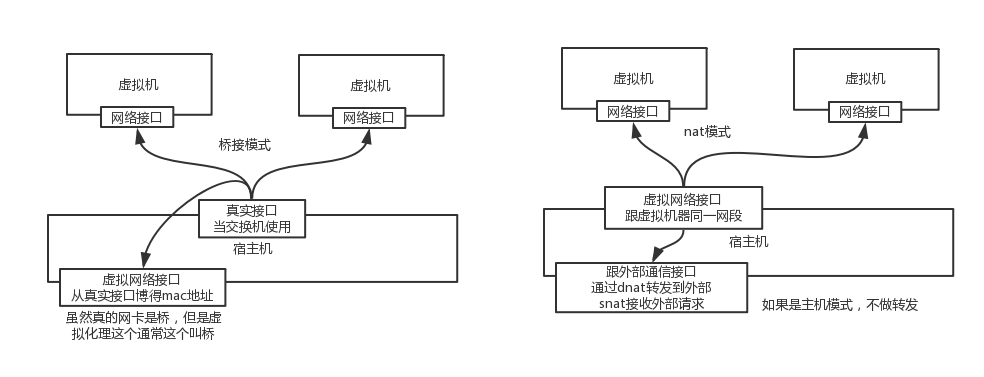

xen与kvm比较
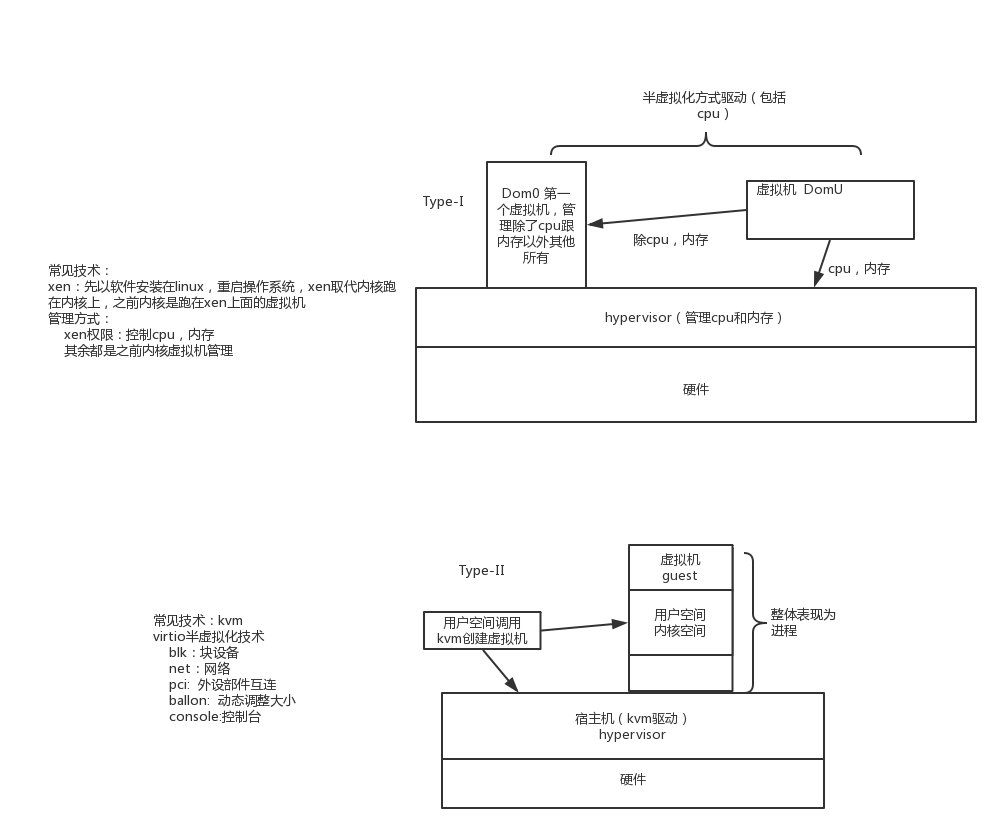
kvm 硬件依赖
虚拟机需要cpu必须是x86_64架构,必须支持Intel VT或者AMD AMD-v
kvm两类组件:
- (kvm.ko)/dev/kvm:工作为hypervisor,在用户空间可通过系统调用ioctl()与内核中的kvm模块交互,从而完成虚拟机的创建、启动、停止、删除等各种管理功能;
- qemu-kvm进程:工作于用户空间,用于实现IO设备模拟;用于实现一个虚拟机实例;
virsh使用
用户空间管理工具安装
[root@node1 ~]# yum -y install libvirt libvirt-daemon-kvm qemu-kvm virt-manager启动libvirtd
[root@node1 ~]# systemctl start libvirtd

[root@localhost ~]# ss -lntup|grep br
udp    UNCONN     0      0      *  %virbr0:67                    *:*                   users:(("dnsmasq",pid=1354,fd=3))
[root@localhost ~]# ip addr show virbr0   #默认是nat模式
4: virbr0: <NO-CARRIER,BROADCAST,MULTICAST,UP> mtu 1500 qdisc noqueue state DOWN qlen 1000
    link/ether 52:54:00:2b:4d:cf brd ff:ff:ff:ff:ff:ff
    inet 192.168.122.1/24 brd 192.168.122.255 scope global virbr0
       valid_lft forever preferred_lft forever
创建桥设备
[root@localhost ~]# virsh help iface-bridge
[root@node1 ~]# virsh iface-bridge ens34 virbr1
#如果创建失败,手动编辑
[root@localhost ~]# cat /etc/sysconfig/network-scripts/ifcfg-virbr1
DEVICE="virbr1"
ONBOOT="no"
TYPE="Bridge"
BOOTPROTO="none"
IPADDR="192.168.1.199"
NETMASK="255.255.255.0"
GATEWAY="192.168.1.1"
IPV6INIT="yes"
IPV6_AUTOCONF="yes"
DHCPV6C="no"
STP="on"
DELAY="0"

[root@localhost ~]# ip a virbr1
Command "virbr1" is unknown, try "ip address help".
[root@localhost ~]# ip addr show  virbr1
6: virbr1: <NO-CARRIER,BROADCAST,MULTICAST,UP> mtu 1500 qdisc noqueue state DOWN qlen 1000
    link/ether 82:8b:a5:4e:fa:87 brd ff:ff:ff:ff:ff:ff
    inet 192.168.1.199/24 brd 192.168.1.255 scope global virbr1
       valid_lft forever preferred_lft forever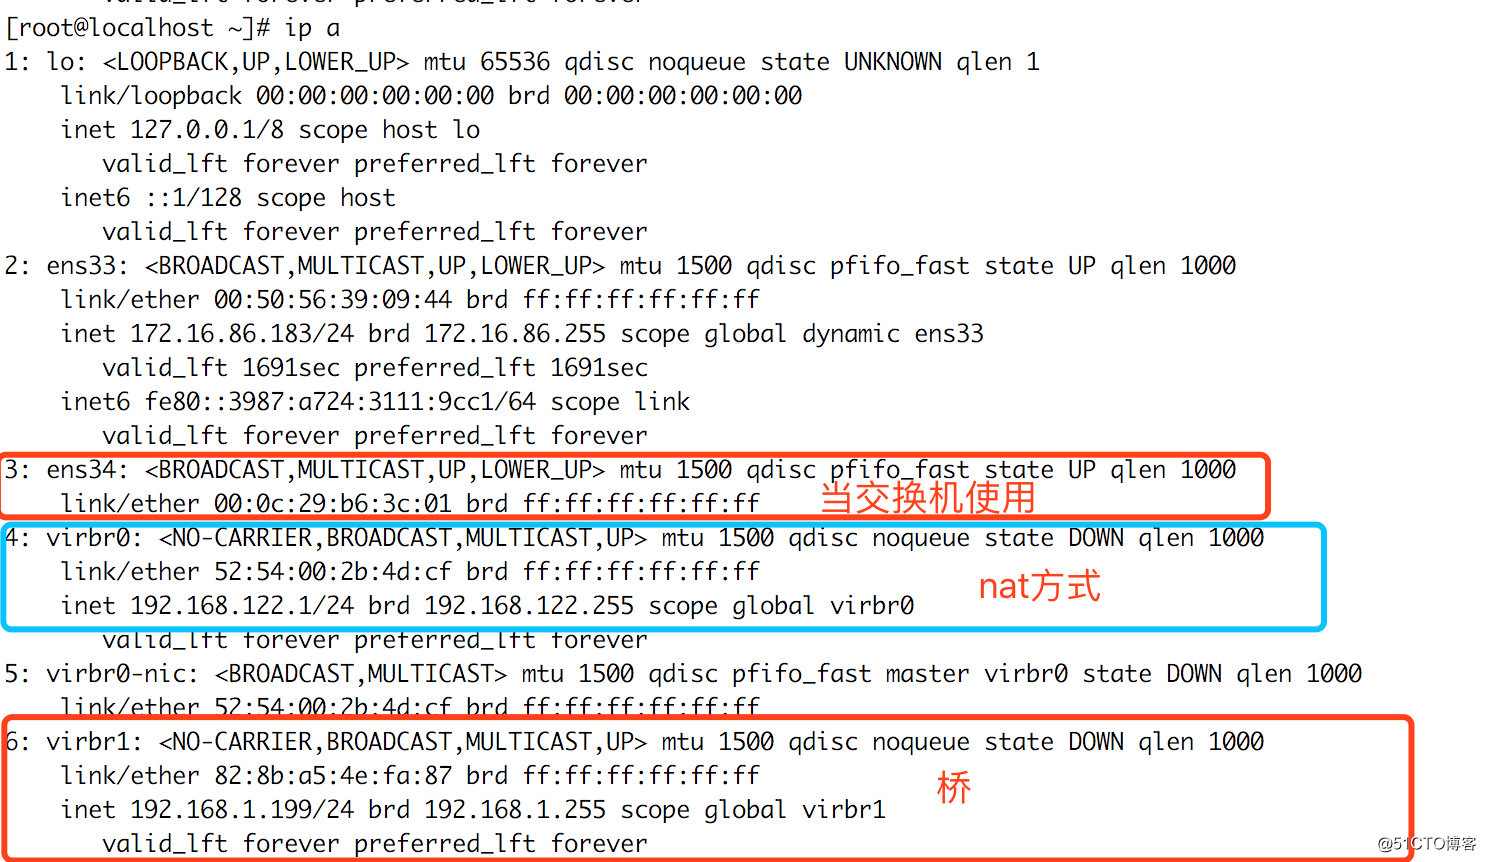
图形化创建: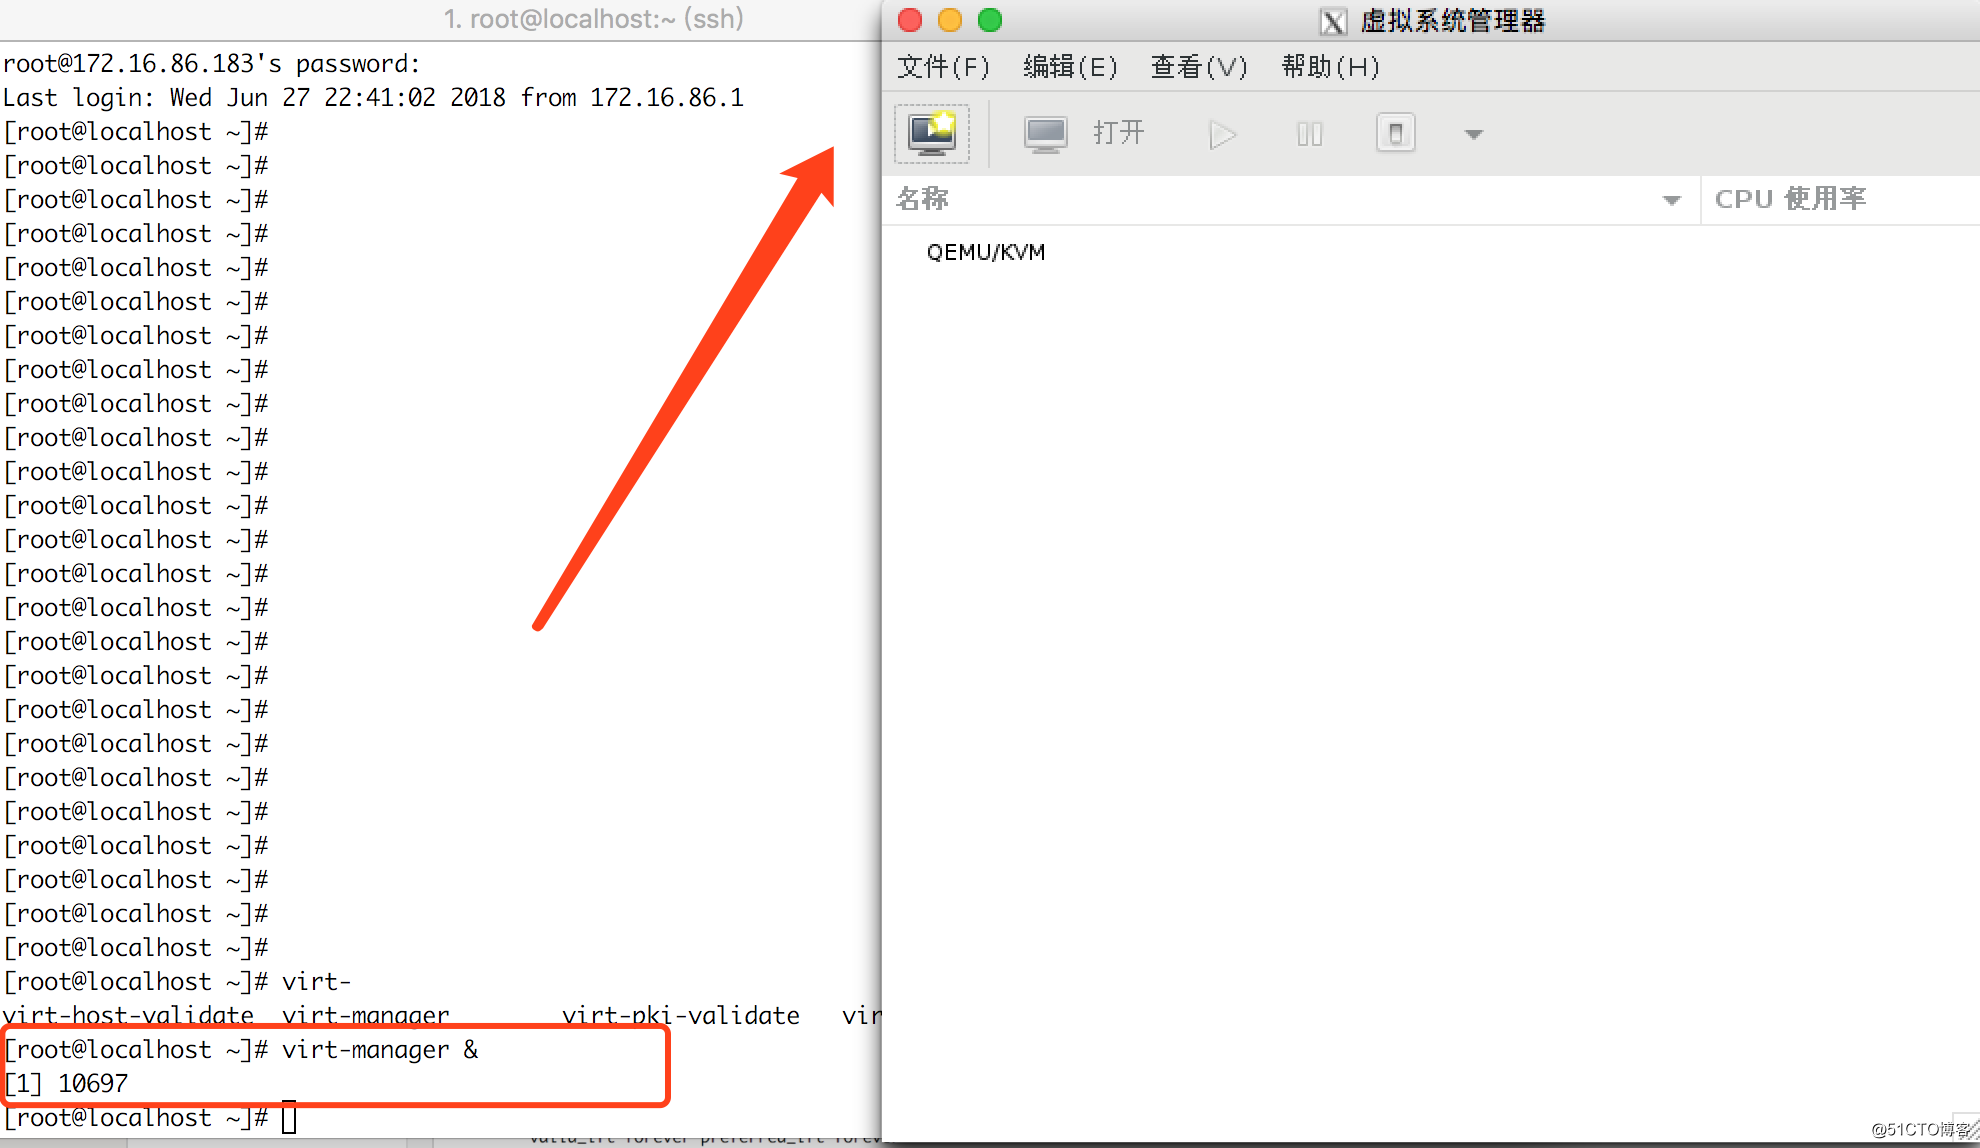
获取帮助
[root@localhost images]# virsh help所有主机状态查看
[root@localhost images]# virsh list --all
 Id    名称                         状态
----------------------------------------------------
 -     c1                             关闭
启动并连接
[root@localhost images]# virsh start c1 --console #可以用机器名 也可以是id,都是唯一脱离
control+]再次连接
[root@localhost images]# virsh list
Id 名称 状态
----------------------------------------------------
7 c1 running
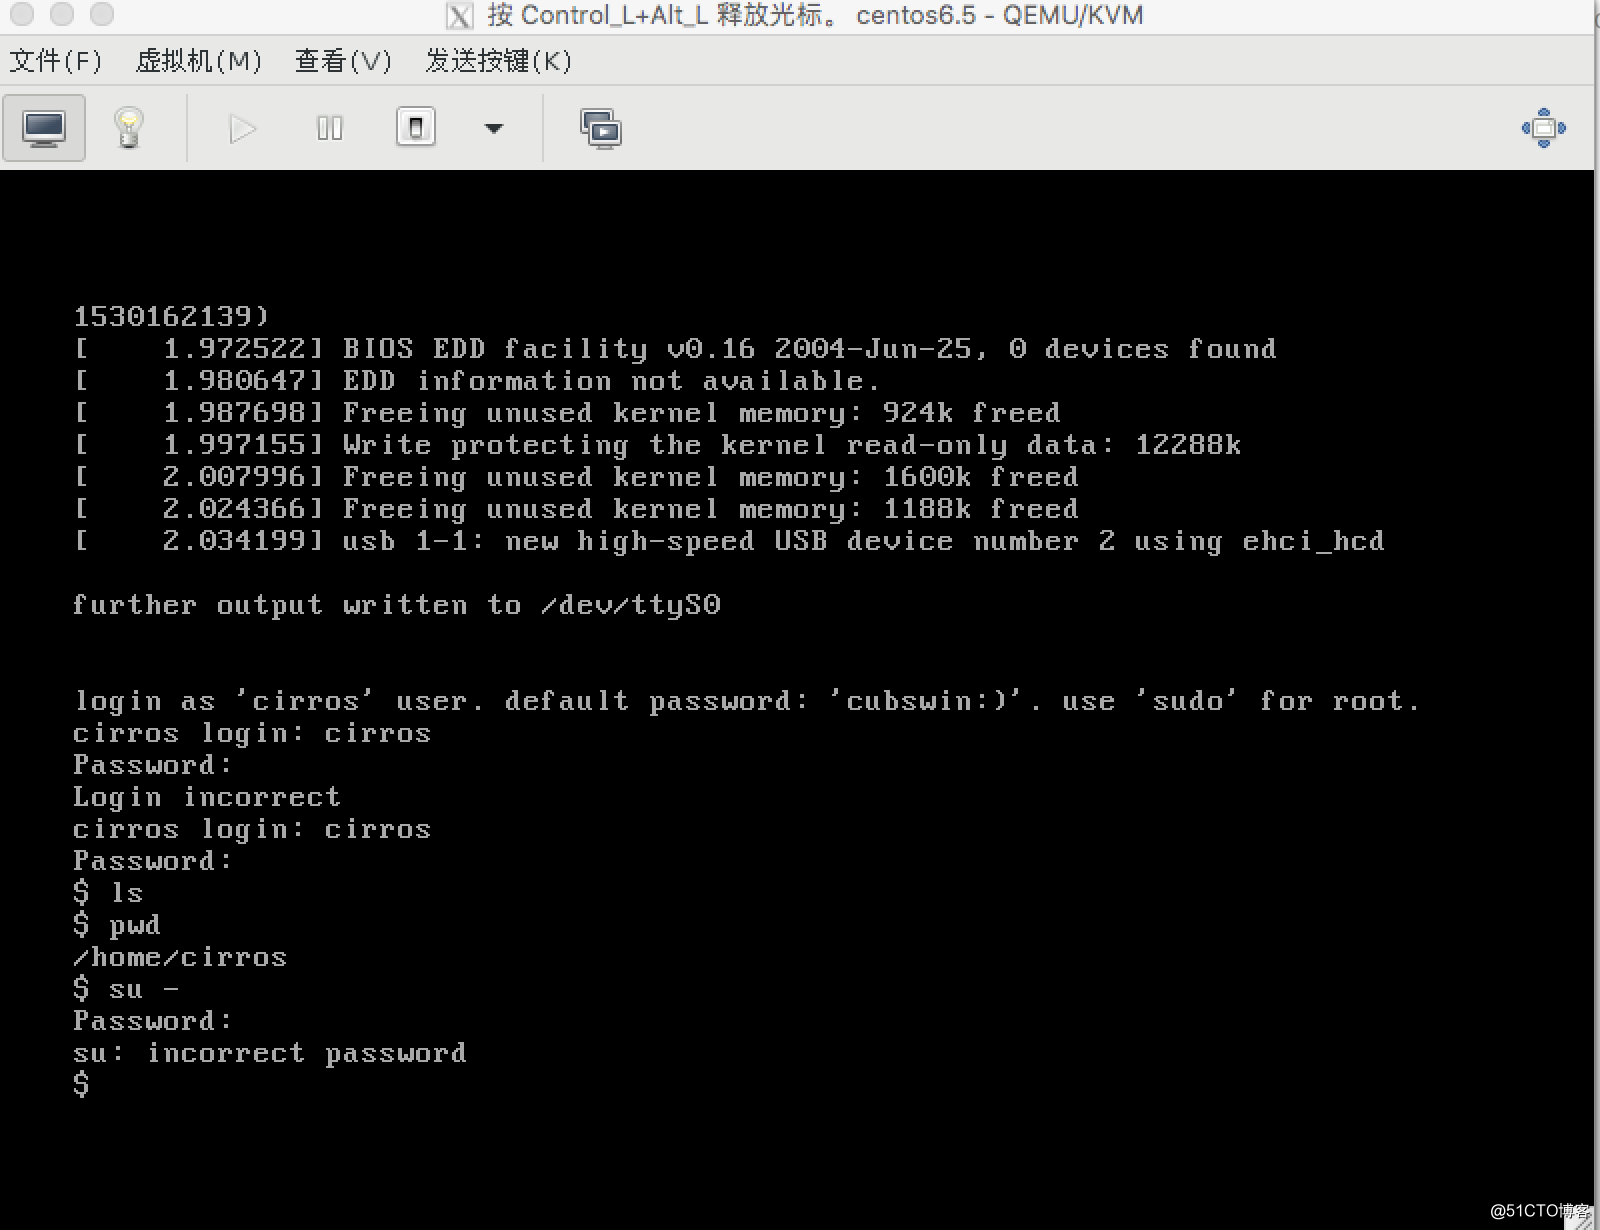
[root@localhost images]# virsh console c1
连接到域 c1
换码符为 ^]正常关机
[root@localhost images]# virsh shutdown #id强行关机
[root@localhost images]# virsh destroy #id配置文件(基于配置文件做复制)
[root@localhost images]# virsh dumpxml 7   配置文件
[root@localhost images]# cd /etc/libvirt/qemu/
[root@localhost qemu]# ls
c1.xml  networks

[root@localhost qemu]# cp c1.xml /root/c2.xml
[root@localhost qemu]# vim /root/c2.xml
<name>c2</name>
<uuid>0cfe85a0-e6b9-41f1-b718-86fb8c620b8c</uuid>
<mac address='52:54:00:7a:33:65'/>
<source file='/root/cirros2.img'/>

 [root@localhost qemu]# virsh define /root/c2.xml
 [root@localhost qemu]# virsh list --all
 Id    名称                         状态
----------------------------------------------------
 7     c1                             running
 -     c2                             关闭

 [root@localhost qemu]# virsh start c2
 [root@localhost qemu]# virsh list --all
 Id    名称                         状态
----------------------------------------------------
 7     c1                             running
 8     c2                             running
磁盘添加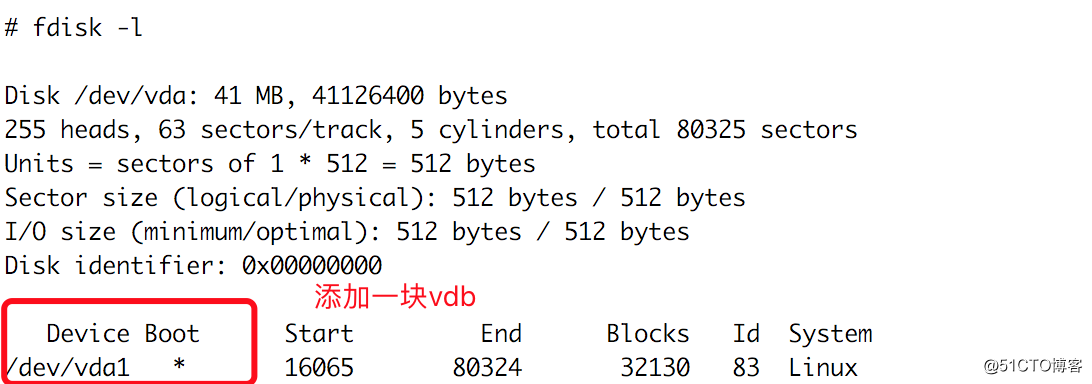
[root@localhost qemu]# qemu-img create -f qcow2 -o preallocation=metadata,size=5G /vms/cirros/newdisk.qcow2
Formatting '/vms/cirros/newdisk.qcow2', fmt=qcow2 size=5368709120 encryption=off cluster_size=65536 preallocation='metadata' lazy_refcounts=off
[root@localhost qemu]# virsh attach-disk c2 /vms/cirros/newdisk.qcow2 vdb
成功附加磁盘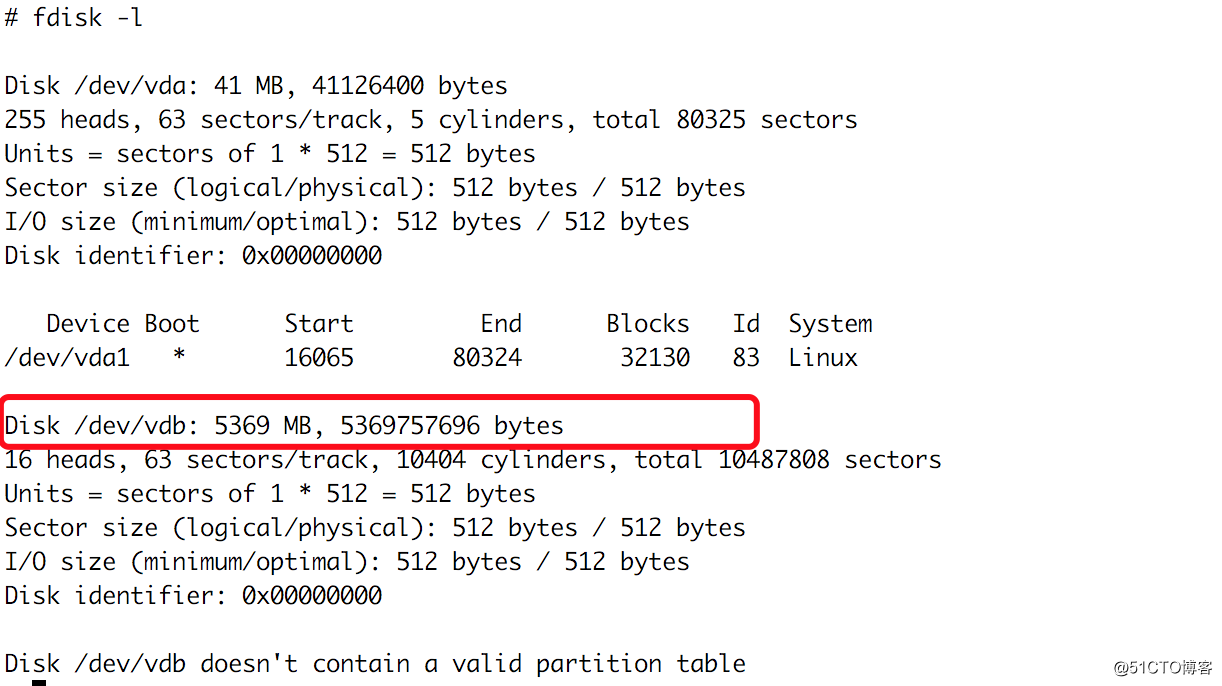
查看
[root@localhost ~]# virsh domblklist c2
目标     源
------------------------------------------------
vda        /root/cirros2.img
vdb        /vms/cirros/newdisk.qcow2
拆除磁盘
[root@localhost ~]# virsh detach-disk c2 vdb
成功分离磁盘

[root@localhost ~]# virsh domblklist c2
目标     源
------------------------------------------------
vda        /root/cirros2.img
qemu-kvm使用
[root@node1 ~]# ln -sv /usr/libexec/qemu-kvm /usr/bin/创建磁盘获取帮助
[root@localhost ~]# qemu-img info /vms/images/cirros.img
image: /vms/images/cirros.img
file format: qcow2
virtual size: 39M (41126400 bytes)
disk size: 13M
cluster_size: 65536
Format specific information:
    compat: 0.10
创建磁盘
[root@localhost ~]# qemu-img create -f qcow2 -o preallocation=metadata  /vms/centos/centos7.img
[root@localhost ~]# qemu-img create -f qcow2 -o preallocation=metadata,size=5G  /vms/centos/centos7.img
Formatting '/vms/centos/centos7.img', fmt=qcow2 size=5368709120 encryption=off cluster_size=65536 preallocation='metadata' lazy_refcounts=off
查看大小
[root@localhost centos]# ll -h /vms/centos/centos7.img
-rw-r--r--. 1 root root 5.1G 6月  28 03:00 /vms/centos/centos7.img
[root@localhost centos]# du -h centos7.img
1.3M    centos7.img  #实际大小
查看虚拟磁盘信息
[root@localhost centos]# qemu-img info centos7.img
image: centos7.img
file format: qcow2
virtual size: 5.0G (5368709120 bytes)
disk size: 1.3M
cluster_size: 65536
Format specific information:
    compat: 1.1
    lazy refcounts: false
图形化启动
[root@localhost vms]# qemu-kvm -name centos -m 512 -cpu host -smp 1,cores=2 -drive file=/vms/centos/centos7.img,if=virtio,media=disk,cache=writeback,format=qcow2 -drive file=/vms/iso/centos-75.iso,media=cdrom -boot order=dc,once=d -vnc :0
[root@localhost vms]# yum -y install tigervnc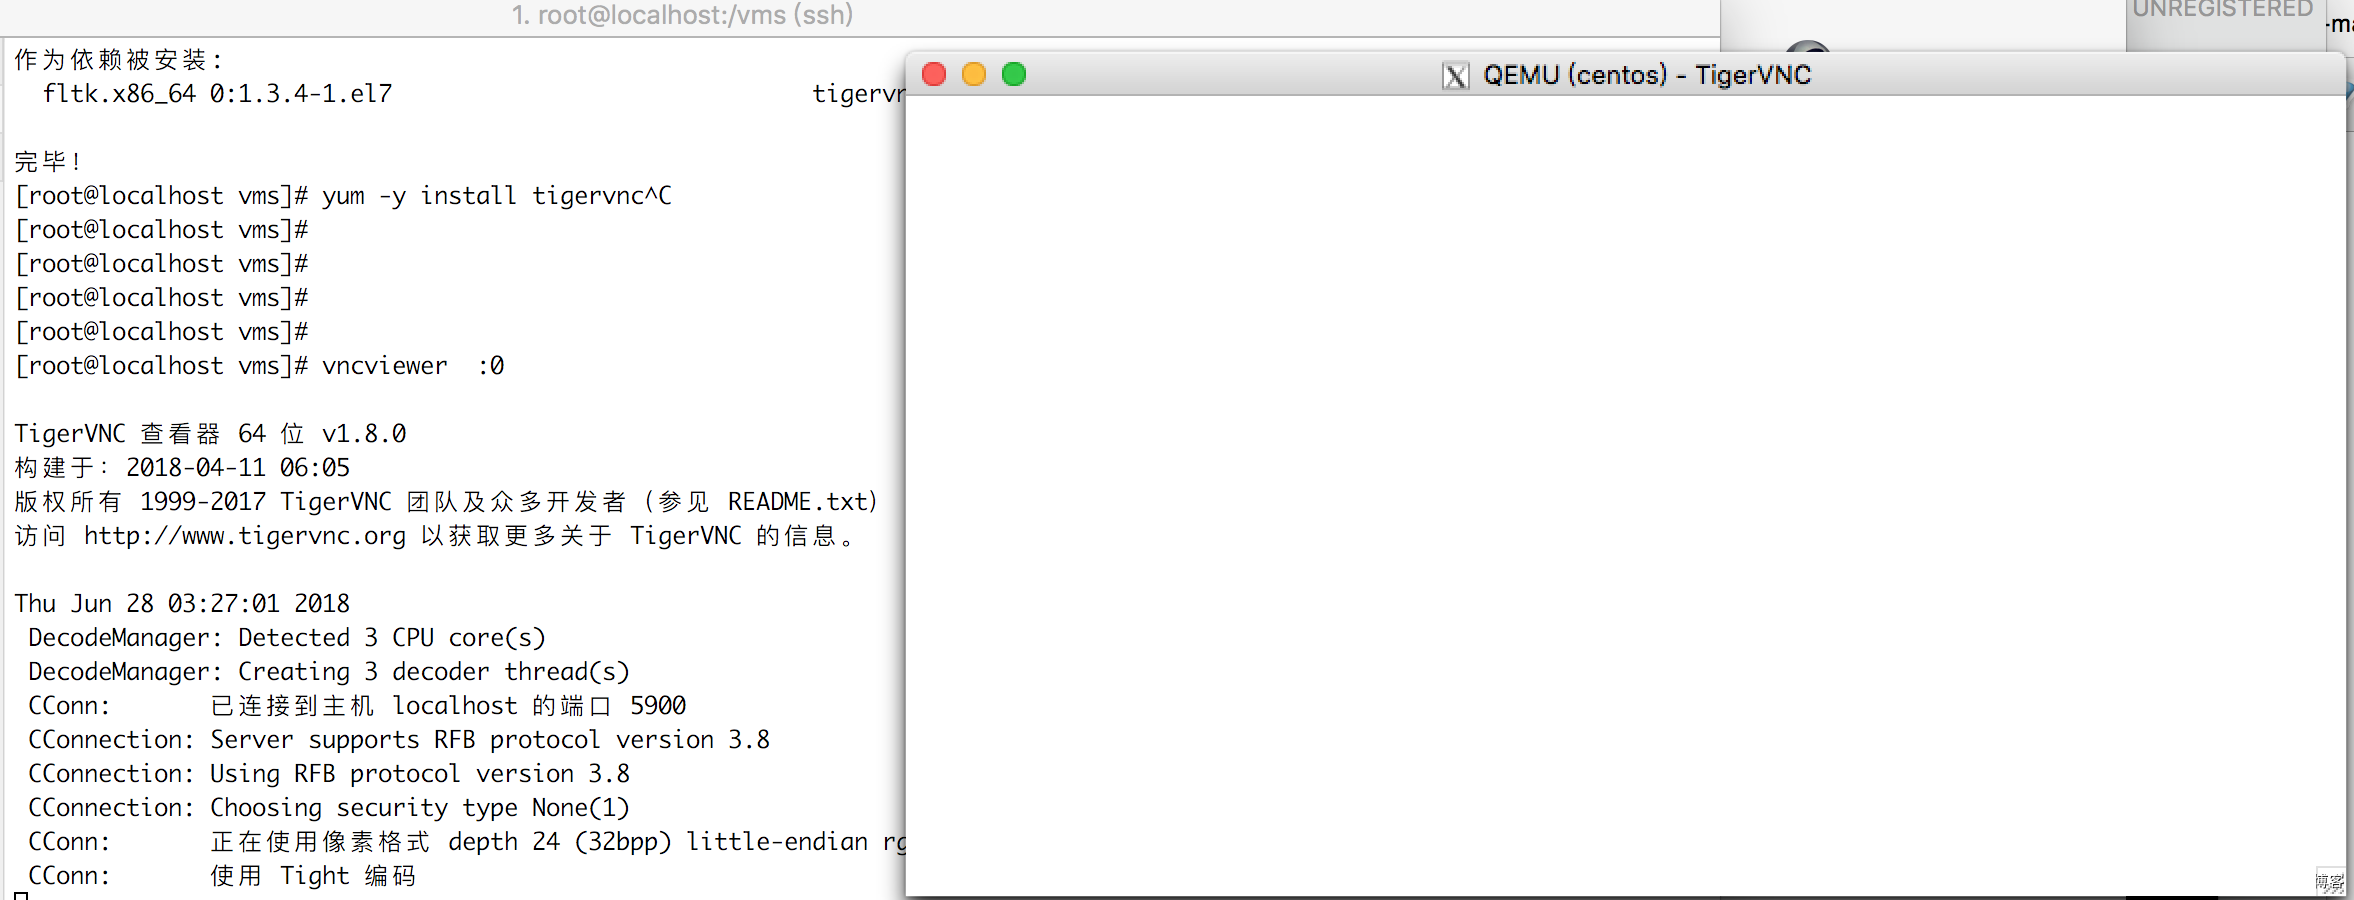
虚拟网络创建:(每一个虚拟都要创建2个网络接口,一个在宿主机上一个连接虚拟机)
[root@localhost vms]# brctl addbr br-int
[root@localhost vms]# ip link set br-int up
[root@localhost vms]# ip a
12: br-int: <BROADCAST,MULTICAST,UP,LOWER_UP> mtu 1500 qdisc noqueue state UNKNOWN qlen 1000
    link/ether 3e:3a:9f:29:61:6f brd ff:ff:ff:ff:ff:ff
    inet6 fe80::3c3a:9fff:fe29:616f/64 scope link
       valid_lft forever preferred_lft forever
需要一个脚本
[root@localhost vms]# vim /etc/qemu-ifup
#!/bin/bash
#
bridge=br-int

if [ -n "$1" ];then
        ip link set $1 up
        sleep 1
        brctl addif $bridge $1
        [ $? -eq 0 ] && exit 0 || exit 1
else
        echo "Error: no interface specified."
        exit 1
fi

[root@localhost vms]# chmod a+x /etc/qemu-ifup
设置网络为桥接 启动2个实例
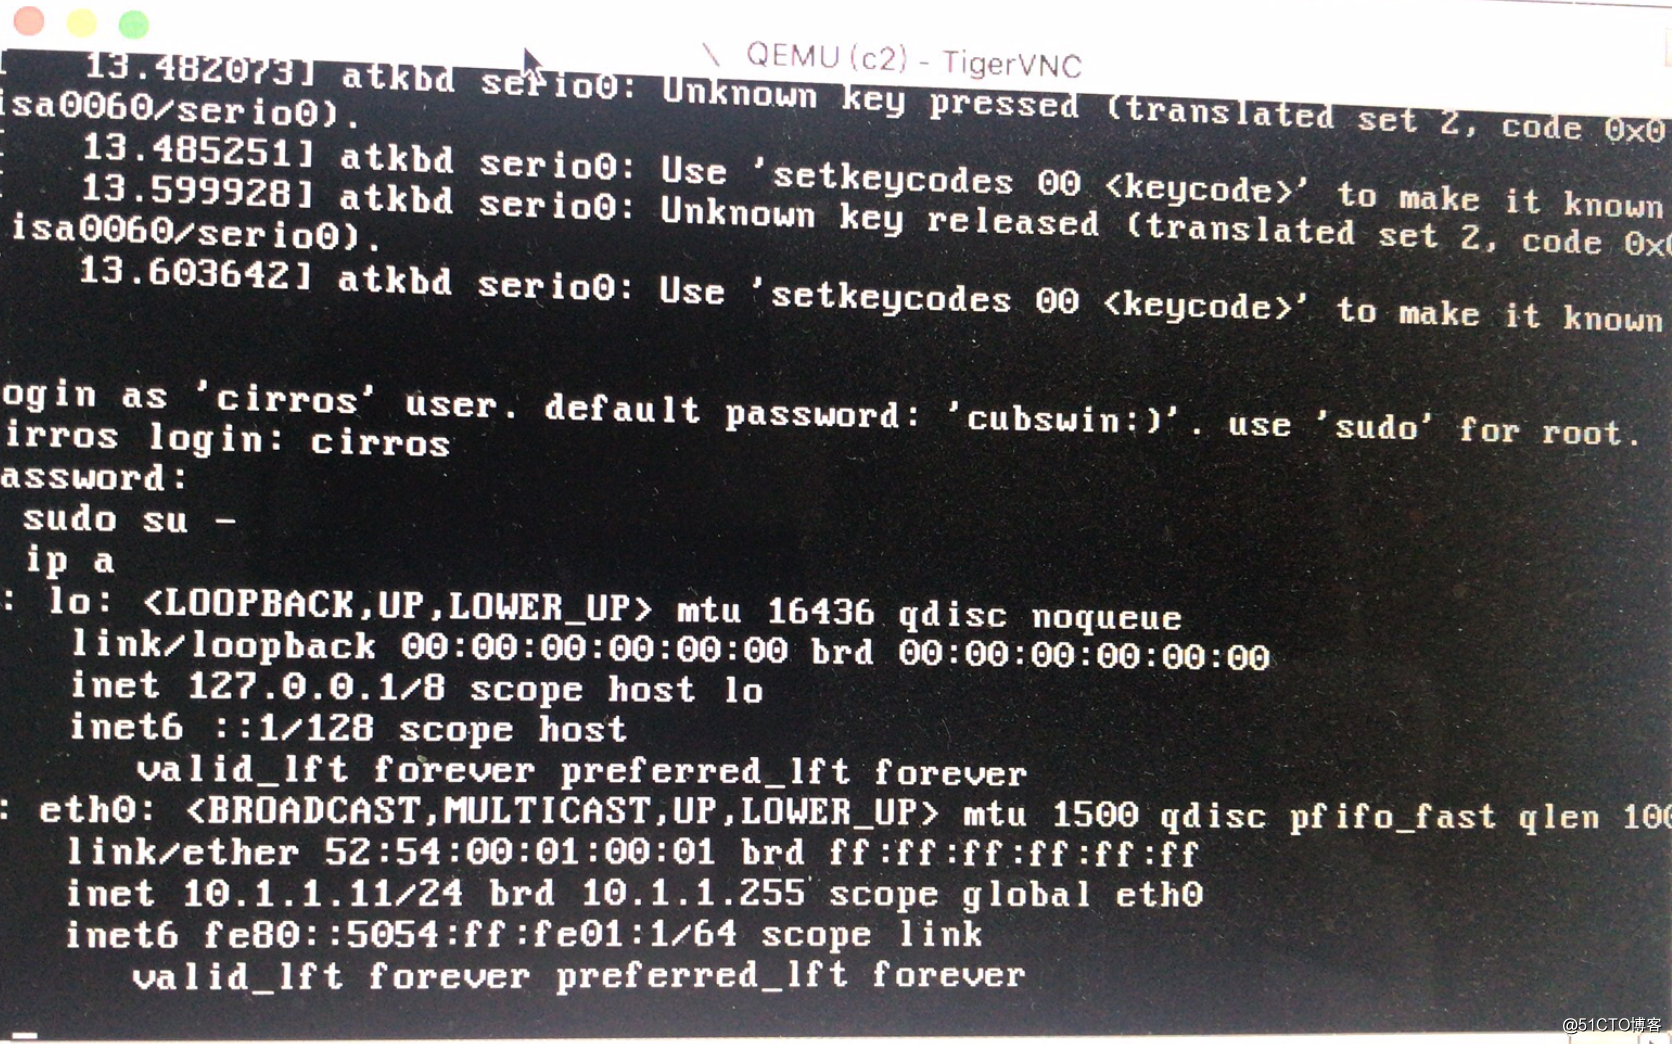
[root@localhost images]# qemu-kvm -name c1 -m 256 -smp 2 -drive file=/vms/images/cirros1.img,media=disk,if=virtio,format=qcow2 -net nic,model=virtio,macaddr=52:54:00:01:00:00 -net tap,script=/etc/qemu-ifup -vnc :0 -daemonize
[root@localhost images]# qemu-kvm -name c2 -m 256 -smp 2 -drive file=/vms/images/cirros2.img,media=disk,if=virtio,format=qcow2 -net nic,model=virtio,macaddr=52:54:00:01:00:01 -net tap,script=/etc/qemu-ifup -vnc :1 -daemonize
宿主机上留2个ip(另外两个在虚拟机中)
[root@localhost images]# brctl show
bridge name bridge id       STP enabled interfaces
br-int      8000.1eeb8ad38953   no      tap0
                            tap1
virbr0      8000.5254002b4dcf   yes     virbr0-nic
virbr1      8000.000000000000   yes

[root@localhost images]# ifconfig
tap0: flags=4163<UP,BROADCAST,RUNNING,MULTICAST>  mtu 1500
        inet6 fe80::6c2d:5fff:fe37:7495  prefixlen 64  scopeid 0x20<link>
        ether 6e:2d:5f:37:74:95  txqueuelen 1000  (Ethernet)
        RX packets 8  bytes 1132 (1.1 KiB)
        RX errors 0  dropped 0  overruns 0  frame 0
        TX packets 15  bytes 1448 (1.4 KiB)
        TX errors 0  dropped 0 overruns 0  carrier 0  collisions 0

tap1: flags=4163<UP,BROADCAST,RUNNING,MULTICAST>  mtu 1500
        inet6 fe80::1ceb:8aff:fed3:8953  prefixlen 64  scopeid 0x20<link>
        ether 1e:eb:8a:d3:89:53  txqueuelen 1000  (Ethernet)
        RX packets 7  bytes 800 (800.0 B)
        RX errors 0  dropped 0  overruns 0  frame 0
        TX packets 8  bytes 648 (648.0 B)
        TX errors 0  dropped 0 overruns 0  carrier 0  collisions 0
虚拟机: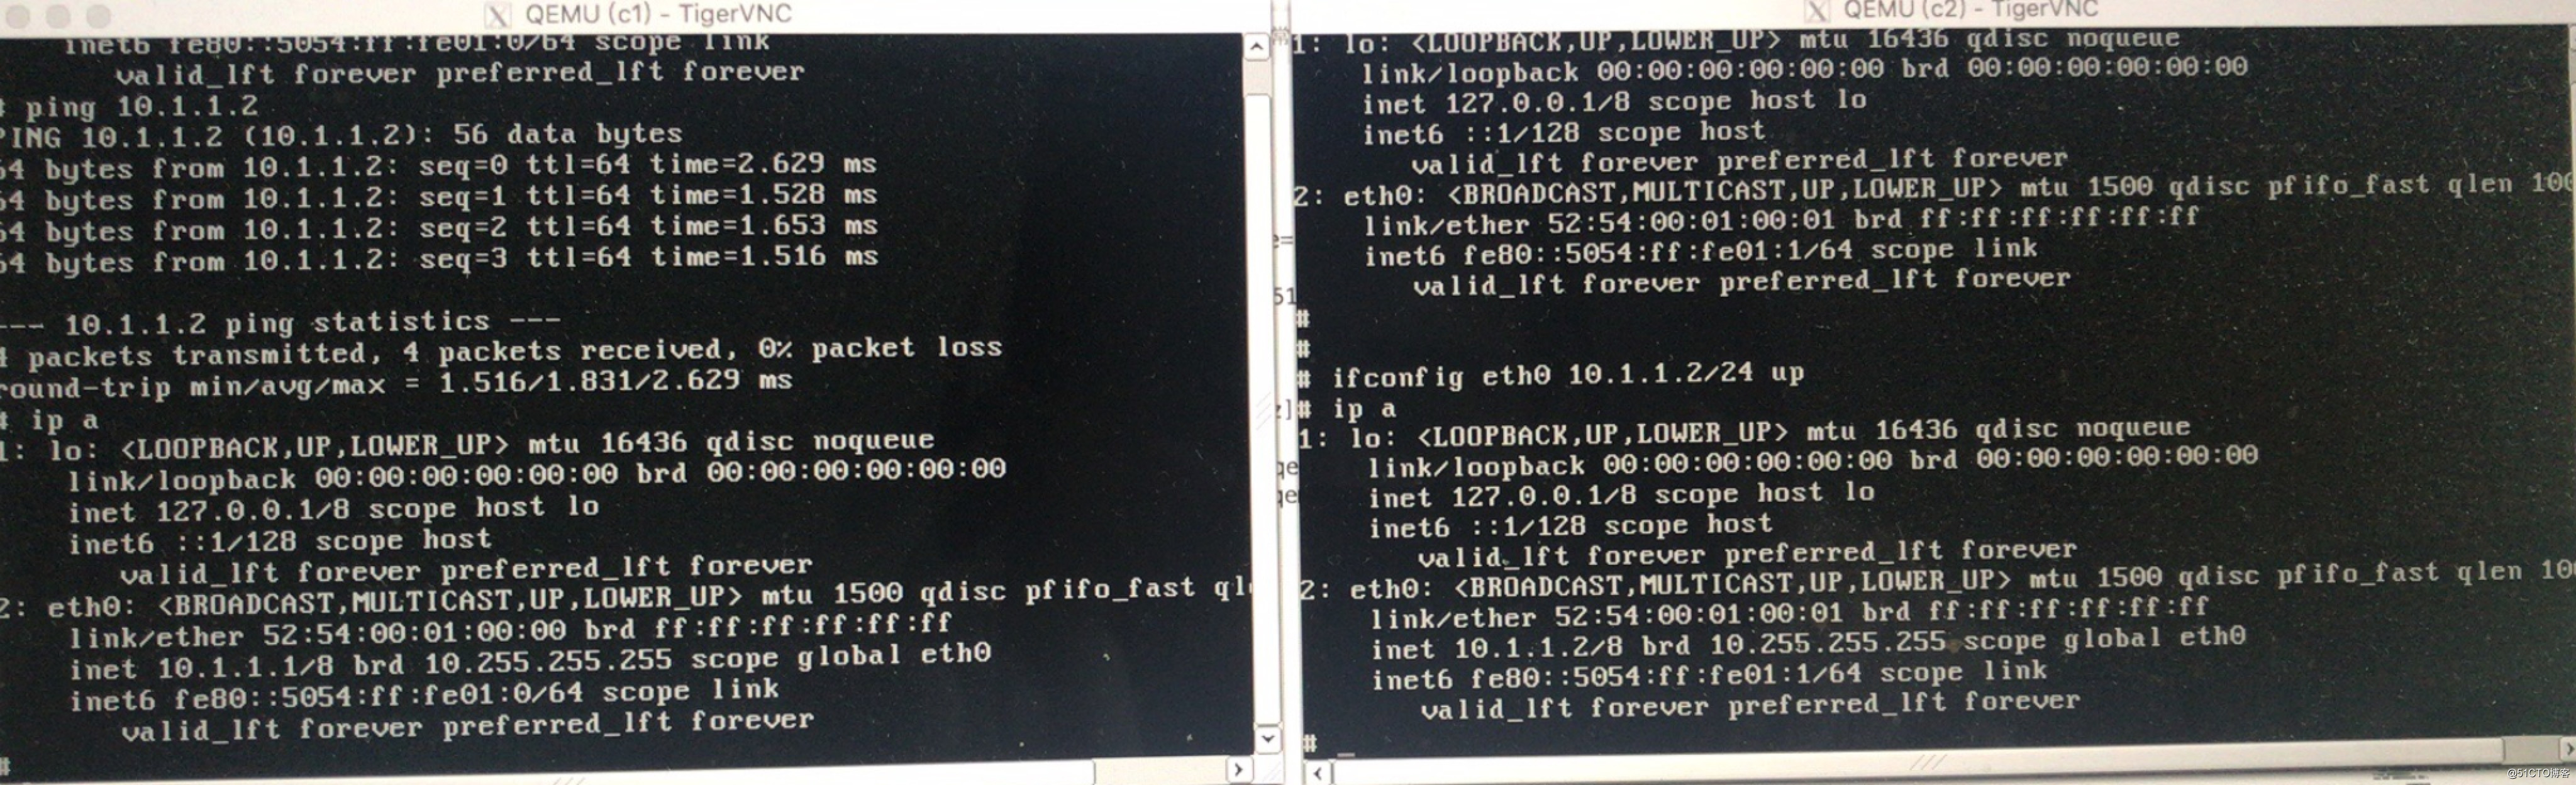
宿主机设置网络:
[root@localhost images]# ifconfig br-int 10.1.1.254/24 up相当于这三个网络在同一物理环境中
dhcp
[root@localhost images]# yum install dnsmasq

#创建ip队
[root@localhost images]# ip link add vethy.1 type veth peer name vethy.2
[root@localhost images]# ifconfig vethy.1 up

一半添加到交换机中
[root@localhost images]# brctl addif br-int vethy.1
[root@localhost images]# brctl show
bridge name bridge id       STP enabled interfaces
br-int      8000.1eeb8ad38953   no      tap0
                            tap1
                            vethy.1
另外一半添加到一个名称空间中,并且启动dhcp
[root@localhost images]# ip netns add dhcpsrv
[root@localhost images]# ip link set dev vethy.2 netns dhcpsrv
[root@localhost images]# ip netns exec dhcpsrv ifconfig  vethy.2 10.1.1.253/24 up
[root@localhost images]# ip netns exec dhcpsrv ifconfig vethy.2
vethy.2: flags=4163<UP,BROADCAST,RUNNING,MULTICAST>  mtu 1500
        inet 10.1.1.253  netmask 255.255.255.0  broadcast 10.1.1.255
        inet6 fe80::8ee:dcff:fe38:9eaf  prefixlen 64  scopeid 0x20<link>
        ether 0a:ee:dc:38:9e:af  txqueuelen 1000  (Ethernet)
        RX packets 8  bytes 648 (648.0 B)
        RX errors 0  dropped 0  overruns 0  frame 0
        TX packets 8  bytes 648 (648.0 B)
        TX errors 0  dropped 0 overruns 0  carrier 0  collisions 0
[root@localhost images]# ip netns exec dhcpsrv dnsmasq  -F 10.1.1.11,10.1.1.100 -O 3,10.1.1.254

重启虚拟机