Form介绍
我们之前在HTML页面中利用form表单向后端提交数据时,都会写一些获取用户输入的标签并且用form标签把它们包起来。
与此同时我们在好多场景下都需要对用户的输入做校验,比如校验用户是否输入,输入的长度和格式等正不正确。如果用户输入的内容有错误就需要在页面上相应的位置显示对应的错误信息.。
Django form组件就实现了上面所述的功能。
总结一下,其实form组件的主要功能如下:
- 生成页面可用的HTML标签(注意只能生成获取用户输入的input标签)
- 对用户提交的数据进行校验,并返回错误提示信息
- 在页面中保留用户上次输入内容
不用Form组件实现的登录
views.py


def login(request):
    error_msg = ""
    if request.method == "POST":
        username = request.POST.get("username")
        pwd = request.POST.get("pwd")
        if username == "Q1mi" and pwd == "123456":
            return HttpResponse("OK")
        else:
            error_msg = "用户名或密码错误"
    return render(request, "login.html", {"error_msg": error_msg})
login.html
<!DOCTYPE html>
<html lang="en">
<head>
  <meta charset="UTF-8">
  <meta http-equiv="x-ua-compatible" content="IE=edge">
  <meta name="viewport" content="width=device-width, initial-scale=1">
  <title>login</title>
  <style>
    .error {
      color: red;
    }
  </style>
</head>
<body>
<form action="/login/" method="post">
  {% csrf_token %}
  <p>
    <label for="username">用户名</label>
    <input type="text" name="username" id="username">
  </p>
  <p>
    <label for="pwd">密码</label>
    <input type="password" name="pwd" id="pwd">
    <span class="error"></span>
  </p>
  <p>
    <input type="submit">
    <span class="error">{{ error_msg }}</span>
  </p>
</form>
</body>
</html>
使用form组件
views.py
先定义好一个RegForm类。

对应的视图函数
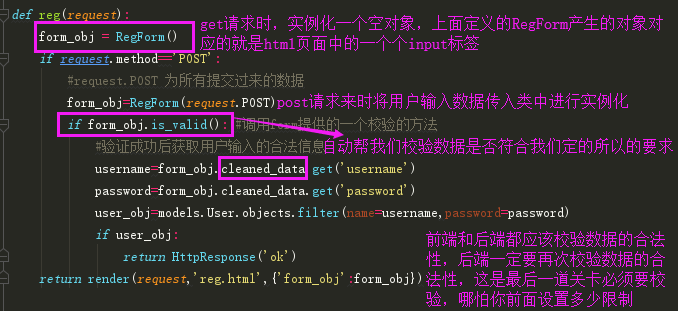
reg.html

浏览器上的测试效果也验证了我们上面说的form组件功能
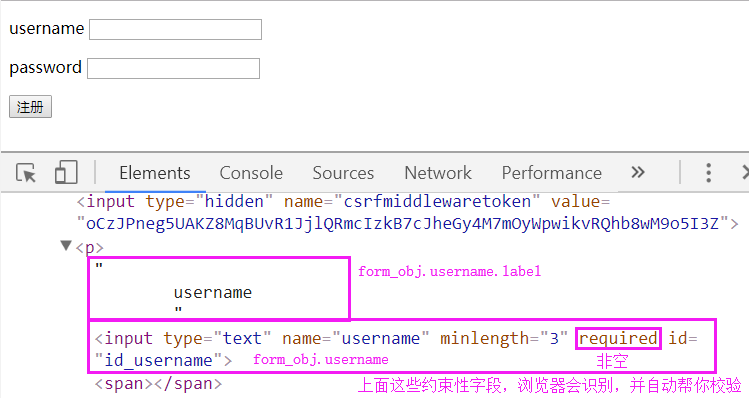
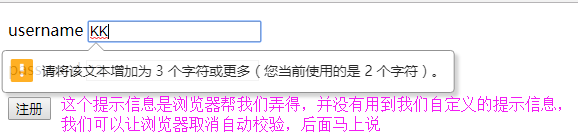
浏览器自动校验效果样式
取消浏览器自动校验提醒功能方法
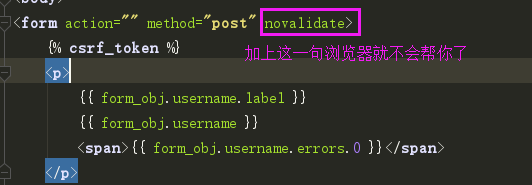
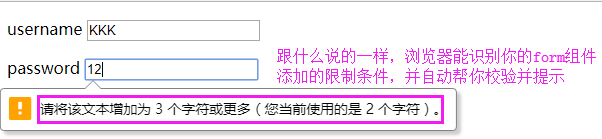
下面来看看,没有浏览器的自动交易和提示信息,我们自定义的提示能否生效(对比上面的views.py视图中的代码)
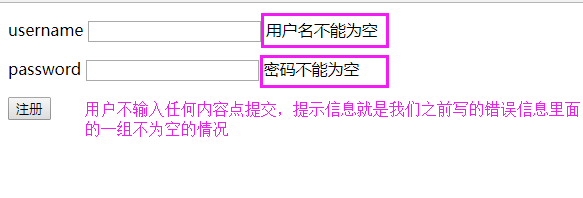
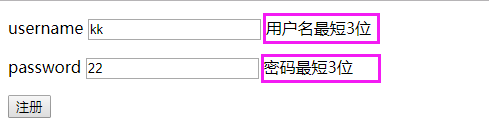
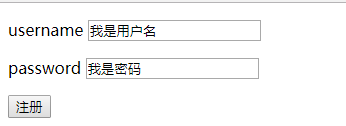
看网页效果发现 也验证了form的功能:
• 前端页面是form类的对象生成的 -->生成HTML标签功能
• 当用户名和密码输入为空或输错之后 页面都会提示 -->用户提交校验功能
• 当用户输错之后 再次输入 上次的内容还保留在input框 -->保留上次输入内容
Form那些事儿
常用字段与插件
创建Form类时,主要涉及到 【字段】 和 【插件】,字段用于对用户请求数据的验证,插件用于自动生成HTML;
initial
初始值,input框里面的初始值。
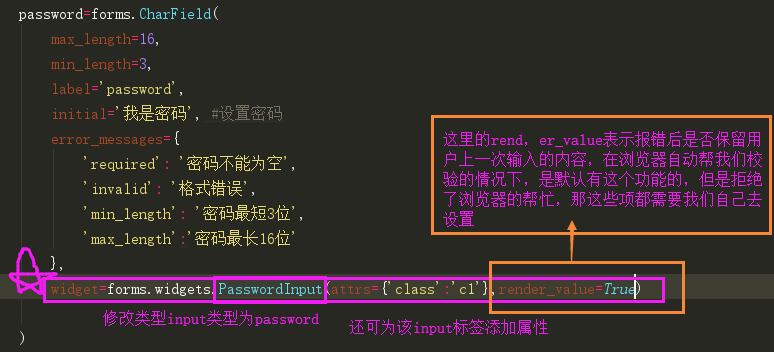
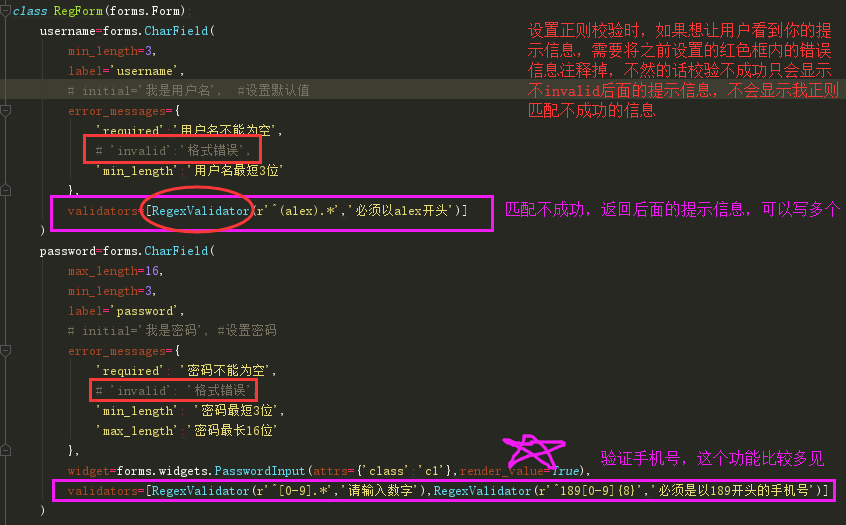
class RegForm(forms.Form):
    username=forms.CharField(
        min_length=3,
        label='username',
        initial='我是用户名',  #设置默认值
        error_messages={
            'required':'用户名不能为空',
            'invalid':'格式错误',
            'min_length':'用户名最短3位'
        }
    )
    password=forms.CharField(
        max_length=16,
        min_length=3,
        label='password',
        initial='我是密码', #设置密码
        error_messages={
            'required': '密码不能为空',
            'invalid': '格式错误',
            'min_length': '密码最短3位',
            'max_length':'密码最长16位'
        }
    )
error_messages
重写错误信息。
看上面的截图
password
我们知道密码这一项用户输入对应的页面上应该是密文展示,而form组件默认都是text文本类型,这里需要引入forms模块下面的widgets插件来帮我们做进一步的修饰
radioSelect
单radio值为字符串
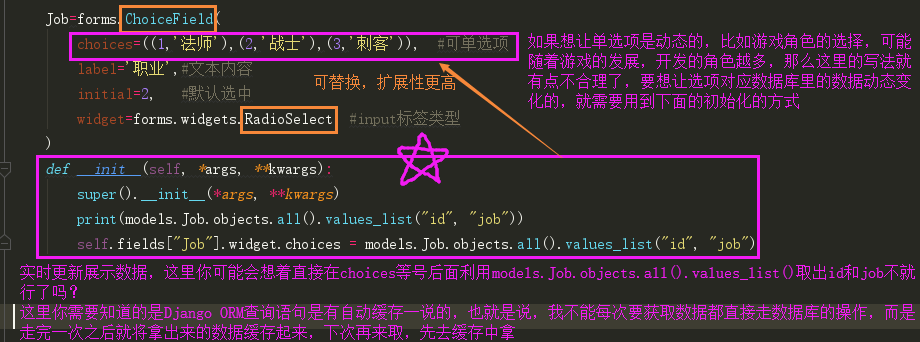
即models.类名.objects.all()这句话是惰性语句,只有你用的时候才会去执行,光写这一句是不会有任何操作的,图片中最后一句没有.widgets
多选Select
单选checkbox
class LoginForm(forms.Form):
    ...
    keep = forms.fields.ChoiceField(
        label="是否记住密码",
        initial="checked",
        widget=forms.widgets.CheckboxInput
    )
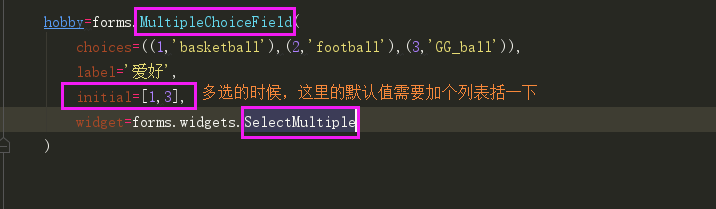
多选checkbox
class LoginForm(forms.Form):
    ...
    hobby = forms.fields.MultipleChoiceField(
        choices=((1, "篮球"), (2, "足球"), (3, "双色球"),),
        label="爱好",
        initial=[1, 3],
        widget=forms.widgets.CheckboxSelectMultiple
    )
关于choice的注意事项
在使用选择标签时,需要注意choices的选项可以从数据库中获取,但是由于是静态字段 ***获取的值无法实时更新***,那么需要自定义构造方法从而达到此目的。
方式一:
Job=forms.ChoiceField(
        choices=((1,'法师'),(2,'战士'),(3,'刺客')),  #可单选项
        label='职业',#文本内容
        initial=2,   #默认选中
        widget=forms.widgets.RadioSelect  #input标签类型
    )
    def __init__(self, *args, **kwargs):
        super().__init__(*args, **kwargs)
        self.fields["Job"].widget.choices = models.Job.objects.all().values_list("id", "job")
方式二:
from django import forms
from django.forms import fields
from django.forms import models as form_model


class FInfo(forms.Form):
    authors = form_model.ModelMultipleChoiceField(queryset=models.NNewType.objects.all())
    # authors = form_model.ModelChoiceField(queryset=models.NNewType.objects.all())
常用字段
Field
    required=True,               是否允许为空
    widget=None,                 HTML插件
    label=None,                  用于生成Label标签或显示内容
    initial=None,                初始值
    help_text='',                帮助信息(在标签旁边显示)
    error_messages=None,         错误信息 {'required': '不能为空', 'invalid': '格式错误'}
    show_hidden_initial=False,   是否在当前插件后面再加一个隐藏的且具有默认值的插件(可用于检验两次输入是否一直)
    validators=[],               自定义验证规则
    localize=False,              是否支持本地化
    disabled=False,              是否可以编辑
    label_suffix=None            Label内容后缀


CharField(Field)
    max_length=None,             最大长度
    min_length=None,             最小长度
    strip=True                   是否移除用户输入空白

IntegerField(Field)
    max_value=None,              最大值
    min_value=None,              最小值

FloatField(IntegerField)
    ...

DecimalField(IntegerField)
    max_value=None,              最大值
    min_value=None,              最小值
    max_digits=None,             总长度
    decimal_places=None,         小数位长度

BaseTemporalField(Field)
    input_formats=None          时间格式化

DateField(BaseTemporalField)    格式:2015-09-01
TimeField(BaseTemporalField)    格式:11:12
DateTimeField(BaseTemporalField)格式:2015-09-01 11:12

DurationField(Field)            时间间隔:%d %H:%M:%S.%f
    ...

RegexField(CharField)
    regex,                      自定制正则表达式
    max_length=None,            最大长度
    min_length=None,            最小长度
    error_message=None,         忽略,错误信息使用 error_messages={'invalid': '...'}

EmailField(CharField)
    ...

FileField(Field)
    allow_empty_file=False     是否允许空文件

ImageField(FileField)
    ...
    注:需要PIL模块,pip3 install Pillow
    以上两个字典使用时,需要注意两点:
        - form表单中 enctype="multipart/form-data"
        - view函数中 obj = MyForm(request.POST, request.FILES)

URLField(Field)
    ...


BooleanField(Field)
    ...

NullBooleanField(BooleanField)
    ...

ChoiceField(Field)
    ...
    choices=(),                选项,如:choices = ((0,'上海'),(1,'北京'),)
    required=True,             是否必填
    widget=None,               插件,默认select插件
    label=None,                Label内容
    initial=None,              初始值
    help_text='',              帮助提示


ModelChoiceField(ChoiceField)
    ...                        django.forms.models.ModelChoiceField
    queryset,                  # 查询数据库中的数据
    empty_label="---------",   # 默认空显示内容
    to_field_name=None,        # HTML中value的值对应的字段
    limit_choices_to=None      # ModelForm中对queryset二次筛选

ModelMultipleChoiceField(ModelChoiceField)
    ...                        django.forms.models.ModelMultipleChoiceField


TypedChoiceField(ChoiceField)
    coerce = lambda val: val   对选中的值进行一次转换
    empty_value= ''            空值的默认值

MultipleChoiceField(ChoiceField)
    ...

TypedMultipleChoiceField(MultipleChoiceField)
    coerce = lambda val: val   对选中的每一个值进行一次转换
    empty_value= ''            空值的默认值

ComboField(Field)
    fields=()                  使用多个验证,如下:即验证最大长度20,又验证邮箱格式
                               fields.ComboField(fields=[fields.CharField(max_length=20), fields.EmailField(),])

MultiValueField(Field)
    PS: 抽象类,子类中可以实现聚合多个字典去匹配一个值,要配合MultiWidget使用

SplitDateTimeField(MultiValueField)
    input_date_formats=None,   格式列表:['%Y--%m--%d', '%m%d/%Y', '%m/%d/%y']
    input_time_formats=None    格式列表:['%H:%M:%S', '%H:%M:%S.%f', '%H:%M']

FilePathField(ChoiceField)     文件选项,目录下文件显示在页面中
    path,                      文件夹路径
    match=None,                正则匹配
    recursive=False,           递归下面的文件夹
    allow_files=True,          允许文件
    allow_folders=False,       允许文件夹
    required=True,
    widget=None,
    label=None,
    initial=None,
    help_text=''

GenericIPAddressField
    protocol='both',           both,ipv4,ipv6支持的IP格式
    unpack_ipv4=False          解析ipv4地址,如果是::ffff:192.0.2.1时候,可解析为192.0.2.1, PS:protocol必须为both才能启用

SlugField(CharField)           数字,字母,下划线,减号(连字符)
    ...

UUIDField(CharField)           uuid类型
校验
方式一(推荐):
导入:from django.core.validators import RegexValidator
方式二:
import re
from django.forms import Form
from django.forms import widgets
from django.forms import fields
from django.core.exceptions import ValidationError


# 自定义验证规则
def mobile_validate(value):
    mobile_re = re.compile(r'^(13[0-9]|15[012356789]|17[678]|18[0-9]|14[57])[0-9]{8}$')
    if not mobile_re.match(value):
        raise ValidationError('手机号码格式错误')


class PublishForm(Form):


    title = fields.CharField(max_length=20,
                            min_length=5,
                            error_messages={'required': '标题不能为空',
                                            'min_length': '标题最少为5个字符',
                                            'max_length': '标题最多为20个字符'},
                            widget=widgets.TextInput(attrs={'class': "form-control",
                                                          'placeholder': '标题5-20个字符'}))


    # 使用自定义验证规则
    phone = fields.CharField(validators=[mobile_validate, ],
                            error_messages={'required': '手机不能为空'},
                            widget=widgets.TextInput(attrs={'class': "form-control",
                                                          'placeholder': u'手机号码'}))

    email = fields.EmailField(required=False,
                            error_messages={'required': u'邮箱不能为空','invalid': u'邮箱格式错误'},
                            widget=widgets.TextInput(attrs={'class': "form-control", 'placeholder': u'邮箱'}))
补充进阶
应用Bootstrap样式
首先我们要清除一点的是,使用Bootstrap的样式,无非是属性的添加,那么在form组件中,如何给我们自定义的字段添加属性呢,用到的还是widgets
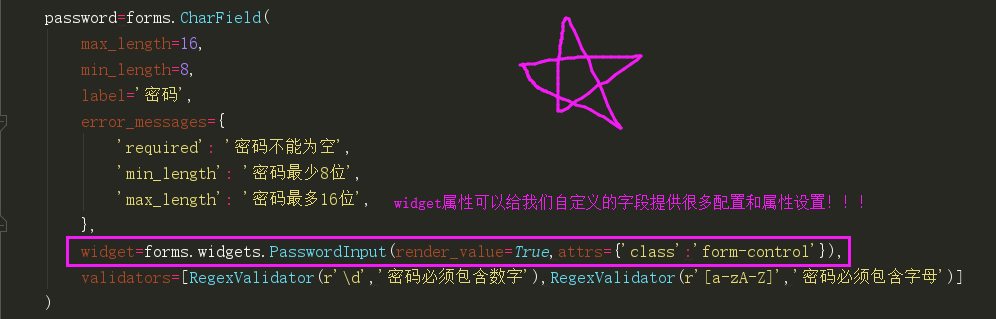
这样的话对于form组件产生的标签,我们就可以操作他的所有的属性了
<!DOCTYPE html>
<html lang="en">
<head>
    <meta charset="UTF-8">
    <title>Title</title>
    <meta name="viewport" content="width=device-width, initial-scale=1">
    <link rel="stylesheet" href="/static/bootstrap-3.3.7/css/bootstrap.min.css">
    <link rel="stylesheet" href="/static/fontawesome/css/font-awesome.min.css">
    <link rel="stylesheet" href="/static/sweetalert/sweetalert.css">
</head>
<body>
<div class="container">
    <div class="row">
        <div class="page-header">
            <h1>博客园注册页面
                <small>技术精英的地盘</small>
            </h1>
        </div>
    </div>
    <div class="row">
        <div class="panel panel-primary">
            <div class="panel-heading">

                   <div class="row">
                        <div class="col-md-6"><h3 class="panel-title"><i class="fa fa-user-secret fa-3x" aria-hidden="true"></i></h3></div>
                       <div class="col-md-6 "><i class="fa fa-users fa-3x pull-right " aria-hidden="true"></i></div>
                   </div>

            </div>
            <div class="panel-body">
                <form class="form-horizontal" action="" method="post">
                    {% csrf_token %}
                    <div class="form-group">
                        <label for="{{ form_obj.username.id_for_label }}"
                               class="col-sm-2 control-label col-lg-push-2">{{ form_obj.username.label }}</label>
                        <div class="col-sm-4 col-lg-push-2">
                            {{ form_obj.username }}
                            <span>{{ form_obj.username.errors.0 }}</span>
                        </div>
                    </div>
                    <div class="form-group">
                        <label for="{{ form_obj.password.id_for_label }}"
                               class="col-sm-2 control-label col-lg-push-2">{{ form_obj.password.label }}</label>
                        <div class="col-sm-4 col-lg-push-2">
                            {{ form_obj.password }}
                            <span>{{ form_obj.password.errors.0 }}</span>
                        </div>
                    </div>
                    <div class="form-group">
                        <label for="{{ form_obj.confirm_password.id_for_label }}"
                               class="col-sm-2 control-label col-lg-push-2">{{ form_obj.confirm_password.label }}</label>
                        <div class="col-sm-4 col-lg-push-2">
                            {{ form_obj.confirm_password }}
                            <span>{{ form_obj.confirm_password.errors.0 }}</span>
                        </div>
                    </div>
                    <div class="form-group">
                        <label for="{{ form_obj.phone.id_for_label }}"
                               class="col-sm-2 control-label col-lg-push-2">{{ form_obj.phone.label }}</label>
                        <div class="col-sm-4 col-lg-push-2">
                            {{ form_obj.phone }}
                            <span>{{ form_obj.phone.errors.0 }}</span>
                        </div>
                    </div>
                    <div class="form-group">
                        <label for="{{ form_obj.email.id_for_label }}"
                               class="col-sm-2 control-label col-lg-push-2">{{ form_obj.email.label }}</label>
                        <div class="col-sm-4 col-lg-push-2">
                            {{ form_obj.email }}
                            <span>{{ form_obj.email.errors.0 }}</span>
                        </div>
                    </div>
                    <div class="form-group">
                    <label class="col-md-2 control-label col-lg-push-2">{{ form_obj.gender.label }}</label>
                        <div class="col-md-10 col-lg-push-2">
                            <div class="radio">
                                {% for radio in form_obj.gender %}
                                    <label for="{{ radio.id_for_label }}">
                                        {{ radio.tag }}{{ radio.choice_label }}
                                    </label>
                                {% endfor %}
                            </div>
                        </div>
                    </div>
                    <div class="form-group">
                        <label class="col-md-2 control-label col-lg-push-2">{{ form_obj.hobby.label }}</label>
                        <div class="col-md-4 col-lg-push-2">
                            {{ form_obj.hobby }}
                        </div>
                    </div>

                    <div class="form-group">
                        <div class="col-sm-offset-5 col-sm-2">
                            <button type="submit" class="btn btn-primary btn-block">注册</button>
                        </div>
                    </div>
                </form>
            </div>
        </div>
    </div>
</div>

<script src="/static/jquery-3.3.1.min.js"></script>
<script src="/static/bootstrap-3.3.7/js/bootstrap.min.js"></script>
</body>
</html>
效果如下:

批量添加样式
可通过重写form类的init方法来实现。
class LoginForm(forms.Form):
    username = forms.CharField(
        min_length=8,
        label="用户名",
        initial="张三",
        error_messages={
            "required": "不能为空",
            "invalid": "格式错误",
            "min_length": "用户名最短8位"
        }
    ...

    def __init__(self, *args, **kwargs):
        super(LoginForm, self).__init__(*args, **kwargs)
        for field in iter(self.fields):
            self.fields[field].widget.attrs.update({
                'class': 'form-control'
            })