写这篇博客之前,我内心是有些犹豫的,因为不知道能不能对Android 里面的源代码进行细致的分析,但由于最近几天,一直在思考,之前学习Android 的路线,无外乎就是完成一些Android 的一些功能,以及Android UI上的一些改动。似乎好像,还没有认真仔细的去研读Android的源代码,总是走马观花,不够耐心。现在做一个小尝试,开始细心研究Android源代码,算是我Android 道路上的一个转折点吧,从此篇博客开始,以后陆陆续续更新我对Android 源代码的一些细致分析理解,并以此篇博客为证!!!开始我的Android 新篇章!
话不多说,开始今天Android 源代码的分析!
在Android系统中,我们会经常通过Context获取系统级别的服务,如WindowsManagerService,ActivityManagerService等,更常用的是一个LayoutInflater的类,这些服务都是以单例的形式注册在系统中,在我们需要的时候就会通过Context.getSystemService(String name)获取,我们先就以LayoutInflater为例来说明。
View view = LayoutInflater.from(activity).inflate(layoutResId, guideLayout, false);我们或多或少都写过这一段代码,在ListView的getView的方法中会经常用到,以及在别的地方,加载资源文件给自定义的View上时,也会用到。
现在就开始一段一段分析:
1.LayoutInflater.from(activity)该方法进去一看Android 的源码
    /**
     * Obtains the LayoutInflater from the given context.
     */
    public static LayoutInflater from(Context context) {
        LayoutInflater LayoutInflater =
                (LayoutInflater) context.getSystemService(Context.LAYOUT_INFLATER_SERVICE);
        if (LayoutInflater == null) {
            throw new AssertionError("LayoutInflater not found.");
        }
        return LayoutInflater;
    }
进入源码中,我们就会看到LayoutInflater LayoutInflater =
(LayoutInflater) context.getSystemService(Context.LAYOUT_INFLATER_SERVICE); 这样一行代码!
我们再来分析Context这个类中的getSystemService()方法,就得去Context该类中探探究竟了!
 * up-calls for application-level operations such as launching activities,
 * broadcasting and receiving intents, etc.
 */
public abstract class Context {
    /**
     * File creation mode: the default mode, where the created file can only
     * be accessed by the calling application (or all applications sharing the
     * same user ID).
     */
    public static final int MODE_PRIVATE = 0x0000;

    /**
     * File creation mode: allow all other applications to have read access to
     * the created file.
     * <p>
     * As of {@link android.os.Build.VERSION_CODES#N} attempting to use this
     * mode will throw a {@link SecurityException}
进入Context中,我们首先会发现,这是个抽象类,记得曾经有人说过,抽象类就要去看抽象方法,一般只有抽象方法需要子类去继承实现的方法,会显得很重要!
果然Context.getSystemService()是个抽象方法,以源代码为例:
  * @see android.app.usage.NetworkStatsManager
     * @see android.os.HardwarePropertiesManager
     * @see #HARDWARE_PROPERTIES_SERVICE
     */
    public abstract Object getSystemService(@ServiceName @NonNull String name);

    /**
     * Return the handle to a system-level service by class.
     * <p>
既然这个getSystemService()是个Context抽象类中的抽象方法,那么我们就得去看Context的实现类去看看该方法是怎么实现的,Let’s Go!
/**
 * Common implementation of Context API, which provides the base
 * context object for Activity and other application components.
 */
class ContextImpl extends Context {
    private final static String TAG = "ContextImpl";
    private final static boolean DEBUG = false;

    /**
     * Map from package name, to preference name, to cached preferences.
     */
    @GuardedBy("ContextImpl.class")
    private static ArrayMap<String, ArrayMap<File, SharedPreferencesImpl>> sSharedPrefsCache;

    /**
     * Map from preference name to generated path.
     */
    @GuardedBy("ContextImpl.class")
    private ArrayMap<String, File> mSharedPrefsPaths;

    final ActivityThread mMainThread;
    final LoadedApk mPackageInfo;
从这段代码中,我们可以看出ContextImpl类是Context的实现类,那么我们就去找找,他的getSystemService()的实现吧!
    @Override
    public Object getSystemService(String name) {
        return SystemServiceRegistry.getSystemService(this, name);
    }

    @Override
    public String getSystemServiceName(Class<?> serviceClass) {
        return SystemServiceRegistry.getSystemServiceName(serviceClass);
    }
该类中有两个方法,一个获取系统服务对象,一个获取系统服务对象的名称,但这都不是重点,重点是又进入另一个类中的getSystemService()方法中!
return SystemServiceRegistry.getSystemService(this, name);现在就去SystemServiceRegistry该类看看吧!
/**
 * Manages all of the system services that can be returned by {@link Context#getSystemService}.
 * Used by {@link ContextImpl}.
 */
final class SystemServiceRegistry {
    private final static String TAG = "SystemServiceRegistry";

    // Service registry information.
    // This information is never changed once static initialization has completed.
    private static final HashMap<Class<?>, String> SYSTEM_SERVICE_NAMES =
            new HashMap<Class<?>, String>();
    private static final HashMap<String, ServiceFetcher<?>> SYSTEM_SERVICE_FETCHERS =
            new HashMap<String, ServiceFetcher<?>>();
    private static int sServiceCacheSize;

    // Not instantiable.
    private SystemServiceRegistry() { }
从Android 源代码中发现该类是一个final 类,终于知道getSystemService()方法的具体实现肯定的在这个类中完成!
我们先看看该类的类结构:
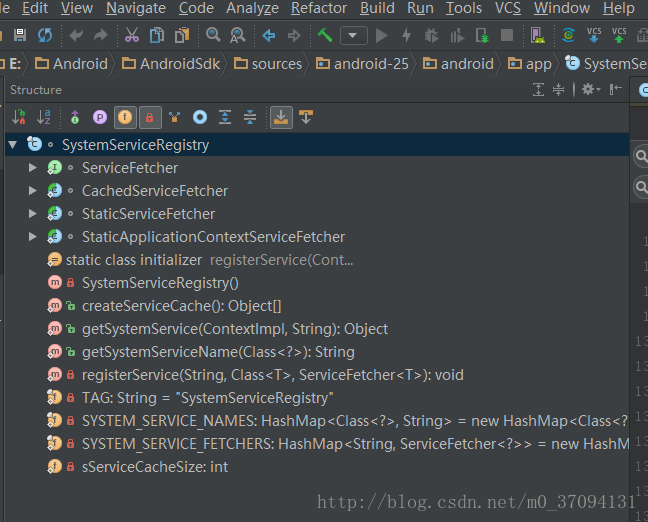
看到该类中有getSystemService()的具体实现,不过我们先不急,先看看整个类的架构,发现其中有一个ServiceFetcher接口以及它的三个实现类,还有一个static 代码块,以及一些方法以及两个HashMap的Field属性。
先看看static 代码块吧:
  // Not instantiable.
    private SystemServiceRegistry() { }

    static {
        registerService(Context.ACCESSIBILITY_SERVICE, AccessibilityManager.class,
                new CachedServiceFetcher<AccessibilityManager>() {
            @Override
            public AccessibilityManager createService(ContextImpl ctx) {
                return AccessibilityManager.getInstance(ctx);
            }});

        registerService(Context.CAPTIONING_SERVICE, CaptioningManager.class,
                new CachedServiceFetcher<CaptioningManager>() {
            @Override
            public CaptioningManager createService(ContextImpl ctx) {
                return new CaptioningManager(ctx);
            }});

        registerService(Context.ACCOUNT_SERVICE, AccountManager.class,
                new CachedServiceFetcher<AccountManager>() {
            @Override
            public AccountManager createService(ContextImpl ctx) {
                IBinder b = ServiceManager.getService(Context.ACCOUNT_SERVICE);
                IAccountManager service = IAccountManager.Stub.asInterface(b);
                return new AccountManager(ctx, service);
            }});
查看该静态代码块,是因为静态代码块,第一次加载该类时执行(而且只会执行一次,保证了实例的唯一性),其次就是我们会发现static 代码块中有很多个这样的方法:
registerService(Context.ACCESSIBILITY_SERVICE, AccessibilityManager.class,
                new CachedServiceFetcher<AccessibilityManager>() {
            @Override
            public AccessibilityManager createService(ContextImpl ctx) {
                return AccessibilityManager.getInstance(ctx);
            }});
只是参数不同,第一个参数 就是服务的String值,第二个参数,该服务牵扯到的类名,第三个参数为ServiceFetcher 接口的实现类。
registerService(…)方法的实现
/**
     * Statically registers a system service with the context.
     * This method must be called during static initialization only.
     */
    private static <T> void registerService(String serviceName, Class<T> serviceClass,
            ServiceFetcher<T> serviceFetcher) {
        SYSTEM_SERVICE_NAMES.put(serviceClass, serviceName);
        SYSTEM_SERVICE_FETCHERS.put(serviceName, serviceFetcher);
    }
里面主要是利用HashMap (SYSTEM_SERVICE_NAMES和SYSTEM_SERVICE_FETCHERS)将该系统服务的服务名和serviceFetcher保留到HashMap中。
registerService方法有两个参数,第一个参数就是服务的名称,第二个参数就是新建的一个ServiceFetcher对象。这个过程可以这么理解,为了生产服务,我新建了一个工厂(ServiceFetcher),然后我告诉了工厂怎么生产这个对象(重载createService()方法)。这样,当我需要服务的时候,工厂就能够生产我需要的服务(通过createService()方法)。
registerService方法的引用:

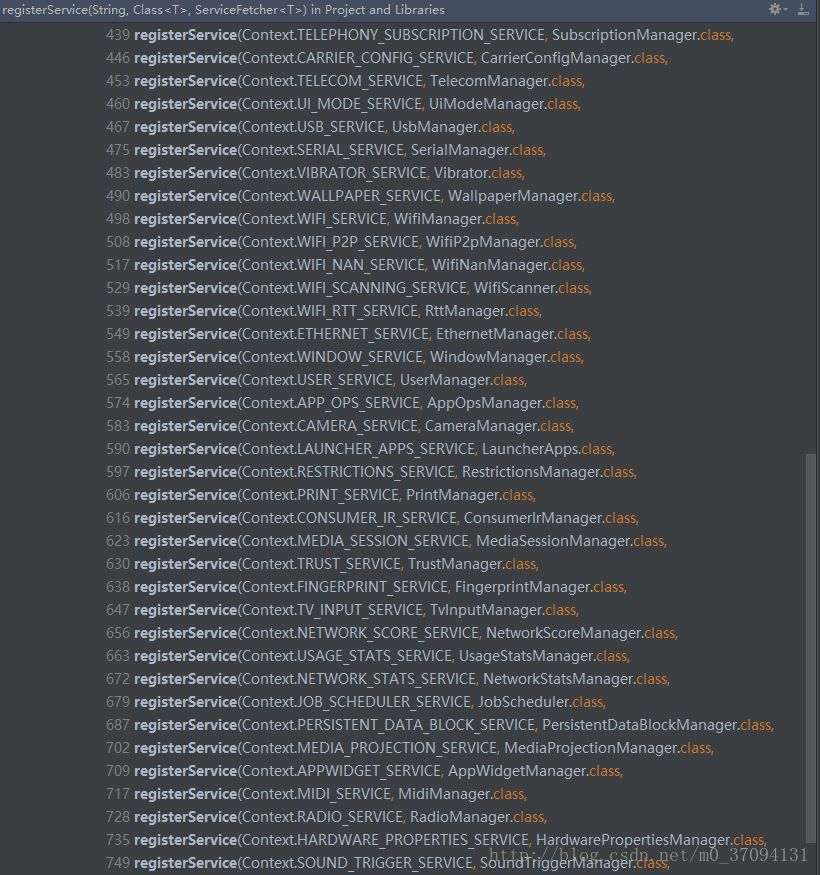
看到这两张图,聪明的同学大概一下就猜到registerService()方法的意图了吧,没错就是注册所有的系统服务,将所有系统提供的XXXManager()注册之后,然后以供调用!
好,现在去看该类的getSystemService()方法
    /**
     * Gets a system service from a given context.
     */
    public static Object getSystemService(ContextImpl ctx, String name) {
        ServiceFetcher<?> fetcher = SYSTEM_SERVICE_FETCHERS.get(name);
        return fetcher != null ? fetcher.getService(ctx) : null;
    }

    /**
     * Gets the name of the system-level service that is represented by the specified class.
     */
    public static String getSystemServiceName(Class<?> serviceClass) {
        return SYSTEM_SERVICE_NAMES.get(serviceClass);
    }
获取系统服务的方法中的代码主要就是,通过SYSTEM_SERVICE_FETCHERS(该HashMap)根据之前保存进来的系统服务名(name) ,通过该key来获取之前保存的ServiceFetcher对象。
return fetcher != null ? fetcher.getService(ctx) : null;进去fecther.getService(ctx)方法中可以看到
  /**
     * Base interface for classes that fetch services.
     * These objects must only be created during static initialization.
     */
    static abstract interface ServiceFetcher<T> {
        T getService(ContextImpl ctx);
    }
这是一个interface ServiceFetcher该接口中的方法,得去看子类的实现比如
/**
     * Override this class when the system service constructor needs a
     * ContextImpl and should be cached and retained by that context.
     */
    static abstract class CachedServiceFetcher<T> implements ServiceFetcher<T> {
        private final int mCacheIndex;

        public CachedServiceFetcher() {
            mCacheIndex = sServiceCacheSize++;
        }

        @Override
        @SuppressWarnings("unchecked")
        public final T getService(ContextImpl ctx) {
            final Object[] cache = ctx.mServiceCache;
            synchronized (cache) {
                // Fetch or create the service.
                Object service = cache[mCacheIndex];
                if (service == null) {
                    service = createService(ctx);
                    cache[mCacheIndex] = service;
                }
                return (T)service;
            }
        }

        public abstract T createService(ContextImpl ctx);
    }
因为
if (service == null) {
service = createService(ctx);
cache[mCacheIndex] = service;
}
return (T)service;
所以我们又得去看该类中的一个抽象方法 public abstract T createService(ContextImpl ctx);
而createService恰好该方法的实现在registerService()方法中,进行了初始化,举个例子
        registerService(Context.MEDIA_PROJECTION_SERVICE, MediaProjectionManager.class,
                new CachedServiceFetcher<MediaProjectionManager>() {
            @Override
            public MediaProjectionManager createService(ContextImpl ctx) {
                return new MediaProjectionManager(ctx);
            }});
因为在这里实现了ServiceFetcher该接口,所以也就重写了createService()该方法,所以也就获取了系统服务,并且具体的怎样的系统服务,就得看你传哪个系统服务名(context.getSystemService(Context.LAYOUT_INFLATER_SERVICE);),然后在SystemServiceRegistry类中hashMap进行缓存了,并且最终在注册服务(registerService)中实现ServiceFetcher接口,并且重写createService()方法,进而就可以获取系统服务了!
由于博主第一次写Android 的源代码分析,写的不好的地方,以及排版不好的地方,还请多多见谅,以后一定会优化的!