

最近的需求中有一个tab切换的场景,设计师提出了自己期望的效果,核心关注点在蓝色边框上,本文围绕如何实现这样的边框效果展开讨论。

设计师期望的效果如下,核心关注点在蓝色边框上。
实现这样的边框,核心问题有几个:
如何将两个元素的边框相连
内凹的圆角如何实现
tab元素滚动离屏,边框如何过渡
▐ 问题一:CSS 如何实现边框相连
这倒不难,我们需要:
给 tab元素 设置
border-right: none,同时border-top-right-radius: 0、border-bottom-right-radius: 0再给 tab元素 一个向右的偏移,偏移量 = 边框宽度
最后让 tab元素 z-Index 高于内容区,并给 tab元素 加上背景色(背景色需要和页面背景色一致)
缺陷
这时候缺点已经来了,我们通过加背景色遮盖边框实现边框相连,不可避免地遮盖了页面内容,如果页面背景比较复杂,我们会很难处理。这个方案并不足够通用,但好在我们的场景页面背景纯白,先忍了。
▐ 问题二:CSS 如何实现内凹圆角
-
新增两个元素,宽高和 border-radius值相等 -
元素1 设置背景色,先覆盖在边框相连处 -
元素2 设置 border-bottom-right-radius: 50%,同时border和tab元素保持一致
缺陷
其实和问题一一样,我们又使用了背景色对边框进行遮盖,但先忍了,实现要紧。
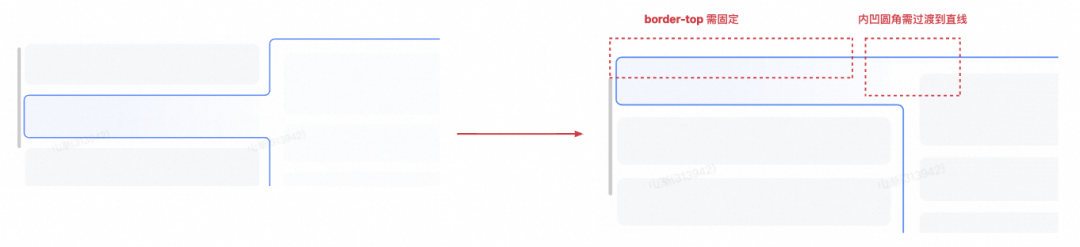
▐ 问题三:CSS 如何实现滚动离屏过渡
这个问题用css就比较难实现了,它可以被拆解成两个子问题:
tab元素的顶边在离屏过程中需要固定,border 框选区域高度不断变小
圆角如何平滑过渡到直线
SVG
其实使用SVG来实现一些CSS不好处理的场景在社区中已经有很多实践了。比如用于新人引导的开源库 driver.js。
driver.js地址:https://driverjs.com/
【新人引导】指的是这样的场景:
这个场景下,【蒙层内区域高亮】是技术核心,driver.js 在几个月前刚进行了一次重构,将蒙层改用SVG实现,支持了高亮区的圆角。这给了我启发,哥们也用 SVG 画个边框吧。
▐ 问题一:SVG 如何实现边框相连
怎么用 SVG 画一条线
这个容易,使用 <line /> 标签,提供两个点坐标(x1, y1)、(x2, y2),在描述一下边框的样式就可以了。
<svg viewBox="0 0 100 100" xmlns="http://www.w3.org/2000/svg"><line x1="0" y1="80" x2="100" y2="20" stroke="black" /></svg>
<path />标签,我们可以通过命令式的方式,完成 SVG 各种型状的绘制,比如一条直线:
<svg viewBox="0 0 100 100" xmlns="http://www.w3.org/2000/svg"><path d="M 0 80 L 100 20" stroke="black" fill="none" /></svg>
<path />
文档地址
:https://developer.mozilla.org/zh-CN/docs/Web/SVG/Tutorial/Paths
其中核心字段位 d="M 0 80 L 100 20",这一段命令中有两个指令 M、L:
M全称“Move to”,可以理解为将SVG画笔挪到某个点作为路径起点,因此该命令后边跟两个数字,分别对应起点的x、yL全称“Line”,可以理解为从当前画笔位置为起点,绘制一条直线到另一个点(终点),并且绘制后,画笔位置也会挪到终点,(path 中大多数指令都是指定终点即可,起点就是当前画笔位置),因此该命令后边跟两个数字,分别对应终点的x、y。
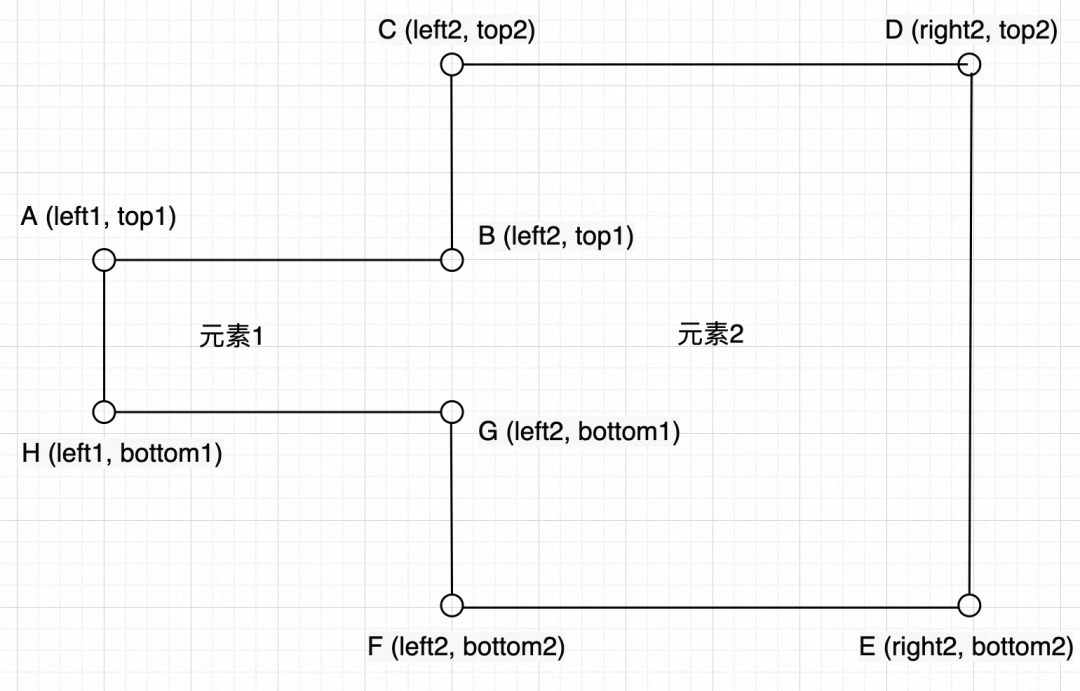
关于 path 的其他指令不再赘述,总的来说,想使用 path 绘制边框,我们首先要获取到边框上各个结点坐标,之后再用命令将他们链接起来。
获取点坐标来画线
getBoundingClientRect
方法获取
top
、
left
、
right
、
bottom
四个值来构造这些点坐标。

但我们不能直接给他两点相连起来,那就成这样了:

我们需要做做个调整,需要将(right1, top1)、(right1, bottom1)两个点的 x 坐标做偏移,让这两点的 x 和元素2的 left 一致,得到(left2, top1)、(left2, bottom1)
<svg viewBox="0 0 100 100" xmlns="http://www.w3.org/2000/svg"><pathd="M left1 top1L left2 top1L left2 top2L right2 top2L right2 bottom2L left2 bottom2L left2 bottom1L left1 bottom1Z"stroke="black"fill="none"/><!-- Z 命令为 path 结束指令--></svg>
▐ 问题二:SVG 如何实现内凹圆角
问题又变得复杂起来了,同样,我们还是先从简单的开始吧:
怎么用 SVG 画一个圆弧
path 中有一个弧形指令A,这个指令能绘制椭圆,正圆自然也不在话下,他的参数有很多:
A rx ry x-axis-rotation large-arc-flag sweep-flag x yrx ry
:为 X 轴和 Y 轴的半径,对于正圆来说,rx = ry,在我们的场景里,他的值和 border-radius 是等效的
x-axis-rotation
:用于控制这个弧线沿 X 轴旋转的角度,对于正圆来说,怎么转都一样,所以这个值我们使用时始终为 0 即可
large-arc-flag
:决定弧线是大于还是小于 180 度,0 表示小角度弧,1 表示大角度弧,由于border-radius 其实都是 90 度角,因此我们使用时始终为 0 即可
sweep-flag
:表示弧线的方向,0 表示从起点到终点沿逆时针画弧,1 表示从起点到终点沿顺时针画弧
x y
:弧线终点坐标
<svg width="325" height="325" xmlns="http://www.w3.org/2000/svg"><pathd="M 80 80A 45 45, 0, 0, 0, 125 125L 125 80 Z"fill="green"/><pathd="M 230 80A 45 45, 0, 1, 0, 275 125L 275 80 Z"fill="red"/><pathd="M 80 230A 45 45, 0, 0, 1, 125 275L 125 230 Z"fill="purple"/><pathd="M 230 230A 45 45, 0, 1, 1, 275 275L 275 230 Z"fill="blue"/></svg>
效果如下(有颜色区域是最终形状,其他线条是辅助线):

给边框加上圆角
const A = {x: 100,y: 100,arc: 'A xxxxxx', // 经过该点的圆弧line: 'L xxxxxx' // 圆弧的结束点到下一个圆弧起点的直线}
根据这个结构,我再按 ABCDEFGH 的顺序,将每个点的 svg 指令拼接起来,先拼接 圆弧(arc) 再拼接 直线(line)
那么圆弧的指令如何生成呢,我们以一个点来分析:

-
圆弧的起点坐标为 (x, y-radius) -
终点坐标为 (x+radius, y) -
半径就是 border-radius 的值 -
弧线方向会有区别,两个内凹圆角是逆时针,其他圆角都是顺时针
enum ESweepFlag {cw = 1, // 顺时针ccw = 0, // 逆时针}/*** 生成圆弧svg路径* @param endX: 圆弧终点x坐标* @param endY: 圆弧终点y坐标* @param radius: 圆弧半径* @param sweepFlag: 顺时针还是逆时针: 1 顺时针、0 逆时针*/const generatorArc = (endX: number, endY: number, radius: number, sweepFlag: ESweepFlag = ESweepFlag.cw) => {return `A${radius} ${radius} 0 0 ${sweepFlag} ${endX} ${endY}`;}
到这里,我们将 圆弧 和 直线 指令,按 ABCDEFGH 点顺序,先圆弧后直线挨个拼接起来,边框也就画成了。
▐ 问题三:SVG 如何实现滚动离屏过渡
我们先看看理想效果:
-
tab元素的顶边在离屏过程中需要固定,border 框选区域高度不断变小 圆角如何平滑过渡到直线
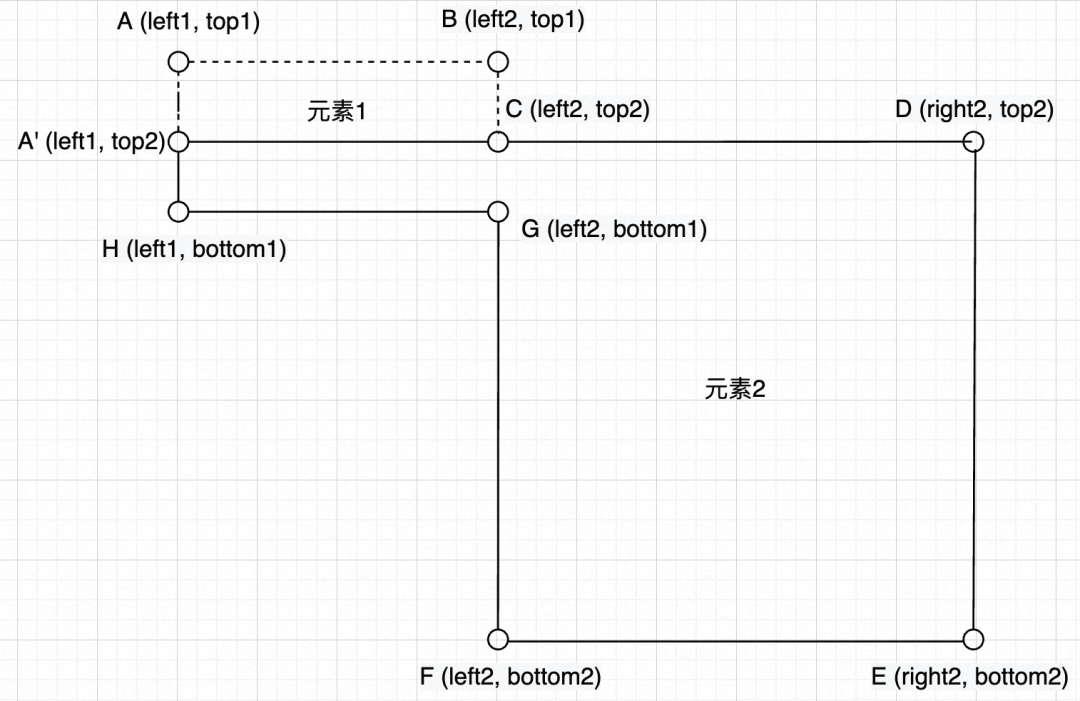
如何固定顶边
在元素已经有一部分离屏的时候,我们需要对点进行修正:
A 点的坐标将会被强制更新,我们用 A' 点表示新坐标,y 值永远被固定为 top2
B、C 点可以直接被丢弃,即数据结构中的 arc、line 值都可以为空,因为 A' 点可以直接一条线连到 D 点
圆角如何平滑过渡到直线
其实有6个圆角(A、B、C、F、G、H点对应的圆角)需要过渡到直线。我们以 B、C 两点为例:
两点想距较远(> 2 * radius),弧是一个正圆弧,两半径长度都为 radius
两点想距较近(< 2 * radius),弧是一个椭圆弧,X轴半径不变,Y轴半径变为
(y1 - y2) / 2

如何通过SVG表达这种过渡曲线呢?我们可以使用圆弧命令 A 的能力,因为它支持椭圆,不过我们还有另一种方式:二次贝塞尔曲线,一个二次贝塞尔曲线由 起点、终点 和一个 控制点 组成,每个圆弧我们其实正好能拿到3与之对应的点。
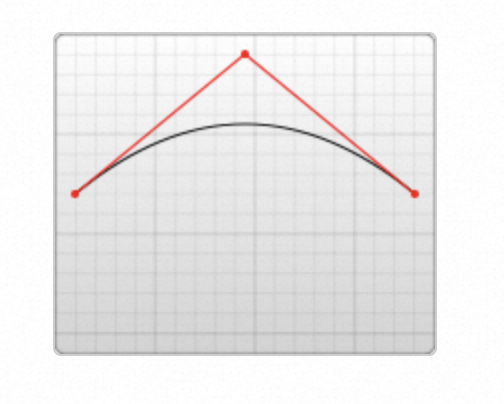
Q x1 y1, x y
,在SVG中,起点为画笔位置,因此Q指令指定 控制点 和 终点:
-
x1 y1:控制点坐标 -
x y:终点坐标
▐ 性能问题
▐ 拓展性
我们的算法基本是为水平布局定制的,如果布局切换到垂直布局,很多地方需要改动,因此当前方案的通用性并不佳。
▐ 源码
使用绘制边框SVG的源码附上,drawSVGBorder方法为入口:
/*** 用于绘制边框的svg的id*/export const Svg_Id = '____TAB_CONTAINER_BORDER_SVG_ID_MAKABAKA____';/*** tab容器的id*/export const Container_Id = '__MKT_TAB_CONTAINER_ID__';export interface IBorderStyle {/*** 边框颜色*/color?: string;/*** 边框宽度*/width?: number;/*** 边框圆角*/radius?: number;}/*** 为了绘制svg边框,需要将两个dom元素的四个顶点定义出来* 为了方便svg最终路径生成,因此每个点还会存储两个信息:* 1. 经过这个点的圆弧的svg路径* 2. 这个点到下一个圆弧起点的svg路径*/interface IPoint {x: number;y: number;arc?: string; // 圆弧svg路径line?: string; // 连线svg路径}interface IRect {left: number;top: number;right: number;bottom: number;}export enum EDirection {column = 'column',row = 'row',}enum ESweepFlag {cw = 1, // 顺时针ccw = 0, // 逆时针}/*** 生成圆弧svg路径* @param endX: 圆弧终点x坐标* @param endY: 圆弧终点y坐标* @param radius: 圆弧半径* @param sweepFlag: 顺时针还是逆时针: 1 顺时针、0 逆时针*/const generatorArc = (endX: number, endY: number, radius: number, sweepFlag: ESweepFlag = ESweepFlag.cw) => {return `A${radius} ${radius} 0 0 ${sweepFlag} ${endX} ${endY}`;}/*** 生成险段svg路径* @param endX 线段终点x坐标* @param endY 线段终点y坐标* @returns*/const generatorLine = (endX: number, endY: number) => {return `L${endX} ${endY}`;}/*** 生成二阶贝塞尔曲线* @param controlPoint 贝塞尔曲线控制点* @param endPoint 贝塞尔曲线结束点* @returns*/const generatorSecondOrderBezierCurve = (controlPoint: IPoint, endPoint: IPoint) => {return `Q${controlPoint.x} ${controlPoint.y} ${endPoint.x} ${endPoint.y}`;}/*** 判断两点是否相同*/const isSamePoint = (point1: IPoint, point2: IPoint) => {return point1.x === point2.x && point1.y === point2.y}/*** 获取元素相对于容器的DomRect*/const getBoundingClientRect = (id: string) => {const containerNode = document.getElementById(Container_Id);const node = document.getElementById(id);const containerRect = containerNode?.getBoundingClientRect();const rect = node?.getBoundingClientRect();if (!containerRect || !rect) return;// 获取相对于容器的 left 和 topconst left = rect.left - containerRect.left;const top = rect.top - containerRect.top;return {left,top,right: left + rect.width,bottom: top + rect.height}}/*** 绘制一个圆角矩形,该函数使用场景为:* 1. 仅获取到一个元素时,给这个元素绘制边框*/function drawRectWithBorderRadius(rect: IRect, radius: number, borderStyle: IBorderStyle) {const svgDom = document.getElementById(Svg_Id);if (!svgDom) return;const pathdom = document.createElementNS("http://www.w3.org/2000/svg", 'rect');svgDom.appendChild(pathdom);const { left, top, right, bottom } = rect;const { color, width } = borderStyle || {};pathdom.setAttribute("x", String(left));pathdom.setAttribute("y", String(top));pathdom.setAttribute("rx", String(radius));pathdom.setAttribute("ry", String(radius));pathdom.setAttribute("width", String(right - left));pathdom.setAttribute("height", String(bottom - top));pathdom.setAttribute("fill", "none");pathdom.setAttribute("stroke", color || 'black');pathdom.setAttribute("stroke-width", `${width || 1}px`);}/*** 绘制svg路径,radius为矩形圆角半径,类似 border-radius*/function drawSvgPath(rect1: IRect, rect2: IRect, radius: number, borderStyle: IBorderStyle) {let { left: left1, top: top1, right: right1, bottom: bottom1 } = rect1;let { left: left2, top: top2, right: right2, bottom: bottom2 } = rect2;// tab标题元素顶点const dotMap1: Record<string, IPoint> = {leftTop: { x: left1, y: top1, },leftBottom: { x: left1, y: bottom1 },rightTop: { x: right1, y: top1 },rightBottom: { x: right1, y: bottom1 },}// 内容区元素顶点const dotMap2: Record<string, IPoint> = {leftTop: { x: left2, y: top2 },leftBottom: { x: left2, y: bottom2 },rightTop: { x: right2, y: top2 },rightBottom: { x: right2, y: bottom2 },}// 当前tab顶边是否和内容区对齐,若对齐,tab标题的右上角顶点 和 tab内容的左上角顶点,在绘制path时,可以不考虑其svg路径const isTopTab = isSamePoint(dotMap1.rightTop, dotMap2.leftTop);// 当前tab底边是否和内容区对齐,若对齐,tab标题的右下角顶点 和 tab内容的左下角顶点,在绘制path时,可以不考虑其svg路径const isBottomTab = isSamePoint(dotMap1.rightBottom, dotMap2.leftBottom);// 当前tab标题右下角的圆弧和tab内容区左下角的圆弧,相交了const isBottomRadiusConnect = (bottom2 - bottom1) < (radius * 2);// 当前tab标题右上角的圆弧和tab内容区左上角的圆弧,相交了const isTopRadiusConnect = (top1 - top2) < (radius * 2);// 当前tab标题的边框高度,已经无法容纳两个圆弧了const isTabTitleShort = (bottom1 - top1) < (radius * 2);dotMap1.leftTop = {...dotMap1.leftTop,arc: isTabTitleShort? generatorSecondOrderBezierCurve(dotMap1.leftTop, { x: left1 + radius, y: top1 }): generatorArc(left1 + radius, top1, radius),line: isTopTab ? generatorLine(right2 - radius, top2) : generatorLine(right1 - radius, top1),}dotMap1.rightTop = {...dotMap1.rightTop,arc: isTopTab? '': isTopRadiusConnect? generatorSecondOrderBezierCurve(dotMap1.rightTop, { x: right1, y: top1 - ((top1 - top2) / 2) }): generatorArc(right1, top1 - radius, radius, ESweepFlag.ccw),line: (isTopTab || isTopRadiusConnect) ? '' : generatorLine(left2, top2 + radius)}dotMap2.leftTop = {...dotMap2.leftTop,arc: isTopTab? '': isTopRadiusConnect? generatorSecondOrderBezierCurve(dotMap2.leftTop, { x: left2 + radius, y: top2 }): generatorArc(left2 + radius, top2, radius),line: isTopTab ? '' : generatorLine(right2 - radius, top2),}dotMap2.rightTop = {...dotMap1.rightTop,arc: generatorArc(right2, top2 + radius, radius),line: generatorLine(right2, bottom2 - radius),}dotMap2.rightBottom = {...dotMap2.rightBottom,arc: generatorArc(right2 - radius, bottom2, radius),line: isBottomTab ? generatorLine(left1 + radius, bottom2) : generatorLine(left2 + radius, bottom2),}dotMap2.leftBottom = {...dotMap2.leftBottom,arc: isBottomTab? '': isBottomRadiusConnect? generatorSecondOrderBezierCurve(dotMap2.leftBottom, { x: left2, y: bottom2 - ((bottom2 - bottom1) / 2) }): generatorArc(left2, bottom2 - radius, radius),line: (isBottomTab || isBottomRadiusConnect) ? '' : generatorLine(right1, bottom1 + radius)}dotMap1.rightBottom = {...dotMap1.rightBottom,arc: isBottomTab? '': isBottomRadiusConnect? generatorSecondOrderBezierCurve(dotMap1.rightBottom, { x: right1 - radius, y: bottom1 }): generatorArc(right1 - radius, bottom1, radius, ESweepFlag.ccw),line: isBottomTab ? '' : generatorLine(left1 + radius, bottom1)}dotMap1.leftBottom = {...dotMap1.leftBottom,arc: isTabTitleShort? generatorSecondOrderBezierCurve(dotMap1.leftBottom, { x: left1, y: bottom1 - ((bottom1 - top1) / 2) }): generatorArc(left1, bottom1 - radius, radius),line: 'Z' // 该点是绘制的结束点}// 按path数组点的顺序,依次绘制pathconst path = [dotMap1.leftTop,dotMap1.rightTop,dotMap2.leftTop,dotMap2.rightTop,dotMap2.rightBottom,dotMap2.leftBottom,dotMap1.rightBottom,dotMap1.leftBottom];const pathString = path.map((item) => `${item.arc} ${item.line}`)// SVG 路径的绘制起点const startPoint = {x: isTabTitleShort ? left1 : path[0].x,y: isTabTitleShort ? top1 + ((bottom1 - top1) / 2) : (path[0].y + radius)}/*** 绘制的起点为:* {* x: dotMap1.leftTop.x,* y: dotMap1.leftTop.y + radius* }*/const svgPath = `M${startPoint.x} ${startPoint.y} ${pathString.join(' ')}`;const svgDom = document.getElementById(Svg_Id);if (!svgDom) return;const pathDom = document.createElementNS("http://www.w3.org/2000/svg", 'path');svgDom.appendChild(pathDom);const { color, width } = borderStyle || {};pathDom.setAttribute("d", svgPath);pathDom.setAttribute("fill", "none");pathDom.setAttribute("stroke", color || 'black');pathDom.setAttribute("stroke-width", `${width || 1}px`);}function mergeRectSideAndGetNewRect(rect1: IRect, rect2: IRect, direction: EDirection, radius: number) {let newRect1: IRect = { top: rect1.top, left: rect1.left, bottom: rect1.bottom, right: rect1.right };let newRect2: IRect = { top: rect2.top, left: rect2.left, bottom: rect2.bottom, right: rect2.right };let isOversize = false; // 两元素是否水平/垂直平移不相交(垂直布局中,水平平移;水平布局中,垂直平移)if (direction === EDirection.column) {/*** 水平布局,固定tab在左边,后续的代码逻辑中,我们将 rect1 视为左边标题区,rect2 视为右边内容区* 如果发现实际位置是相反的,那么需要对变量进行交换,确保 rect1 在左,rect2 在右*/if (newRect1.left > newRect2.left) {const tempRect = newRect1;newRect1 = newRect2;newRect2 = tempRect;}newRect1.right = newRect2.left;if (newRect1.top < newRect2.top) newRect1.top = newRect2.top;if (newRect1.bottom > newRect2.bottom) newRect1.bottom = newRect2.bottom;if (// 如果 tab标题 已经无法通过水平平移,和内容区相交了,那也不用给tab标题加border了newRect1.bottom < newRect2.top ||newRect1.top > newRect2.bottom// 如果tab标题的border框高度,已经不足以容纳两倍的圆角,那也不用给tab标题加border了// (newRect2.bottom - newRect1.top) <= (radius * 2 ) ||// (newRect1.bottom - newRect2.top) <= (radius * 2)) {isOversize = true;};} else if (direction === EDirection.row) {// TODO: 后续增加水平布局}return {rect1: newRect1,rect2: newRect2,isOversize}}function updateSvgBorder() {const svgDom = document.getElementById(Svg_Id);if (!svgDom.children[0]) return;svgDom.removeChild(svgDom.children[0]);}/*** 使用SVG绘制边框* @param elementId1 tab元素ID* @param elementId2 内容区元素ID* @param direction tab布局(水平或垂直)* @param borderStyle 边框样式*/export default function drawSVGBorder(elementId1: string = '',elementId2: string = '',direction = EDirection.column,borderStyle: IBorderStyle) {updateSvgBorder();if (!elementId1 || !elementId2) return; // 传入的元素id为空时,什么都不做const radius = borderStyle.radius || 6;// let rect1 = document.getElementById(elementId1)?.getBoundingClientRect?.();// let rect2 = document.getElementById(elementId2)?.getBoundingClientRect?.();let rect1 = getBoundingClientRect(elementId1);let rect2 = getBoundingClientRect(elementId2);if (!rect1 && !rect2) return; // 两个元素都没拿到时,什么都不做/*** 只能获取到一个元素时,这个场景有两种:* 1. 获取不到的元素是tab标题,标题列表滚动后,这个元素已经不在视口内,由于虚拟滚动,元素不会渲染,因此获取不到* 2. 元素tab标题能获取到,但是获取不到内容区*/if ((!rect1 && rect2) ||(!rect2 && rect1)) {// 给仅剩的dom元素画边框,一个圆角矩形drawRectWithBorderRadius(rect1 || rect2, radius, borderStyle);return;}const { rect1: newRect1, rect2: newRect2, isOversize } = mergeRectSideAndGetNewRect(rect1, rect2, direction, radius);if (isOversize) {drawRectWithBorderRadius(newRect2, radius, borderStyle); // 两元素平移不相交,则仅对内容区画边框} else {drawSvgPath(newRect1, newRect2, radius, borderStyle);}}
团队介绍
我们是淘天集团-营销中后台前端团队,负责核心的淘宝&天猫营销业务,搭建千级运营小二、百万级商家和亿级消费者三方之间的连接通道,在这里将有机会参与到618、双十一等大型营销活动,与上下游伙伴协同作战,参与百万级流量后台场景的前端基础能力建设,通过标准化、归一化、模块化、低代码化的架构设计,保障商家与运营的经营体验和效率;参与面向亿级消费者的万级活动页面快速生产背后的架构设计、交付手段和协作方式。
本文分享自微信公众号 - 大淘宝技术(AlibabaMTT)。
如有侵权,请联系 [email protected] 删除。
本文参与“OSC源创计划”,欢迎正在阅读的你也加入,一起分享。