前言
俗话说的好,只会敲代码的程序员不是好程序员,作为一名合格的程序员,有点自己的其他小爱好很正常对吧?
比如我就喜欢骑行,附带着喜欢琢磨一下摄影,虽然技术很垃圾就是了。
最近不是国庆刚过去了嘛,我在国庆期间就和二三好友一起自驾了川西,期间拍了不少照片。
正所谓拍照一时爽,后期火葬场啊。
拍是拍爽了,但是后期可就愁坏了我。
其中我特意拍了好多适合于后期处理成移轴效果的照片(别问我为什么是后期处理,因为我买不起镜头),但是一张一张的处理实在是太累人了,于是我就想着能不能自己写个程序来实现快速处理呢?
得益于 Compose 的强大,对于我这个安卓程序员来说,想写一个桌面程序那也是轻轻松松。
软件截图如下:
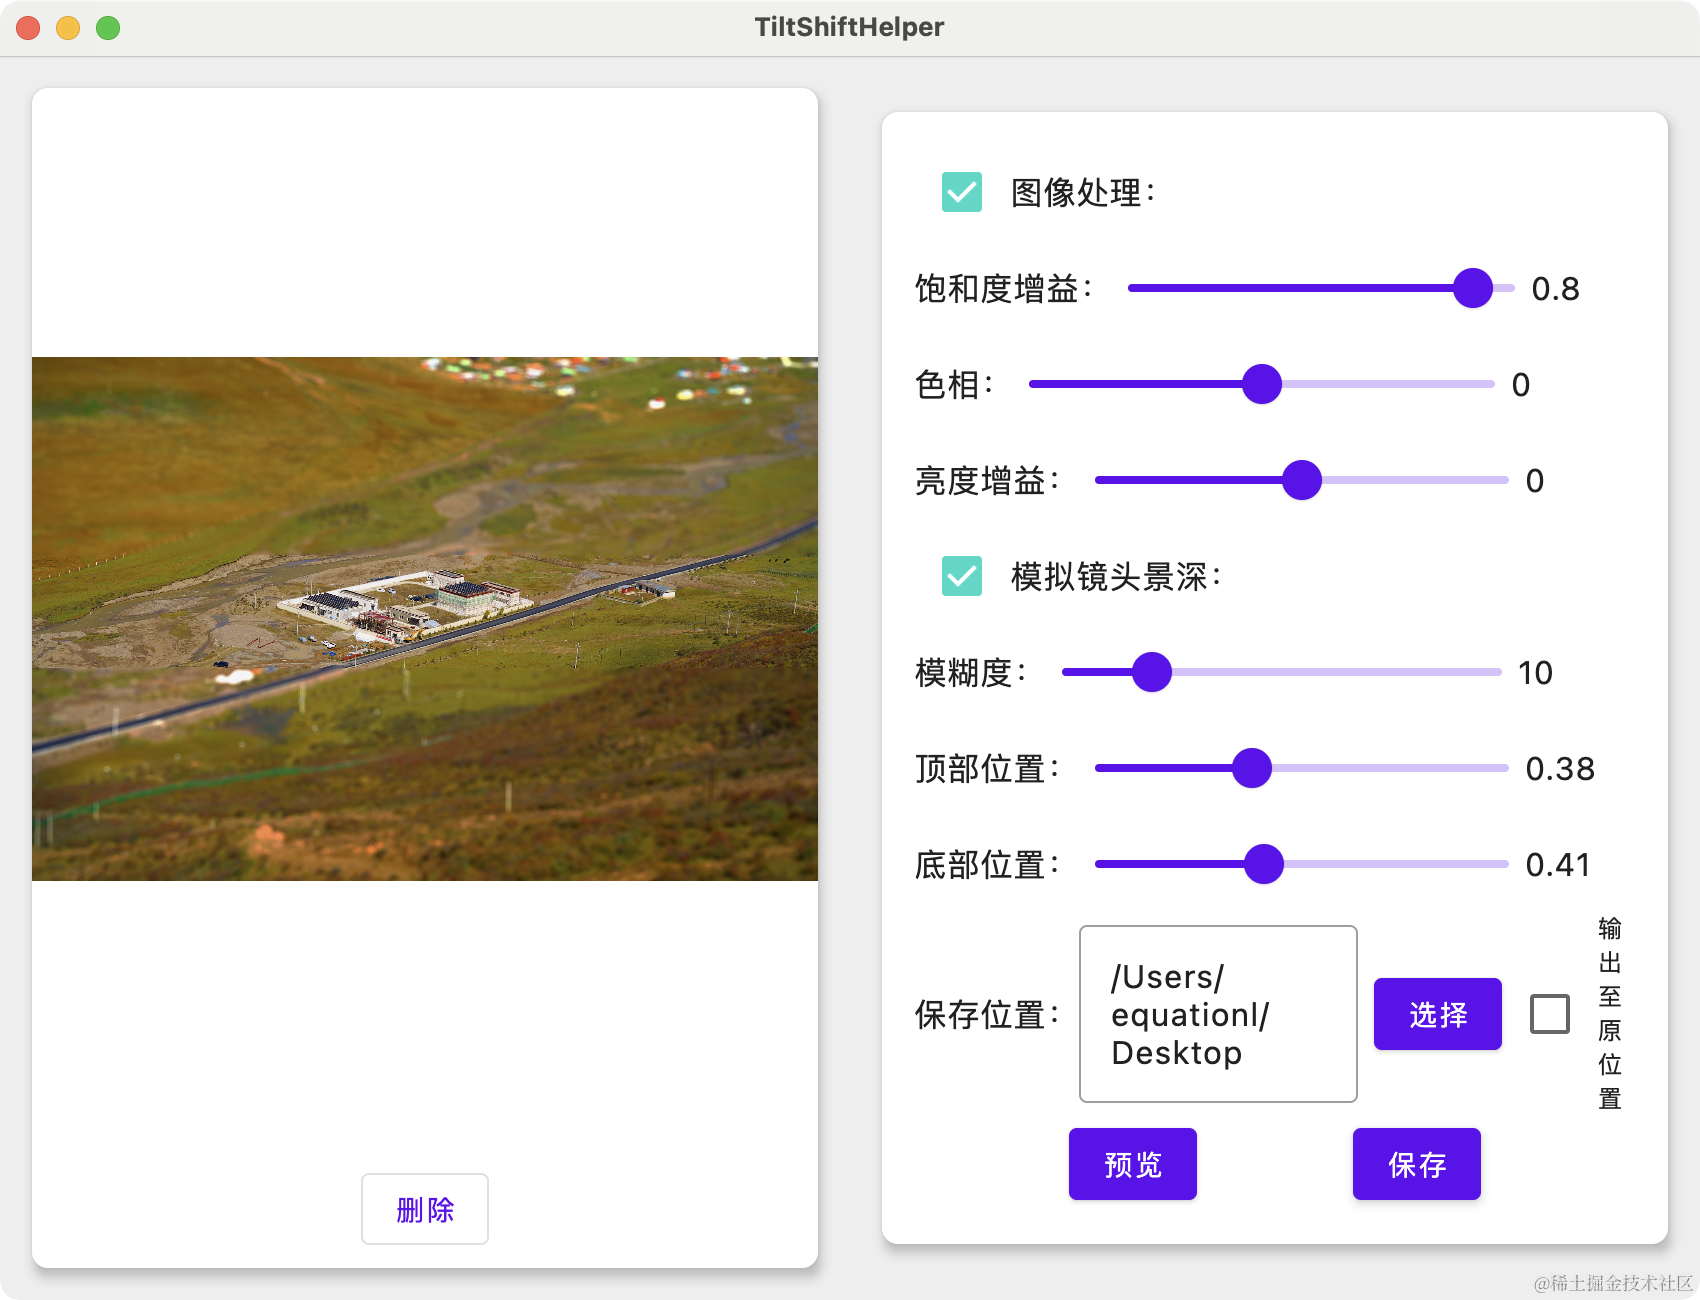
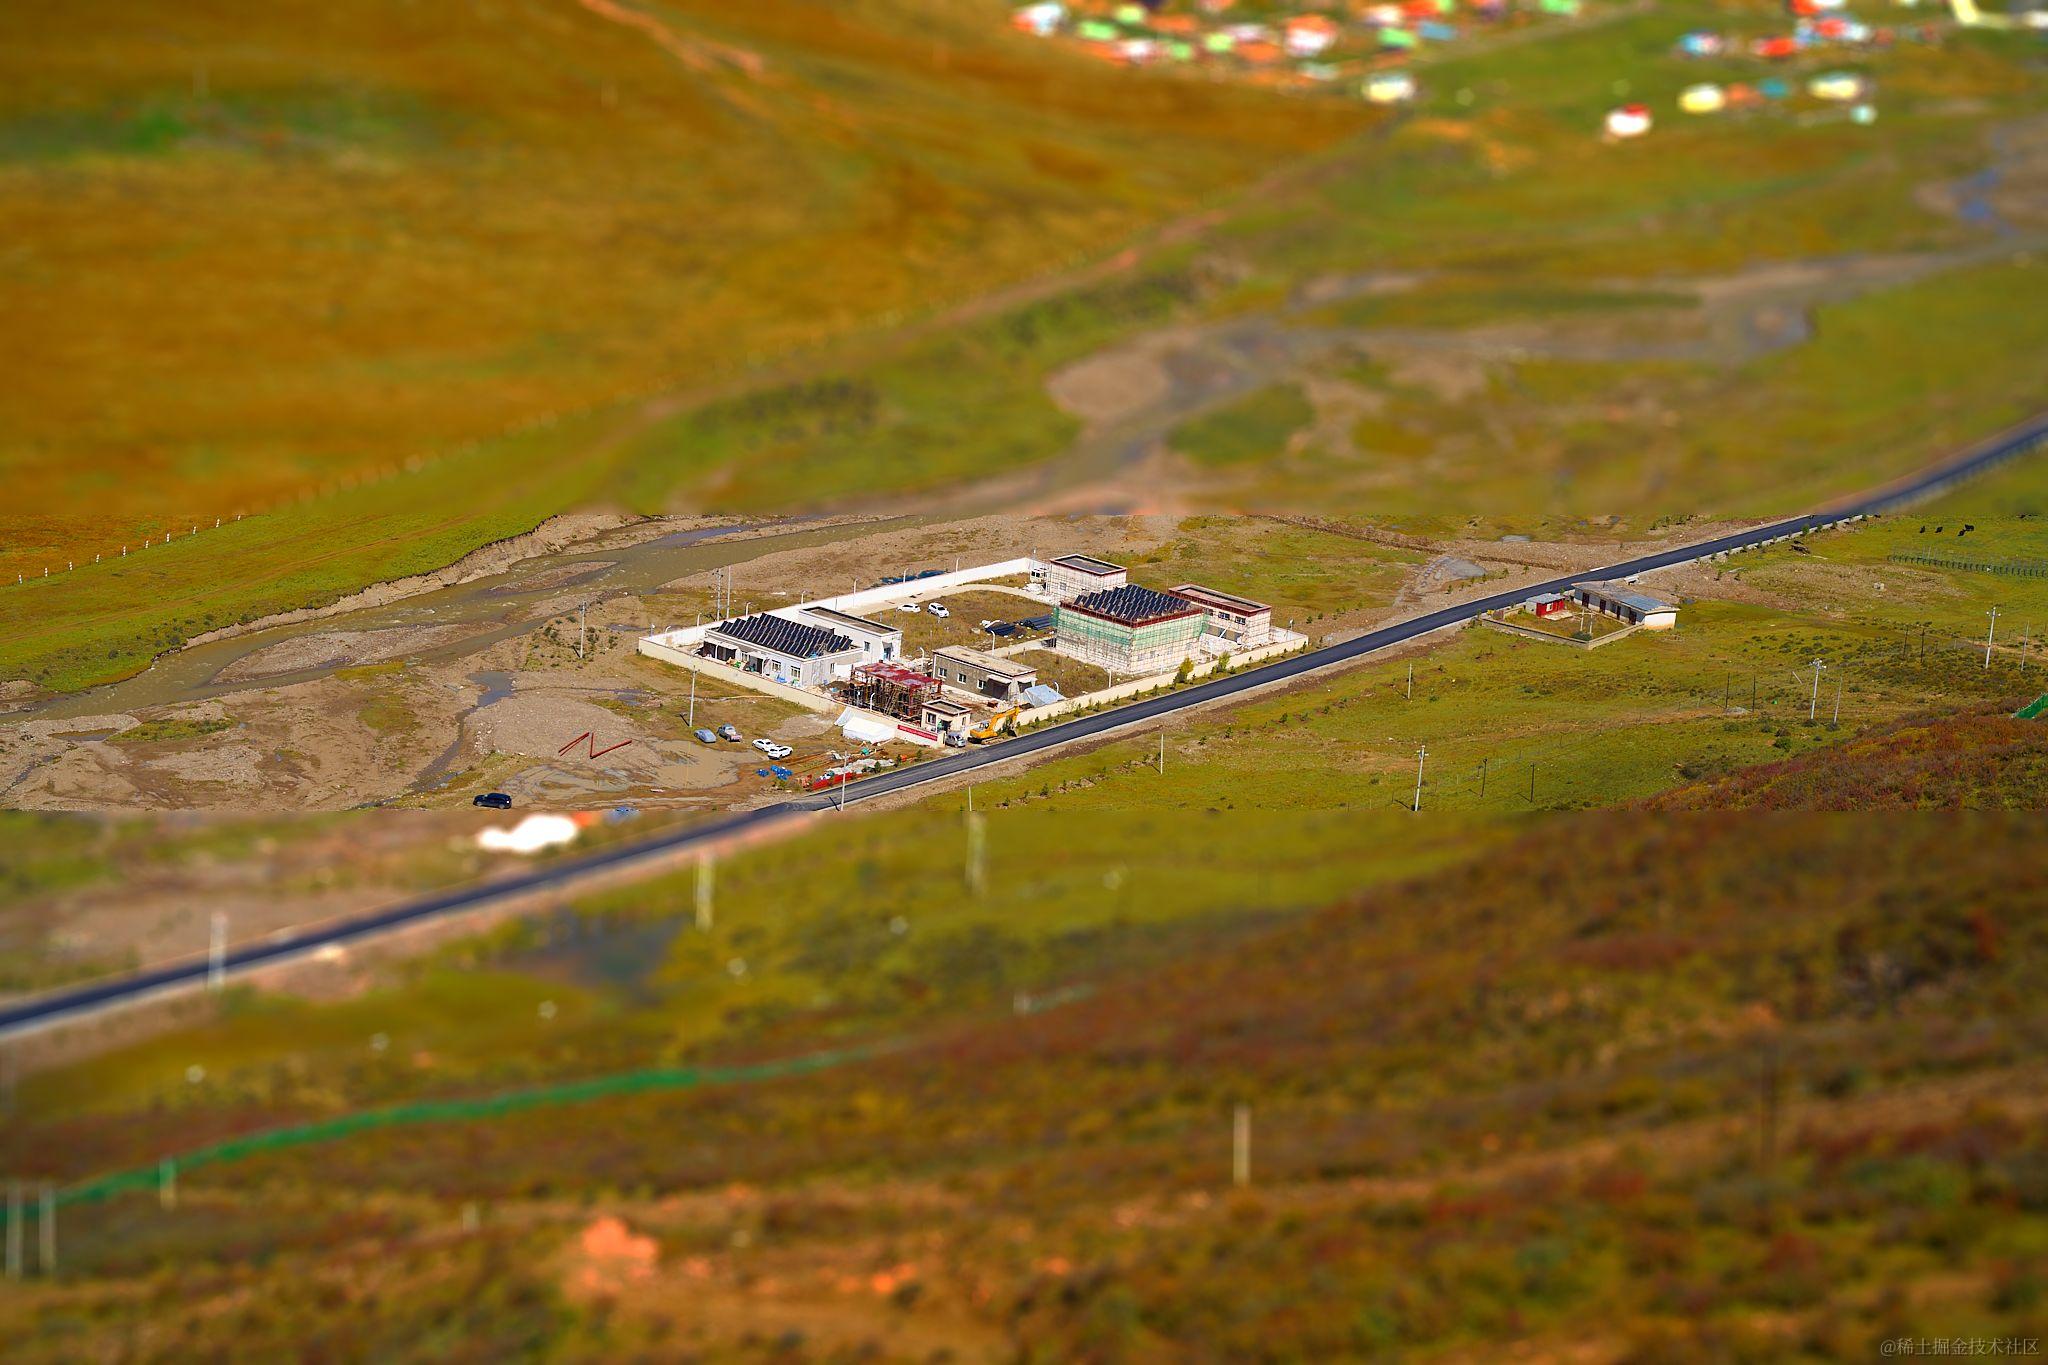
处理后效果如下:
在正式开始之前,我们还是需要简单介绍一下背景知识的。
正文
什么是移轴摄影?
移轴摄影一般指使用移轴镜头拍摄出来的照片,但是现在也有很多使用非移轴镜头拍摄但是后期处理成移轴效果的照片也被称为移轴摄影。
移轴摄影的中的移轴翻译自 Tilt-shift ,即倾斜与位移。之所以叫这个名字是因为移轴镜头通常会平移、倾斜或旋转镜头主光轴相对于图像传感器的位置,从而达到调整被摄物的透视关系或聚焦的目的。
移轴摄影通常用于拍摄建筑物全景,一般为了拍摄出建筑物的全景都会使用广角镜头,并且通常是俯拍或仰拍,这就会导致拍摄出来的建筑物“近大远小”,拍出来的建筑是严重变形的。为了解决这个问题移轴镜头就诞生了,使用移轴镜头可以调整拍摄时的透视关系,使得拍出来的建筑比例符合实际情况。
除此之外,使用移轴镜头拍摄由于改变了透视关系,所以在某些场景下,拍出来的东西宛如微缩模型或玩具的效果:
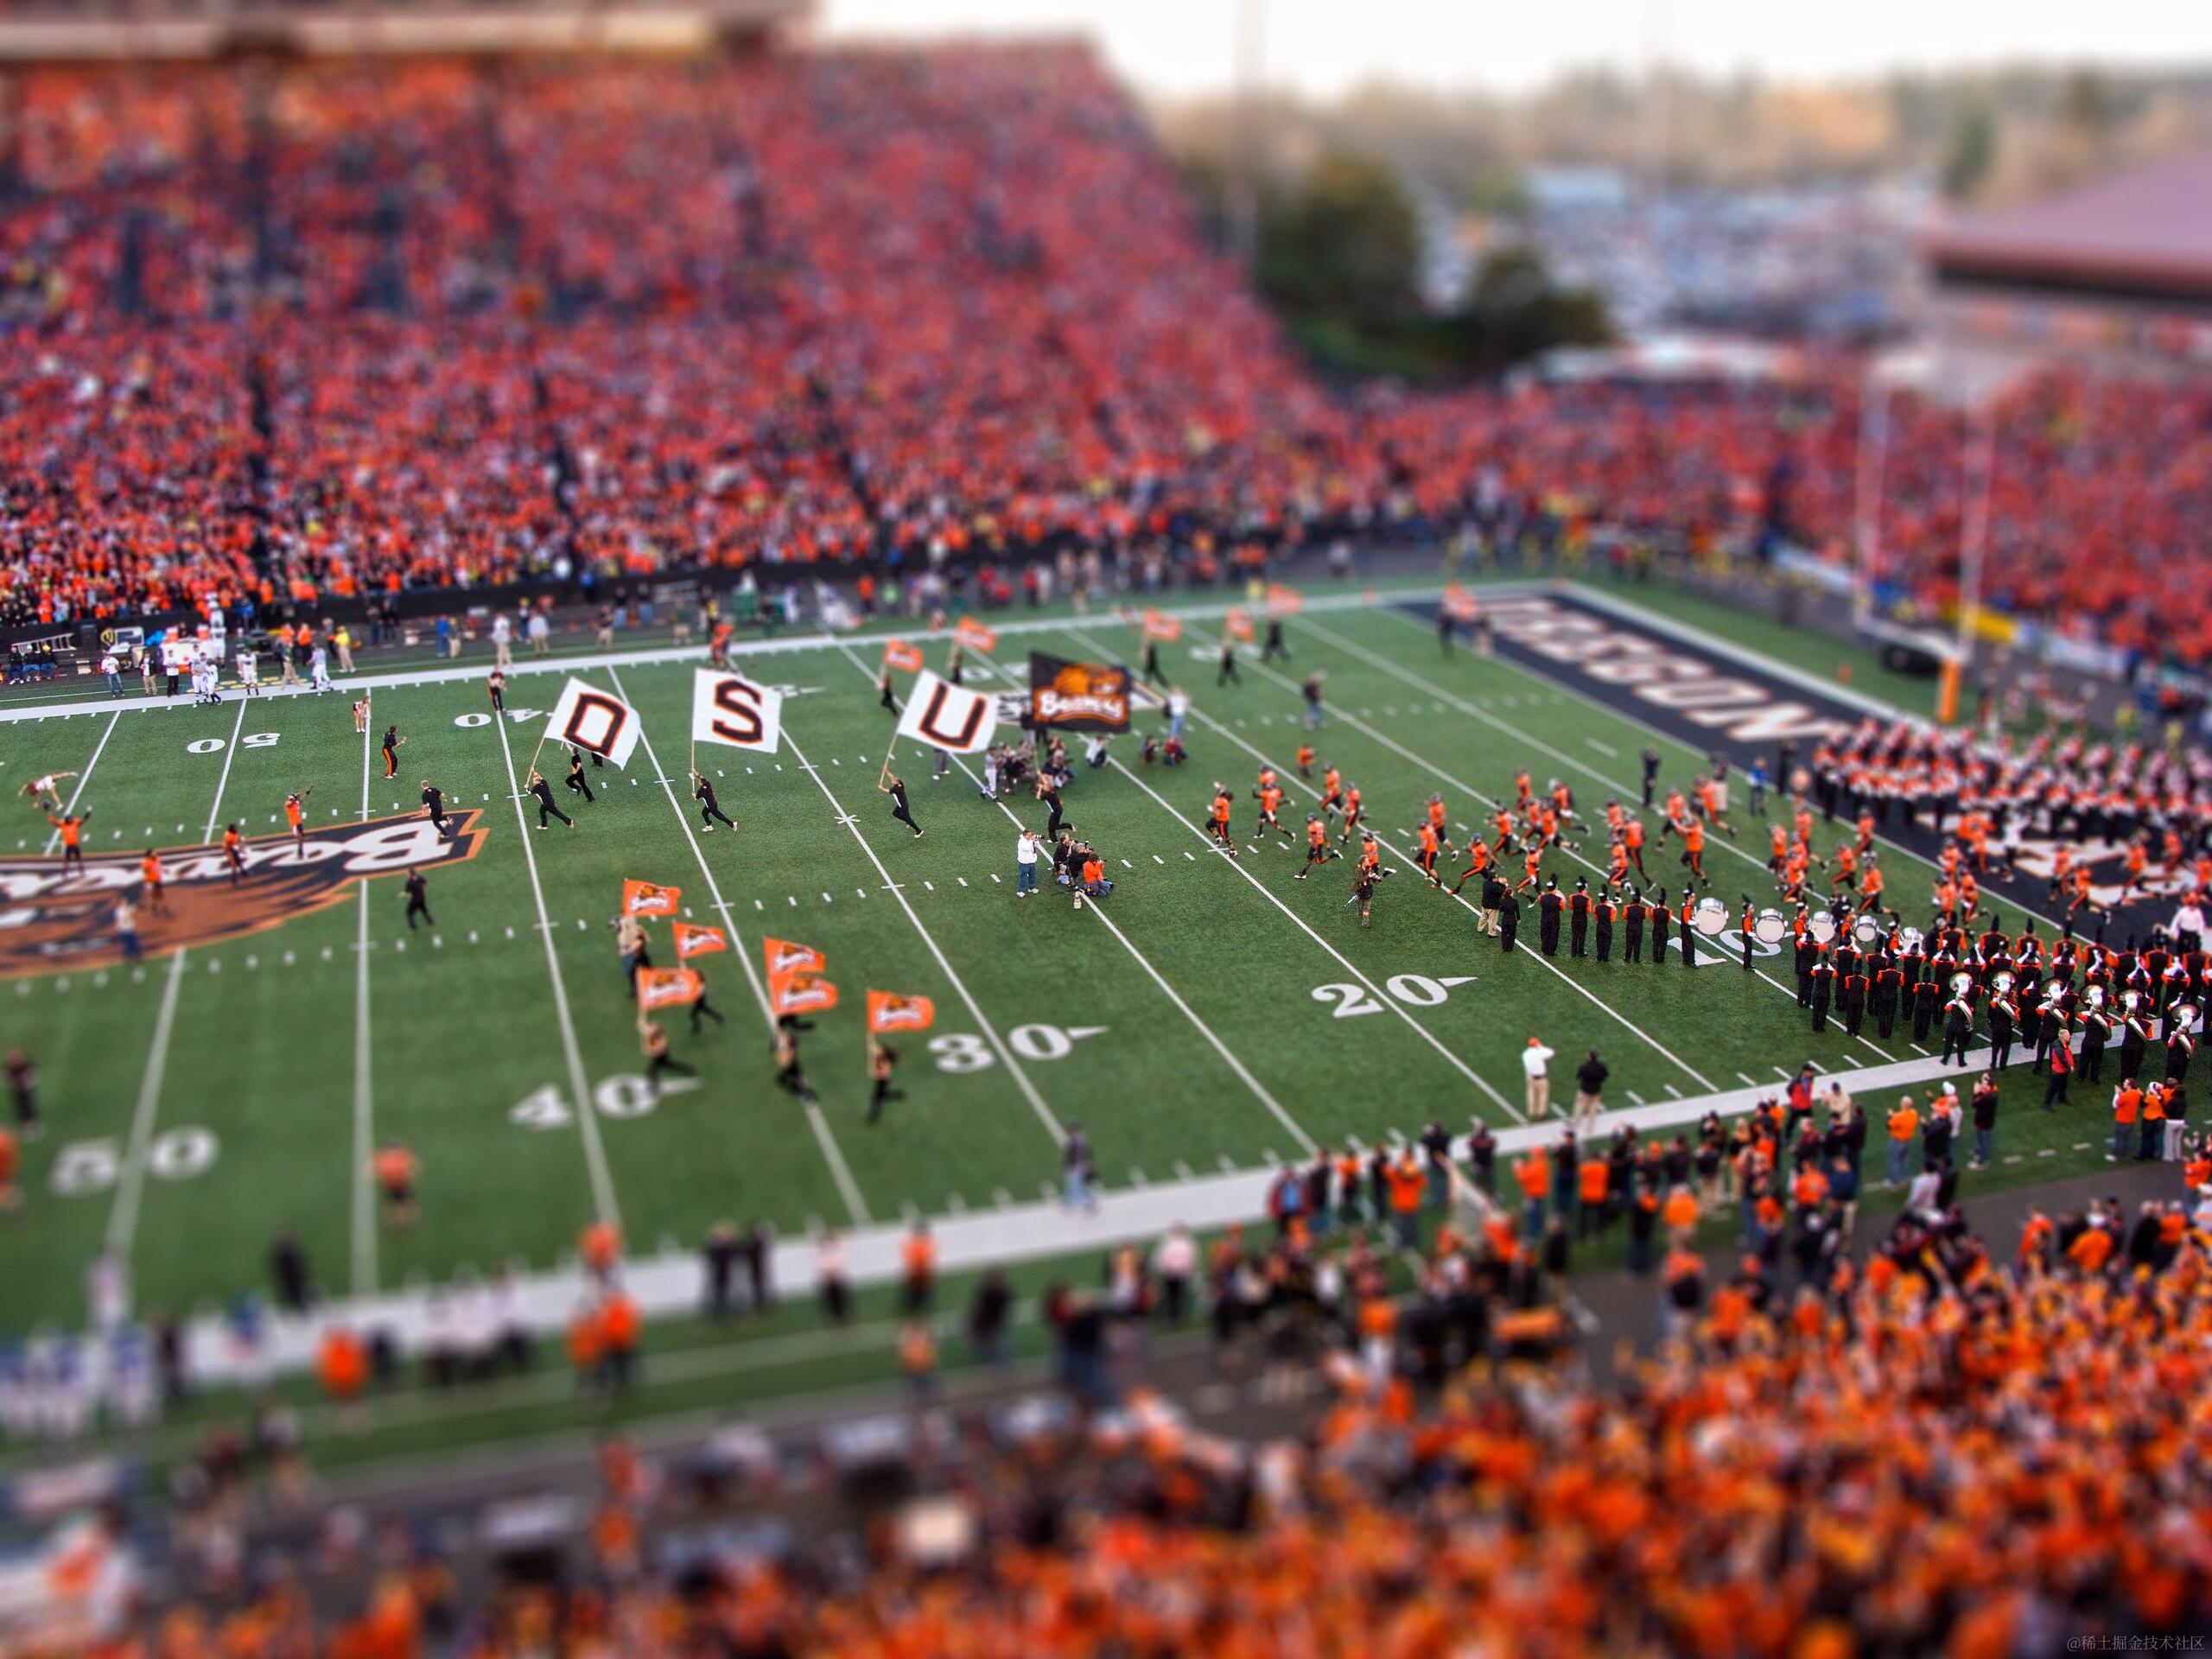
一般后期处理的移轴摄影都是为了处理成上述的微缩模型效果。
我这次写的这个程序也是想要处理成这个效果。
如何后期实现移轴?
通过上面的原理简介,我们可以大致了解到,移轴摄影就是通过改变照片的景深效果从而达到改变透视关系的目的。
而改变景深效果说人话就是给照片的特定区域加上模糊效果。
(其实这里的说法是非常不恰当的,但是为了便于理解,这里我就简单的说为加上模糊效果就能改变图像的景深)
但是这样的话就要求待处理的图像景深较浅,焦平面较大,不然处理出来效果非常不显著。
另外,为了让图像看起来更像模型,更有“玩具”的感觉,通常还需要改变图像的饱和度,一般是拉高原图的饱和度,从而使得图像看起来更加像“假”的。
下面我们就说说如何通过代码更改图像的模糊度和饱和度。
如何模糊图像?
首先在 java 中处理图像我们一般都是使用 BufferedImage 然后通过 BufferedImage.getRGB() 获取到图像的像素信息,通过某种算法遍历并修改其中的像素信息就可以达到我们修改图像的目的。
而模糊图像的算法,一般有以下几种:
- Box Blur - 方框模糊
- Gaussian Blur - 高斯模糊
- Motion Blur - 运动模糊
- Spin and Zoom Blur - 旋转和缩放模糊
- Lens Blur - 镜头模糊
等等,不同的模糊算法有不同的效果和性能,详情可以看文末的参考资料 1 了解,在这里就不在额外赘述。
对于我们这里的需求,我们想要实现的是通过模糊来模拟景深效果,因此使用 Lens Blur 模糊算法效果最佳。
因为 Lens Blur 算法模糊能够更好的模拟真实镜头带来的景深效果。
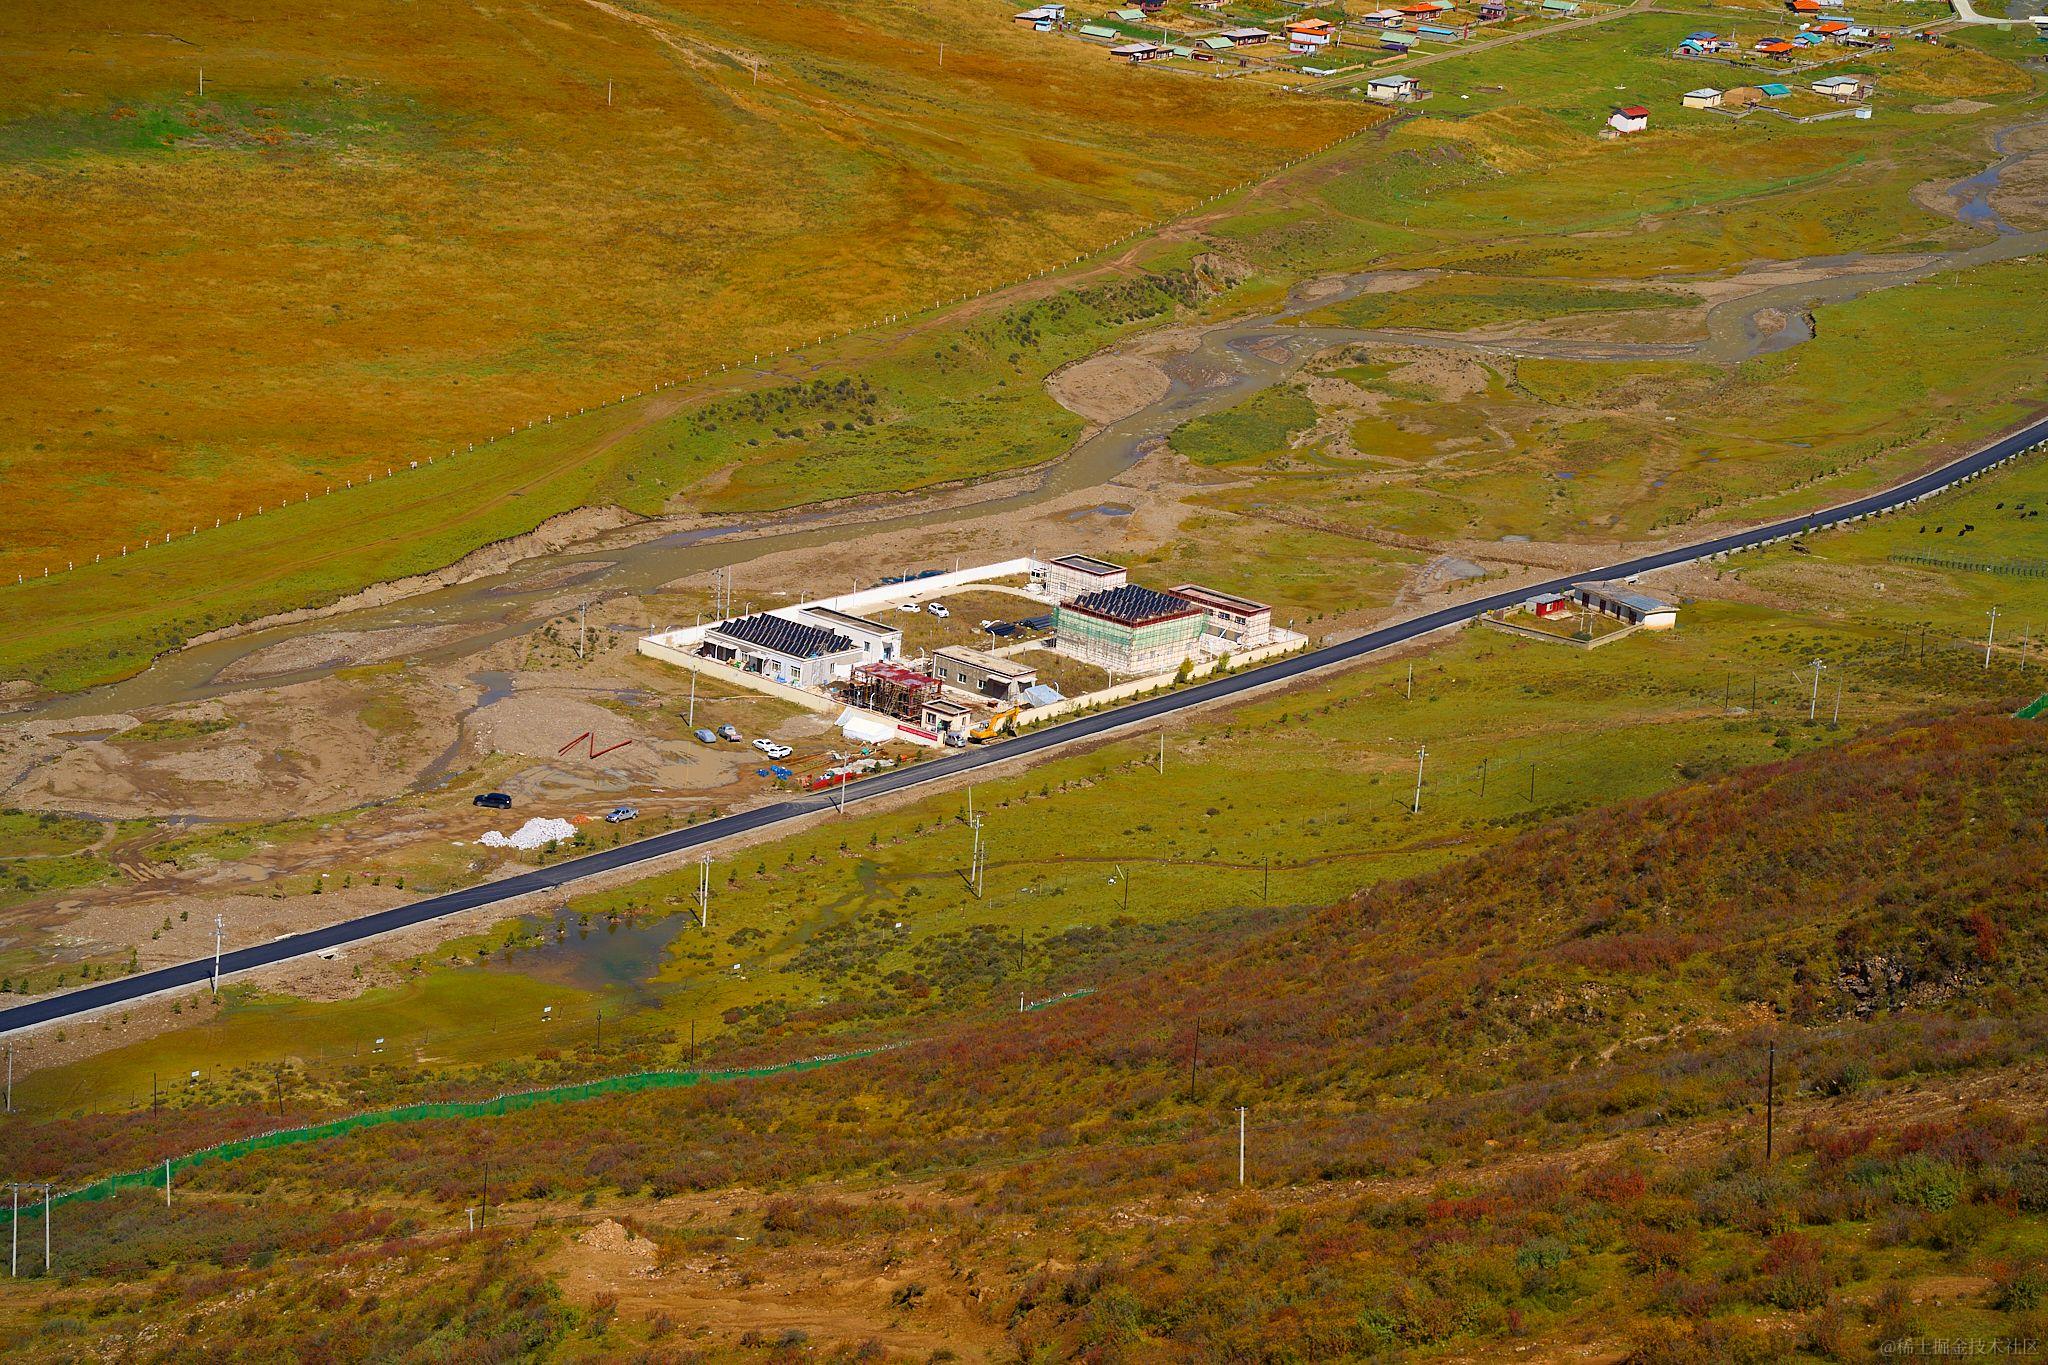
举个例子,如果是使用真实镜头拍摄的大景深的图像,那么焦点之外(背景)的物体被模糊成了类似圆形或五边形的光斑,并且焦外高光部分会变得更亮,以这张我在色达拍的照为例:
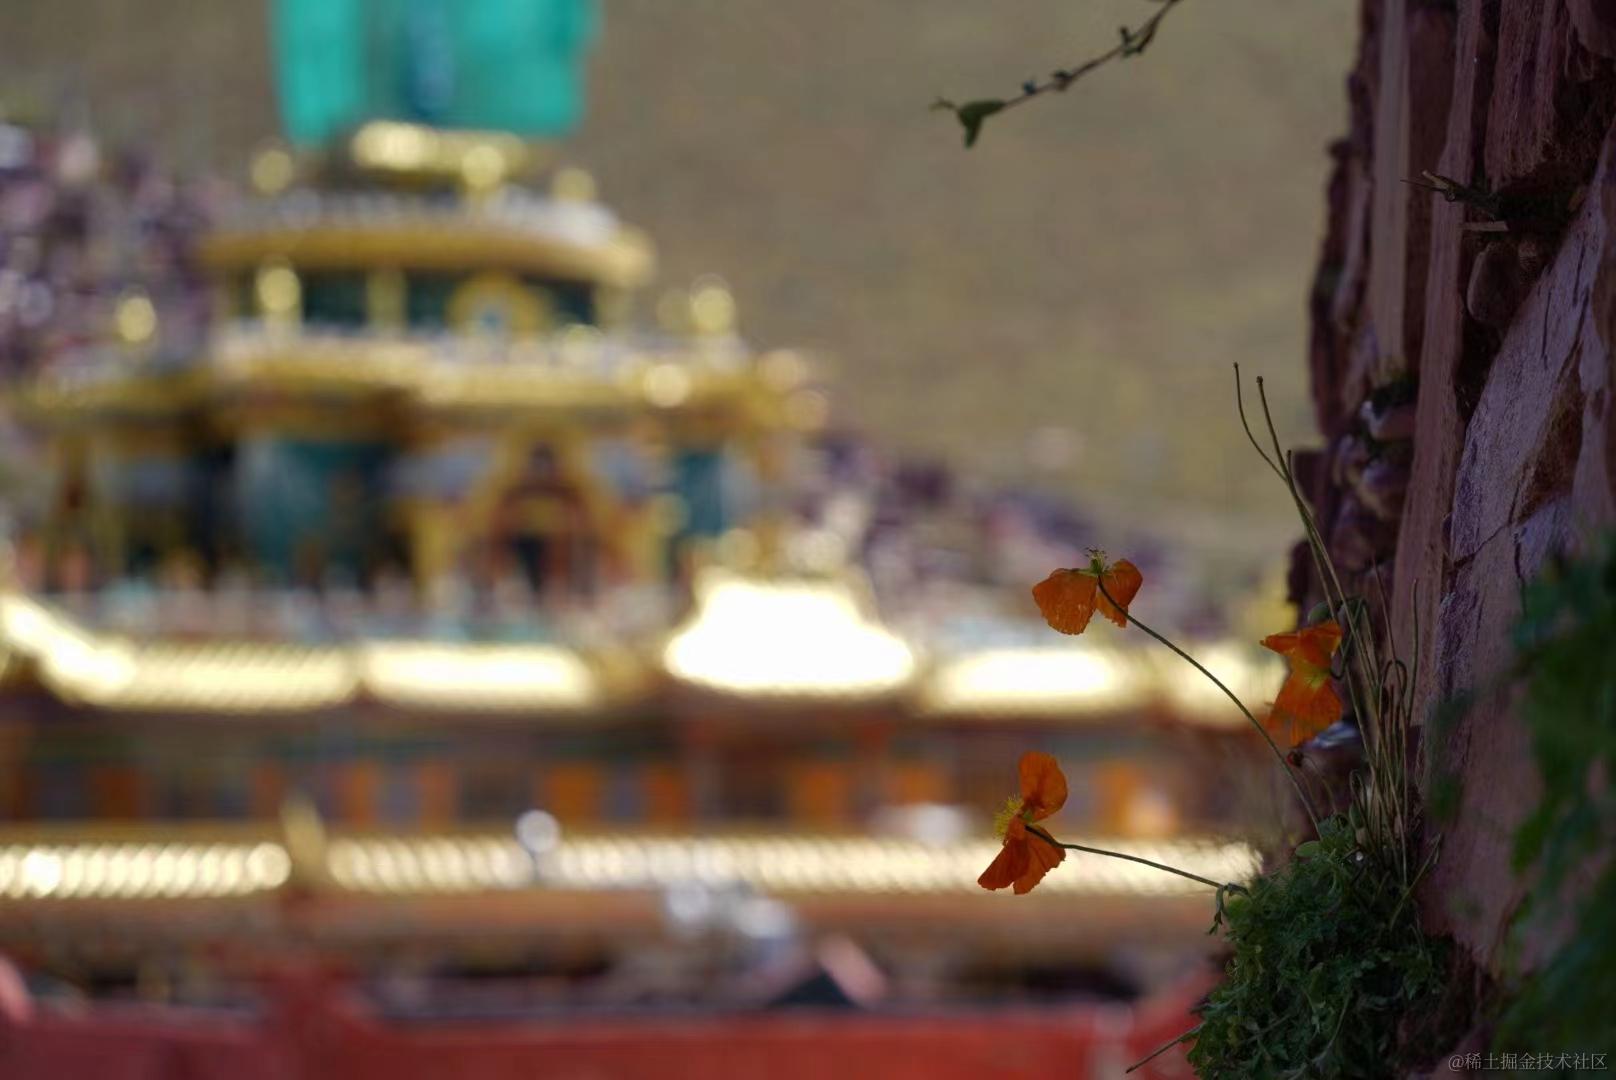
可以看到焦外的高光部分都变得更加的亮,且形状为圆形或五边形。
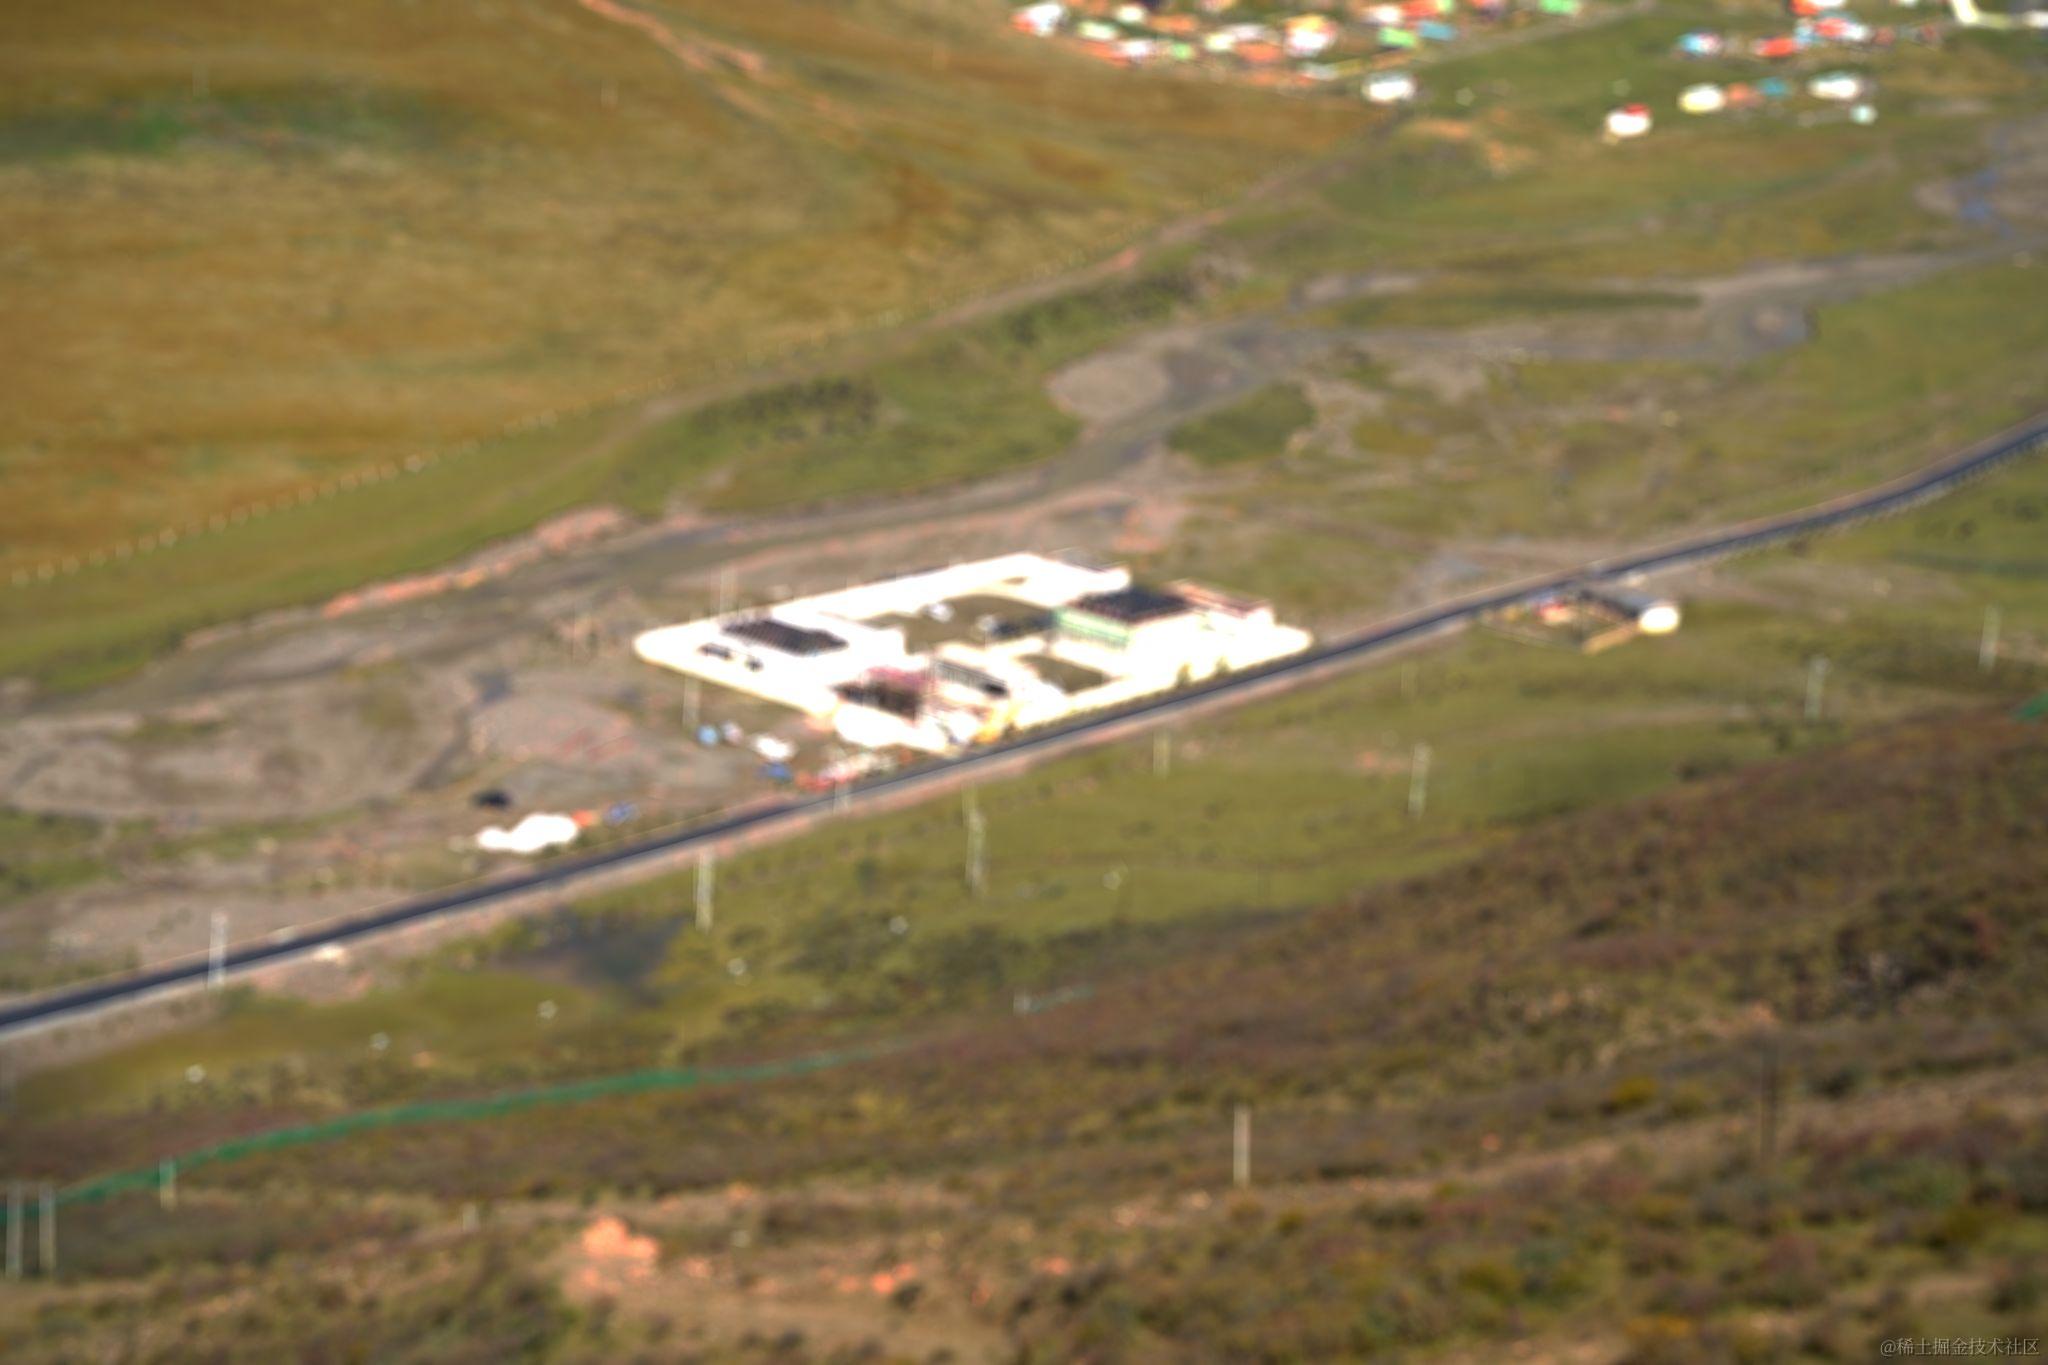
如果我们采用其他模糊算法,例如高斯模糊来模拟这种效果的话是不理想的,例如(图片来自参考资料1),下图是使用镜头模糊处理后的图像:

下图是使用高斯模糊处理后的图像:
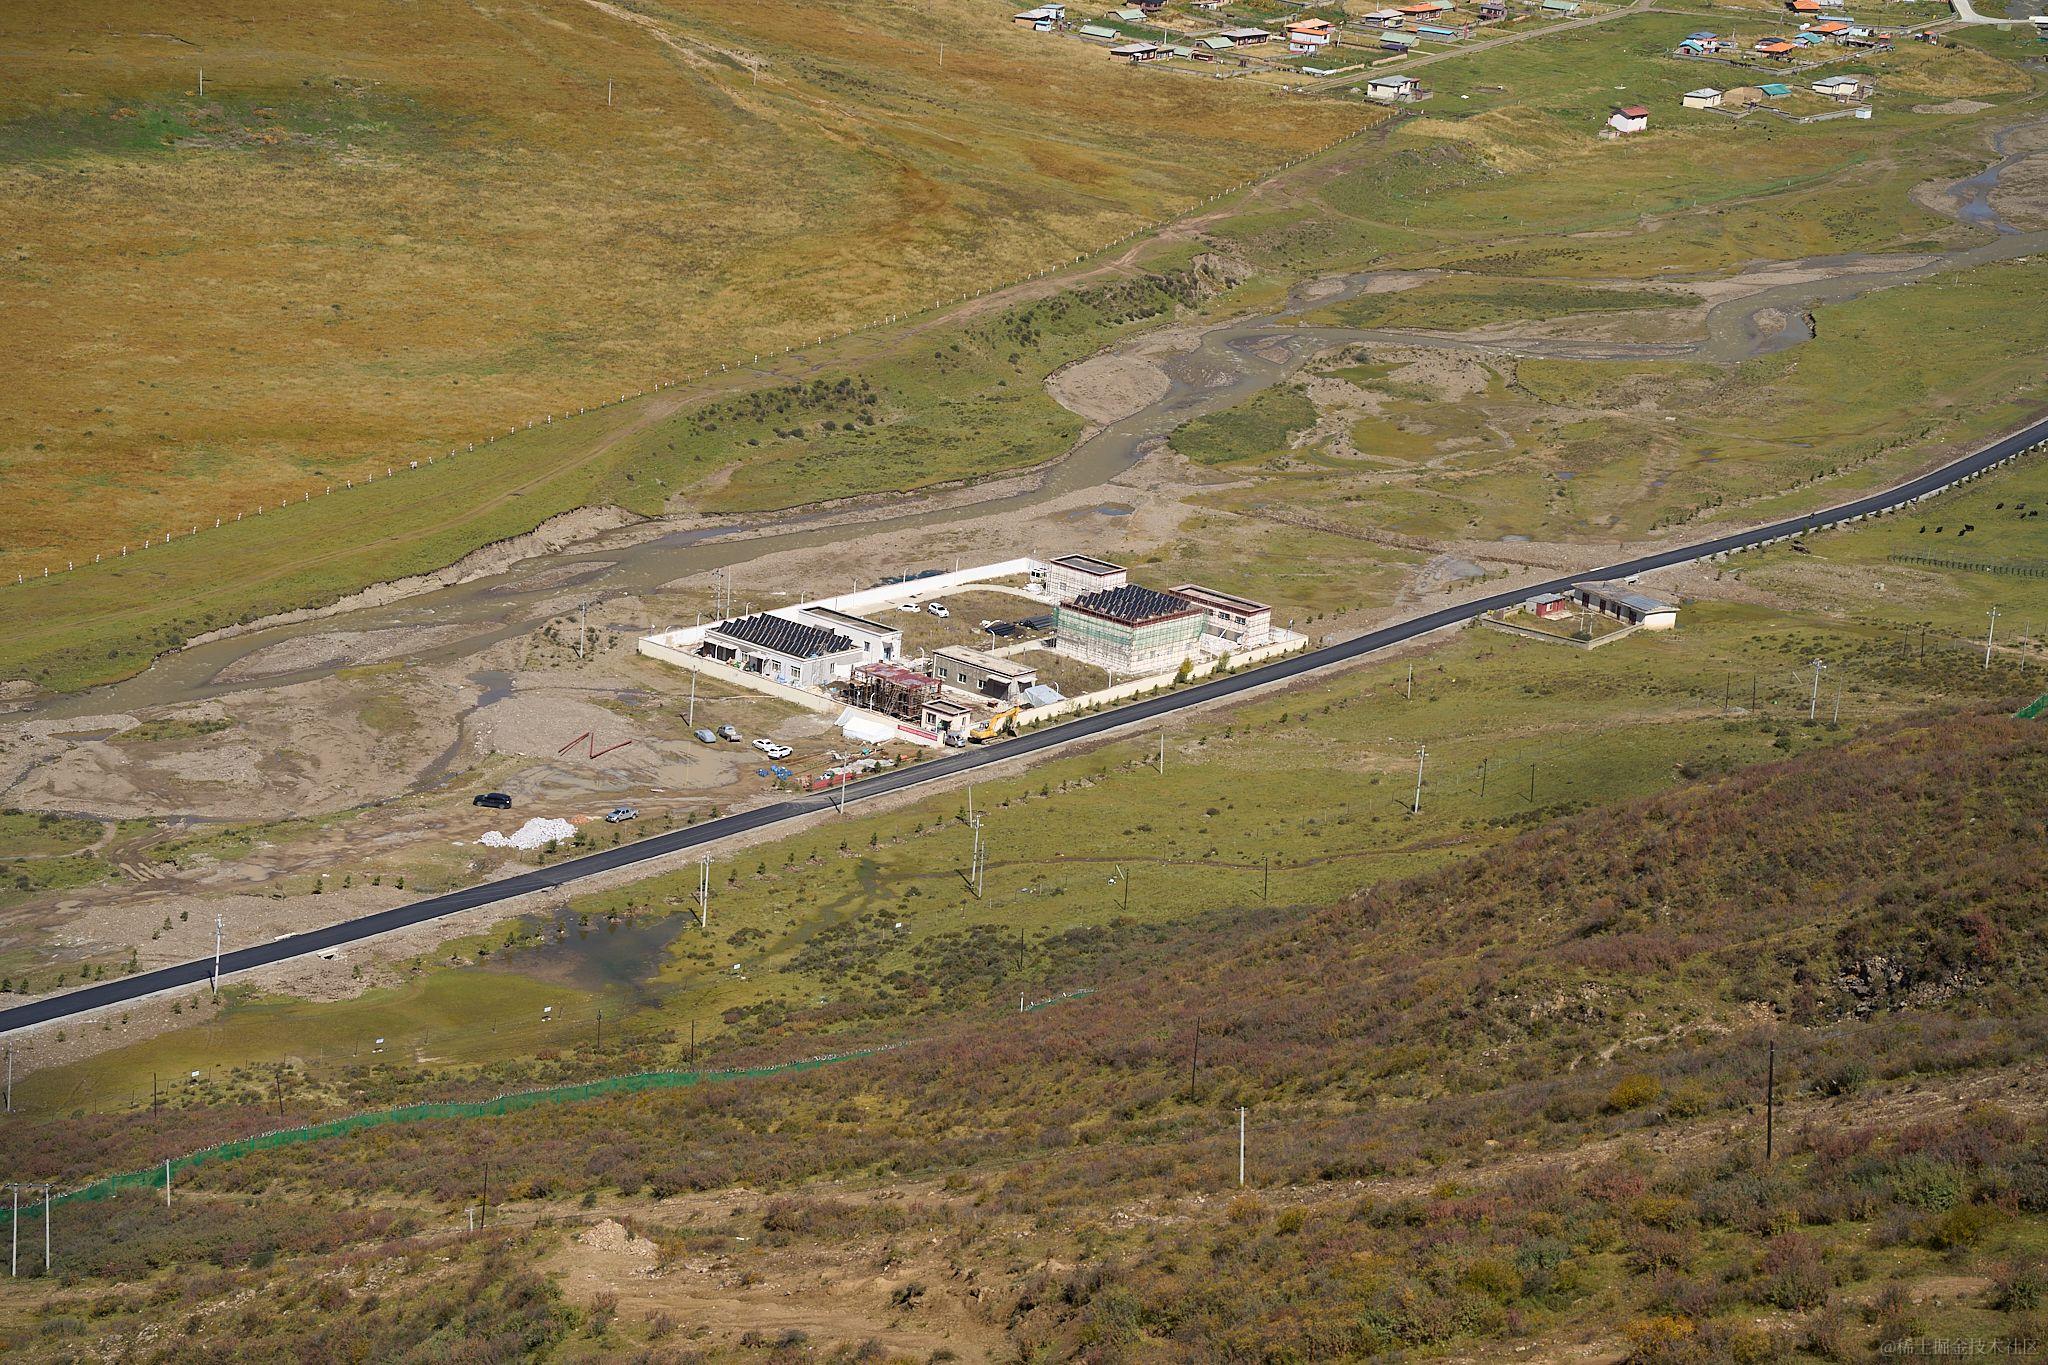
下图为原图:

可以看出,高斯模糊显然不如镜头模糊真实。
那么,镜头模糊的算法要怎么实现呢?
优质解答:我也不会。
但是,有大神已经给出了可以直接使用的算法,我们直接用就行。
另外使用镜头模糊需要使用到 傅立叶变换,所以还需要一个傅立叶变换工具类。
具体代码如下:
LensBlurFilter.kt:
class LensBlurFilter : AbstractBufferedImageOp() {


    /**
     * Get the radius of the kernel.
     * @return the radius
     */
    /**
     * Set the radius of the kernel, and hence the amount of blur.
     * @param radius the radius of the blur in pixels.
     */
    var radius = 10f
    var bloom = 2f
    var bloomThreshold = 192f
    private val angle = 0f
    var sides = 5
    override fun filter(src: BufferedImage, dst: BufferedImage): BufferedImage {


        var dst: BufferedImage? = dst
        val width = src.width
        val height = src.height
        var rows = 1
        var cols = 1
        var log2rows = 0
        var log2cols = 0
        val iradius = ceil(radius.toDouble()).toInt()
        var tileWidth = 128
        var tileHeight = tileWidth
        val adjustedWidth = (width + iradius * 2)
        val adjustedHeight = (height + iradius * 2)
        tileWidth = if (iradius < 32) min(128.0, (width + 2 * iradius).toDouble()).toInt() else min(
            256.0,
            (width + 2 * iradius).toDouble()
        )
            .toInt()
        tileHeight = if (iradius < 32) min(128.0, (height + 2 * iradius).toDouble()).toInt() else min(
            256.0,
            (height + 2 * iradius).toDouble()
        )
            .toInt()
        if (dst == null) dst = BufferedImage(width, height, BufferedImage.TYPE_INT_ARGB)
        while (rows < tileHeight) {


            rows *= 2
            log2rows++
        }
        while (cols < tileWidth) {


            cols *= 2
            log2cols++
        }
        val w = cols
        val h = rows
        tileWidth = w
        tileHeight = h // tileWidth, w, and cols are always all the same
        val fft = FFT(
            max(log2rows.toDouble(), log2cols.toDouble()).toInt()
        )
        val rgb = IntArray(w * h)
        val mask = Array(2) {

     FloatArray(w * h) }
        val gb = Array(2) {

     FloatArray(w * h) }
        val ar = Array(2) {

     FloatArray(w * h) }

        // Create the kernel
        val polyAngle = Math.PI / sides
        val polyScale = 1.0f / cos(polyAngle)
        val r2 = (radius * radius).toDouble()
        val rangle = Math.toRadians(angle.toDouble())
        var total = 0f
        var i = 0
        for (y in 0 until h) {


            for (x in 0 until w) {


                val dx = (x - w / 2f).toDouble()
                val dy = (y - h / 2f).toDouble()
                var r = dx * dx + dy * dy
                var f = (if (r < r2) 1 else 0).toDouble()
                if (f != 0.0) {


                    r = sqrt(r)
                    if (sides != 0) {


                        var a = atan2(dy, dx) + rangle
                        a = mod(a, polyAngle * 2) - polyAngle
                        f = cos(a) * polyScale
                    } else f = 1.0
                    f = (if (f * r < radius) 1 else 0).toDouble()
                }
                total += f.toFloat()
                mask[0][i] = f.toFloat()
                mask[1][i] = 0f
                i++
            }
        }

        // Normalize the kernel
        i = 0
        for (y in 0 until h) {


            for (x in 0 until w) {


                mask[0][i] /= total
                i++
            }
        }
        fft.transform2D(mask[0], mask[1], w, h, true)
        var tileY = -iradius
        while (tileY < height) {


            var tileX = -iradius
            while (tileX < width) {


//                System.out.println("Tile: "+tileX+" "+tileY+" "+tileWidth+" "+tileHeight);

                // Clip the tile to the image bounds
                var tx = tileX
                var ty = tileY
                var tw = tileWidth
                var th = tileHeight
                var fx = 0
                var fy = 0
                if (tx < 0) {


                    tw += tx
                    fx -= tx
                    tx = 0
                }
                if (ty < 0) {


                    th += ty
                    fy -= ty
                    ty = 0
                }
                if (tx + tw > width) tw = width - tx
                if (ty + th > height) th = height - ty
                src.getRGB(tx, ty, tw, th, rgb, fy * w + fx, w)

                // Create a float array from the pixels. Any pixels off the edge of the source image get duplicated from the edge.
                i = 0
                for (y in 0 until h) {


                    val imageY = y + tileY
                    var j: Int
                    j = if (imageY < 0) fy else if (imageY > height) fy + th - 1 else y
                    j *= w
                    for (x in 0 until w) {


                        val imageX = x + tileX
                        var k: Int
                        k = if (imageX < 0) fx else if (imageX > width) fx + tw - 1 else x
                        k += j
                        ar[0][i] = (rgb[k] shr 24 and 0xff).toFloat()
                        var r = (rgb[k] shr 16 and 0xff).toFloat()
                        var g = (rgb[k] shr 8 and 0xff).toFloat()
                        var b = (rgb[k] and 0xff).toFloat()

                        // Bloom...
                        if (r > bloomThreshold) r *= bloom
                        //							r = bloomThreshold + (r-bloomThreshold) * bloom;
                        if (g > bloomThreshold) g *= bloom
                        //							g = bloomThreshold + (g-bloomThreshold) * bloom;
                        if (b > bloomThreshold) b *= bloom
                        //							b = bloomThreshold + (b-bloomThreshold) * bloom;
                        ar[1][i] = r
                        gb[0][i] = g
                        gb[1][i] = b
                        i++
                        k++
                    }
                }

                // Transform into frequency space
                fft.transform2D(ar[0], ar[1], cols, rows, true)
                fft.transform2D(gb[0], gb[1], cols, rows, true)

                // Multiply the transformed pixels by the transformed kernel
                i = 0
                for (y in 0 until h) {


                    for (x in 0 until w) {


                        var re = ar[0][i]
                        var im = ar[1][i]
                        val rem = mask[0][i]
                        val imm = mask[1][i]
                        ar[0][i] = re * rem - im * imm
                        ar[1][i] = re * imm + im * rem
                        re = gb[0][i]
                        im = gb[1][i]
                        gb[0][i] = re * rem - im * imm
                        gb[1][i] = re * imm + im * rem
                        i++
                    }
                }

                // Transform back
                fft.transform2D(ar[0], ar[1], cols, rows, false)
                fft.transform2D(gb[0], gb[1], cols, rows, false)

                // Convert back to RGB pixels, with quadrant remapping
                val row_flip = w shr 1
                val col_flip = h shr 1
                var index = 0

                // don't bother converting pixels off image edges
                for (y in 0 until w) {


                    val ym = y xor row_flip
                    val yi = ym * cols
                    for (x in 0 until w) {


                        val xm = yi + (x xor col_flip)
                        val a = ar[0][xm].toInt()
                        var r = ar[1][xm].toInt()
                        var g = gb[0][xm].toInt()
                        var b = gb[1][xm].toInt()

                        // Clamp high pixels due to blooming
                        if (r > 255) r = 255
                        if (g > 255) g = 255
                        if (b > 255) b = 255
                        val argb = a shl 24 or (r shl 16) or (g shl 8) or b
                        rgb[index++] = argb
                    }
                }

                // Clip to the output image
                tx = tileX + iradius
                ty = tileY + iradius
                tw = tileWidth - 2 * iradius
                th = tileHeight - 2 * iradius
                if (tx + tw > width) tw = width - tx
                if (ty + th > height) th = height - ty
                dst.setRGB(tx, ty, tw, th, rgb, iradius * w + iradius, w)
                tileX += tileWidth - 2 * iradius
            }
            tileY += tileHeight - 2 * iradius
        }
        return dst
    }

    override fun toString(): String {


        return "Blur/Lens Blur..."
    }
}
傅立叶帮助类 FFT.kt :
class FFT(logN: Int) {


    // Weighting factors
    protected var w1: FloatArray
    protected var w2: FloatArray
    protected var w3: FloatArray

    init {


        // Prepare the weighting factors
        w1 = FloatArray(logN)
        w2 = FloatArray(logN)
        w3 = FloatArray(logN)
        var N = 1
        for (k in 0 until logN) {


            N = N shl 1
            val angle = -2.0 * Math.PI / N
            w1[k] = sin(0.5 * angle).toFloat()
            w2[k] = -2.0f * w1[k] * w1[k]
            w3[k] = sin(angle).toFloat()
        }
    }

    private fun scramble(n: Int, real: FloatArray, imag: FloatArray) {


        var j = 0
        for (i in 0 until n) {


            if (i > j) {


                var t: Float
                t = real[j]
                real[j] = real[i]
                real[i] = t
                t = imag[j]
                imag[j] = imag[i]
                imag[i] = t
            }
            var m = n shr 1
            while (j >= m && m >= 2) {


                j -= m
                m = m shr 1
            }
            j += m
        }
    }

    private fun butterflies(n: Int, logN: Int, direction: Int, real: FloatArray, imag: FloatArray) {


        var N = 1
        for (k in 0 until logN) {


            var w_re: Float
            var w_im: Float
            var wp_re: Float
            var wp_im: Float
            var temp_re: Float
            var temp_im: Float
            var wt: Float
            val half_N = N
            N = N shl 1
            wt = direction * w1[k]
            wp_re = w2[k]
            wp_im = direction * w3[k]
            w_re = 1.0f
            w_im = 0.0f
            for (offset in 0 until half_N) {


                var i = offset
                while (i < n) {


                    val j = i + half_N
                    val re = real[j]
                    val im = imag[j]
                    temp_re = w_re * re - w_im * im
                    temp_im = w_im * re + w_re * im
                    real[j] = real[i] - temp_re
                    real[i] += temp_re
                    imag[j] = imag[i] - temp_im
                    imag[i] += temp_im
                    i += N
                }
                wt = w_re
                w_re = wt * wp_re - w_im * wp_im + w_re
                w_im = w_im * wp_re + wt * wp_im + w_im
            }
        }
        if (direction == -1) {


            val nr = 1.0f / n
            for (i in 0 until n) {


                real[i] *= nr
                imag[i] *= nr
            }
        }
    }

    fun transform1D(real: FloatArray, imag: FloatArray, logN: Int, n: Int, forward: Boolean) {


        scramble(n, real, imag)
        butterflies(n, logN, if (forward) 1 else -1, real, imag)
    }

    fun transform2D(real: FloatArray, imag: FloatArray, cols: Int, rows: Int, forward: Boolean) {


        val log2cols = log2(cols)
        val log2rows = log2(rows)
        val n = max(rows.toDouble(), cols.toDouble()).toInt()
        val rtemp = FloatArray(n)
        val itemp = FloatArray(n)

        // FFT the rows
        for (y in 0 until rows) {


            val offset = y * cols
            System.arraycopy(real, offset, rtemp, 0, cols)
            System.arraycopy(imag, offset, itemp, 0, cols)
            transform1D(rtemp, itemp, log2cols, cols, forward)
            System.arraycopy(rtemp, 0, real, offset, cols)
            System.arraycopy(itemp, 0, imag, offset, cols)
        }

        // FFT the columns
        for (x in 0 until cols) {


            var index = x
            for (y in 0 until rows) {


                rtemp[y] = real[index]
                itemp[y] = imag[index]
                index += cols
            }
            transform1D(rtemp, itemp, log2rows, rows, forward)
            index = x
            for (y in 0 until rows) {


                real[index] = rtemp[y]
                imag[index] = itemp[y]
                index += cols
            }
        }
    }

    private fun log2(n: Int): Int {


        var m = 1
        var log2n = 0
        while (m < n) {


            m *= 2
            log2n++
        }
        return if (m == n) log2n else -1
    }
}
该算法处理效果如下:
- 原图:
- 处理后:
如何模拟出景深效果?
虽然上面我们已经实现了模糊效果,但是也只是实现了模糊整张图像,这显然不符合我们模糊的根本目的-模拟景深效果。
为了模拟景深效果,我们应该是框选出图像中的主体,然后使用模糊算法模糊掉除主体外的其他部分。
为了实现这个目标,最好的办法是直接更改模糊算法使其支持部分模糊,但是正如上文我所说的,这个算法原理我不是太懂,所以不能贸然去直接改源码,而且这个算法似乎对模糊的图像尺寸有要求。所以直接改源码是行不通的。
那么,我们就另辟蹊径。
其实仔细观察其他后期处理出来的模拟移轴效果的作品,就不难发现,大多数都是将主体置于中间,或中间偏上一点的地方,然后模糊掉其他地方。
而这个主体也不是只单独保留主体部分,而是保留主体所在的一整行图像,或是倾斜的一行图像。
我们为了方便处理,直接认为是保留图像中某一行不模糊。
这样的话,就非常好好处理了,我们将原图像按照设定的主体边框位置切分为三分,其中上下部分做镜头模糊处理,中间部分保留不变,处理完成后再拼合图像即可,代码如下:
- 拆分图像:
    /**
     * @return listOf(topImg, normalImg, bottomImg)
     * */
    private fun BufferedImage.split(
        top: Float,
        bottom: Float
    ): List<BufferedImage> {


        val topHeight = this.height * top
        val bottomHeight = this.height * bottom

        val topImg = BufferedImage(this.width, topHeight.roundToInt(), BufferedImage.TYPE_INT_RGB)
        val bottomImg = BufferedImage(this.width, bottomHeight.roundToInt(), BufferedImage.TYPE_INT_RGB)
        val normalImg = BufferedImage(this.width, this.height - topImg.height - bottomImg.height, BufferedImage.TYPE_INT_RGB)

        val topGraphics2D = topImg.createGraphics()
        topGraphics2D.drawImage(this,
            0, 0, topImg.width, topImg.height,
            0, 0, this.width, topImg.height,
            null)
        topGraphics2D.dispose()

        val bottomGraphics2D = bottomImg.createGraphics()
        bottomGraphics2D.drawImage(this,
            0, 0, bottomImg.width, bottomImg.height,
            0, (this.height * (1f - bottom)).roundToInt(), bottomImg.width, this.height,
            null)
        bottomGraphics2D.dispose()

        val normalGraphics2D = normalImg.createGraphics()
        normalGraphics2D.drawImage(this,
            0, 0, normalImg.width, normalImg.height,
            0, topImg.height, normalImg.width, (this.height * (1f - bottom)).roundToInt(),
            null)
        normalGraphics2D.dispose()

        return listOf(topImg, normalImg, bottomImg)
    }
其中的 top 参数表示要拆分的上边框距离顶部的百分数,bottom 表示下边框距离底部的百分数。返回值为拆分完成的三个图像(BufferedImage)的 List。
- 合并图像:
    private fun mergeImg(
        imgList: List<BufferedImage>
    ): BufferedImage {


        val totalHeight = imgList.sumOf {


            it.height
        }

        val resultImg = BufferedImage(imgList[0].width, totalHeight, BufferedImage.TYPE_INT_RGB)
        val topGraphics2D = resultImg.createGraphics()

        var currentHeight = 0
        imgList.forEach {


            topGraphics2D.drawImage(it, 0, currentHeight, it.width, it.height, null)
            currentHeight += it.height
        }

        topGraphics2D.dispose()

        return resultImg
    }
- 拆分模糊合并:
    suspend fun BufferedImage.blur(
        radius: Float,
        top: Float,
        bottom: Float,
    ): BufferedImage {


        return withContext(Dispatchers.IO) {


            val imgList = this@blur.split(top, bottom)

            val blurTop = imgList[0].blur(radius)
            val blurBottom = imgList[2].blur(radius)

            mergeImg(listOf(blurTop, imgList[1], blurBottom))
        }
    }
其中的 radius 参数可以简单理解为模糊程度。
测试效果如下:
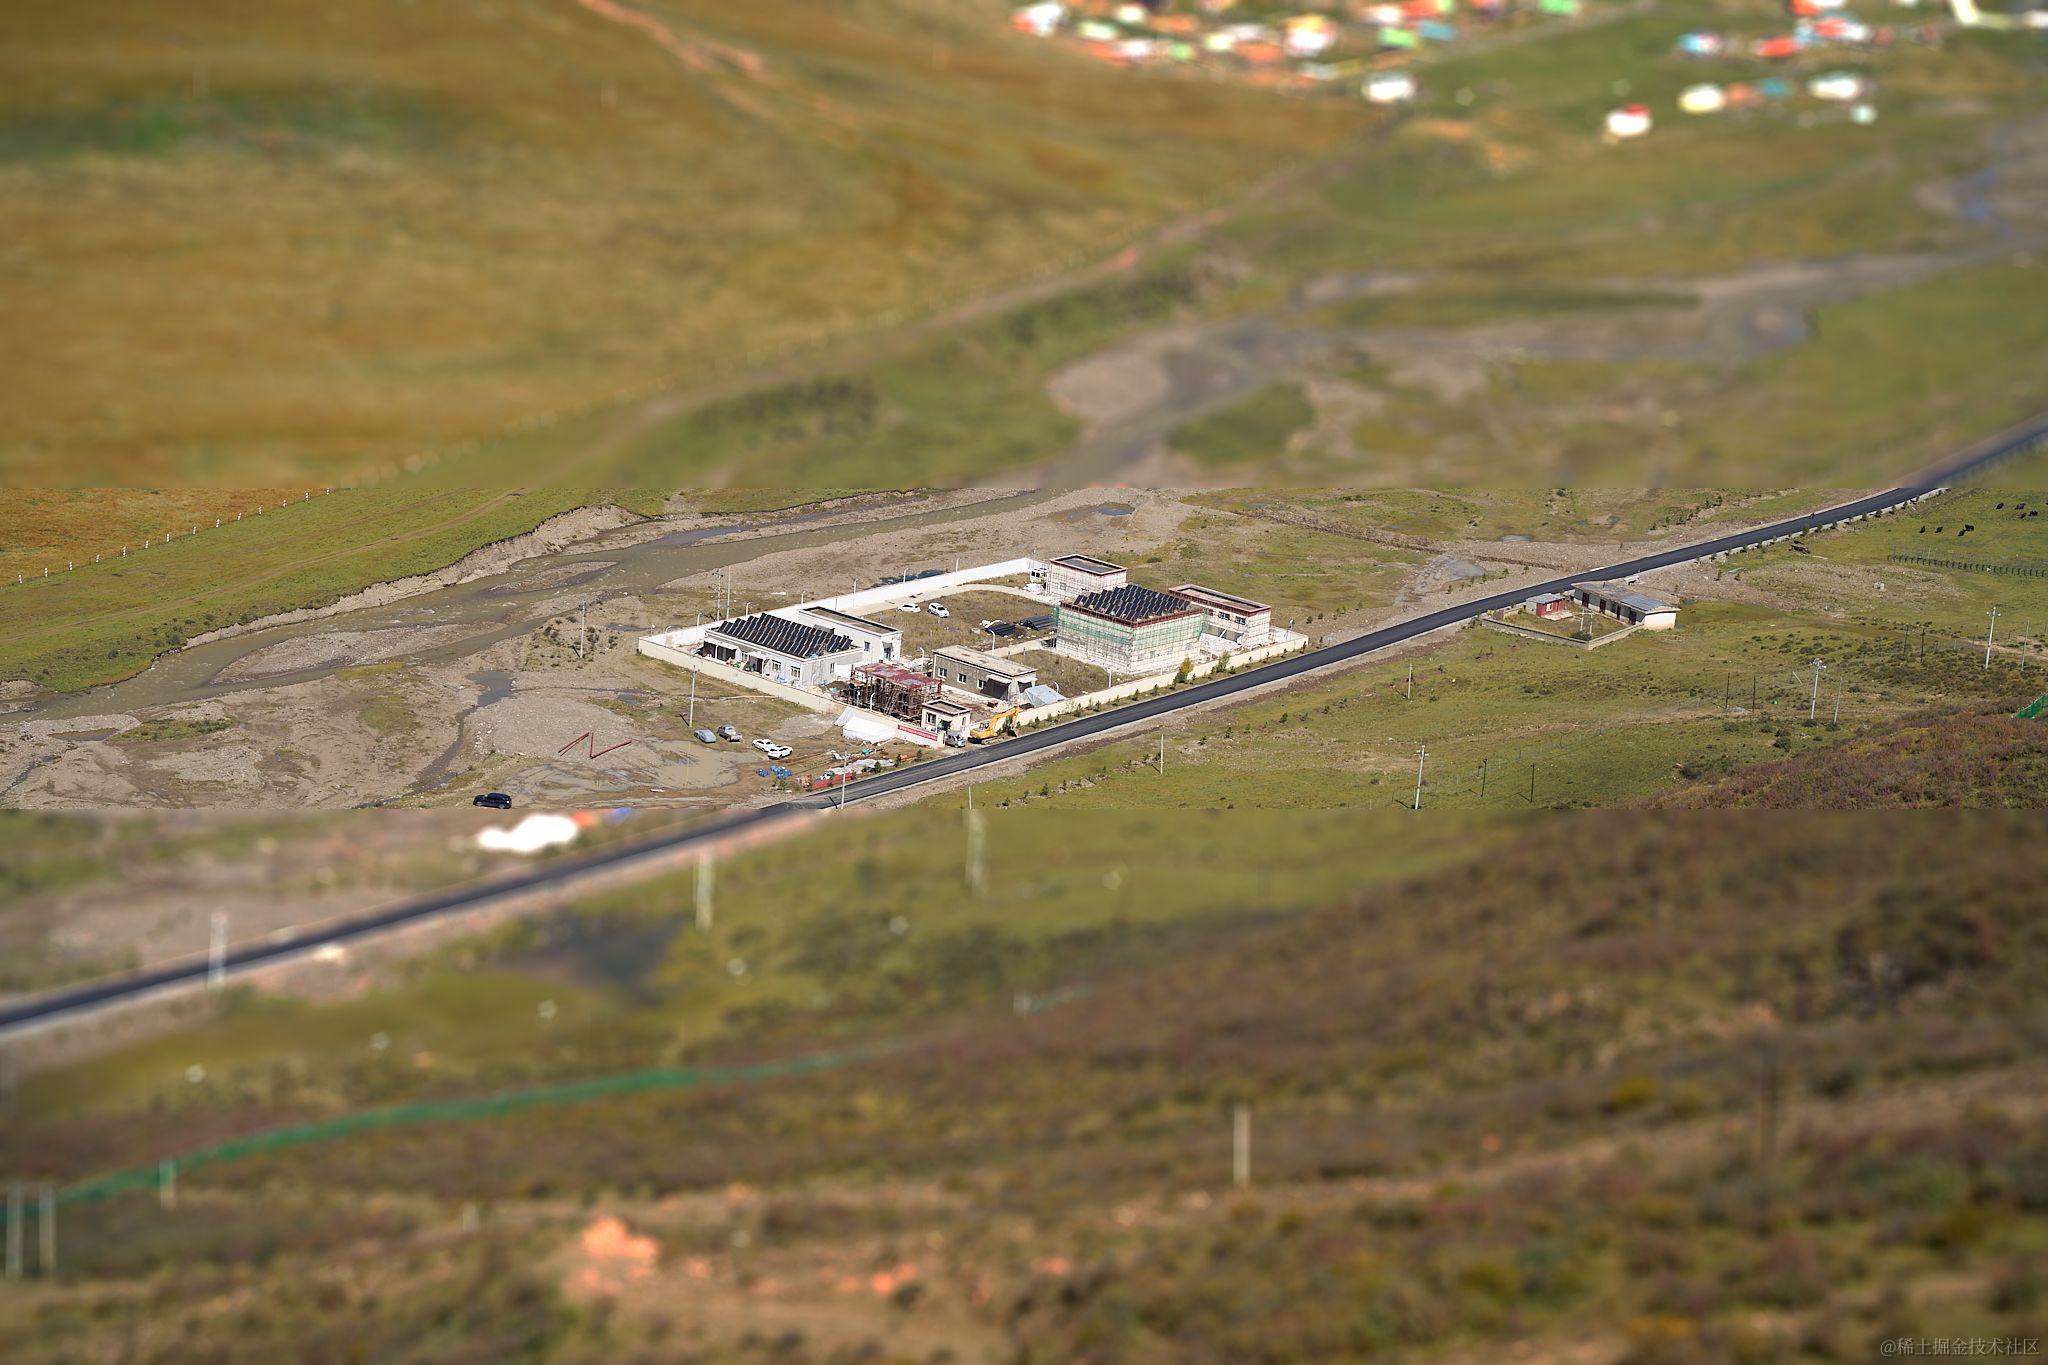
以上为 radius = 10 ; top = 0.36 ; bottom = 0.41 参数处理后的效果。
可以看到,似乎有那么一点味了,但是好像还是差点什么。
没错,因为我们这里只是简单的实现,实际上要想效果更佳,一般保留不模糊的部分应该是倾斜的,并且模糊与不模糊之间应该有一点过渡(羽化)效果,而不是现在这样被生硬的切割开来。
另外,为了视觉效果更好,我们还应该修改图像的饱和度等参数。
修改图像饱和度
为了实现修改图像饱和度,我们需要先了解一些前置知识。
通常,图像的颜色是以 RGB 模型来表示的,比如我们这里的 BufferedImage 获取像素信息使用的 getRGB 就是获取这个像素的 RGB 颜色信息。
这种表示方式相信作为程序员的各位是再熟悉不过了,简单来说就是把一个颜色表示为不同分量的 红色(R)、绿色(G)、B(蓝色)三种颜色的组合。中学物理我们就已经知道了,这三种颜色排列组合几乎可以得出所有的颜色。
但是其实除了 RGB 外,还有其他的颜色表示方式,例如 HSL:
H (Hue):色调,色相
S(Saturation):饱和度
L(lightness): 亮度
色调可以理解为有一个圆形的大调色盘,通过调整 H 分量的参数可以使得指针指向调色盘的不同位置,从而改变基础的颜色信息:

而 S 表示的是颜色的鲜艳程度或者说颜色的深浅,该值越大颜色越深越鲜艳,反之则越浅越单调,当该值足够低时,就成为灰度图。
L 表示的是颜色的亮度,该值越大颜色越亮,当该值足够大时,则颜色直接成为白色了。
三者对颜色的影响可见如图:

由此易知,我们想要改变图像的饱和度的话,需要先把它的颜色由 RGB 改为 HSL。
好在 java 的 AWT 提供了一个方法给我们直接就能把 RGB 颜色模型转为 HSL 颜色模型: Color.RGBtoHSB 。
对了,这里的名字叫 RGBtoHSB 而不是 RGBtoHSL,是因为在 AWT 中亮度翻译为了 brightness,所以叫 HSB,实际上只是名字不同,概念是一样的。
我们编写一个工具类用于更改图像的饱和度、色调、亮度信息:
    /**
     * 调整色相、饱和度、亮度
     *
     * @param image 图片
     * @param satuPer 饱和度
     * @param huePer 色相
     * @param lumPer 亮度
     * */
    suspend fun hslImage(image: BufferedImage, satuPer: Float, huePer: Float, lumPer: Float): BufferedImage {


        return withContext(Dispatchers.IO) {


            val bimg = BufferedImage(image.width, image.height, BufferedImage.TYPE_INT_RGB)
            for (y in 0 until bimg.height) {


                for (x in 0 until bimg.width) {


                    val pixel = image.getRGB(x, y)
                    val r = pixel shr 16 and 0xFF
                    val g = pixel shr 8 and 0xFF
                    val b = pixel and 0xFF

                    val hsb: FloatArray = Color.RGBtoHSB(r, g, b, null)
                    val hue = (hsb[0] + hsb[0] * huePer).coerceIn(0f, 1f)
                    val saturation = (hsb[1] + hsb[1] * satuPer).coerceIn(0f, 1f)
                    val brightness = (hsb[2] + hsb[2] * lumPer).coerceIn(0f, 1f)

                    val rgb = HSBtoRGB(hue, saturation, brightness)

                    bimg.setRGB(x, y, rgb)
                }
            }
            bimg
        }
    }
其中的三个参数 satuPer 、 huePer 、 lumPer 分别表示饱和度、色调、亮度的增益值,取值范围 -1f ~ 1f 之间。
这里我们通过将 原数值 * 增益值 + 原数值 的方式实现修改三个参数值。
需要注意的是,HSL 三个参数值的取值范围都是 0f-1f ,当然,如果你非要超出这个范围也不会出错,只是生成的图像会变得诡异起来而已。
完成参数修改后再通过 HSBtoRGB 将 HSL 模型转为 RGB 模型,然后写回图像 setRGB 即可。
下面看下处理效果,依旧使用上面举例用的图像处理:
以上是设置饱和度增益为 0.8f 的效果。
接下来,我们看下混合了模糊以及饱和度处理的效果:
可以看到,还是有点效果的。
原理和基本处理逻辑讲完了,下面就是实现布局。
界面布局
先看下成品总体布局:
显而易见,和我之前的时间水印助手一样,非常丑
显而易见,和我之前的时间水印助手一样,使用了左右分栏的布局方式(毕竟现在电脑屏幕都是宽屏嘛)。
左边是图像预览区,右边是控制区。
左边的图像预览区没有选择图像时支持拖拽图像进入和点击选择图像,已选择图像后支持点击查看大图。
右边的控制区就是一堆 Slider 堆叠而成的。
其布局部分其实和时间水印助手几乎别无二致,所以这里不再赘述。
另外可以稍微说一下我自己实现的查看大图。
在桌面端,不同于移动端,桌面端本身就是多窗口形式的程序,所以我在这里查看大图写的也是在一个新全屏窗口中打开图像:
    if (applicationState.isShowPreviewWindow && applicationState.showImg != null) {


        Window(
            title = "预览",
            onCloseRequest = {


                applicationState.togglePreviewWindow(false)
            },
            state = rememberWindowState().apply {


                position = WindowPosition(Alignment.Center)
                placement = WindowPlacement.Fullscreen
            }
        ) {


            ShowImgView(applicationState.showImg!!.toComposeImageBitmap())
        }
    }
并且通过设置 WindowState 的 placement 属性为 WindowPlacement.Fullscreen 来实现窗口默认打开时是全屏。
在预览窗口的 UI 部分 ShowImgView,通过 Modifier.onPointerEvent() 修饰符分别监听 PointerEventType.Scroll 鼠标滚轮事件用于缩放图像、PointerEventType.Move 鼠标移动事件用于自由的移动图像。
并在实际显示图像的 Image 中应用:
modifier = Modifier
                .fillMaxSize()
                .graphicsLayer {


                    scaleX = scaleNumber
                    scaleY = scaleNumber

                    translationX = offset.x
                    translationY = offset.y
                }
            ,
来实现滚动鼠标滚轮缩放图像,移动鼠标来移动图像。
同时,如果已经应用了缩放,则显示一个提示按钮提示当前缩放倍数,并支持点击按钮还原:
        AnimatedVisibility(
            visible = isShowScaleTip
        ) {


            Text(
                "${

      scaleNumber}X",
                modifier = Modifier.background(MaterialTheme.colors.surface),
                color = MaterialTheme.colors.onSurface,
                fontSize = 48.sp
            )
        }

        AnimatedVisibility(
            visible = offset != Offset.Zero || scaleNumber != 1f,
            modifier = Modifier.align(Alignment.BottomCenter)
        ) {


            OutlinedButton(
                onClick = {


                    offset = Offset.Zero
                    scaleNumber = 1f
                },
            ) {


                Text("恢复")
            }
        }
完整的图像预览代码如下:
@OptIn(ExperimentalComposeUiApi::class)
@Composable
fun ShowImgView(
    img: ImageBitmap
) {


    var scaleNumber by remember {

     mutableStateOf(1f) }
    var offset by remember {

     mutableStateOf(Offset.Zero) }
    var isShowScaleTip by remember {

     mutableStateOf(false) }

    LaunchedEffect(isShowScaleTip) {


        delay(2000)
        isShowScaleTip = false
    }

    Box(
        Modifier
            .fillMaxSize()
            .onPointerEvent(PointerEventType.Scroll) {


                scaleNumber = (scaleNumber - it.changes.first().scrollDelta.y).coerceIn(1f, 20f)
                isShowScaleTip = true
            }
            .onPointerEvent(PointerEventType.Move) {


                if (it.changes.first().pressed) {


                    offset -= (it.changes.first().previousPosition - it.changes.first().position)
                }
            },
        contentAlignment = Alignment.Center
    ) {


        Image(
            bitmap = img,
            contentDescription = null,
            contentScale = ContentScale.Fit,
            modifier = Modifier
                .fillMaxSize()
                .graphicsLayer {


                    scaleX = scaleNumber
                    scaleY = scaleNumber

                    translationX = offset.x
                    translationY = offset.y
                }
            ,
        )

        AnimatedVisibility(
            visible = isShowScaleTip
        ) {


            Text(
                "${

      scaleNumber}X",
                modifier = Modifier.background(MaterialTheme.colors.surface),
                color = MaterialTheme.colors.onSurface,
                fontSize = 48.sp
            )
        }

        AnimatedVisibility(
            visible = offset != Offset.Zero || scaleNumber != 1f,
            modifier = Modifier.align(Alignment.BottomCenter)
        ) {


            OutlinedButton(
                onClick = {


                    offset = Offset.Zero
                    scaleNumber = 1f
                },
            ) {


                Text("恢复")
            }
        }
    }
}
总结
至此,我们的移轴助手就算是开发完成了,只是目前的效果还不算太好,我也会持续的抽出时间来慢慢完善,感兴趣的可以 star 一下:
完整代码地址: TiltshiftHelper