环境准备
准备三台虚拟机及相应软件包
apache服务器 192.168.30.25
apr-1.6.3.tar.gz apr-util-1.6.1.tar.gz httpd-2.4.33.tar.bz2 wordpress-4.9.4-zh_CN.tar.gz
php服务器 192.168.30.26
php-7.1.18.tar.bz2 wordpress-4.9.4-zh_CN.tar.gz
mariadb服务器 192.168.30.27
mariadb-10.2.15-linux-x86_64.tar.gz
由于是最小化安装的系统,这里使用光盘镜像配置了yum源,也建议大家都配好yum源
拓扑图:
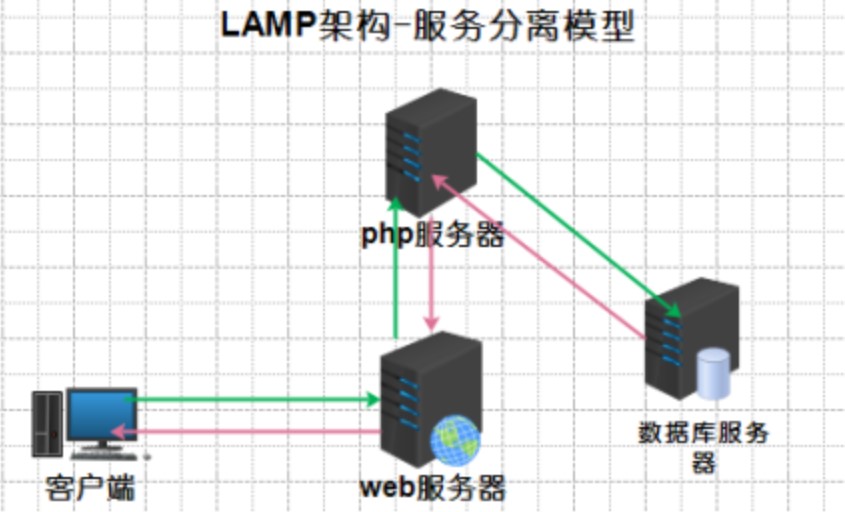
安装顺序:apache >>> mariadb >>> php
Checklist:
- 准备项
| 项目 | 值 |
|---|---|
| apache服务器 | 192.168.30.25 |
| httpd服务用户 | useradd -r -s /sbin/nologin -M apache |
| httpd软件安装目录 | /app/http2433 |
| http DocumentRoot | /var/www/wordpress |
| PHP服务器 | 192.168.30.26 |
| PHP服务用户 | useradd -r -s /sbin/nologin -M apache |
| PHP软件安装目录 | /app/php |
| mariadb服务器 | 192.168.30.27 |
| mariadb用户 | useradd -r -s /sbin/nologin -M mysql |
| mariadb安装路径 | /usr/local/ |
| mariadb 数据存放路径 | datadir=/data/mysqldb |
| wordpress数据库 | wordpress |
| wordpress数据库账户 | wpadmin |
简略步骤
1. 准备环境(干净的环境,已配yum仓库,上传各自需要的源码包)
2. 编译安装httpd
3. 配置httpd.conf以及虚拟机主机配置文件
4. 安装二进制mariadb包,并配置conf和创建wordpress数据库
5. 编译安装PHP并配置fcgi
6. 安装wordpress程序包
7. 测试验证
- httpd编译安装
[root@apache 09:08:22 ~]#cd /opt
[root@apache 09:08:24 opt]#ls
apr-1.6.3.tar.gz apr-util-1.6.1.tar.gz httpd-2.4.33.tar.bz2 wordpress-4.9.4-zh_CN.tar.gz
[root@apache 09:08:25 opt]#useradd -r -s /sbin/nologin -M apache
[root@apache 09:09:13 opt]#tar -xf httpd-2.4.33.tar.bz2
[root@apache 09:09:33 opt]#tar -xf apr-1.6.3.tar.gz -C httpd-2.4.33/srclib/
[root@apache 09:10:35 opt]#tar -xf apr-util-1.6.1.tar.gz -C httpd-2.4.33/srclib/
[root@apache 09:10:51 opt]#mv httpd-2.4.33/srclib/apr-1.6.3/ httpd-2.4.33/srclib/apr
[root@apache 09:11:26 opt]#mv httpd-2.4.33/srclib/apr-util-1.6.1/ httpd-2.4.33/srclib/apr-util
[root@apache 09:11:47 opt]#mkdir /app
[root@apache 09:12:27 opt]#yum install -y -q pcre-devel openssl-devel expat-devel libxml2-devel bzip2-devel libmcrypt-devel
[root@apache 09:13:35 opt]#
[root@apache 09:15:00 opt]#cd httpd-2.4.33/
[root@apache 09:16:10 httpd-2.4.33]#./configure --prefix=/app/httpd2433 \
> --enable-so \
> --enable-ssl \
> --enable-cgi \
> --enable-rewrite \
> --with-zlib \
> --with-pcre \
> --with-included-apr \
> --enable-modules=most \
> --enable-mpms-shared=all \
> --with-mpm=prefork

======编译中间过程省略========

config.status: creating build/pkg/pkginfo
config.status: creating build/config_vars.sh
config.status: creating include/ap_config_auto.h
config.status: executing default commands
configure: summary of build options:
    Server Version: 2.4.33
    Install prefix: /app/httpd2433
    C compiler: gcc -std=gnu99
    CFLAGS: -g -O2 -pthread
    CPPFLAGS: -DLINUX -D_REENTRANT -D_GNU_SOURCE
    LDFLAGS:
    LIBS:
    C preprocessor: gcc -E

[root@apache 09:29:19 httpd-2.4.33]# make -j 2 && make install

======编译中间过程省略========

Installing configuration files
mkdir /app/httpd2433/conf
mkdir /app/httpd2433/conf/extra
mkdir /app/httpd2433/conf/original
mkdir /app/httpd2433/conf/original/extra
Installing HTML documents
mkdir /app/httpd2433/htdocs
Installing error documents
mkdir /app/httpd2433/error
Installing icons
mkdir /app/httpd2433/icons
mkdir /app/httpd2433/logs
Installing CGIs
mkdir /app/httpd2433/cgi-bin
Installing header files
Installing build system files
Installing man pages and online manual
mkdir /app/httpd2433/man
mkdir /app/httpd2433/man/man1
mkdir /app/httpd2433/man/man8
mkdir /app/httpd2433/manual
make[1]: Leaving directory `/opt/httpd-2.4.33`

[root@apache 09:46:13 httpd-2.4.33]#
[root@apache 09:46:13 httpd-2.4.33]#echo 'export PATH=/app/httpd2433/bin:$PATH' > /etc/profile.d/httpd.sh
[root@apache 10:12:47 httpd-2.4.33]#. /etc/profile.d/httpd.sh
- httpd.conf配置以及虚拟主机配置
[root@apache 10:12:57 httpd-2.4.33]#sed -i 's/^User.*/User apache/' /app/httpd2433/conf/httpd.conf
[root@apache 10:12:58 httpd-2.4.33]#sed -ri 's/^#(ServerName ).*(:80)/\1localhost\2/' /app/httpd2433/conf/httpd.conf
[root@apache 10:13:05 httpd-2.4.33]#sed -ri 's/(^[[:space:]]*DirectoryIndex)(.*)/\1 index.php\2/' /app/httpd2433/conf/httpd.conf
[root@apache 10:14:42 httpd-2.4.33]#sed -i 's/^Group.*/Group apache/' /app/httpd2433/conf/httpd.conf
[root@apache 10:16:58 httpd-2.4.33]#sed -ri 's/^#(.*httpd-vhosts.*)/\1/' /app/httpd2433/conf/httpd.conf
[root@apache 10:18:24 httpd-2.4.33]#sed -ri 's/^#(.*proxy_module.*)/\1/' /app/httpd2433/conf/httpd.conf
[root@apache 10:20:18 httpd-2.4.33]#sed -ri 's/^#(.*proxy_fcgi_module.*)/\1/' /app/httpd2433/conf/httpd.conf

[root@apache 10:45:27 httpd2433]#cat > /app/httpd2433/conf/extra/httpd-vhosts.conf << EOF
> <VirtualHost 192.168.30.25:80>
> DocumentRoot "/var/www/wordpress"
> ServerName www.mywordpress.com
> ErrorLog "logs/mywordpress-error_log"
> CustomLog "logs/mywordpress-access_log" common
> <Directory "/var/www/wordpress">
> Options None
> AllowOverride None
> Require all granted
> </Directory>
> ProxyRequests Off
> ProxyPassMatch ^/(.*\.php)$ fcgi://192.168.30.26:9000/var/www/wordpress/\$1
> </VirtualHost>
> EOF
- 安装二进制mariadb包,配置conf,准备wordpress数据库
[root@mariadb 11:01:06 ~]#cd /opt
[root@mariadb 11:01:10 opt]#ls
mariadb-10.2.15-linux-x86_64.tar.gz rh
[root@mariadb 11:02:06 opt]#tar xf mariadb-10.2.15-linux-x86_64.tar.gz -C /usr/local
[root@mariadb 11:03:36 opt]#cd /usr/local/
[root@mariadb 11:03:46 local]#ln -s mariadb-10.2.15-linux-x86_64 mysql
[root@mariadb 11:03:57 local]#useradd -r -s /sbin/nologin -M mysql
[root@mariadb 11:04:31 local]#chown -R mysql.mysql mysql
[root@mariadb 11:04:47 local]#cd mysql
[root@mariadb 11:05:35 mysql]#mkdir -p /data/mysqldb
[root@mariadb 11:05:42 mysql]#./scripts/mysql_install_db --datadir=/data/mysqldb --user=mysql
Installing MariaDB/MySQL system tables in '/data/mysqldb' ...
OK

========安装过程省略=======================

[root@mariadb 11:09:44 mysql]#sed -i '/\[mysqld\]/a\datadir=\/data\/mysqldb' /etc/my.cnf
[root@mariadb 11:09:50 mysql]#sed -i '/\[mysqld\]/a\skip_name_resolve=on' /etc/my.cnf
[root@mariadb 11:19:10 mysql]#cp support-files/mysql.server /etc/init.d/mysqld
[root@mariadb 11:19:35 mysql]#chkconfig --add mysqld
[root@mariadb 11:19:44 mysql]#chkconfig --list
Note: This output shows SysV services only and does not include native
      systemd services. SysV configuration data might be overridden by native
      systemd configuration.
      If you want to list systemd services use 'systemctl list-unit-files'.
      To see services enabled on particular target use
      'systemctl list-dependencies [target]'.
mysqld 0:off    1:off   2:on    3:on    4:on    5:on    6:off
netconsole 0:off    1:off   2:off   3:off   4:off   5:off   6:off
network 0:off   1:off   2:on    3:on    4:on    5:on    6:off

[root@mariadb 11:20:51 ~]#
[root@mariadb 11:20:52 ~]#echo 'export PATH=/usr/local/mysql/bin:$PATH' > /etc/profile.d/mysqld.sh
[root@mariadb 11:22:59 ~]#. /etc/profile.d/mysqld.sh
[root@mariadb 11:23:47 mysql]#service mysqld start
Starting mysqld (via systemctl): [ OK ]
[root@mariadb 11:23:58 mysql]#mysql
Welcome to the MariaDB monitor. Commands end with ; or \g.
Your MariaDB connection id is 10
Server version: 10.2.15-MariaDB-log MariaDB Server
Copyright (c) 2000, 2018, Oracle, MariaDB Corporation Ab and others.
Type 'help;' or '\h' for help. Type '\c' to clear the current input statement.
MariaDB [(none)]> create database wordpress;
Query OK, 1 row affected (0.00 sec)
MariaDB [(none)]> grant all on wordpress.* to wpadm@'192.168.30.26' identified by 'mywordpress';
Query OK, 0 rows affected (0.01 sec)
MariaDB [(none)]> exit
Bye
[root@mariadb 11:28:00 mysql]#
[root@mariadb 11:28:08 mysql]#
- 编译安装PHP并配置fcgi
[root@php 10:58:45 opt]#pwd
/opt
[root@php 10:58:50 opt]#ls
php-7.1.18.tar.bz2 wordpress-4.9.4-zh_CN.tar.gz
[root@php 10:58:51 opt]#tar xf php-7.1.18.tar.bz2
[root@php 10:59:10 opt]#yum install -y -q pcre-devel openssl-devel expat-devel libxml2-devel bzip2-devel
[root@php 11:32:43 opt]#cd php-7.1.18/
[root@php 11:37:13 php-7.1.18]#./configure --prefix=/app/php \
> --enable-mysqlnd \
> --with-mysqli=mysqlnd \
> --with-openssl \
> --with-pdo-mysql=mysqlnd \
> --enable-mbstring \
> --with-freetype-dir \
> --with-jpeg-dir \
> --with-png-dir \
> --with-zlib \
> --with-libxml-dir=/usr \
> --enable-xml \
> --enable-sockets \
> --enable-fpm \
> --with-config-file-path=/etc \
> --with-config-file-scan-dir=/etc/php.d \
> --enable-maintainer-zts \
> --disable-fileinfo

============中间编译过程省略============

Thank you for using PHP.
config.status: creating php7.spec
config.status: creating main/build-defs.h
config.status: creating scripts/phpize
config.status: creating scripts/man1/phpize.1
config.status: creating scripts/php-config
config.status: creating scripts/man1/php-config.1
config.status: creating sapi/cli/php.1
config.status: creating sapi/fpm/php-fpm.conf
config.status: creating sapi/fpm/www.conf
config.status: creating sapi/fpm/init.d.php-fpm
config.status: creating sapi/fpm/php-fpm.service
config.status: creating sapi/fpm/php-fpm.8
config.status: creating sapi/fpm/status.html
config.status: creating sapi/cgi/php-cgi.1
config.status: creating ext/phar/phar.1
config.status: creating ext/phar/phar.phar.1
config.status: creating main/php_config.h
config.status: executing default commands
[root@php 11:39:56 php-7.1.18]#
[root@php 11:44:40 php-7.1.18]#make -j 2 && make install

===========编译安装过程省略==========
Installing PEAR environment: /app/php/lib/php/
[PEAR] Archive_Tar - installed: 1.4.3
[PEAR] Console_Getopt - installed: 1.4.1
[PEAR] Structures_Graph- installed: 1.1.1
[PEAR] XML_Util - installed: 1.4.2
[PEAR] PEAR - installed: 1.10.5
Wrote PEAR system config file at: /app/php/etc/pear.conf
You may want to add: /app/php/lib/php to your php.ini include_path
/opt/php-7.1.18/build/shtool install -c ext/phar/phar.phar /app/php/bin
ln -s -f phar.phar /app/php/bin/phar
Installing PDO headers: /app/php/include/php/ext/pdo/
[root@php 11:50:37 php-7.1.18]#
[root@php 11:50:37 php-7.1.18]#pwd
/opt/php-7.1.18
[root@php 11:53:56 php-7.1.18]#cp php.ini-production /etc/php.ini
[root@php 11:54:09 php-7.1.18]#cp sapi/fpm/init.d.php-fpm /etc/init.d/php-fpm
[root@php 11:55:27 php-7.1.18]#chmod +x /etc/init.d/php-fpm
[root@php 11:56:00 php-7.1.18]#chkconfig --add php-fpm
[root@php 11:56:07 php-7.1.18]# useradd -r -s /sbin/nologin -M apache
[root@php 12:28:06 php-7.1.18]#cd /app/php/etc/
[root@php 12:28:27 etc]#cp php-fpm.conf.default php-fpm.conf
[root@php 12:29:00 etc]#cp php-fpm.d/www.conf.default php-fpm.d/www.conf
[root@php 12:30:42 etc]#sed -ri 's/(^listen.*)127.0.0.1(.*)/\1192.168.30.26\2/' /app/php/etc/php-fpm.d/www.conf
[root@php 12:38:45 etc]#sed -ri 's/;(.*_clients =).*/\1 192.168.30.25/' /app/php/etc/php-fpm.d/www.conf
[root@php 12:49:55 ~]#sed -ri 's/;(.*php-fpm.pid$)/\1/' /app/php/etc/php-fpm.conf
[root@php 12:56:06 ~]#sed -ri 's/^group.*/group=apache/' /app/php/etc/php-fpm.d/www.conf
[root@php 12:57:03 ~]#sed -ri 's/^user.*/user=apache/' /app/php/etc/php-fpm.d/www.conf
- 安装wordpress
在apache服务器和PHP服务器上都执行以下代码
[root@apache 13:00:33 ~]#cd /opt/
[root@apache 13:00:35 opt]#ls
apr-1.6.3.tar.gz apr-util-1.6.1.tar.gz httpd-2.4.33 httpd-2.4.33.tar.bz2 wordpress-4.9.4-zh_CN.tar.gz
[root@apache 13:00:37 opt]#mkdir -p /var/www
[root@apache 13:00:46 opt]#tar xf wordpress-4.9.4-zh_CN.tar.gz -C /var/www/
[root@apache 13:00:55 opt]#cd /var/www/wordpress/
[root@apache 13:01:46 wordpress]#cp wp-config-sample.php wp-config.php
[root@apache 13:04:46 ~]#sed -ri 's/(.*)database_name_here(.*)/\1wordpress\2/' /var/www/wordpress/wp-config.php
[root@apache 13:06:14 ~]#sed -ri 's/(.*)username_here(.*)/\1wpadm\2/' /var/www/wordpress/wp-config.php
[root@apache 13:06:56 ~]#sed -ri 's/(.*)password_here(.*)/\1mywordpress\2/' /var/www/wordpress/wp-config.php
[root@apache 13:07:55 ~]#sed -ri 's/(.*)localhost(.*)/\1192.168.30.27\2/' /var/www/wordpress/wp-config.php
[root@apache 13:12:37 wordpress]#chown -R apache.apache /var/www/wordpress/
- 启动PHP和httpd服务,验证
[root@php 13:19:52 wordpress]#service php-fpm start
Starting php-fpm done
[root@php 13:20:09 wordpress]#ss -tanl
State Recv-Q Send-Q Local Address:Port Peer Address:Port
LISTEN 0 128 *:111 *:*
LISTEN 0 128 *:22 *:*
LISTEN 0 100 127.0.0.1:25 *:*
LISTEN 0 128 192.168.30.26:9000 *:*    ########9000端口启动成功
LISTEN 0 128 :::111 :::*
LISTEN 0 128 :::22 :::*
LISTEN 0 100 ::1:25 :::*

[root@apache 13:43:23 ~]#apachectl start
[root@apache 13:44:23 ~]#ss -tanl
State Recv-Q Send-Q Local Address:Port Peer Address:Port
LISTEN 0 128 *:111 *:*
LISTEN 0 128 *:22 *:*
LISTEN 0 100 127.0.0.1:25 *:*
LISTEN 0 128 :::111 :::*
LISTEN 0 128 :::80 :::*         ###############80端口开启
LISTEN 0 128 :::22 :::*
LISTEN 0 100 ::1:25 :::*
[root@apache 13:44:41 ~]#
使用同网段客户端,在/etc/hosts文件中加入ServerName,如下:

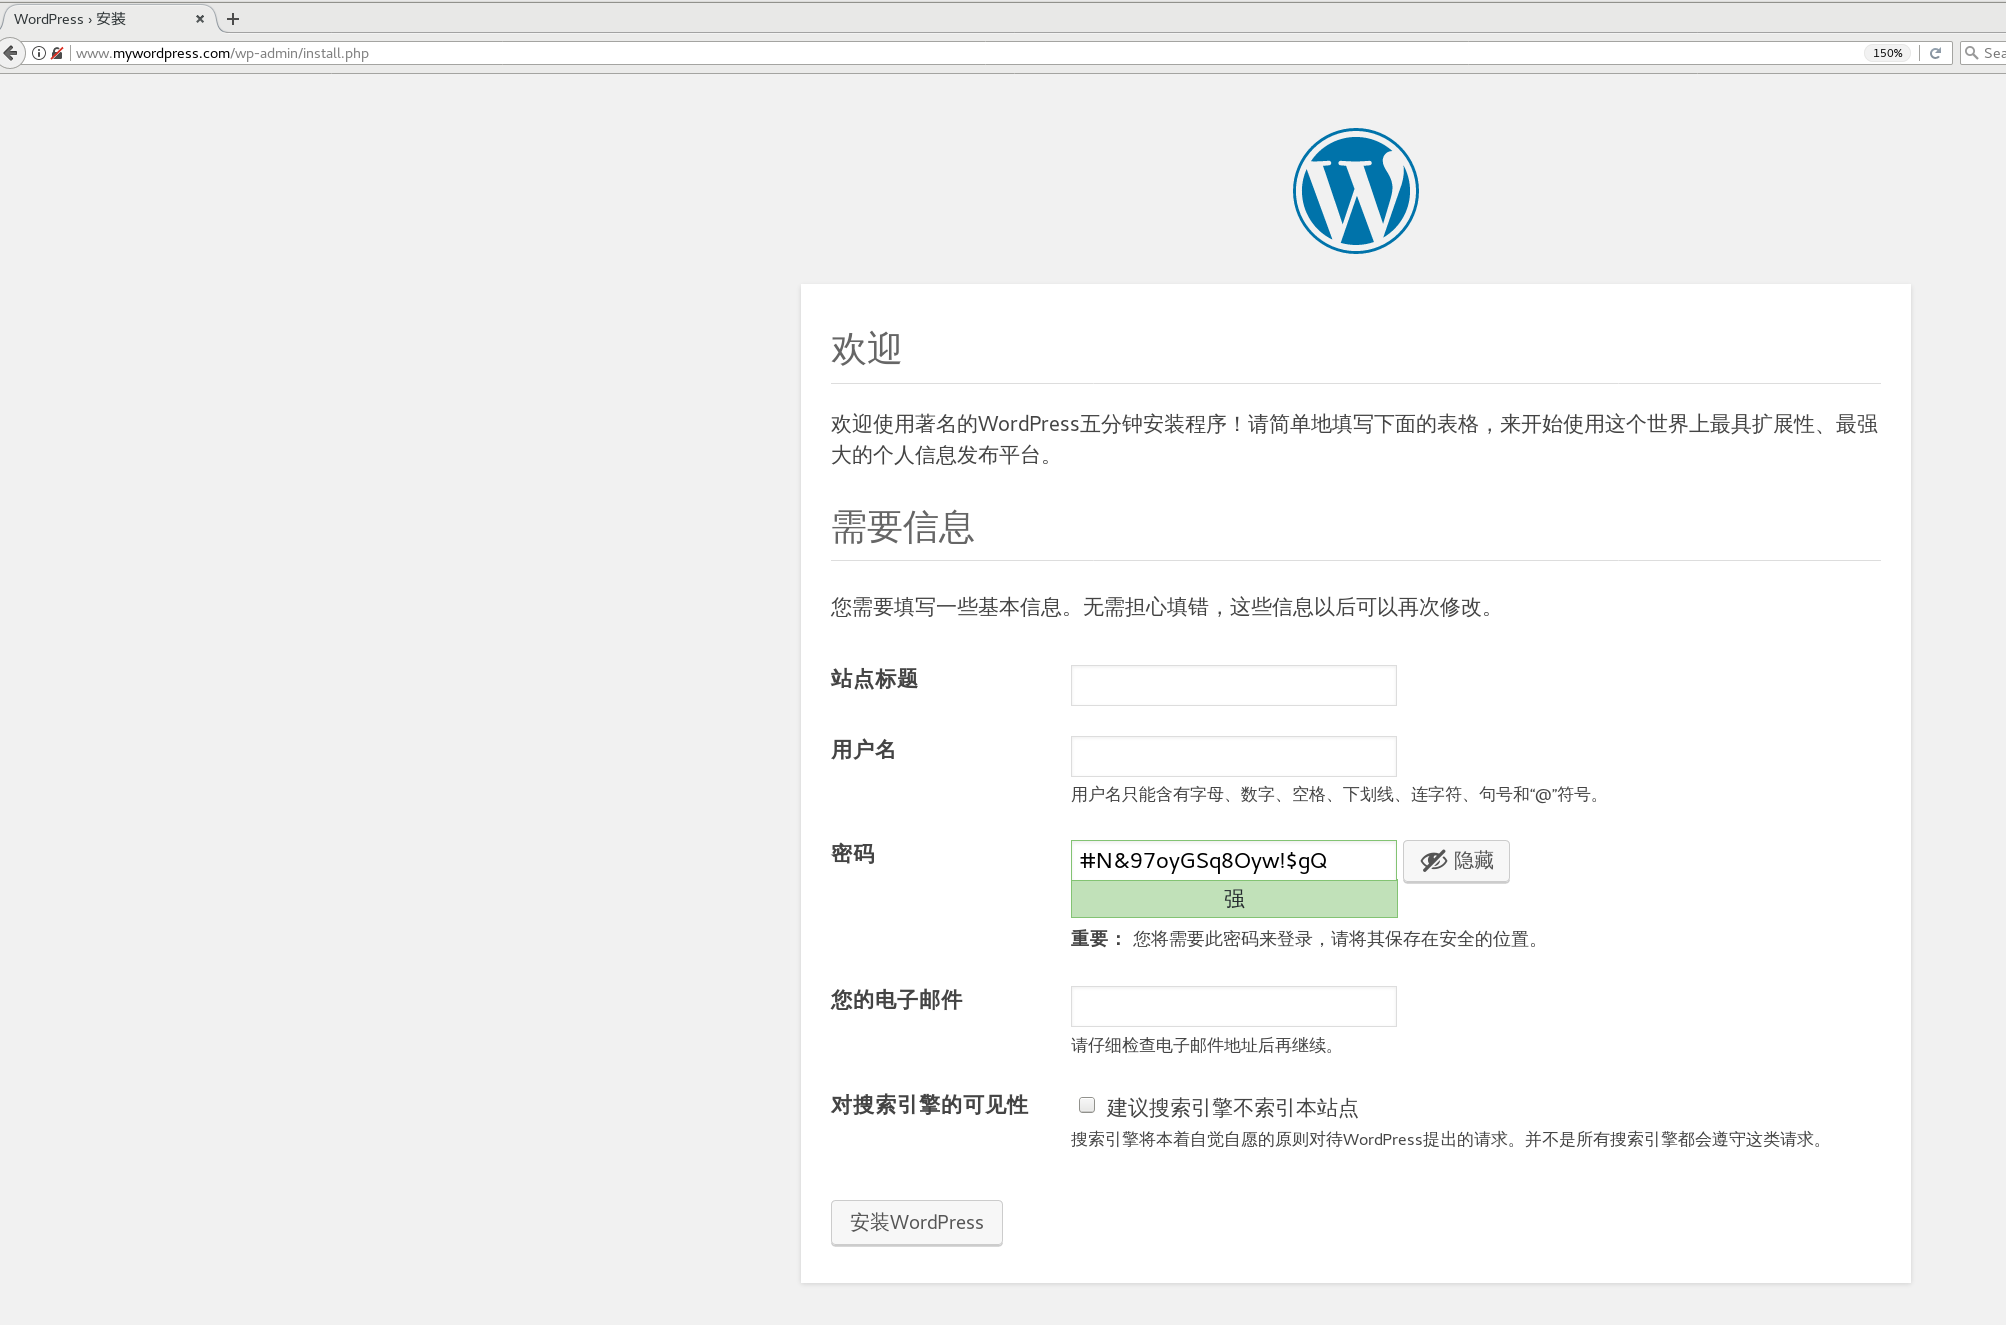
然后在此客户端使用浏览器访问www.mywordpress.com ,出现如下界面即成功。可以继续配置wordpress站点并测试

总结:
这种apache和PHP分离的结构有两个问题:
1.应用程序,如wordpress,需要在apache和php两台服务器上安装,浪费空间
2.用户上传的文件,如图片,无法显示,因为上传的文件是被放到PHP上,而客户端访问读取时在apache上找不到
解决方案:1.使用同步机制,如rsync+inotify,同步web和php服务器;2.使用共享存储,如NFS;3.对程序进行二次开发