一、概要
大家应该都清楚,大家上线app,需要上线各种平台,比如:小米,华为,百度等等等等,我们多数称之为渠道,如果发的渠道多,可能有上百个渠道。
针对每个渠道,我们希望可以获取各个渠道的一些独立的统计信息,比如:下载量等。
那么,如何区分各个渠道呢?
我们需要一个特性的标识符与该渠道对应,这个标识符肯定是要包含在apk中的。那么,我们就要针对每个渠道包去设置一个特定的标识符,然后打一个特定的apk。
这个过程可以手动去完成,每次修改一个字符串,然后手动打包。大家都清楚打包是一个相当耗时的过程,要是打几百个渠道包,这种枯燥重复的任务,当然不是我们所能容忍的。
当然,我们会想到,这样的需求,官方肯定有解决方案。没错,Gradle Plugin为我们提供了一个自动化的方案,我们可以利用占位符,然后在build.gradle中去配置多个渠道信息,这样就可以将枯燥重复的任务自动化了。
这样的方式最大的问题,就是效率问题,每个渠道包,都要执行一遍构建流程。
自动化了,时间依然过长,还是不能忍。
接下来就是寻找高效率的方案了。
因为本文是源码解析,就不饶弯子了~~
目前针对 V1(Android N开始推出了V2),快速的方案,主要有:
-
美团Android自动化之旅—生成渠道包
主要利用修改apk的目录META-INF中添加空文件,由于不需要重新签名,操作非常快。
-
利用zip文件中的comment的字段,例如VasDolly
后面在解析源码时,会详细说明方式2。
自Android N之后,Google建议使用V2来做签名,因为这样更加安全(对整个apk文件进行hash校验,无法修改apk信息),安装速度也更加高效(无需解析校验单个文件,v1需要单个文件校验hash)。
美团对此动作非常快,立马推出了:
- 新一代开源Android渠道包生成工具Walle
其原理是利用v2的方式在做签名时,在apk中插入了一个签名块(安装时校验apk的hash不包含此块),该快中允许插入一些key-value对,于是将签名插在该区域。
当然,腾讯的VasDolly采取的也是相同的方案。
本文,为VasDolly的源码解析,即会详细分析:
- 针对v1签名方式,利用zip的comment区域
- 针对v2签名方式,利用apk中的签名块中插入key-value
本文不涉及v1,v2具体的签名方式,以及安装时的校验流程,这些内容在:
- VasDolly实现原理
一文中,说的非常详细。
本文重点是源码的解析。
二、接入VasDolly
其实,接入非常简单,而且readme写的非常详细。
但是为了文章的完整性,简单陈述一下。
根目录build.gradle
buildscript {
    dependencies {
        classpath 'com.leon.channel:plugin:1.1.7'
app的build.gradle
apply plugin: 'channel'

android {
    signingConfigs {
        release {
            storeFile file(RELEASE_STORE_FILE)
            storePassword RELEASE_STORE_PASSWORD
            keyAlias RELEASE_KEY_ALIAS
            keyPassword RELEASE_KEY_PASSWORD
            v1SigningEnabled true
            v2SigningEnabled false
        }
    }
    buildTypes {
        release {
            signingConfig signingConfigs.release
            minifyEnabled false
proguardFiles getDefaultProguardFile('proguard-android.txt'), 'proguard-rules.pro' } } channel{ //指定渠道文件 channelFile = file("/Users/zhanghongyang01/git-repo/learn/VasDollyTest/channel.txt") //多渠道包的输出目录,默认为new File(project.buildDir,"channel") baseOutputDir = new File(project.buildDir,"channel") //多渠道包的命名规则,默认为:${appName}-${versionName}-${versionCode}-${flavorName}-${buildType} apkNameFormat ='${appName}-${versionName}-${versionCode}-${flavorName}-${buildType}' //快速模式:生成渠道包时不进行校验(速度可以提升10倍以上) isFastMode = true } } dependencies { api 'com.leon.channel:helper:1.1.7' } - 1
- 2
- 3
- 4
- 5
- 6
- 7
- 8
- 9
- 10
- 11
- 12
- 13
- 14
- 15
- 16
- 17
- 18
- 19
- 20
- 21
- 22
- 23
- 24
- 25
- 26
- 27
- 28
- 29
- 30
- 31
- 32
- 33
- 34
- 35
- 36
- 37
首先要apply plugin,然后在android的闭包下写入channel相关信息。
channel中需要制定一个channel.txt文件,其中每行代码一个渠道:
c1
c2
c3- 1
- 2
- 3
dependencies中的依赖主要是为了获取渠道号的辅助类,毕竟你写入渠道信息的地方这么奇怪,肯定要提供API进行读取渠道号。
注意:我们在signingConfigs的release中配置的是:v1SigningEnabled=true和v2SigningEnabled=false,先看V1方式的快速渠道包。
在Terminal面板执行./gradlew channelRelease执行完成后,即可在app/build/channel/release下看到:
release
├── app-1.0-1-c1-release.apk ├── app-1.0-1-c2-release.apk └── app-1.0-1-c3-release.apk- 1
- 2
- 3
- 4
注意:本文主要用于讲解源码,如果只需接入,尽可能查看github文档。
三、V1的渠道读取与写入
首先我们需要知道对于V1的签名,渠道信息写在哪?
这里直接白话说明一下,我们的apk实际上就是普通的zip,在一个zip文件的最后允许写入N个字符的注释,我们关注的zip末尾两个部分:
2字节的的注释长度+N个字节的注释。
那么,我们只要把签名内容作为注释写入,再修改2字节的注释长度即可。
现在需要考虑的是我们怎么知道一个apk有没有写入这个渠道信息呢,需要有一个判断的标准:
这时候,魔数这个概念产生了,我们可以在文件文件末尾写入一个特殊的字符串,当我们读取文件末尾为这个特殊的字符串,即可认为该apk写入了渠道信息。
很多文件类型起始部分都包含特性的魔数用于区分文件类型。
最终的渠道信息为:
渠道字符串+渠道字符串长度+魔数
3.1 读取
有了上面的分析,读取就简单了:
- 拿到本地的apk文件
- 读取固定字节与预定义魔数做比对
- 然后再往前读取两个字节为渠道信息长度
- 再根据这个长度往前读取对应字节,即可取出渠道信息。
在看源码之前,我们也可以使用二进制编辑器打开打包好的Apk,看末尾的几个字节,如图:

咱们逆着看:
- 首先读取8个字节,对应一个特殊字符串“ltlovezh”
- 往前两个字节为02 00,对应渠道信息长度,实际值为2.
- 再往前读取2个字节为63 31,对照ASCII表,即可知为c1
这样我们就读取除了渠道信息为:c1。
这么看代码也不复杂,最后看一眼代码吧:
代码中通过ChannelReaderUtil.getChannel获取渠道信息:
public static String getChannel(Context context) {
if (mChannelCache == null) { String channel = getChannelByV2(context); if (channel == null) { channel = getChannelByV1(context); } mChannelCache = channel; } return mChannelCache; }- 1
- 2
- 3
- 4
- 5
- 6
- 7
- 8
- 9
- 10
- 11
我们只看v1,根据调用流程,最终会到:
V1SchemeUtil.readChannel方法:
public static String readChannel(File file) throws Exception {
RandomAccessFile raf = null; try { raf = new RandomAccessFile(file, "r"); long index = raf.length(); byte[] buffer = new byte[ChannelConstants.V1_MAGIC.length]; index -= ChannelConstants.V1_MAGIC.length; raf.seek(index); raf.readFully(buffer); // whether magic bytes matched if (isV1MagicMatch(buffer)) { index -= ChannelConstants.SHORT_LENGTH; raf.seek(index); // read channel length field int length = readShort(raf); if (length > 0) { index -= length; raf.seek(index); // read channel bytes byte[] bytesComment = new byte[length]; raf.readFully(bytesComment); return new String(bytesComment, ChannelConstants.CONTENT_CHARSET); } else { throw new Exception("zip channel info not found"); } } else { throw new Exception("zip v1 magic not found"); } } finally { if (raf != null) { raf.close(); } } }- 1
- 2
- 3
- 4
- 5
- 6
- 7
- 8
- 9
- 10
- 11
- 12
- 13
- 14
- 15
- 16
- 17
- 18
- 19
- 20
- 21
- 22
- 23
- 24
- 25
- 26
- 27
- 28
- 29
- 30
- 31
- 32
- 33
- 34
使用了RandomAccessFile,可以很方便的使用seek指定到具体的字节处。注意第一次seek的目标是length - magic.length,即对应我们的读取魔数,读取到比对是否相同。
如果相同,再往前读取SHORT_LENGTH = 2个字节,读取为short类型,即为渠道信息所占据的字节数。
再往前对去对应的长度,转化为String,即为渠道信息,与我们前面的分析一模一样。
ok,读取始终是简单的。
后面还要看如何写入以及如何自动化。
3.2 写入v1渠道信息
写入渠道信息,先思考下,有个apk,需要写入渠道信息,需要几步:
- 找到合适的写入位置
- 写入渠道信息、写入长度、写入魔数
好像唯一的难点就是找到合适的位置。
但是找到这个合适的位置,又涉及到zip文件的格式内容了。
大致讲解下:
zip的末尾有一个数据库,这个数据块我们叫做EOCD块,分为4个部分:
- 4字节,固定值0x06054b50
- 16个字节,不在乎其细节
- 2个字节,注释长度
- N个字节,注释内容
知道这个规律后,我们就可以通过匹配1中固定值来确定对应区域,然后seek到注释处。
可能99.99%的apk默认是不包含注释内容的,所以直接往前seek 22个字节,读取4个字节做下匹配即可。
但是如果已经包含了注释内容,就比较难办了。很多时候,我们会正向从头开始按协议读取zip文件格式,直至到达目标区域。
不过VasDolly的做法是,从文件末尾seek 22 ~ 文件size - 22,逐一匹配。
我们简单看下代码:
public static void writeChannel(File file, String channel) throws Exception { byte[] comment = channel.getBytes(ChannelConstants.CONTENT_CHARSET); Pair<ByteBuffer, Long> eocdAndOffsetInFile = getEocd(file); if (eocdAndOffsetInFile.getFirst().remaining() == ZipUtils.ZIP_EOCD_REC_MIN_SIZE) { System.out.println("file : " + file.getAbsolutePath() + " , has no comment"); RandomAccessFile raf = new RandomAccessFile(file, "rw"); //1.locate comment length field raf.seek(file.length() - ChannelConstants.SHORT_LENGTH); //2.write zip comment length (content field length + length field length + magic field length) writeShort(comment.length + ChannelConstants.SHORT_LENGTH + ChannelConstants.V1_MAGIC.length, raf); //3.write content raf.write(comment); //4.write content length writeShort(comment.length, raf); //5. write magic bytes raf.write(ChannelConstants.V1_MAGIC); raf.close(); } else { System.out.println("file : " + file.getAbsolutePath() + " , has comment"); if (containV1Magic(file)) { try { String existChannel = readChannel(file); if (existChannel != null){ file.delete(); throw new ChannelExistException("file : " + file.getAbsolutePath() + " has a channel : " + existChannel + ", only ignore"); } }catch (Exception e){ e.printStackTrace(); } } int existCommentLength = ZipUtils.getUnsignedInt16(eocdAndOffsetInFile.getFirst(), ZipUtils.ZIP_EOCD_REC_MIN_SIZE - ChannelConstants.SHORT_LENGTH); int newCommentLength = existCommentLength + comment.length + ChannelConstants.SHORT_LENGTH + ChannelConstants.V1_MAGIC.length; RandomAccessFile raf = new RandomAccessFile(file, "rw"); //1.locate comment length field raf.seek(eocdAndOffsetInFile.getSecond() + ZipUtils.ZIP_EOCD_REC_MIN_SIZE - ChannelConstants.SHORT_LENGTH); //2.write zip comment length (existCommentLength + content field length + length field length + magic field length) writeShort(newCommentLength, raf); //3.locate where channel should begin raf.seek(eocdAndOffsetInFile.getSecond() + ZipUtils.ZIP_EOCD_REC_MIN_SIZE + existCommentLength); //4.write content raf.write(comment); //5.write content length writeShort(comment.length, raf); //6.write magic bytes raf.write(ChannelConstants.V1_MAGIC); raf.close();
getEocd(file)的的返回值是Pair<ByteBuffer, Long>,多数情况下first为EOCD块起始位置到结束后的内容;second为EOCD块起始位置。
if为apk本身无comment的情况,这种方式属于大多数情况,从文件末尾,移动2字节,该2字节为注释长度,然后组装注释内容,重新计算注释长度,重新写入注释长度,再写入注释内容,最后写入MAGIC魔数。
else即为本身存在comment的情况,首先读取原有注释长度,然后根据渠道等信息计算出先的注释长度,写入。
3.3 gradle自动化
最后我们看下,是如何做到输入./gradle channelRelease就实现所有渠道包的生成呢。
这里主要就是解析gradle plugin了,如果你还没有自定义过plugin,非常值得参考。
代码主要在VasDolly/plugin这个module.
入口代码为ApkChannelPackagePlugin的apply方法。
主要代码:
project.afterEvaluate {
    project.android.applicationVariants.all { variant ->
        def variantOutput = variant.outputs.first();
        def dirName = variant.dirName;
        def variantName = variant.name.capitalize();
        Task channelTask = project.task("channel${variantName}", type: ApkChannelPackageTask) {
            mVariant = variant;
            mChannelExtension = mChannelConfigurationExtension;
            mOutputDir = new File(mChannelConfigurationExtension.baseOutputDir, dirName)
            mChannelList = mChanneInfolList
            dependsOn variant.assemble
为每个variantName添加了一个task,并且依赖于variant.assemble。
也就是说,当我们执行./gradlew channelRelease时,会先执行assemble,然后对产物apk做后续操作。
重点看这个Task,ApkChannelPackageTask。
执行代码为:
@TaskAction
public void channel() {
    //1.check all params checkParameter(); //2.check signingConfig , determine channel package mode checkSigningConfig() //3.generate channel apk generateChannelApk();
注释也比较清晰,首先channelFile、baseOutputDir等相关参数。接下来校验signingConfig中v2SigningEnabled与v1SigningEnabled,确定使用V1还是V2 mode,我们上文中将v2SigningEnabled设置为了false,所以这里为V1_MODE。
最后就是生成渠道apk了:
void generateV1ChannelApk() {
     // 省略了一些代码
    mChannelList.each { channel ->
        String apkChannelName = getChannelApkName(channel)
        println "generateV1ChannelApk , channel = ${channel} , apkChannelName = ${apkChannelName}"
        File destFile = new File(mOutputDir, apkChannelName) copyTo(mBaseApk, destFile) V1SchemeUtil.writeChannel(destFile, channel) if (!mChannelExtension.isFastMode){ //1. verify channel info if (V1SchemeUtil.verifyChannel(destFile, channel)) { println("generateV1ChannelApk , ${destFile} add channel success") } else { throw new GradleException("generateV1ChannelApk , ${destFile} add channel failure") } //2. verify v1 signature if (VerifyApk.verifyV1Signature(destFile)) { println "generateV1ChannelApk , after add channel , apk ${destFile} v1 verify success" } else { throw new GradleException("generateV1ChannelApk , after add channel , apk ${destFile} v1 verify failure")
很简单,遍历channelList,然后调用V1SchemeUtil.writeChannel,该方法即我们上文解析过的方法。
如果fastMode设置为false,还会读取出渠道再做一次强校验;以及会通过apksig做对签名进行校验。
ok,到这里我们就完全剖析了基于V1的快速签名的全过程。
接下来我们看基于v2的快速签名方案。
四、基于V2的快速签名方案
关于V2签名的产生原因,原理以及安装时的校验过程可以参考 VasDolly实现原理。
我这里就抛开细节,尽可能让大家能明白整个过程,v2签名的原理可以简单理解为:
- 我们的apk其实是个zip,我们可以理解为3块:块1+块2+块3
- 签名让我们的apk变成了4部分:块1+签名块+块2+块3
在这个签名块的某个区域,允许我们写一些key-value对,我们就将渠道信息写在这个地方。
这里有一个问题,v2不是说是对整个apk进行校验吗?为什么还能够让我们在apk中插入这样的信息呢?
因为在校验过程中,对于签名块是不校验的(细节上由于我们插入了签名块,某些偏移量会变化,但是在校验前,Android系统会先重置偏移量),而我们的渠道信息刚好写在这个签名块中。
好了,细节一会看代码。
4.1 读取渠道信息
写入渠道信息,根据我们上述的分析,流程应该大致如下:
- 找到签名块
- 找到签名块中的key-value的地方
- 读取出所有的key-value,找到我们特定的key对应的渠道信息
这里我们不按照整个代码流程走了,太长了,一会看几段关键代码。
4.1.1 如何找到签名块
我们的apk现在格式是这样的:
块1+签名块+块2+块3
其中块3称之为EOCD,现在必须要展示下其内部的数据结构了:
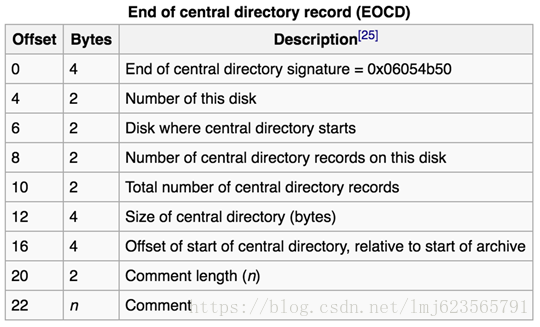
图片来自:参考
在V1的相关代码中,我们已经可以定位到EOCD的位置了,然后往下16个字节即可拿到Offset of start of central directory即为块2开始的位置,也为签名块末尾的位置。
块2 再往前,就可以获取到我们的 签名块了。
我们先看一段代码,定位到 块2 的开始位置。
# V2SchemeUtil
public static ByteBuffer getApkSigningBlock(File channelFile) throws ApkSignatureSchemeV2Verifier.SignatureNotFoundException, IOException {

    RandomAccessFile apk = new RandomAccessFile(channelFile, "r"); //1.find the EOCD Pair<ByteBuffer, Long> eocdAndOffsetInFile = ApkSignatureSchemeV2Verifier.getEocd(apk); ByteBuffer eocd = eocdAndOffsetInFile.getFirst(); long eocdOffset = eocdAndOffsetInFile.getSecond(); if (ZipUtils.isZip64EndOfCentralDirectoryLocatorPresent(apk, eocdOffset)) { throw new ApkSignatureSchemeV2Verifier.SignatureNotFoundException("ZIP64 APK not supported"); } //2.find the APK Signing Block. The block immediately precedes the Central Directory. long centralDirOffset = ApkSignatureSchemeV2Verifier.getCentralDirOffset(eocd, eocdOffset);//通过eocd找到中央目录的偏移量 //3. find the apk V2 signature block Pair<ByteBuffer, Long> apkSignatureBlock = ApkSignatureSchemeV2Verifier.findApkSigningBlock(apk, centralDirOffset);//找到V2签名块的内容和偏移量 return apkSignatureBlock.getFirst();
首先发现EOCD块,这个前面我们已经分析了。
然后寻找到签名块的位置,上面我们已经分析了只要往下移动16字节即可到达签名块末尾 ,那么看下ApkSignatureSchemeV2Verifier.getCentralDirOffset代码,最终调用:
public static long getZipEocdCentralDirectoryOffset(ByteBuffer zipEndOfCentralDirectory) {
    assertByteOrderLittleEndian(zipEndOfCentralDirectory);
    return getUnsignedInt32( zipEndOfCentralDirectory, zipEndOfCentralDirectory.position() + 16);
到这里我们已经可以到达签名块末尾了。
我们继续看findApkSigningBlock找到V2签名块的内容和偏移量:
public static Pair<ByteBuffer, Long> findApkSigningBlock(
        RandomAccessFile apk, long centralDirOffset)
        throws IOException, SignatureNotFoundException { ByteBuffer footer = ByteBuffer.allocate(24); footer.order(ByteOrder.LITTLE_ENDIAN); apk.seek(centralDirOffset - footer.capacity()); apk.readFully(footer.array(www.caihonyule.com), footer.arrayOffset(www.douniuyuLept.com), footer.capacity()); if ((footer.getLong(8) != APK_SIG_BLOCK_MAGIC_LO) || (footer.getLong(16) != APK_SIG_BLOCK_MAGIC_HI)) { throw new SignatureNotFoundException( "No APK Signing Block before ZIP Central Directory"); } // Read and compare size fields long apkSigBlockSizeInFooter = footer.getLong(0); int totalSize = (int) (apkSigBlockSizeInFooter + 8); long apkSigBlockOffset = centralDirOffset - totalSize; ByteBuffer apkSigBlock = ByteBuffer.allocate(totalSize); apkSigBlock.order(ByteOrder.LITTLE_ENDIAN); apk.seek(apkSigBlockOffset); apk.readFully(apkSigBlock.array(), apkSigBlock.arrayOffset(), apkSigBlock.capacity()); return Pair.create(apkSigBlock, apkSigBlockOffset);
这里我们需要介绍下签名块相关信息了:
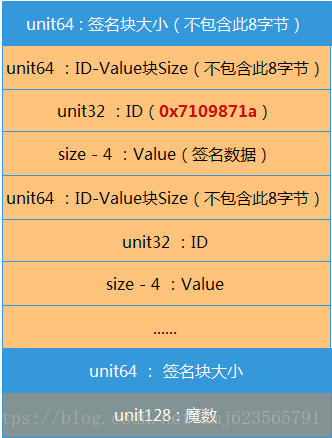
图片来自:参考
中间的不包含此8字节,值得是该ID-VALUE的size值不包含此8字节。
首先往前读取24个字节,即读取了签名块大小64bits+魔数128bits;然后会魔数信息与实际的魔数对比。
接下来读取8个字节为apkSigBlockSizeInFooter,即签名块大小。
然后+8加上上图顶部的8个字节。
最后将整个签名块读取到ByteBuffer中返回。
此时我们已经有了签名块的所有数据了。
接下来我们要读取这个签名块中所有的key-value对!
# V2SchemeUtil
public static Map<Integer, ByteBuffer> getAllIdValue(ByteBuffer apkSchemeBlock) {
    ApkSignatureSchemeV2Verifier.checkByteOrderLittleEndian(apkSchemeBlock);

    ByteBuffer pairs = ApkSignatureSchemeV2Verifier.sliceFromTo(apkSchemeBlock, 8, apkSchemeBlock.capacity() - 24); Map<Integer, ByteBuffer> idValues = new LinkedHashMap<Integer, ByteBuffer>(); // keep order int entryCount = 0; while (pairs.hasRemaining()) { entryCount++; long lenLong = pairs.getLong(www.vboyule.cn ); int len = (int) lenLong; int nextEntryPos = pairs.position(www.hjha178.com/) + len; int id = pairs.getInt(); idValues.put(id, ApkSignatureSchemeV2Verifier.getByteBuffer(pairs, len - 4));//4 is length of id if (id == ApkSignatureSchemeV2Verifier.APK_SIGNATURE_SCHEME_V2_BLOCK_ID) { System.out.println("find V2 signature block Id : " + ApkSignatureSchemeV2Verifier.APK_SIGNATURE_SCHEME_V2_BLOCK_ID);
首先读取8到capacity() - 24中的内容,即所有的id-value集合。
然后进入while循环,读取一个个key-value存入idValues,我们看下循环体内:
- pairs.getLong,读取8个字节,即此id-value块的size
- 然后pairs.getInt,读取4个字节,即可得到id
- size - 4 中包含的内容即为value
如此循环,得到所有的idValues。
有了所有的idValues,然后根据特定的id,即可获取我们的渠道信息了。
即:
# ChannelReader
public static String getChannel(File channelFile) {
    System.out.println("try to read channel info from apk : " + channelFile.getAbsolutePath());
    return IdValueReader.getStringValueById(channelFile, ChannelConstants.CHANNEL_BLOCK_ID);
- 5
这样我们就走通了读取的逻辑。
我替大家总结下:
- 根据zip的格式,先定位到EOCD的开始位置
- 然后根据EOCD中的内容定位到签名块末尾
- 然后根据签名块中的数据格式,逐一读取出id-values
- 我们的渠道信息与一个特点的id映射,读取出即可
4.2 写入渠道信息
先思考下,现在要正视的是,目前到我们这里已经是v2签名打出的包了。那么我们应该找到签名块中的id-values部分,把我们的渠道信息插入进去。
大致的方式可以为:
- 读取出块1,签名块,块2,EOCD
- 在签名块中插入渠道信息
- 回写块1,签名块,块2,EOCD
4.2.1 读取出相关信息
# V2SchemeUtil
public static ApkSectionInfo getApkSectionInfo(File baseApk) {
RandomAccessFile apk = new RandomAccessFile(baseApk, "r"); //1.find the EOCD and offset Pair<ByteBuffer, Long> eocdAndOffsetInFile = ApkSignatureSchemeV2Verifier.getEocd(apk); ByteBuffer eocd = eocdAndOffsetInFile.getFirst(www.feifanyule.cn); long eocdOffset = eocdAndOffsetInFile.getSecond(); //2.find the APK Signing Block. The block immediately precedes the Central Directory. long centralDirOffset = ApkSignatureSchemeV2Verifier.getCentralDirOffset(eocd, eocdOffset);//通过eocd找到中央目录的偏移量 Pair<ByteBuffer, Long> apkSchemeV2Block = ApkSignatureSchemeV2Verifier.findApkSigningBlock(apk, centralDirOffset);//找到V2签名块的内容和偏移量 //3.find the centralDir Pair<ByteBuffer, Long> centralDir = findCentralDir(apk, centralDirOffset, (int) (eocdOffset - centralDirOffset)); //4.find the contentEntry Pair<ByteBuffer, Long> contentEntry = findContentEntry(apk, (int) apkSchemeV2Block.getSecond().longValue()); ApkSectionInfo apkSectionInfo = new ApkSectionInfo(); apkSectionInfo.mContentEntry = contentEntry; apkSectionInfo.mSchemeV2Block = apkSchemeV2Block; apkSectionInfo.mCentralDir = centralDir; apkSectionInfo.mEocd = eocdAndOffsetInFile; System.out.println("baseApk : " + baseApk.getAbsolutePath(www.leyouzaixan.cn) + " , ApkSectionInfo = " + apkSectionInfo); return apkSectionInfo; }- 首先读取出EOCD,这个代码见过多次了。
- 然后根据EOCD读取到中间目录的偏移量(块2)。
- 将中间目录完整的内容读取出来,
- 读取出块1
全部都存储到apkSectionInfo中。
目前我们将整个apk按区域读取出来了。
4.2.2 签名块中插入渠道信息
# ChannelWriter
public static void addChannel(ApkSectionInfo apkSectionInfo, File destApk, String channel) { byte[] buffer = channel.getBytes(ChannelConstants.CONTENT_CHARSET); ByteBuffer channelByteBuffer = ByteBuffer.wrap(buffer); //apk中所有字节都是小端模式 channelByteBuffer.order(ByteOrder.LITTLE_ENDIAN); IdValueWriter.addIdValue(apkSectionInfo, destApk, ChannelConstants.CHANNEL_BLOCK_ID, channelByteBuffer); }
将渠道字符串与特定的渠道id准备好,调用addIdValue
# IdValueWriter
public static void addIdValue(ApkSectionInfo apkSectionInfo, File destApk, int id, ByteBuffer valueBuffer) { Map<Integer, ByteBuffer> idValueMap = new LinkedHashMap<>(); idValueMap.put(id, valueBuffer); addIdValueByteBufferMap(apkSectionInfo, destApk, idValueMap);
继续:
public static void addIdValueByteBufferMap(ApkSectionInfo apkSectionInfo, File destApk, Map<Integer, ByteBuffer> idValueMap) {

    Map<Integer, ByteBuffer> existentIdValueMap = www.baohuayule.com V2SchemeUtil.getAllIdValue(apkSectionInfo.mSchemeV2Block.getFirst());

    existentIdValueMap.putAll(idValueMap);

    ByteBuffer newApkSigningBlock = V2SchemeUtil.generateApkSigningBlock(existentIdValueMap);

    ByteBuffer contentEntry = apkSectionInfo.mContentEntry.getFirst();
    ByteBuffer centralDir = apkSectionInfo.mCentralDir.getFirst();
    ByteBuffer eocd = apkSectionInfo.mEocd.getFirst();
    long centralDirOffset = apkSectionInfo.mCentralDir.getSecond(); //update the offset of centralDir centralDirOffset += (newApkSigningBlock.remaining(www.cnzhaotai.com) - apkSectionInfo.mSchemeV2Block.getFirst().remaining()); ZipUtils.setZipEocdCentralDirectoryOffset(eocd, centralDirOffset);//修改了apkSectionInfo中eocd的原始数据 RandomAccessFile fIn = new RandomAccessFile(destApk, "rw"); long apkLength = contentEntry.remaining() + newApkSigningBlock.remaining() + centralDir.remaining() + eocd.remaining(); fIn.seek(0l); //1. write real content Entry block fIn.write(contentEntry.array(www.boshenyl.cn ), contentEntry.arrayOffset(www.dfgj157.com) + contentEntry.position(), contentEntry.remaining()); //2. write new apk v2 scheme block fIn.write(newApkSigningBlock.array(), newApkSigningBlock.arrayOffset() + newApkSigningBlock.position(), newApkSigningBlock.remaining()); //3. write central dir block fIn.write(centralDir.array(), centralDir.arrayOffset(www.taohuayuan178.com) + centralDir.position(), centralDir.remaining()); //4. write eocd block fIn.write(eocd.array(), eocd.arrayOffset() + eocd.position(), eocd.remaining()); fIn.setLength(apkLength); System.out.println("addIdValueByteBufferMap , after add channel , new apk is " + destApk.getAbsolutePath() + " , length = " + apkLength);
首先读取出原本的id-values,代码我们前面已经分析过,与我们要添加的id-value放到一个map中。
然后调用V2SchemeUtil.generateApkSigningBlock重新生成一个新的签名块,这里不看了,其实就是根据上图的字节描述,很容易生成。
再根据新的签名块,和之前的中间目录偏移量,计算出新的偏移量,调整EOCD中的相关值。
最后,通过RandomAccessFile重新写入:
- 块1
- 新的签名块
- 中间目录块
- EOCD块
完工!
关于V2的gradle部分与V1部分基本一致,不再赘述。