前言:
因为公司项目需要发布到更多的平台上,以供用户下载。打包就成了一个很大的问题。利用原本的打包方式,又慢油耗。主要是电脑慢的话,打一个包都已经要一俩分钟了,如果需要发布的渠道多的话,那么真的就GG了。
当然第一想到的还是使用第三方框架来实现。原始的做法如何配置渠道打包我这就不介绍啦。咱们主要讲的就是使用VasDolly来配置完成打包的过程。
这个框架是腾讯的开源框架,大家可以了解一下,VasDolly实现原理
大家可以对比一下目前比较流行的三个框架,VasDolly、packer-ng-plugin、Walle。选择适用自己的。
正文:
先贴一下全部的配置代码
apply plugin: 'com.android.application'
apply plugin: 'channel'

android {
    compileSdkVersion rootProject.ext.android.compileSdkVersion
    buildToolsVersion rootProject.ext.android.buildToolsVersion

    defaultConfig {
        minSdkVersion rootProject.ext.android.minSdkVersion
        targetSdkVersion rootProject.ext.android.targetSdkVersion
        versionCode rootProject.ext.android.versionCode
        versionName rootProject.ext.android.versionName
        multiDexEnabled true
        ndk {
            abiFilters "armeabi", "armeabi-v7a", "x86", "mips"
        }
    }
    sourceSets rootProject.ext.android.sourceSets

    dexOptions {
        javaMaxHeapSize "4g"
    }

    flavorDimensions 'default'

     //等更新到3.0.0的版本AS更换成这个
    android.applicationVariants.all { variant ->
        if (variant.buildType.name == "debug") {
            // 服务器地址
            buildConfigField "String", "HOST", "\"http://testBaidu.com/\""
        } else if (variant.buildType.name == "release") {
            // 服务器地址
            buildConfigField "String", "HOST", "\"http://www.baidu.com/\""
        }
        variant.outputs.all {
            outputFileName = "app-${variant.versionName}.apk"
        }
    }

    signingConfigs {
        debug {
            storeFile file("test.keystore")
            storePassword "android"
            keyAlias "test"
            keyPassword "123456"
        }

        release {
            storeFile file("test.keystore")
            storePassword "android"
            keyAlias test
            keyPassword "123456"
            v1SigningEnabled true//开启V1签名
            v2SigningEnabled true//开启V2签名
        }
    }

    buildTypes {
        debug {
            signingConfig signingConfigs.debug
            proguardFiles getDefaultProguardFile('proguard-android.txt'), 'proguard-rules.pro'
            debuggable true
        }

        release {
            signingConfig signingConfigs.release
            debuggable false
            minifyEnabled true
            shrinkResources true
            proguardFiles getDefaultProguardFile('proguard-android.txt'), 'proguard-rules.pro'
        }
    }


    dataBinding {
        enabled = true
    }

    packagingOptions{
        exclude "META-INF/rxjava.properties"
        exclude 'META-INF/DEPENDENCIES.txt'
        exclude 'META-INF/NOTICE'
        exclude 'META-INF/NOTICE.txt'
        exclude 'META-INF/LICENSE'
        exclude 'META-INF/LICENSE.txt'
    }

    useLibrary 'org.apache.http.legacy'

    //直接编译生成多渠道包
    //命令行操作打包,gradlew channelDebug、gradlew channelRelease
    channel{
        //指定渠道文件
        channelFile = new File(project.rootDir, "channel.txt")
        //多渠道包的输出目录,默认为new File(project.buildDir,"channel")
        baseOutputDir = new File(project.rootProject.buildDir,"channel")
        //多渠道包的命名规则,默认为:${appName}-${versionName}-${versionCode}-${flavorName}-${buildType}
        apkNameFormat ='${appName}-${versionName}-${versionCode}-${flavorName}-${buildType}'
        //快速模式:生成渠道包时不进行校验(速度可以提升10倍以上,默认为false)
        isFastMode = false
        //buildTime的时间格式,默认格式:yyyyMMdd-HHmmss
        buildTimeDateFormat = 'yyyyMMdd-HH:mm:ss'
        //低内存模式(仅针对V2签名,默认为false):只把签名块、中央目录和EOCD读取到内存,不把最大头的内容块读取到内存,在手机上合成APK时,可以使用该模式
        lowMemory = false
    }

    /*根据已有基础包重新生成多渠道包
    rebuildChannel {
        //命令操作打包 gradlew rebuildChannel
        //指定渠道文件
        channelFile = new File(project.rootDir, "channel.txt")
        //存在的基础包路径
        baseDebugApk = 已有Debug APK
        baseReleaseApk = 已有Release APK
        //默认为new File(project.buildDir, "rebuildChannel/debug")
        debugOutputDir = Debug渠道包输出目录
        //默认为new File(project.buildDir, "rebuildChannel/release")
        releaseOutputDir = Release渠道包输出目录
        //快速模式:生成渠道包时不进行校验(速度可以提升10倍以上,默认为false)
        isFastMode = false
        //低内存模式(仅针对V2签名,默认为false):只把签名块、中央目录和EOCD读取到内存,不把最大头的内容块读取到内存,在手机上合成APK时,可以使用该模式
        lowMemory = false
    }*/

    aaptOptions {
        cruncherEnabled = false
        useNewCruncher = false
    }
}

dependencies {

    //extra lib for libs package
    implementation fileTree(include: ['*.jar'], dir: 'libs')
    androidTestImplementation('com.android.support.test.espresso:espresso-core:2.2.2', {
        exclude group: 'com.android.support', module: 'support-annotations'
    })
    testImplementation rootProject.ext.dependencies.junit
    implementation rootProject.ext.dependencies.cardviewV7
    implementation rootProject.ext.dependencies.multidex
    implementation rootProject.ext.dependencies.percent
    implementation rootProject.ext.dependencies.constraintLayout
    implementation rootProject.ext.dependencies.butterknife
    annotationProcessor rootProject.ext.dependencies.butterknifeCompiler
    implementation rootProject.ext.dependencies.switchbutton
    implementation rootProject.ext.dependencies.easypermissions
    implementation rootProject.ext.dependencies.TimePickerDialog
    implementation rootProject.ext.dependencies.chenypAdapter
    implementation rootProject.ext.dependencies.journeyappsZxing
    implementation rootProject.ext.dependencies.zxingCore
    implementation rootProject.ext.dependencies.systembartintSystembartint
    implementation rootProject.ext.dependencies.systembartintSystembartint
    implementation rootProject.ext.dependencies.umengAnalytics
    implementation rootProject.ext.dependencies.flowlayoutLib
    implementation project(path: ':simple_lib')
    implementation project(path: ':tribes_module')
    api 'com.leon.channel:helper:2.0.1'

}
接下来说一下步骤细节。
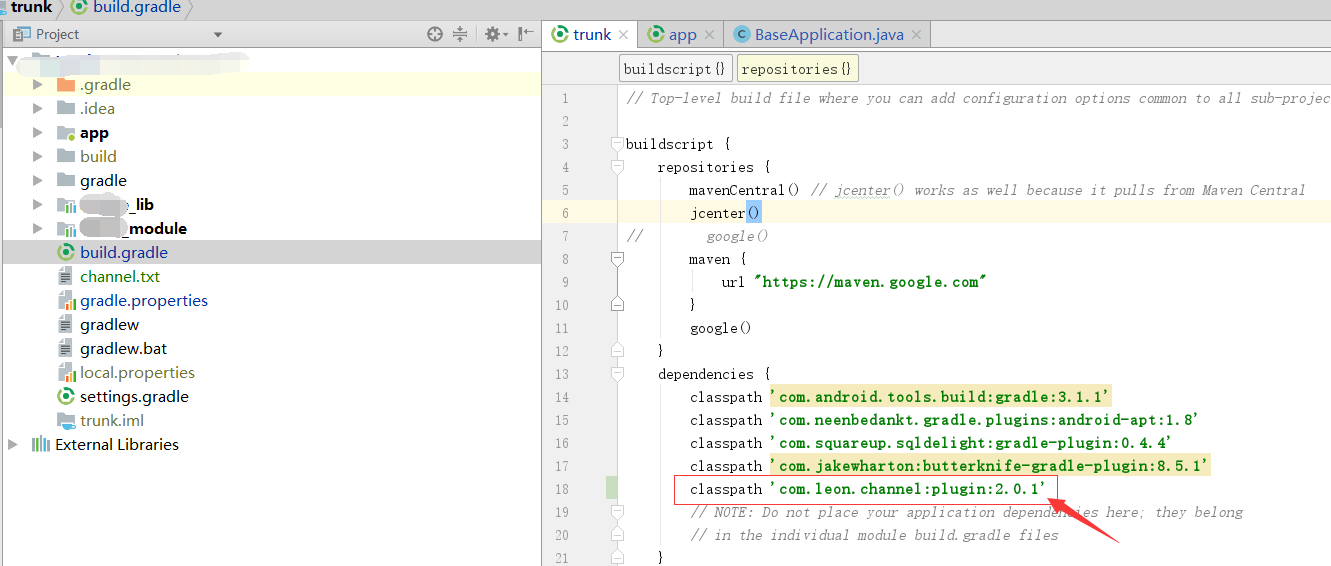
第一步:在项目的build.gradle中添加这行代码
官方GitHub地址:https://github.com/Tencent/VasDolly

classpath 'com.leon.channel:plugin:2.0.1'
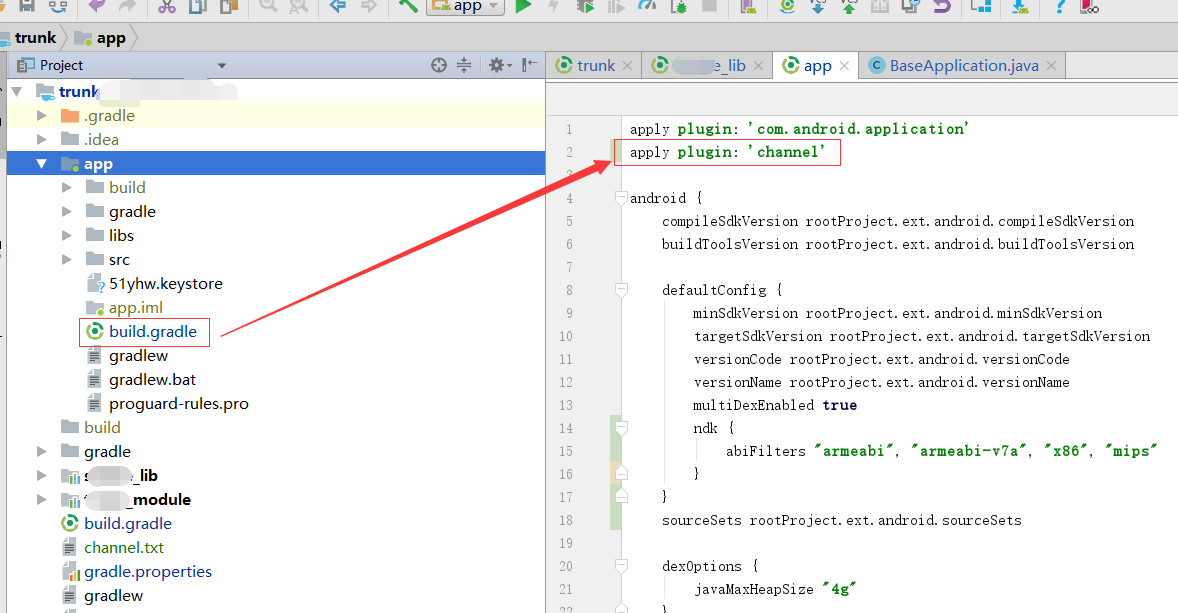
第二步:在主APP工程中,添加对VasDolly的引用
apply plugin: 'channel'
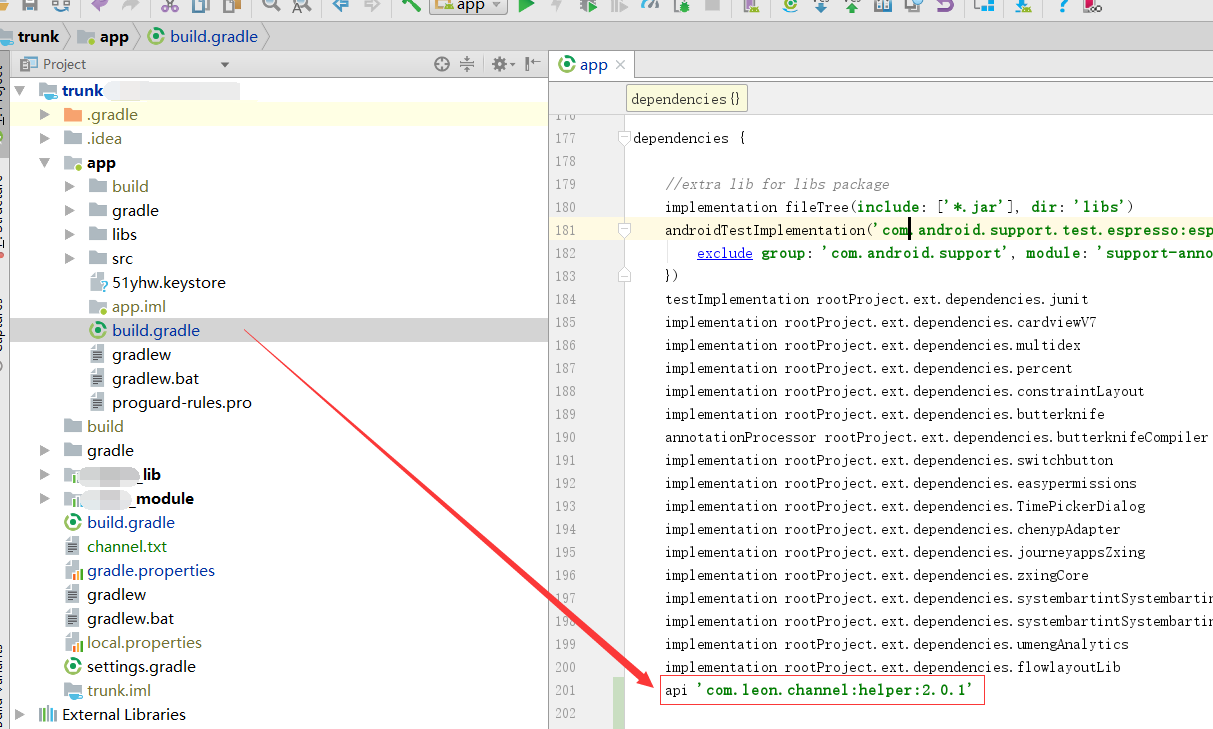
第三步:在工程中去引用helper依赖(版本还是看官网当前的版本吧)
api 'com.leon.channel:helper:2.0.1'
第四步:配置渠道列表,这里呢有两种方式。(以下部分说明,摘自github VasDolly 点击打开链接)
1)第一种:在grable.properties文件指定渠道文件名称,该渠道文件不许位于根工程目录下,一行一个渠道信号
channel_file=channel.txt
2) 第二种:在 channel 或者 rebuildChannel 属性中通过 channelFile 属性指定渠道文件,一行一个渠道信息(目前我是使用的这种方式,方便于我在一个地方可以管理)
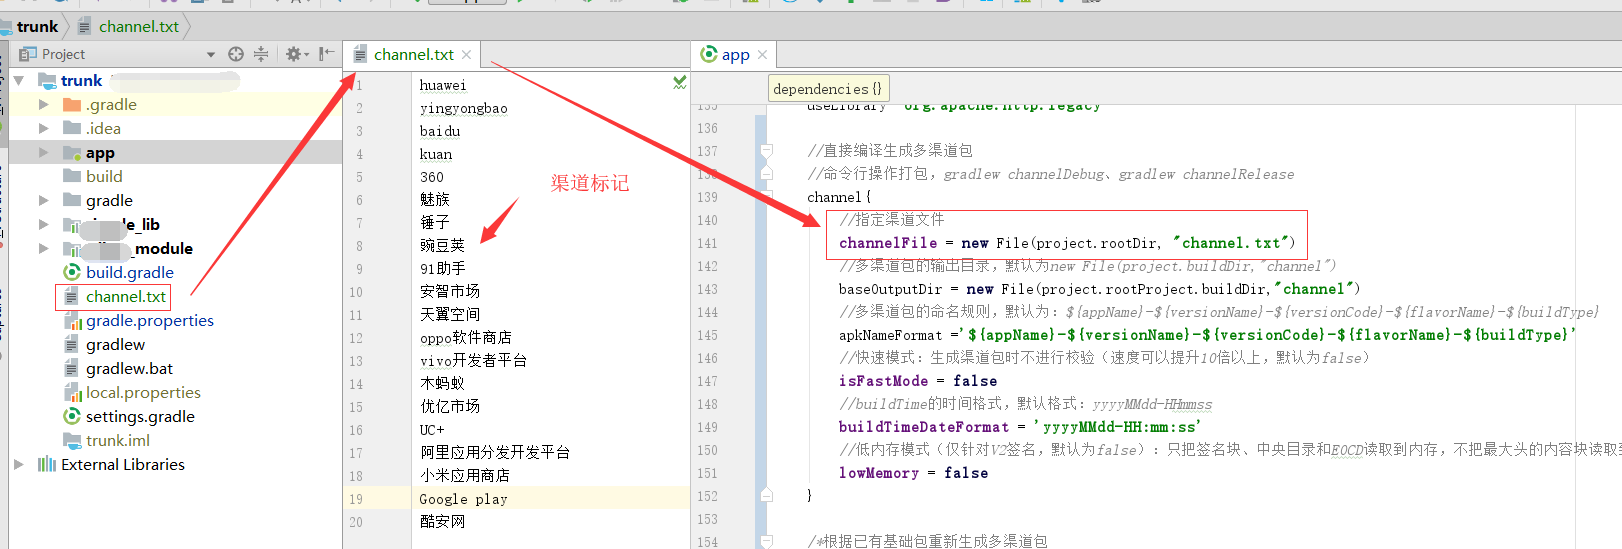
其中,多渠道包的命名规则中,可使用以下字段:
- appName : 当前project的name
- versionName : 当前Variant的versionName
- versionCode : 当前Variant的versionCode
- buildType : 当前Variant的buildType,即debug or release
- flavorName : 当前的渠道名称
- appId : 当前Variant的applicationId
- buildTime : 当前编译构建日期时间,时间格式可以自定义,默认格式:yyyyMMdd-HHmmss
第五步:开始打包,在Android Studio 下的 Terminal 下输入命令行即可
gradlew channelDebug 测试
gradlew channelRelease 正式
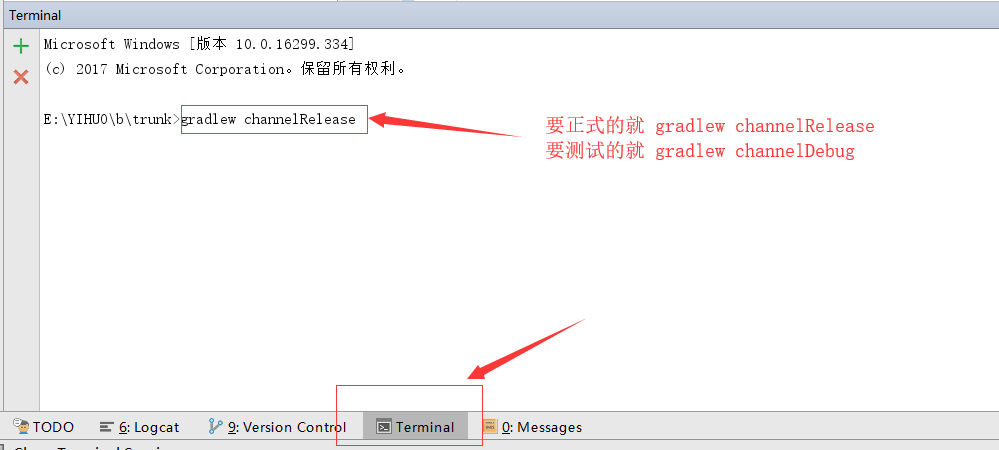
一个回车键....进度条跑起来啦!!!
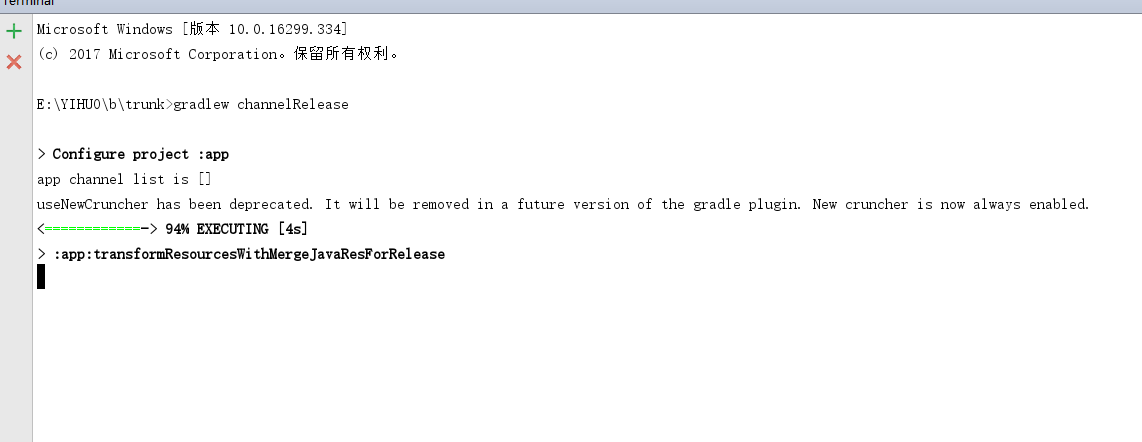
当我们看到这个BUILD SUCCESSFUL的时候,就说明打包成功啦
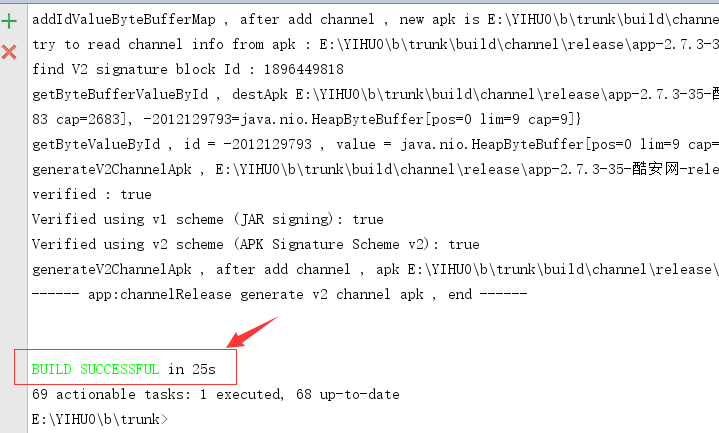
看一下这速度,25秒,打出了20个包。厉不厉害,牛X不
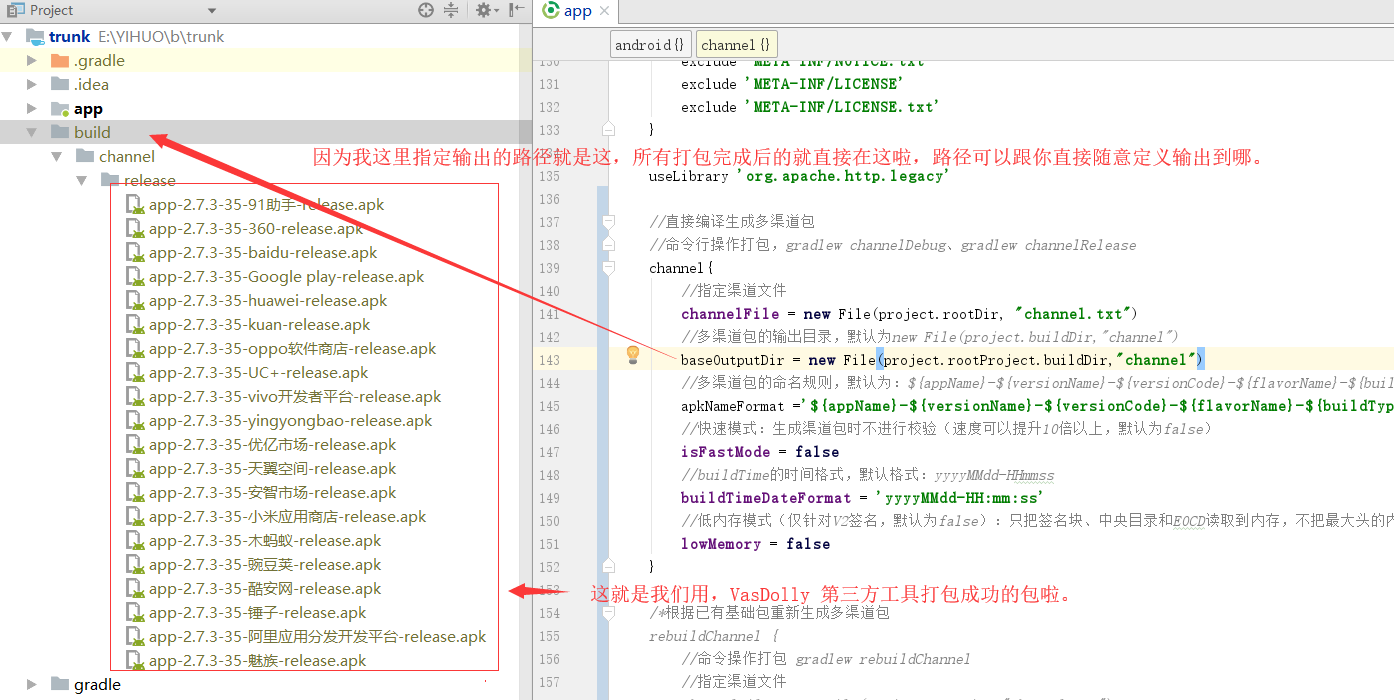
另外咱们再说一下,VasDolly 还给我们提供的另外一个方式,已经有基础包了,根据基础包生成更多的渠道包。
注意:这里需要配置的东西有,基础包的路径,和输出的目录路径
然后这是的命令就是 gradlew rebuildChannel
    rebuildChannel {
        //命令操作打包 gradlew rebuildChannel
        //指定渠道文件
        channelFile = new File(project.rootDir, "channel.txt")
        //存在的基础包路径
        baseDebugApk = 已有Debug APK
        baseReleaseApk = 已有Release APK
        //默认为new File(project.buildDir, "rebuildChannel/debug")
        debugOutputDir = Debug渠道包输出目录
        //默认为new File(project.buildDir, "rebuildChannel/release")
        releaseOutputDir = Release渠道包输出目录
        //快速模式:生成渠道包时不进行校验(速度可以提升10倍以上,默认为false)
        isFastMode = false
        //低内存模式(仅针对V2签名,默认为false):只把签名块、中央目录和EOCD读取到内存,不把最大头的内容块读取到内存,在手机上合成APK时,可以使用该模式
        lowMemory = false
    }
还有就是,如果你有集成友盟统计,那么就需要你在,Application 下的 onCreate() 方法中去加多这两行代码了
    private void initUmeng() {
        //获取渠道标识
        String channel = ChannelReaderUtil.getChannel(getApplicationContext());
        MobclickAgent.setDebugMode(true);
        // SDK在统计Fragment时,需要关闭Activity自带的页面统计,
        // 然后在每个页面中重新集成页面统计的代码(包括调用了 onResume 和 onPause 的Activity)。
        MobclickAgent.openActivityDurationTrack(false);
        //普通统计场景类型
        MobclickAgent.setScenarioType(this, MobclickAgent.EScenarioType.E_UM_NORMAL);
        MobclickAgent. startWithConfigure(new MobclickAgent.UMAnalyticsConfig(this,
                "你的友盟AppKey", channel, MobclickAgent.EScenarioType.E_UM_NORMAL,true));
    }
好了,到这里就全部介绍完咯。如果不明白的欢迎留言。其他详情可以观看github上作者的描述