目录
3)-cpu host ,hv_vpindex,hv_time,hv_synic,hv_stimer时
4)-cpu host ,hv_vpindex,hv_time,hv_synic,hv_stimer,kvm=off时
一、前言和背景
1、问题背景
在使用kvm的过程中,我们发现在win10虚拟机环境中,一旦win10虚拟机被stop后,win10虚拟机时钟时间就会丢失stop的这段时间。然而在对比win7虚拟机时发现,win7虚拟机并不会丢失stop的时间。本文主要探索研究,为什么win10会丢失虚拟机stop后会丢失stop时间的问题。
2、前言
首先,我们要知道大部分PC机中有两个时钟源,分别叫做RTC硬件时钟(实时时钟)和OS(操作系统)时钟(软时钟)。
- RTC硬件时钟独立于操作系统,它为整个计算机提供一个计时标准,是最原始最底层的时钟数据。硬件时钟其实就是RTC(Real Time Clock,实时时钟)也叫做CMOS时钟,它是PC主机板上的一块芯片,它靠电池供电,即使系统断电,也可以维持日期和时间。
- OS时钟产生于PC主板上的定时/计数芯片,由操作系统控制这个芯片的工作,OS时钟的基本单位就是该芯片的计数周期。OS时钟是由可编程定时/计数器产生的输出脉冲触发中断而产生的。输出脉冲的周期叫做一个“时钟滴答”。计算机中的时间是以时钟滴答为单位的,每一次时钟滴答,系统时间就会加1。操作系统根据当前时钟滴答的数目就可以得到以秒或毫秒等为单位的其他时间格式。当前linux内核支持的系统时钟的时钟源有PIT计时器/TSC计时器/HPET计时器/ACPI(PM) 计时器,windows还有一个QPC计时器(QPC Timer)。
RTC硬件时钟和OS(操作系统)时钟保持着以下关系:
- 在开机时操作系统取得RTC硬件时钟中的时间数据来初始化OS时钟,然后通过计数器的向下计数形成了OS时钟。OS时钟只在开机时才有效,而且完全由操作系统控制,所以也被称为软时钟或系统时钟。
- OS时钟输出脉冲信号,接到中断控制器上,产生中断信号,触发时钟中断,由时钟中断服务程序维持OS时钟的正常工作。
- RTC硬件时钟是OS时钟的时间基准,操作系统通过读取硬件时钟来初始化OS时钟,在操作系统运行过程中,每隔一个固定时间会刷新或校正RTC硬件时钟中的信息,共同维持着系统时间。
而不同时钟源在linux中是如何实现的,以及qemu-kvm中的时钟源是怎么模拟的,接下来就让我们来探索了解下。
二、kernel时钟原理和实现
以linux x86架构为例, 在第一章节我们说到两种时钟源,即RTC硬件时钟(实时时钟)和OS(操作系统)时钟(软时钟)。RTC在时间相关的硬件中独特的,作用和其他的硬件不同,无论系统是不是运行,RTC时间总是在增加的。而其他的硬件只是Linux操作系统抽象出了的clocksource(时钟源),这些时钟源以一定的频率产生时钟中断,帮助OS完成计时。Linux会在所有的硬件时钟中选择出精度最高作为当前在用的时钟源。它们的结构关系可以通过下图去理解:

当前可用和正在使用的时钟源可以通过以下两个命令分别获取:

接下来,要想探索内核clocksource时钟源,首先我们必须要知道一个最重要的数据结构,就是struct clocksource结构体,如下代码:
- /******************include/linux/clocksource.h********************/
- /**
- * struct clocksource - hardware abstraction for a free running counter
- * Provides mostly state-free accessors to the underlying hardware.
- * This is the structure used for system time.
- *
- * @name: ptr to clocksource name
- * @list: list head for registration
- * @rating: rating value for selection (higher is better)
- * To avoid rating inflation the following
- * list should give you a guide as to how
- * to assign your clocksource a rating
- * 1-99: Unfit for real use
- * Only available for bootup and testing purposes.
- * 100-199: Base level usability.
- * Functional for real use, but not desired.
- * 200-299: Good.
- * A correct and usable clocksource.
- * 300-399: Desired.
- * A reasonably fast and accurate clocksource.
- * 400-499: Perfect
- * The ideal clocksource. A must-use where
- * available.
- * @read: returns a cycle value, passes clocksource as argument
- * @enable: optional function to enable the clocksource
- * @disable: optional function to disable the clocksource
- * @mask: bitmask for two's complement
- * subtraction of non 64 bit counters
- * @mult: cycle to nanosecond multiplier
- * @shift: cycle to nanosecond divisor (power of two)
- * @max_idle_ns: max idle time permitted by the clocksource (nsecs)
- * @maxadj: maximum adjustment value to mult (~11%)
- * @flags: flags describing special properties
- * @archdata: arch-specific data
- * @suspend: suspend function for the clocksource, if necessary
- * @resume: resume function for the clocksource, if necessary
- * @cycle_last: most recent cycle counter value seen by ::read()
- * @owner: module reference, must be set by clocksource in modules
- */
- struct clocksource {
- /*
- * Hotpath data, fits in a single cache line when the
- * clocksource itself is cacheline aligned.
- */
- u64 (*read)(struct clocksource *cs);
- u64 cycle_last;
- u64 mask;
- u32 mult;
- u32 shift;
- u64 max_idle_ns;
- u32 maxadj;
- #ifdef CONFIG_ARCH_CLOCKSOURCE_DATA
- struct arch_clocksource_data archdata;
- #endif
- const char *name;
- struct list_head list;
- int rating;
- int (*enable)(struct clocksource *cs);
- void (*disable)(struct clocksource *cs);
- unsigned long flags;
- void (*suspend)(struct clocksource *cs);
- void (*resume)(struct clocksource *cs);
- /* private: */
- #ifdef CONFIG_CLOCKSOURCE_WATCHDOG
- /* Watchdog related data, used by the framework */
- struct list_head wd_list;
- u64 cs_last;
- u64 wd_last;
- #endif
- struct module *owner;
- } ____cacheline_aligned;
很重要的一个参数是rating时钟源分优劣,精度越高的时钟源的,rating值越大。从注释中我们可以看到:
1--99: 不适合于用作实际的时钟源,只用于启动过程或用于测试;
100--199:基本可用,可用作真实的时钟源,但不推荐;
200--299:精度较好,可用作真实的时钟源;
300--399:很好,精确的时钟源;
400--499:理想的时钟源,如有可能就必须选择它作为时钟源;
接下来,就来看下各个时钟源的原理和实现。
1、RTC
RTC(real time clock)实时时钟和其他的硬件是不同的,RTC吐出来的是时刻,而其他硬件时钟吐出来的是时间。也就是说,RTC能告诉我们,当前是2023年6月5日,14:49:38,但是其他的硬件如TSC,PIT,HPET只能告诉我们,我应该走过了XXX个cycle,按照我的频率,已经过去了多少时间了。
以X86为例,RTC是主板上的一块CMOS芯片,即使系统关机,也可以依赖主板上的电池维持时钟的准确。RTC存储的是UTC时间,而不会考虑timezone。
所以,Linux启动的时候首先会读取RTC来获得当前的时刻值,尽管精度不高(精确到秒)。一般情况下,用户不需要去设置RTC时间,所以本文也不介绍如何去设置RTC时间,感兴趣的可以自行研究。我们大多数情况下只是去读取RTC时间,那么RTC时间是在什么时候,以及如何读取到的呢?接下来让我们来了解下:
首先,Linux内核中有4大time相关的初始化函数:1)init_timers(); 2)hrtimers_init(); 3)timekeeping_init();4)time_init()。从RTC中读取当前的UTC时间是timekeeping_init中做的事情,调用路径如下:
timekeeping_init
|___________read_persistent_clock (arch/x86/kernel/rtc.c)
|_____x86_platform.get_wallclock()
|_____mach_get_cmos_time (arch/x86/kernel/x86_init.c)
在struct x86_platform_ops x86_platform结构体中,其get_wallclock成员就是获取cmos RTC时间的接口。
- /*****************arch/x86/kernel/x86_init.c ****************/
- struct x86_platform_ops x86_platform = {
- .calibrate_cpu = native_calibrate_cpu,
- .calibrate_tsc = native_calibrate_tsc,
- .get_wallclock = mach_get_cmos_time,
- .set_wallclock = mach_set_rtc_mmss,
- .iommu_shutdown = iommu_shutdown_noop,
- .is_untracked_pat_range = is_ISA_range,
- .nmi_init = default_nmi_init,
- .get_nmi_reason = default_get_nmi_reason,
- .i8042_detect = default_i8042_detect,
- .save_sched_clock_state = tsc_save_sched_clock_state,
- .restore_sched_clock_state = tsc_restore_sched_clock_state,
- };
而mach_get_cmos_time接口的实现如下:
- /***************** arch/x86/kernel/rtc.c ****************/
- void mach_get_cmos_time(struct timespec *now)
- {
- unsigned int status, year, mon, day, hour, min, sec, century = 0;
- unsigned long flags;
- spin_lock_irqsave(&rtc_lock, flags);
- /*
- * If UIP is clear, then we have >= 244 microseconds before
- * RTC registers will be updated. Spec sheet says that this
- * is the reliable way to read RTC - registers. If UIP is set
- * then the register access might be invalid.
- */
- while ((CMOS_READ(RTC_FREQ_SELECT) & RTC_UIP))
- cpu_relax();
- sec = CMOS_READ(RTC_SECONDS);
- min = CMOS_READ(RTC_MINUTES);
- hour = CMOS_READ(RTC_HOURS);
- day = CMOS_READ(RTC_DAY_OF_MONTH);
- mon = CMOS_READ(RTC_MONTH);
- year = CMOS_READ(RTC_YEAR);
- #ifdef CONFIG_ACPI
- if (acpi_gbl_FADT.header.revision >= FADT2_REVISION_ID &&
- acpi_gbl_FADT.century)
- century = CMOS_READ(acpi_gbl_FADT.century);
- #endif
- status = CMOS_READ(RTC_CONTROL);
- WARN_ON_ONCE(RTC_ALWAYS_BCD && (status & RTC_DM_BINARY));
- spin_unlock_irqrestore(&rtc_lock, flags);
- if (RTC_ALWAYS_BCD || !(status & RTC_DM_BINARY)) {
- sec = bcd2bin(sec);
- min = bcd2bin(min);
- hour = bcd2bin(hour);
- day = bcd2bin(day);
- mon = bcd2bin(mon);
- year = bcd2bin(year);
- }
- if (century) {
- century = bcd2bin(century);
- year += century * 100;
- } else
- year += CMOS_YEARS_OFFS;
- now->tv_sec = mktime(year, mon, day, hour, min, sec);
- now->tv_nsec = 0;
- }
调用mktime,将年月日时分秒组装成1970年1月1日00:00:00这个UNIX基准时间以来的秒数。
2、PIT
Programmalbe Interval Timer(PIT),PIT主要由8254时钟芯片实现的,这个时钟源是出现比较早,但比较菜的硬件,它的频率只有1MHZ左右,且当前已经被HPET取代。
它的频率在include/linux/timex.h:161:#define PIT_TICK_RATE 1193182ul中设定,也即约1.193182MHZ的频率。在支持HPET时钟源的时候,available_clocksource中是不会出现PIT时钟源的,因为Kernel中发现可以使用HPET,就不会用PIT作为始终源了。后面我们会分析到。
3、TSC
Time Stamp Counter.(TSC),TSC的主体是位于CPU里面的一个64位的TSC寄存器。每个CPU时钟周期其值加一。比如CPU的主频为1GHZ,则每一秒时间内,TSC寄存器的值将增加1G次,或者说每一个纳秒加一次。x86还提供 rtdsc指令来读取该值,因此TSC也可以作为时钟设备。TSC提供了比RTC更高精度的时间,即纳秒级的时间精度。
TSC这个时钟源的检测和注册是在前文提到的四大初始化中的最后一个:time_init
|_____x86_late_time_init
|___tsc_init
|________x86_platform.calibrate_tsc (x86_init.c)
|______native_calibrate_tsc
|___quit_pit_calibrate
而它的rating值为300,如下代码片段:
- /******************** arch/x86/kernel/tsc.c*****************************/
- static struct clocksource clocksource_tsc = {
- .name = "tsc",
- .rating = 300,
- .read = read_tsc,
- .mask = CLOCKSOURCE_MASK(64),
- .flags = CLOCK_SOURCE_IS_CONTINUOUS |
- CLOCK_SOURCE_MUST_VERIFY,
- #ifdef CONFIG_X86_64
- .archdata = { .vclock_mode = VCLOCK_TSC },
- #endif
- };
4、HPET
HPET(High Precision Event Timer)俗称高精度定时器。PIT 的精度较低,HPET 被设计来替代 PIT 提供高精度时钟中断(至少 10MHz)。它是由微软和 Intel 联合开发的。一个 HPET 包括了一个固定频率的数值增加的计数器以及 3 到 32 个独立的计时器,这每一个计时器有包涵了一个比较器和一个寄存器(保存一个数值,表示触发中断的时机)。每一个比较器都比较计数器中的数值和寄存器的数值,相等就会产生中断。
HPET这个时钟源的检测和注册是在前文提到的四大初始化中的最后一个:time_init
- /*********************arch/x86/kernel/time.c********************/
- /* Default timer init function */
- void __init hpet_time_init(void)
- {
- if (!hpet_enable())
- setup_pit_timer();
- setup_default_timer_irq();
- }
- static __init void x86_late_time_init(void)
- {
- x86_init.timers.timer_init();
- tsc_init();
- }
- /*
- * Initialize TSC and delay the periodic timer init to
- * late x86_late_time_init() so ioremap works.
- */
- void __init time_init(void)
- {
- late_time_init = x86_late_time_init;
- }
time_init的大致流程如下:
time_init
|_________x86_late_time_init
|_________x86_init.timers.timer_init (arch/x86/kernel/x86_init.c)
|________hpet_time_init
|_____hpet_enable
|____hpet_clocksource_register
|_____set_default_time_irq
从上面time_init的代码流程中,我们可以看到,当hpet_enable时,是不会再设置pit timer的,因此,一旦系统支持hpet时钟源,则会替代pit时钟源。
而HPET时钟源的rating值是250,其值小于TSC的300。
- /*************arch/x86/kernel/hpet.c***********************/
- static struct clocksource clocksource_hpet = {
- .name = "hpet",
- .rating = 250,
- .read = read_hpet,
- .mask = HPET_MASK,
- .flags = CLOCK_SOURCE_IS_CONTINUOUS,
- .resume = hpet_resume_counter,
- #ifdef CONFIG_X86_64
- .archdata = { .vclock_mode = VCLOCK_HPET },
- #endif
- };
5、ACPI(PM)
ACPI Power Management Timer,rating值为200,初始化在fs_initcall时执行,它的rating值为200,低于hept(250)和tsc(300)。
- /***************drivers/clocksource/acpi_pm.c******************/
- …
- static struct clocksource clocksource_acpi_pm = {
- .name = "acpi_pm",
- .rating = 200,
- .read = acpi_pm_read,
- .mask = (u64)ACPI_PM_MASK,
- .flags = CLOCK_SOURCE_IS_CONTINUOUS,
- };
- …
- static int __init init_acpi_pm_clocksource(void)
- {
- …
- }
- …
- fs_initcall(init_acpi_pm_clocksource);
时钟频率在include/linux/acpi_pmtmr.h:7:#define PMTMR_TICKS_PER_SEC 3579545定义,约为3.5MHZ。
6、Hyper-V(KVM环境的时钟源支持)
Hyper-V 的优点之一是不必担心将虚拟机时钟设置为正确的时间。在绝大多数情况下,虚拟机将它们的时钟同步到主机服务器,这意味着如果Hyper-V主机的时间是正确的,那么虚拟机时钟也是正确的。此外,由于虚拟机将其时钟同步到Hyper-V主机,因此在给定主机上运行的所有虚拟机通常会彼此显示相同的时间。
Hyper-V提供两个时钟源计数器,分别为hyperv_clocksource_msr和hyperv_clocksource_tsc_page,当hyperv_clocksource_tsc_page支持(由内核编译选项CONFIG_HYPERV_TSCPAGE控制,受系统内核编译时配置影响)时,则不再使用hyperv_clocksource_msr时钟源。在启用kvm时,会根据kvm的启动设置,即下方代码的if (ms_hyperv.features & HV_X64_MSR_REFERENCE_TSC_AVAILABLE)语句成立,在检测到虚拟机管理程序后在引导序列的早期调用hyperv_init()初始化,如果配置了hyperv特性以及使能了HYPERV_TSCPAGE则从hyperv_clocksource_tsc_page获取时钟源。当hyperv_clocksource_tsc_page不支持时则从hyperv_clocksource_msr获取时钟源(我们环境不是这样的,不介绍了)。
- /****************arch/x86/hyperv/hv_init.c*********************/
- /*
- * This function is to be invoked early in the boot sequence after the
- * hypervisor has been detected.
- *
- * 1. Setup the hypercall page.
- * 2. Register Hyper-V specific clocksource.
- */
- void hyperv_init(void)
- {
- ...
- #ifdef CONFIG_HYPERV_TSCPAGE
- if (ms_hyperv.features & HV_X64_MSR_REFERENCE_TSC_AVAILABLE) {
- union hv_x64_msr_hypercall_contents tsc_msr;
- tsc_pg = __vmalloc(PAGE_SIZE, GFP_KERNEL, PAGE_KERNEL);
- if (!tsc_pg)
- goto register_msr_cs;
- hyperv_cs = &hyperv_cs_tsc;
- rdmsrl(HV_X64_MSR_REFERENCE_TSC, tsc_msr.as_uint64);
- tsc_msr.enable = 1;
- tsc_msr.guest_physical_address = vmalloc_to_pfn(tsc_pg);
- wrmsrl(HV_X64_MSR_REFERENCE_TSC, tsc_msr.as_uint64);
- __set_fixmap(HVCLOCK_TSC_PAGE,
- tsc_msr.guest_physical_address << PAGE_SHIFT,
- PAGE_KERNEL_VVAR);
- kaiser_add_mapping(__fix_to_virt(HVCLOCK_TSC_PAGE), PAGE_SIZE,
- __PAGE_KERNEL_VVAR | _PAGE_GLOBAL);
- /* set fixmap before switching vclock mode */
- wmb();
- hyperv_cs_tsc.archdata.vclock_mode = VCLOCK_HVCLOCK;
- clocksource_register_hz(&hyperv_cs_tsc, NSEC_PER_SEC/100);
- return;
- }
- register_msr_cs:
- #endif
- /*
- * For 32 bit guests just use the MSR based mechanism for reading
- * the partition counter.
- */
- hyperv_cs = &hyperv_cs_msr;
- if (ms_hyperv.features & HV_X64_MSR_TIME_REF_COUNT_AVAILABLE)
- clocksource_register_hz(&hyperv_cs_msr, NSEC_PER_SEC/100);
- return;
- ...
- }
Hyper-V时钟源的rating是400,高于tsc(300),hept(250)和acpi_pm(200)。
- /*************** arch/x86/hyperv/hv_init.c*******************/
- static struct clocksource hyperv_cs_tsc = {
- .name = "hyperv_clocksource_tsc_page",
- .rating = 400,
- .read = read_hv_clock_tsc,
- .mask = CLOCKSOURCE_MASK(64),
- .flags = CLOCK_SOURCE_IS_CONTINUOUS,
- };
- …
- static struct clocksource hyperv_cs_msr = {
- .name = "hyperv_clocksource_msr",
- .rating = 400,
- .read = read_hv_clock_msr,
- .mask = CLOCKSOURCE_MASK(64),
- .flags = CLOCK_SOURCE_IS_CONTINUOUS,
- };
7、kvm-clock(KVM环境的时钟源支持)
kvm-clock是KVM下Linux Guest默认的半虚拟化时钟源。在Guest上实现一个kvmclock驱动,Guest通过该驱动向VMM查询时间。其工作流程也比较简单:Guest分配一个内存页,将该内存地址通过写入MSR告诉VMM,VMM把Host系统时间写入这个内存页,然后Guest去读取这个时间来更新。这里使用到的两个MSR是:MSR_KVM_WALL_CLOCK_NEW和MSR_KVM_SYSTEM_TIME_NEW(这是新的,使用cpuid 0x40000001来标志使用新的还是旧的)分别对应pvclock_wall_clock和pvclock_vcpu_time_info。kvm-clock时钟源会根据kvm的-cpu选项的启动设置(未配置kvm=off时),在检测到虚拟机管理程序后在引导序列的早期调用初始化流程。
kvm-clock的rating是400,高于tsc(300),hept(250)和acpi_pm(200),与Hyper-V的值相等,但是他们同时存在并支持时,会选择kvm-clock。
- /****************arch/x86/kernel/kvmclock.c**************/
- struct clocksource kvm_clock = {
- .name = "kvm-clock",
- .read = kvm_clock_get_cycles,
- .rating = 400,
- .mask = CLOCKSOURCE_MASK(64),
- .flags = CLOCK_SOURCE_IS_CONTINUOUS,
- };
- EXPORT_SYSBOL_GPL(kvm_clock);
8、kernel各个时钟的总结
在了解了上面的kernel中不同时钟的原理和相关实现后,我们可以总结对比如下:
| Clock |
时钟源说明 |
rating |
频率 |
精度 |
| RTC |
CMOS RTC需要电池供电的计时芯片,当操作系统关机后,RTC可以继续计数。系统每次上电以后通过读取rtc时间作为系统的实时时间,否则的话系统默认是将1970年作为起始时间。 |
特殊的cmos时间 |
2KHz~8192KHz |
1秒或更小 |
| PIT |
pit是最古老的pc时钟设备。Intel 8253/8254 PIT是具有3个16位计数器通道的可编程计数/定时器芯片 |
由HPET替代 |
1.193182MHZ |
约1毫秒 |
| HPET |
HPET(High Precision Event Timer)俗称高精度定时器(到时了产生中断),最低时钟频率为10MHZ,而且定义了比较严格的精确度。HPET设计时是为了替代PIT和RTC,但是现在PIT和RTC在一些系统中还是有应用的价值。 |
250 |
至少 10MHz |
0.1毫秒或更小 |
| TSC |
TSC是64bit的cycle计数器,根据CPU的时钟振荡器产生的周期计数。TSC不能产生中断。软件可以通过指令(rdtsc/rdtscp)来获取TSC计数值。 |
300 |
CPU主频 |
1纳秒或更小 |
| ACPI_PM |
ACPI timer又称Power management timer(PM timer),是ACPI提供的定时器。它有一个以频率(PIT时钟频率的3倍)向上计数的24位的计数寄存器,但没有计数设置寄存器。每当计数达到最大值时,计数又从0开始递增计数。 |
200 |
3.5MHZ |
约0.3毫秒 |
| Hyper-V |
虚拟机将它们的时钟同步到主机服务器 |
400 |
和host的CPU主频同步 |
1纳秒或更小 |
| kvm-clock |
kvm-clock是KVM下Linux Guest默认的半虚拟化时钟源 |
400 |
CPU主频 |
1纳秒或更小 |
不同时钟的时钟rating不同,精度也受时钟频率影响而有所不同。在推荐使用程度上,也存在着差异。
1)在物理机环境中,可用时钟源推荐顺序为TSC(精度1纳秒或更小)>HPET(精度0.1毫秒或更小)>ACPI_PM(约0.3毫秒);
2)在虚拟机环境中,比较复杂,但可用时钟源推荐顺序大致为kvm-clock=Hyper-V> TSC(精度1纳秒或更小)>HPET(精度0.1毫秒或更小)>ACPI_PM(约0.3毫秒)。
接下来,我们再来看看在qemu-kvm中,这些时钟源是怎么使用的。
三、qemu-kvm中的时钟源
首先,要想了解qemu-kvm中clocksource,我们需要知道模拟时钟源和kvm可用时钟源的不同。首先,qemu-kvm中模拟了所有主机支持的时钟源的支持,而kvm中可用时钟源理论上和主机是相同的。但是由于中间多了一层虚拟化,所以kvm实际上支持的可用时钟源是受qemu-kvm的启动配置参数影响的,qemu-kvm会在kvm启动配置下配置支持哪些时钟源给kvm虚拟环境。
在第二章节,我们提到过,kvm中实际可以支持的时钟源有:kvm-clock;Hyper-V;TSC;HPET;ACPI_PM。我们也知道可用时钟源推荐顺序为kvm-clock>Hyper-V> TSC(精度1纳秒或更小)>HPET(精度0.1毫秒或更小)>ACPI_PM(约0.3毫秒)。接下来就让我们来看下kvm的时钟源是如何实现的。
- struct QEMUTimer {
- int64_t expire_time; /* in nanoseconds */
- QEMUTimerList *timer_list;
- QEMUTimerCB *cb;
- void *opaque;
- QEMUTimer *next;
- int attributes;
- int scale;
- };
的初始化创建流程在hw/i386/kvm/clock.c中实现
Qemu-kvm中所有的时钟读取都需要调用qemu_clock_get_ns接口获取
- int64_t qemu_clock_get_ns(QEMUClockType type)
- {
- switch (type) {
- case QEMU_CLOCK_REALTIME:
- return get_clock(); //调用clock_gettime()接口
- default:
- case QEMU_CLOCK_VIRTUAL:
- if (use_icount) {
- return cpu_get_icount();
- } else {
- return cpu_get_clock();
- }
- case QEMU_CLOCK_HOST:
- return REPLAY_CLOCK(REPLAY_CLOCK_HOST, get_clock_realtime());
- case QEMU_CLOCK_VIRTUAL_RT:
- return REPLAY_CLOCK(REPLAY_CLOCK_VIRTUAL_RT, cpu_get_clock());
- }
- }
kvmclock_create接口
- void kvmclock_create(void)
- {
- X86CPU *cpu = X86_CPU(first_cpu);
- if (kvm_enabled() &&
- cpu->env.features[FEAT_KVM] & ((1ULL << KVM_FEATURE_CLOCKSOURCE) |
- (1ULL << KVM_FEATURE_CLOCKSOURCE2))) {
- sysbus_create_simple(TYPE_KVM_CLOCK, -1, NULL);
- }
- }
1、RTC
qemu-kvm的RTC时钟是通过对0x70端口数据读取来获取当前时钟的,它的实现在hw/rtc/mc146818rtc.c中模拟实现QEMU MC146818 RTC芯片,它的注册流程是:
type_init(mc146818rtc_register_types)
|____mc146818rtc_info
|_____rtc_class_initfn
|_______________DeviceClass *dc = DEVICE_CLASS(klass);
|_______________dc->realize = rtc_realizefn;
|_______________dc->reset = rtc_resetdev;
|_______________dc->vmsd = &vmstate_rtc;
|_______________dc->props = mc146818rtc_properties;
QEMU MC146818 RTC的频率是为define RTC_CLOCK_RATE 32768,约为32KHZ。
QEMU MC146818 RTC的初始时间设置流程大致如下:
QEMU MC146818 RTC通过读取host时间,并根据qemu-kvm启动时-rtc的相关配置,来设计当前kvm中的RTC的初始时刻。且由于在configure_rtc时,全局变量rtc_clock被设置为QEMU_CLOCK_HOST,因此他始终通过get_clock_realtime(调用gettimeofday并计数当前精确到秒的时刻)读取host时刻。所以,rtc时钟源的时钟时间,不受虚拟机kvm的影响,是独立的,无论qemu-kvm在运行中,还是关机状态,其都是从host读取的时刻。
2、PIT
PIT时钟源的qemu-kvm支持,是通过模拟实现i8254芯片实现的,其主要涉及两个两个时钟源:kvm-pit和isa-pit,分别在hw/i386/kvm/i8254.c和hw/timer/i8254.c文件中实现。
1)hw/i386/kvm/i8254.c
type_init(pit_register_types) /**** hw/timer/i8254.c****/
|____ type_register_static(&kvm_pit_info); /**** kvm-pit时钟源***/
|_____ kvm_pit_class_init
2)hw/timer/i8254.c
type_init(pit_register_types) /**** hw/timer/i8254.c****/
|____ type_register_static(&pit_info); /**** isa-pit时钟源***/
|_____ pit_class_initfn
它们的频率为define PIT_FREQ 1193182,模拟的频率约为1.19MHZ。
3、TSC
Qemu中没有做特殊的模拟,因为TSC的主体是位于CPU里面的一个64位的TSC寄存器。每个CPU时钟周期其值加一。比如CPU的主频为1GHZ,则每一秒时间内,TSC寄存器的值将增加1G次,或者说每一个纳秒加一次。当需要读取tsc时钟源时间时,只需要去读取tsc寄存器中的计数值+RTC时刻即可获得当前的时间。
4、HPET
HPET时钟源的qemu-kvm支持,是在hw/timer/hpet.c中编写实现的。
type_init(hpet_register_types) /**** hw/timer/hpet.c****/
|____ type_register_static(&hpet_device_info); /**** hpet时钟源***/
|_____ hpet_device_class_init
它通过一个struct HPETState结构体,其中存储着模拟的hpet时钟源的计数时间。它的数据是通过一个全局结构体HPETState保持的,并按照一定的频率对数据进行更新,当需要读取的时候,再读出当前计数值,计算当前系统经过的时间。
- typedef struct HPETState {
- /*< private >*/
- SysBusDevice parent_obj;
- /*< public >*/
- MemoryRegion iomem;
- uint64_t hpet_offset;
- bool hpet_offset_saved;
- qemu_irq irqs[HPET_NUM_IRQ_ROUTES];
- uint32_t flags;
- uint8_t rtc_irq_level;
- qemu_irq pit_enabled;
- uint8_t num_timers;
- uint32_t intcap;
- HPETTimer timer[HPET_MAX_TIMERS];
- /* Memory-mapped, software visible registers */
- uint64_t capability; /* capabilities */
- uint64_t config; /* configuration */
- uint64_t isr; /* interrupt status reg */
- uint64_t hpet_counter; /* main counter */
- uint8_t hpet_id; /* instance id */
- } HPETState;
5、ACPI(PM)
acpi时钟源的qemu-kvm支持,是通过在hw/acpi/core.c中的代码实现的,它的init过程如下。
type_init(piix4_pm_register_types) /**** hw/timer/hpet.c****/
|____ type_register_static(&piix4_pm_info);
|______piix4_pm_class_init
|_____ piix4_pm_realize
|_______ acpi_pm_tmr_init //初始化一个acpi-tmr的io事件
|_______ acpi_pm1_evt_init //初始化一个acpi-evt的io事件
|_______ acpi_pm1_cnt_init //初始化一个acpi-cnt的io事件
可以看出,acpi_pm时钟源读写的是acpi总线上的一个寄存器,它的时间数据获取是通过以下代码获取的:
muldiv64(qemu_clock_get_ns(QEMU_CLOCK_VIRTUAL), PM_TIMER_FREQUENCY, NANOSECONDS_PER_SECOND);
这句代码解析后其实就是以下代码:
/********* include/qemu/timer.h************/
#define NANOSECONDS_PER_SECOND 1000000000LL
/**********include/hw/acpi/acpi.h***********/
#define PM_TIMER_FREQUENCY 3579545
/********** cpus.c ****************/
static int64_t cpu_get_clock_locked(void)
{
int64_t time;
time = timers_state.cpu_clock_offset;
if (timers_state.cpu_ticks_enabled) {
time += get_clock();
}
return time;
}
也就是说,按照PM_TIMER_FREQUENCY设置的频率进行计算,当需要读写数据时cpu也必须在计数,不能停止,一旦停止,则acpi的时间无法写入和读出新的时间。而它读取的时间值计算方法为:
时间=acpi-tmr寄存器计数值* PM_TIMER_FREQUENCY+ get_clock()时间。
而它的频率为#define PM_TIMER_FREQUENCY 3579545,约为3.57MHZ。
6、Hyper-V
Hyper-V在qemu中实际需要通过启动qemu-kvm进程时配置获得,它其实就是设计读取0x40000021或者0x40000020寄存器地址的计数时间来作为时钟数据的。先看如下代码:
- /*********************target/i386/kvm.c**************************/
- static struct {
- const char *desc;
- struct {
- uint32_t fw;
- uint32_t bits;
- } flags[2];
- uint64_t dependencies;
- } kvm_hyperv_properties[] = {
- [HYPERV_FEAT_RELAXED] = {
- .desc = "relaxed timing (hv-relaxed)",
- .flags = {
- {.fw = FEAT_HYPERV_EAX,
- .bits = HV_HYPERCALL_AVAILABLE},
- {.fw = FEAT_HV_RECOMM_EAX,
- .bits = HV_RELAXED_TIMING_RECOMMENDED}
- }
- },
- [HYPERV_FEAT_VAPIC] = {
- .desc = "virtual APIC (hv-vapic)",
- .flags = {
- {.fw = FEAT_HYPERV_EAX,
- .bits = HV_HYPERCALL_AVAILABLE | HV_APIC_ACCESS_AVAILABLE},
- {.fw = FEAT_HV_RECOMM_EAX,
- .bits = HV_APIC_ACCESS_RECOMMENDED}
- }
- },
- [HYPERV_FEAT_TIME] = {
- .desc = "clocksources (hv-time)",
- .flags = {
- {.fw = FEAT_HYPERV_EAX,
- .bits = HV_HYPERCALL_AVAILABLE | HV_TIME_REF_COUNT_AVAILABLE |
- HV_REFERENCE_TSC_AVAILABLE}
- }
- },
- ...
- }
一旦我们在启动qemu-kvm时配置了hv_time选项,那么此时就使能了HV_X64_MSR_REFERENCE_TSC。参考如下代码:
- /****************target/i386/kvm.c****************************/
- static int kvm_get_msrs(X86CPU *cpu)
- {
- ...
- if (env->features[FEAT_KVM] & (1 << KVM_FEATURE_ASYNC_PF)) {
- kvm_msr_entry_add(cpu, MSR_KVM_ASYNC_PF_EN, 0);
- }
- if (env->features[FEAT_KVM] & (1 << KVM_FEATURE_PV_EOI)) {
- kvm_msr_entry_add(cpu, MSR_KVM_PV_EOI_EN, 0);
- }
- if (env->features[FEAT_KVM] & (1 << KVM_FEATURE_STEAL_TIME)) {
- kvm_msr_entry_add(cpu, MSR_KVM_STEAL_TIME, 0);
- }
- if (env->features[FEAT_KVM] & (1 << KVM_FEATURE_POLL_CONTROL)) {
- kvm_msr_entry_add(cpu, MSR_KVM_POLL_CONTROL, 1);
- }
- ...
- if (has_msr_hv_hypercall) {
- kvm_msr_entry_add(cpu, HV_X64_MSR_HYPERCALL, 0);
- kvm_msr_entry_add(cpu, HV_X64_MSR_GUEST_OS_ID, 0);
- }
- if (hyperv_feat_enabled(cpu, HYPERV_FEAT_VAPIC)) {
- kvm_msr_entry_add(cpu, HV_X64_MSR_APIC_ASSIST_PAGE, 0);
- }
- if (hyperv_feat_enabled(cpu, HYPERV_FEAT_TIME)) {
- kvm_msr_entry_add(cpu, HV_X64_MSR_REFERENCE_TSC, 0);
- }
- ...
- ret = kvm_vcpu_ioctl(CPU(cpu), KVM_GET_MSRS, cpu->kvm_msr_buf);
- if (ret < 0) {
- return ret;
- }
- ...
- for (i = 0; i < ret; i++) {
- uint32_t index = msrs[i].index;
- switch (index) {
- ...
- case HV_X64_MSR_REFERENCE_TSC:
- env->msr_hv_tsc = msrs[i].data;
- ...
- }
- }
- ...
- }
- static int kvm_put_msrs(X86CPU *cpu, int level)
- {
- ...
- if (level >= KVM_PUT_RESET_STATE) {
- kvm_msr_entry_add(cpu, MSR_IA32_TSC, env->tsc);
- kvm_msr_entry_add(cpu, MSR_KVM_SYSTEM_TIME, env->system_time_msr);
- kvm_msr_entry_add(cpu, MSR_KVM_WALL_CLOCK, env->wall_clock_msr);
- if (env->features[FEAT_KVM] & (1 << KVM_FEATURE_ASYNC_PF)) {
- kvm_msr_entry_add(cpu, MSR_KVM_ASYNC_PF_EN, env->async_pf_en_msr);
- }
- if (env->features[FEAT_KVM] & (1 << KVM_FEATURE_PV_EOI)) {
- kvm_msr_entry_add(cpu, MSR_KVM_PV_EOI_EN, env->pv_eoi_en_msr);
- }
- if (env->features[FEAT_KVM] & (1 << KVM_FEATURE_STEAL_TIME)) {
- kvm_msr_entry_add(cpu, MSR_KVM_STEAL_TIME, env->steal_time_msr);
- }
- if (env->features[FEAT_KVM] & (1 << KVM_FEATURE_POLL_CONTROL)) {
- kvm_msr_entry_add(cpu, MSR_KVM_POLL_CONTROL, env->poll_control_msr);
- }
- ...
- /*
- * Hyper-V partition-wide MSRs: to avoid clearing them on cpu hot-add,
- * only sync them to KVM on the first cpu
- */
- if (current_cpu == first_cpu) {
- if (has_msr_hv_hypercall) {
- kvm_msr_entry_add(cpu, HV_X64_MSR_GUEST_OS_ID,
- env->msr_hv_guest_os_id);
- kvm_msr_entry_add(cpu, HV_X64_MSR_HYPERCALL,
- env->msr_hv_hypercall);
- }
- if (hyperv_feat_enabled(cpu, HYPERV_FEAT_TIME)) {
- kvm_msr_entry_add(cpu, HV_X64_MSR_REFERENCE_TSC,
- env->msr_hv_tsc);
- }
- if (hyperv_feat_enabled(cpu, HYPERV_FEAT_REENLIGHTENMENT)) {
- kvm_msr_entry_add(cpu, HV_X64_MSR_REENLIGHTENMENT_CONTROL,
- env->msr_hv_reenlightenment_control);
- kvm_msr_entry_add(cpu, HV_X64_MSR_TSC_EMULATION_CONTROL,
- env->msr_hv_tsc_emulation_control);
- kvm_msr_entry_add(cpu, HV_X64_MSR_TSC_EMULATION_STATUS,
- env->msr_hv_tsc_emulation_status);
- }
- }
- ...
- }
- }
而HV_X64_MSR_REFERENCE_TSC对应的就是0x40000021寄存器地址,通过rdtsc指令获取该寄存器地址的值,以此计算时钟时间,未配置时不会设置寄存器地址,读取数据是无效的。
- /******************** include/qemu/timer.h ***********************/
- #elif defined(__i386__)
- static inline int64_t cpu_get_host_ticks(void)
- {
- int64_t val;
- asm volatile ("rdtsc" : "=A" (val));
- return val;
- }
- #elif defined(__x86_64__)
- static inline int64_t cpu_get_host_ticks(void)
- {
- uint32_t low,high;
- int64_t val;
- asm volatile("rdtsc" : "=a" (low), "=d" (high));
- val = high;
- val <<= 32;
- val |= low;
- return val;
- }
因此,此项配置下的时钟源,它的数据读取来源于rdtsc汇编指令的寄存器值,由于这个值是由host保持和更改的,kvm无法更改,所以使用此时钟源的所有的kvm,都可以保持与host的时间始终保持一致。
7、kvm-clock
kvmclock时钟时kvm环境特有的,且必须不配置-cpu kvm=off时才生效。首先来看下代码:
- /*************hw/i386/kvm/clock.c***************/
- /* Note: Must be called after VCPU initialization. */
- void kvmclock_create(void)
- {
- X86CPU *cpu = X86_CPU(first_cpu);
- if (kvm_enabled() &&
- cpu->env.features[FEAT_KVM] & ((1ULL << KVM_FEATURE_CLOCKSOURCE) |
- (1ULL << KVM_FEATURE_CLOCKSOURCE2))) {
- sysbus_create_simple(TYPE_KVM_CLOCK, -1, NULL);
- }
- }
- int kvm_arch_init_vcpu(CPUState *cs)
- {
- ....
- if (cpu->expose_kvm) { //kvm=off时条件不成立,不设置kvm=off时会被打上KVMKVMKVM标签
- memcpy(signature, "KVMKVMKVM\0\0\0", 12);
- c = &cpuid_data.entries[cpuid_i++];
- c->function = KVM_CPUID_SIGNATURE | kvm_base;
- c->eax = KVM_CPUID_FEATURES | kvm_base;
- c->ebx = signature[0];
- c->ecx = signature[1];
- c->edx = signature[2];
- c = &cpuid_data.entries[cpuid_i++];
- c->function = KVM_CPUID_FEATURES | kvm_base;
- c->eax = env->features[FEAT_KVM];
- c->edx = env->features[FEAT_KVM_HINTS];
- }
- ...
- }
以上代码总结下就是, CPUID[4000_0001].EAX标志由kvm=off/on决定,CPUID[4000_0001].EAX标志值影响内核判断当前环境是kvm环境还是非kvm环境,如果是kvm环境,则将提供kvm-clock时钟源做为一个可用的时钟源给kvm虚拟机使用,且之前提供kvm-clock的rating值为400,高于其他的时钟源,因此,一旦检测到环境为kvm环境,则kvm系统默认会使用kvm-clock时钟源。
而它的实现大致为
type_init(kvmclock_register_types) /**** hw/i386/kvm/clock.c****/
|____ type_register_static(&kvmclock_info); /**** kvmclock时钟源***/
|_____ kvmclock_class_init
它的数据读取来源于system_time_msr寄存器的读取。
8、qemu-kvm时钟总结
在前面章节我们依次简单说明了qemu-kvm中的时钟源模拟的代码实现路径以及一些核心的设计点,让我们来总结下,参考下表:
| 时钟源 |
qemu-kvm实现路径 |
模拟的频率 |
数据来源 |
时钟源rating值 |
| RTC |
hw/rtc/mc146818rtc.c |
约为32KHZ |
gettimeofday |
NA |
| PIT |
hw/i386/kvm/i8254.c和hw/timer/i8254.c |
约为1.19MHZ |
按照计数间隔计数,每次计数完成时间刷新 |
NA |
| TSC |
NA |
kvm cpu主频 |
kvm cpu的TSC寄存器 |
300 |
| HPET |
hw/timer/hpet.c |
至少10MHZ |
自己持有的全局结构体HPETState |
250 |
| ACPI(PM) |
hw/acpi/core.c |
约为3.57MHZ |
acpi总线的acpi-tmr寄存器 |
200 |
| Hyper-V |
target/i386/kvm.c |
与host cpu主频保持一致 |
rdtsc,host寄存器 |
400 |
| kvmclock |
hw/i386/kvm/clock.c |
kvm cpu主频 |
kvm的system_time_msr |
400 |
在目前的理论基础上,kvm的时钟优先级顺序应该是kvm-clock=Hyper-V> TSC>HPET>ACPI_PM。
那我们实际kvm中到底使用了哪个时钟源?这将在下面的实践中说明。
四、虚拟机中的时钟源实践
在背景前言章节提过,之所以调查研究时钟源问题,是因为在win10环境中发现,win10虚拟机stop的时间不会补偿,导致win10时钟不准。在调查过程中,我们发现配置kvm虚拟机不同的配置(-cpu配置)会影响时钟的补偿效果,大概总结如下:
1)在-cpu host时,gdb和stop的时间,win10虚拟机时钟都不会补偿;
2)在-cpu host,hv_vpindex,hv_time,hv_synic,hv_stimer时,gdb时间会补偿,stop时间不补偿;
3)在-cpu host,kvm=off时,gdb和stop时间都不补偿;
4)在-cpu host,hv_vpindex,hv_time,hv_synic,hv_stimer,kvm=off时,gdb和stop时间都会补偿;
感兴趣可以试下kvm中时钟在这些配置下的效果,接下来我们带着这些疑惑来进行实践,以此来分析kvm时钟同步的问题。由于windows代码不可见,我们无法分析windows时钟原理,我们先以linux(centos)为例,从理论上对kvm时钟进行解析。
前面提及过,RTC以外的时钟源是由cpu产生计数,时钟时间通过RTC时刻+计数次数*时钟源频率获取的当前时间的。那么时间的补偿与否,肯定和kvm cpu的状态有关,因为一旦cpu不再计数,那么时钟无论如何也无法得到正确的时间,只有当cpu正常计数时,时钟时间才能正常计算。
我们的问题就是再kvm stop后,时钟时间得不到补偿,从理论上推测,kvm stop和kvm start运行之间,kvm的cpu状态被改变了,从而导致cpu不再计数,从而导致系统除RTC以外的时钟源时间,全部丢失stop->start之间的时间。那么kvm stop时,到底对kvm的cpu都做了些什么?可以看如下代码片段(核心部分已加粗):
- /***************cpus.c********************/
- ...
- void pause_all_vcpus(void)
- {
- CPUState *cpu;
- qemu_clock_enable(QEMU_CLOCK_VIRTUAL, false);
- CPU_FOREACH(cpu) {
- if (qemu_cpu_is_self(cpu)) {
- qemu_cpu_stop(cpu, true);
- } else {
- cpu->stop = true;
- qemu_cpu_kick(cpu);
- }
- }
- /* We need to drop the replay_lock so any vCPU threads woken up
- * can finish their replay tasks
- */
- replay_mutex_unlock();
- while (!all_vcpus_paused()) {
- qemu_cond_wait(&qemu_pause_cond, &qemu_global_mutex);
- CPU_FOREACH(cpu) {
- qemu_cpu_kick(cpu);
- }
- }
- qemu_mutex_unlock_iothread();
- replay_mutex_lock();
- qemu_mutex_lock_iothread();
- }
- ...
- static int do_vm_stop(RunState state, bool send_stop)
- {
- int ret = 0;
- if (runstate_is_running()) {
- cpu_disable_ticks();
- pause_all_vcpus();
- runstate_set(state);
- vm_state_notify(0, state);
- if (send_stop) {
- qapi_event_send_stop();
- }
- }
- bdrv_drain_all();
- ret = bdrv_flush_all();
- return ret;
- }
- ...
- void resume_all_vcpus(void)
- {
- CPUState *cpu;
- qemu_clock_enable(QEMU_CLOCK_VIRTUAL, true);
- CPU_FOREACH(cpu) {
- cpu_resume(cpu);
- }
- }
- ...
- int vm_stop(RunState state)
- {
- if (qemu_in_vcpu_thread()) {
- qemu_system_vmstop_request_prepare();
- qemu_system_vmstop_request(state);
- /*
- * FIXME: should not return to device code in case
- * vm_stop() has been requested.
- */
- cpu_stop_current();
- return 0;
- }
- return do_vm_stop(state, true);
- }
- /**
- * Prepare for (re)starting the VM.
- * Returns -1 if the vCPUs are not to be restarted (e.g. if they are already
- * running or in case of an error condition), 0 otherwise.
- */
- int vm_prepare_start(void)
- {
- RunState requested;
- qemu_vmstop_requested(&requested);
- if (runstate_is_running() && requested == RUN_STATE__MAX) {
- return -1;
- }
- /* Ensure that a STOP/RESUME pair of events is emitted if a
- * vmstop request was pending. The BLOCK_IO_ERROR event, for
- * example, according to documentation is always followed by
- * the STOP event.
- */
- if (runstate_is_running()) {
- qapi_event_send_stop();
- qapi_event_send_resume();
- return -1;
- }
- /* We are sending this now, but the CPUs will be resumed shortly later */
- qapi_event_send_resume();
- cpu_enable_ticks();
- runstate_set(RUN_STATE_RUNNING);
- vm_state_notify(1, RUN_STATE_RUNNING);
- return 0;
- }
- void vm_start(void)
- {
- if (!vm_prepare_start()) {
- resume_all_vcpus();
- }
- }
它的核心逻辑为:
/***************cpus.c***********************/
main
|__main_loop
|___main_loop_should_exit
|___vm_stop
|____qemu_system_vmstop_request_prepare()
|____qemu_system_vmstop_request(state)
|____cpu_stop_current()
|____do_vm_stop
|____ cpu_disable_ticks() //后面会再提及
|____ pause_all_vcpus()
|____ qemu_clock_enable(QEMU_CLOCK_VIRTUAL, false)
|____ qemu_cpu_is_self(cpu)
|____qemu_cpu_stop(cpu, true)
|____ !qemu_cpu_is_self(cpu)
|___ cpu->stop = true; qemu_cpu_kick(cpu);
vm_start
|________ vm_prepare_start()
|____________________cpu_enable_ticks() //后面会再提及
|________ resume_all_vcpus()
|____________________qemu_clock_enable(QEMU_CLOCK_VIRTUAL, true)
|___________________ cpu_resume(cpu)
在上述过程,我们可以看到,当kvm stop时,会将cpu设置成stop状态,且把qemu clock关闭;在继续运行时,把qemu clock使能,并唤醒cpu。因此,kvm stop时,kvm cpu被停止了,且qemu clock也被关闭,此时clock时钟计数均不会再增加和变化,当kvm start继续运行时,重新使能了qemu clock并唤醒cpu,但是系统中的时钟源数据都是stop时的数据,因此kvm系统时钟时间会丢失,从而得不到补偿。
这种stop后cpu计数和os时钟源停止计数,是符合时钟源的原理设定的,因为kvm的stop信号,相当于物理机的关机,关机后,理应停止所有cpu和os时钟。但物理机重启后,会重新读取RTC时刻,并初始化os时钟源,所以物理机时钟时间不会出问题。而kvm stop并不是kvm认为的关机,在qemu-kvm进程中,stop只是一个stop信号,主进程仍然在循环等待进程发出继续运行的中断指令,之后再继续运行。
那既然这样,我们该如何设置时钟源,让kvm即使在kvm stop时时钟源数据也保持正确呢。其实有两种方法:1)读取RTC时间;2)另外一种从host读取时钟源数据的方法,即hyperv_clocksource_tsc_page时钟源的数据。
1、linux(以centos为例)
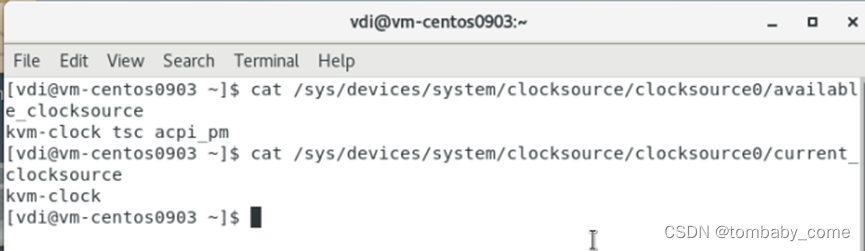
首先,配置kvm虚拟机不同的配置(-cpu配置)会影响kvm系统中的可用时钟源和当前默认选择的时钟源配置,具体对应关系如下表:
| -cpu参数 |
/sys/devices/system/clocksource/clocksource0/available_clocksource |
/sys/devices/system/clocksource/clocksource0/current_clocksource |
| -cpu host |
kvm-clock tsc acpi_pm |
kvm-clock |
| -cpu host,kvm=off |
tsc acpi_pm |
tsc |
| -cpu host ,hv_vpindex,hv_time,hv_synic,hv_stimer |
kvm-clock tsc acpi_pm |
kvm-clock |
| -cpu host ,hv_vpindex,hv_time,hv_synic,hv_stimer,kvm=off |
hyperv_clocksource_tsc_page acpi_pm |
hyperv_clocksource_tsc_page |
接下来,我们就依次来研究下,为什么在不同参数下,kvm中的可用时钟源会有所不同,进而影响当前正在使用的时钟源,从而导致虚拟环境中的时钟效果不同。
1)-cpu host时
本文前面分析过,不同时钟源的默认推荐优先级是不同的,它们的顺序是kvm-clock>Hyper-V> TSC(精度1纳秒或更小)>HPET(精度0.1毫秒或更小)>ACPI_PM(约0.3毫秒),而当我们仅仅配置-cpu host参数时,默认是所有时钟源都启用的,实际结果如下图:
我们看到此时,虚拟机中的可用时钟源有kvm-clock、tsc和acpi_pm,我们发现再kvm中可以被支持的可用的5个时钟源只出现了3个,其中:
1)没有hpet是因为我们还增加了-no-hpet参数,这里不再做扩展;
2)没有hyper-v是因为我们未配置hv_vpindex,hv_time,hv_synic,hv_stimer参数。
在当前可用时钟源为kvm-clock、tsc和acpi_pm时,系统默认选择了kvm-clock,这是因为第二章节中提及的linux内核中,kvm-clock的rating值为400,大于tsc(rating值为300)和acpi_pm(rating值为200)。
而前面我们说过,kvm-clock时钟源是依据os实现的cpu计数中断计算而来的时间,当kvm stop时,kvm cpu将完全处于关闭状态(同等物理机的关机),那么此时kvm-clock时钟源中的时间就不会再增加,因此,当kvm start继续运行时,stop->start之间的时间就没有得到计数,kvm中的时间就会丢失。
而此时,如果给虚拟机发送stop信号,虚拟机继续运行时,时钟时间没有得到补偿。
2)-cpu host,kvm=off时
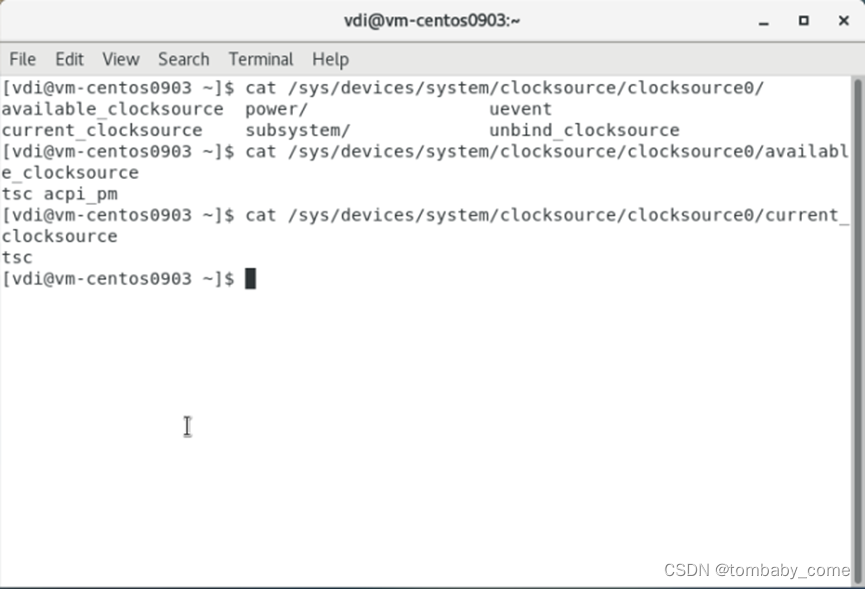
我们看到此时,虚拟机中的可用时钟源有tsc和acpi_pm,我们发现再kvm中可以被支持的可用的5个时钟源只出现了2个,其中:
1)没有hpet是因为我们还增加了-no-hpet参数,这里不再做扩展;
2)没有hyper-v是因为我们未配置hv_vpindex,hv_time,hv_synic,hv_stimer参数;
3)而对比-cpu host时,kvm-clock时钟源也没了,这是受我们配置的kvm=off影响。
kvm=off影响cpu->expose_kvm值不同(off时为false)->进而影响env->features[FEAT_KVM]值(off时为0,否则不为0,即 CPUID[4000_0001].EAX (KVM_CPUID_FEATURES)中的值)->进而影响:off时不会创建kvmclock时钟。
- /*************hw/i386/kvm/clock.c***************/
- /* Note: Must be called after VCPU initialization. */
- void kvmclock_create(void)
- {
- X86CPU *cpu = X86_CPU(first_cpu);
- if (kvm_enabled() &&
- cpu->env.features[FEAT_KVM] & ((1ULL << KVM_FEATURE_CLOCKSOURCE) |
- (1ULL << KVM_FEATURE_CLOCKSOURCE2))) {
- sysbus_create_simple(TYPE_KVM_CLOCK, -1, NULL);
- }
- }
- int kvm_arch_init_vcpu(CPUState *cs)
- {
- ....
- if (cpu->expose_kvm) { //kvm=off时条件不成立,不设置kvm=off时会被打上KVMKVMKVM标签
- memcpy(signature, "KVMKVMKVM\0\0\0", 12);
- c = &cpuid_data.entries[cpuid_i++];
- c->function = KVM_CPUID_SIGNATURE | kvm_base;
- c->eax = KVM_CPUID_FEATURES | kvm_base;
- c->ebx = signature[0];
- c->ecx = signature[1];
- c->edx = signature[2];
- c = &cpuid_data.entries[cpuid_i++];
- c->function = KVM_CPUID_FEATURES | kvm_base;
- c->eax = env->features[FEAT_KVM];
- c->edx = env->features[FEAT_KVM_HINTS];
- }
- ...
- }
在kvmclock_create()接口中,一旦符合条件,将创建一个kvm-clock时钟源的sysbus,从而使能kvm-clock时钟源,这里是否执行sysbus_create_simple(TYPE_KVM_CLOCK, -1, NULL),并且受我们启用qemu-kvm进程时的配置影响的主要为两个方面:1)kvm_enabled()的返回值;2)cpu->env.features[FEAT_KVM]的值。
kvm_enabled()和cpu->env.features[FEAT_KVM]这两个值就不展开讲了,总结下就是:①-accel accel=kvm控制kvm_enabled()为真,配置为其他的则不成立;②kvm=off控制cpu->env.features[FEAT_KVM]=0,不配置时默认为1。
因此,当我们配置kvm=off时,不会再执行 sysbus_create_simple(TYPE_KVM_CLOCK, -1, NULL)。除此之外,kvm=off可以总结影响3个方面:① CPUID[4000_0001].EAX标志off时由1变为0,cpuid里面的KVM标志被抹掉了②不再执行sysbus_create_simple(TYPE_KVM_CLOCK, -1, NULL);创建一个kvm clock;③vmstate中有4个msr_entry不再设置,分别是MSR_KVM_ASYNC_PF_EN、MSR_KVM_PV_EOI_EN、MSR_KVM_STEAL_TIME、MSR_KVM_POLL_CONTROL。而kvm-clock是否支持可用,在内核中就是通过CPUID[4000_0001].EAX标志判断当前环境是否为kvm决定的,一旦当前环境的CPUID[4000_0001].EAX标志被设置为1,则仍为时kvm环境,提供kvm-clock的支持,提供给系统做为可用时钟源。
那么在当前可用时钟源为tsc和acpi_pm时,系统默认选择了tsc,这是因为第二章节中提及的linux内核中, tsc的rating值为300,大于acpi_pm的rating值200。
而前面我们说过,tsc时钟源也是依据os实现的cpu计数中断计算而来的时间,当kvm stop时,kvm cpu将完全处于关闭状态(同等物理机的关机),那么此时tsc时钟源中的时间就不会再增加,因此,当kvm start继续运行时,stop->start之间的时间就没有得到计数,kvm中的时间也同样会丢失。
而此时,如果给虚拟机发送stop信号,虚拟机继续运行时,时钟时间没有得到补偿。
3)-cpu host ,hv_vpindex,hv_time,hv_synic,hv_stimer时

我们看到此时,虚拟机中的可用时钟源有kvm-clock、tsc和acpi_pm,我们发现再kvm中可以被支持的可用的5个时钟源只出现了3个,其中:
1)没有hpet是因为我们还增加了-no-hpet参数,这里不再做扩展;
2)没有hyper-v是因为我们虽然配置了hv_vpindex,hv_time,hv_synic,hv_stimer参数,但是由于qemu-kvm中的代码逻辑,没有设置tsc相关的寄存器配置,导致系统无法识别,此时,仍然hyper-V时钟源不会出现。
在当前可用时钟源为kvm-clock、tsc和acpi_pm时,系统默认选择了kvm-clock,这是因为第二章节中提及的linux内核中,kvm-clock的rating值为400,大于tsc(rating值为300)和acpi_pm(rating值为200)。
而前面我们说过,kvm-clock时钟源是依据os实现的cpu计数中断计算而来的时间,当kvm stop时,kvm cpu将完全处于关闭状态(同等物理机的关机),那么此时kvm-clock时钟源中的时间就不会再增加,因此,当kvm start继续运行时,stop->start之间的时间就没有得到计数,kvm中的时间就会丢失。
而此时,如果给虚拟机发送stop信号,虚拟机继续运行时,时钟时间没有得到补偿。
4)-cpu host ,hv_vpindex,hv_time,hv_synic,hv_stimer,kvm=off时

我们看到此时,虚拟机中的可用时钟源有hyperv_clocksource_tsc_page和acpi_pm,我们发现再kvm中可以被支持的可用的5个时钟源只出现了2个,相比前面的配置,多了hyperv_clocksource_tsc_page时钟源,其中:
1)没有hpet是因为我们还增加了-no-hpet参数,这里不再做扩展;
2)出现了hyperv_clocksource_tsc_page是因为我们配置了hv_vpindex,hv_time,hv_synic,hv_stimer参数;
在介绍kernel时钟原理和实现中介绍Hyper-V时我们说过,Hyper-V提供两个时钟源计数器,分别为hyperv_clocksource_msr和hyperv_clocksource_tsc_page,当hyperv_clocksource_tsc_page支持(由内核编译选项CONFIG_HYPERV_TSCPAGE控制,受系统内核编译时配置影响)时,则不再使用hyperv_clocksource_msr时钟源。在启用kvm时,会根据kvm的启动设置,即下方代码的if (ms_hyperv.features & HV_X64_MSR_REFERENCE_TSC_AVAILABLE)语句成立,在检测到虚拟机管理程序后在引导序列的早期调用hyperv_init()初始化,如果配置了hyperv特性以及使能了HYPERV_TSCPAGE则从hyperv_clocksource_tsc_page获取时钟源。当hyperv_clocksource_tsc_page不支持时则从hyperv_clocksource_msr获取时钟源(我们环境不是这样的,不介绍了)。
而hyperv_clocksource_tsc_page的出现,正因为hv_vpindex,hv_time,hv_synic,hv_stimer参数的配置。先看如下代码:
- /*********************target/i386/kvm.c**************************/
- static struct {
- const char *desc;
- struct {
- uint32_t fw;
- uint32_t bits;
- } flags[2];
- uint64_t dependencies;
- } kvm_hyperv_properties[] = {
- [HYPERV_FEAT_RELAXED] = {
- .desc = "relaxed timing (hv-relaxed)",
- .flags = {
- {.fw = FEAT_HYPERV_EAX,
- .bits = HV_HYPERCALL_AVAILABLE},
- {.fw = FEAT_HV_RECOMM_EAX,
- .bits = HV_RELAXED_TIMING_RECOMMENDED}
- }
- },
- [HYPERV_FEAT_VAPIC] = {
- .desc = "virtual APIC (hv-vapic)",
- .flags = {
- {.fw = FEAT_HYPERV_EAX,
- .bits = HV_HYPERCALL_AVAILABLE | HV_APIC_ACCESS_AVAILABLE},
- {.fw = FEAT_HV_RECOMM_EAX,
- .bits = HV_APIC_ACCESS_RECOMMENDED}
- }
- },
- [HYPERV_FEAT_TIME] = {
- .desc = "clocksources (hv-time)",
- .flags = {
- {.fw = FEAT_HYPERV_EAX,
- .bits = HV_HYPERCALL_AVAILABLE | HV_TIME_REF_COUNT_AVAILABLE |
- HV_REFERENCE_TSC_AVAILABLE}
- }
- },
- ...
- }
一旦我们在启动qemu-kvm时配置了hv_time选项,那么此时就使能了HV_X64_MSR_REFERENCE_TSC。参考如下代码:
- /****************target/i386/kvm.c****************************/
- static int kvm_get_msrs(X86CPU *cpu)
- {
- ...
- if (env->features[FEAT_KVM] & (1 << KVM_FEATURE_ASYNC_PF)) {
- kvm_msr_entry_add(cpu, MSR_KVM_ASYNC_PF_EN, 0);
- }
- if (env->features[FEAT_KVM] & (1 << KVM_FEATURE_PV_EOI)) {
- kvm_msr_entry_add(cpu, MSR_KVM_PV_EOI_EN, 0);
- }
- if (env->features[FEAT_KVM] & (1 << KVM_FEATURE_STEAL_TIME)) {
- kvm_msr_entry_add(cpu, MSR_KVM_STEAL_TIME, 0);
- }
- if (env->features[FEAT_KVM] & (1 << KVM_FEATURE_POLL_CONTROL)) {
- kvm_msr_entry_add(cpu, MSR_KVM_POLL_CONTROL, 1);
- }
- ...
- if (has_msr_hv_hypercall) {
- kvm_msr_entry_add(cpu, HV_X64_MSR_HYPERCALL, 0);
- kvm_msr_entry_add(cpu, HV_X64_MSR_GUEST_OS_ID, 0);
- }
- if (hyperv_feat_enabled(cpu, HYPERV_FEAT_VAPIC)) {
- kvm_msr_entry_add(cpu, HV_X64_MSR_APIC_ASSIST_PAGE, 0);
- }
- if (hyperv_feat_enabled(cpu, HYPERV_FEAT_TIME)) {
- kvm_msr_entry_add(cpu, HV_X64_MSR_REFERENCE_TSC, 0);
- }
- ...
- ret = kvm_vcpu_ioctl(CPU(cpu), KVM_GET_MSRS, cpu->kvm_msr_buf);
- if (ret < 0) {
- return ret;
- }
- ...
- for (i = 0; i < ret; i++) {
- uint32_t index = msrs[i].index;
- switch (index) {
- ...
- case HV_X64_MSR_REFERENCE_TSC:
- env->msr_hv_tsc = msrs[i].data;
- ...
- }
- }
- ...
- }
- static int kvm_put_msrs(X86CPU *cpu, int level)
- {
- ...
- if (level >= KVM_PUT_RESET_STATE) {
- kvm_msr_entry_add(cpu, MSR_IA32_TSC, env->tsc);
- kvm_msr_entry_add(cpu, MSR_KVM_SYSTEM_TIME, env->system_time_msr);
- kvm_msr_entry_add(cpu, MSR_KVM_WALL_CLOCK, env->wall_clock_msr);
- if (env->features[FEAT_KVM] & (1 << KVM_FEATURE_ASYNC_PF)) {
- kvm_msr_entry_add(cpu, MSR_KVM_ASYNC_PF_EN, env->async_pf_en_msr);
- }
- if (env->features[FEAT_KVM] & (1 << KVM_FEATURE_PV_EOI)) {
- kvm_msr_entry_add(cpu, MSR_KVM_PV_EOI_EN, env->pv_eoi_en_msr);
- }
- if (env->features[FEAT_KVM] & (1 << KVM_FEATURE_STEAL_TIME)) {
- kvm_msr_entry_add(cpu, MSR_KVM_STEAL_TIME, env->steal_time_msr);
- }
- if (env->features[FEAT_KVM] & (1 << KVM_FEATURE_POLL_CONTROL)) {
- kvm_msr_entry_add(cpu, MSR_KVM_POLL_CONTROL, env->poll_control_msr);
- }
- ...
- /*
- * Hyper-V partition-wide MSRs: to avoid clearing them on cpu hot-add,
- * only sync them to KVM on the first cpu
- */
- if (current_cpu == first_cpu) {
- if (has_msr_hv_hypercall) {
- kvm_msr_entry_add(cpu, HV_X64_MSR_GUEST_OS_ID,
- env->msr_hv_guest_os_id);
- kvm_msr_entry_add(cpu, HV_X64_MSR_HYPERCALL,
- env->msr_hv_hypercall);
- }
- if (hyperv_feat_enabled(cpu, HYPERV_FEAT_TIME)) {
- kvm_msr_entry_add(cpu, HV_X64_MSR_REFERENCE_TSC,
- env->msr_hv_tsc);
- }
- if (hyperv_feat_enabled(cpu, HYPERV_FEAT_REENLIGHTENMENT)) {
- kvm_msr_entry_add(cpu, HV_X64_MSR_REENLIGHTENMENT_CONTROL,
- env->msr_hv_reenlightenment_control);
- kvm_msr_entry_add(cpu, HV_X64_MSR_TSC_EMULATION_CONTROL,
- env->msr_hv_tsc_emulation_control);
- kvm_msr_entry_add(cpu, HV_X64_MSR_TSC_EMULATION_STATUS,
- env->msr_hv_tsc_emulation_status);
- }
- }
- ...
- }
- }
而HV_X64_MSR_REFERENCE_TSC对应的就是0x40000021寄存器地址,通过rdtsc指令获取该寄存器地址的值,以此计算时钟时间,未配置时不会设置寄存器地址,读取数据是无效的。
- /******************** include/qemu/timer.h ***********************/
- #elif defined(__i386__)
- static inline int64_t cpu_get_host_ticks(void)
- {
- int64_t val;
- asm volatile ("rdtsc" : "=A" (val));
- return val;
- }
- #elif defined(__x86_64__)
- static inline int64_t cpu_get_host_ticks(void)
- {
- uint32_t low,high;
- int64_t val;
- asm volatile("rdtsc" : "=a" (low), "=d" (high));
- val = high;
- val <<= 32;
- val |= low;
- return val;
- }
而cpu_get_host_ticks调用时间就是在kvm cpu stop和start流程中设置
- /********************** cpus.c ***************************/
- /* enable cpu_get_ticks()
- * Caller must hold BQL which serves as mutex for vm_clock_seqlock.
- */
- void cpu_enable_ticks(void)
- {
- seqlock_write_lock(&timers_state.vm_clock_seqlock,
- &timers_state.vm_clock_lock);
- if (!timers_state.cpu_ticks_enabled) {
- timers_state.cpu_ticks_offset -= cpu_get_host_ticks();
- timers_state.cpu_clock_offset -= get_clock();
- timers_state.cpu_ticks_enabled = 1;
- }
- seqlock_write_unlock(&timers_state.vm_clock_seqlock,
- &timers_state.vm_clock_lock);
- }
- /* disable cpu_get_ticks() : the clock is stopped. You must not call
- * cpu_get_ticks() after that.
- * Caller must hold BQL which serves as mutex for vm_clock_seqlock.
- */
- void cpu_disable_ticks(void)
- {
- seqlock_write_lock(&timers_state.vm_clock_seqlock,
- &timers_state.vm_clock_lock);
- if (timers_state.cpu_ticks_enabled) {
- timers_state.cpu_ticks_offset += cpu_get_host_ticks();
- timers_state.cpu_clock_offset = cpu_get_clock_locked();
- timers_state.cpu_ticks_enabled = 0;
- }
- seqlock_write_unlock(&timers_state.vm_clock_seqlock,
- &timers_state.vm_clock_lock);
- }
前面我们说过,kvm stop和start它的核心逻辑为:
/***************cpus.c***********************/
main
|__main_loop
|___main_loop_should_exit
|___vm_stop
|____qemu_system_vmstop_request_prepare()
|____qemu_system_vmstop_request(state)
|____cpu_stop_current()
|____do_vm_stop
|____ cpu_disable_ticks()
|____ cpu_get_host_ticks() //里面调用rdtsc读取0x40000021寄存器地址值,未配置hv_time时获取不到,未配置kvm=off时会被kvm-clock抢先优先作为kvm时钟源
|____ pause_all_vcpus()
|____ qemu_clock_enable(QEMU_CLOCK_VIRTUAL, false)
|____ qemu_cpu_is_self(cpu)
|____qemu_cpu_stop(cpu, true)
|____ !qemu_cpu_is_self(cpu)
|___ cpu->stop = true; qemu_cpu_kick(cpu);
vm_start
|________ vm_prepare_start()
|____________________cpu_enable_ticks()
|____ cpu_get_host_ticks() //里面调用rdtsc读取0x40000021寄存器地址值,未配置hv_time时获取不到,未配置kvm=off时会被kvm-clock抢先优先作为kvm时钟源
|________ resume_all_vcpus()
|____________________qemu_clock_enable(QEMU_CLOCK_VIRTUAL, true)
|___________________ cpu_resume(cpu)
因此,我们配置-cpu host,hv_vpindex,hv_time,hv_synic,hv_stimer,kvm=off时,会出现hyperv_clocksource_tsc_page时钟源,而hyperv_clocksource_tsc_page时钟源因为在vm_stop和vm_start期间,都会去通过rdtsc读取host的cpu计数时间,从而hyperv_clocksource_tsc_page时钟源在kvm stop和start期间的时钟时间也不会丢失,且进入系统后,应该是时钟立马跳到正确的时间,不会慢慢调整。而实际现象,也正如我们分析的这样。
3)而对比-cpu host时,kvm-clock时钟源也没了,上面章节讲过,不再赘述。
在当前可用时钟源为hyperv_clocksource_tsc_page和acpi_pm时,系统默认选择了hyperv_clocksource_tsc_page,这是因为第二章节中提及的linux内核中, hyperv_clocksource_tsc_page的rating值为400,大于acpi_pm的rating值200。
然而前面我们说过,os时钟源也是依据os实现的cpu计数中断计算而来的时间,当kvm stop时,kvm cpu将完全处于关闭状态(同等物理机的关机),那么此时时钟源中的时间就不会再增加,因此,当kvm start继续运行时,stop->start之间的时间就没有得到计数,kvm中的时间应该会丢失。而hyperv_clocksource_tsc_page时钟源因为在vm_stop和vm_start期间,都会去通过rdtsc读取host的cpu计数,从而hyperv_clocksource_tsc_page时钟源在kvm stop和start期间的时钟时间也不会丢失,且进入系统后,应该是时钟立马跳到正确的时间,不会慢慢调整。
5)总结
从上述分析对比发现,linux支持的时钟源中hyperv_clocksource_tsc_page和RTC是从host读取的时间做为kvm时钟源时间数据的,因此,我们要想kvm系统时钟时间不会导致stop后时间丢失,那就只有在启动qemu-kvm进程时配置-cpu host,hv_vpindex,hv_time,hv_synic,hv_stimer,kvm=off参数,gdb和stop时间才都会得到补偿,所以要想kvm中的时钟保持和host一致,我们应该配置这个参数,否则将导致kvm stop的时钟源丢失stop时间,从而导致系统时钟时间可能不准。
2、windows10
前面我们提及过,win10时钟时间的补偿效果受-cpu配置参数的不同会有不同的表现:
1)在-cpu host时,gdb和stop的时间,win10虚拟机时钟都不会补偿;
2)在-cpu host,hv_vpindex,hv_time,hv_synic,hv_stimer时,gdb时间会补偿,stop时间不补偿;
3)在-cpu host,kvm=off时,gdb和stop时间都不补偿;
4)在-cpu host,hv_vpindex,hv_time,hv_synic,hv_stimer,kvm=off时,gdb和stop时间都会补偿;
在经过以上章节可以得知,-cpu后续配置会影响kvm中可用时钟源。而在linux(以centos为例)中,我们经过验证以及依据linux kernel时钟源原理可以总结出以下内容:
| -cpu参数 |
/sys/devices/system/clocksource/clocksource0/available_clocksource |
/sys/devices/system/clocksource/clocksource0/current_clocksource |
| -cpu host |
kvm-clock tsc acpi_pm |
kvm-clock |
| -cpu host,kvm=off |
tsc acpi_pm |
tsc |
| -cpu host ,hv_vpindex,hv_time,hv_synic,hv_stimer |
kvm-clock tsc acpi_pm |
kvm-clock |
| -cpu host ,hv_vpindex,hv_time,hv_synic,hv_stimer,kvm=off |
hyperv_clocksource_tsc_page acpi_pm |
hyperv_clocksource_tsc_page |
然而windows内核我们并不可见,无法探索研究win内核时钟源原理,但是从实际现象上看,win10上在未配置-cpu host ,hv_vpindex,hv_time,hv_synic,hv_stimer,kvm=off时,时钟时间在stop后会无法得到补偿,可以推断win内核中的时钟源设计应该适合linux相一致的。
为了研究win10到底在运行时使用了哪个时钟源,通过在gdb跟踪qemu-kvm进程(并设置断点kvm_update_clock)时发现:
①加了配置-cpu host ,hv_vpindex,hv_time,hv_synic,hv_stimer,kvm=off时
kvm_update_clock断点stop后不会被触发到,证明kvm_update_clock不会被调用
②不加配置-cpu host ,hv_vpindex,hv_time,hv_synic,hv_stimer,kvm=off时
kvm_update_clock会被stop后会被触发到,证明kvm_update_clock会被调用
而kvm_update_clock就是kvm-clock的时钟源的接口,因此也可以判断在不加-cpu host ,hv_vpindex,hv_time,hv_synic,hv_stimer,kvm=off时,win10虚拟机使用的时kvm-clock时钟源,加了后就会使用hyperv_clocksource_tsc_page acpi_pm中的某一个时钟源。
而我们打上acpi_pm时钟源的读写操作断点时,gdb时钟不会触发断点,因此证明几点内容:1)未配置-cpu host ,hv_vpindex,hv_time,hv_synic,hv_stimer,kvm=off时,win10使用kvm-clock时钟源;2)配置-cpu host ,hv_vpindex,hv_time,hv_synic,hv_stimer,kvm=off时,win10使用hyperv_clocksource_tsc_page时钟源。
因此,在使用win10 kvm虚拟机时,我们在启动qemu-kvm进程时,也应该为win10 kvm虚拟机配置-cpu host ,hv_vpindex,hv_time,hv_synic,hv_stimer,kvm=off参数,让kvm虚拟机的时钟时间保持和host一致,从而解决win10 kvm stop后丢失stop期间的时钟时间。
3、windows7
前面说过,win10只有配置-cpu host ,hv_vpindex,hv_time,hv_synic,hv_stimer,kvm=off参数时,kvm系统时钟时间才不会在stop后丢失stop期间的时钟时间,但是在使用win7虚拟机时发现,win7系统的时钟时间,无论是否配置-cpu host ,hv_vpindex,hv_time,hv_synic,hv_stimer,kvm=off参数,kvm中的系统时钟时间始终会得到补偿。那这又是为什么呢?
前面我们也提及过,kvm保持和host时钟同步的时钟源其实有两种,一种时通过配置参数-cpu host ,hv_vpindex,hv_time,hv_synic,hv_stimer,kvm=off 配置生效的hyperv_clocksource_tsc_page时钟源,还有一个就是RTC时钟源。那既然在win7中无论是否使用hyperv_clocksource_tsc_page时钟源,kvm系统的时钟时间都正确,那以此推断,win7时钟源其实使用的是RTC时钟源。那我们又该如何取证呢?
接下来,让我们来对比下win10和win7在系统运行过程中,在host中通过qemu-kvm进程观察两个系统的ioport事件,看看是否有存在差异。我们使用perf kvm stat record -p $pid sleep 30来跟踪qemu-kvm进程的ioport事件情况(注意:尽量保持虚拟机在系统就绪中,并保持系统空载,防止其他因素影响我们的观察结果),并通过perf kvm stat report --event=ioport -p $pid来观察ioport结果。
1)配置-cpu host
Perf跟踪的结果发现,ioport事件中,win10和win7几乎一致,主要的ioport事件有3个,分别为1)0x608:PIN;2)0x71:PIN;3)0x70:POUT。实际结果如下:
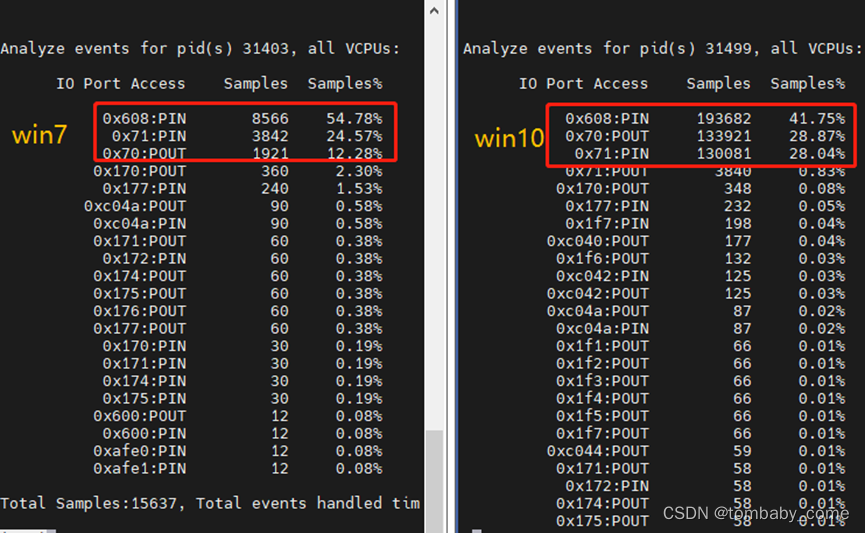
2)配置-cpu host ,hv_vpindex,hv_time,hv_synic,hv_stimer
Perf跟踪的结果发现,ioport事件中,win10和win7就不再一致了,win7主要的ioport事件有:1)0x71:PIN;2)0x70:POUT;3)0x1f7:PIN;4)0xc040:POUT。而win10缺少了两个ioport事件:1)0x71:PIN;2)0x70:POUT。实际结果如下:

3)配置-cpu host ,hv_vpindex,hv_time,hv_synic,hv_stimer,kvm=off
Perf跟踪的结果发现,ioport事件中,win10和win7就不再一致了,win7主要的ioport事件有:1)0x71:PIN;2)0x70:POUT;3)0x1f7:PIN;4)0xc040:POUT。而win10只有1)0x1f7:PIN;2)0xc040:POUT。缺少了两个ioport事件:1)0x71:PIN;2)0x70:POUT。实际结果如下:

也许你会好奇,为啥win10配置参数后,rtc时钟为啥不更新了,这其实是因为hv特性导致的。Qemu-kvm中增加了hv特性相关的设置,以此来优化kvm的性能问题,在docs/hyperv.txt说明文档中由这么一段话
感兴趣的可以去研究下,这里不展开讲述了。
那上面那些统计的ioport事件到底是代表什么含义,我们可以通过qemu-kvm的mtree查询。贴上我从qemu的mstree查询到的结果。
address-space: I/O
0000000000000000-000000000000ffff (prio 0, i/o): io
0000000000000000-0000000000000007 (prio 0, i/o): dma-chan
0000000000000008-000000000000000f (prio 0, i/o): dma-cont
0000000000000020-0000000000000021 (prio 0, i/o): kvm-pic
0000000000000040-0000000000000043 (prio 0, i/o): kvm-pit
0000000000000060-0000000000000060 (prio 0, i/o): i8042-data
0000000000000061-0000000000000061 (prio 0, i/o): pcspk
0000000000000064-0000000000000064 (prio 0, i/o): i8042-cmd
0000000000000070-0000000000000071 (prio 0, i/o): rtc
0000000000000070-0000000000000070 (prio 0, i/o): rtc-index
000000000000007e-000000000000007f (prio 0, i/o): kvmvapic
0000000000000080-0000000000000080 (prio 0, i/o): ioport80
0000000000000081-0000000000000083 (prio 0, i/o): dma-page
0000000000000087-0000000000000087 (prio 0, i/o): dma-page
0000000000000089-000000000000008b (prio 0, i/o): dma-page
000000000000008f-000000000000008f (prio 0, i/o): dma-page
0000000000000092-0000000000000092 (prio 0, i/o): port92
00000000000000a0-00000000000000a1 (prio 0, i/o): kvm-pic
00000000000000b2-00000000000000b3 (prio 0, i/o): apm-io
00000000000000c0-00000000000000cf (prio 0, i/o): dma-chan
00000000000000d0-00000000000000df (prio 0, i/o): dma-cont
00000000000000f0-00000000000000f0 (prio 0, i/o): ioportF0
0000000000000170-0000000000000177 (prio 0, i/o): ide
00000000000001ce-00000000000001d1 (prio 0, i/o): vbe
00000000000001f0-00000000000001f7 (prio 0, i/o): ide
0000000000000376-0000000000000376 (prio 0, i/o): ide
00000000000003b4-00000000000003b5 (prio 0, i/o): vga
00000000000003ba-00000000000003ba (prio 0, i/o): vga
00000000000003c0-00000000000003cf (prio 0, i/o): vga
00000000000003d4-00000000000003d5 (prio 0, i/o): vga
00000000000003da-00000000000003da (prio 0, i/o): vga
00000000000003f1-00000000000003f5 (prio 0, i/o): fdc
00000000000003f6-00000000000003f6 (prio 0, i/o): ide
00000000000003f7-00000000000003f7 (prio 0, i/o): fdc
00000000000003f8-00000000000003ff (prio 0, i/o): serial
00000000000004d0-00000000000004d0 (prio 0, i/o): kvm-elcr
00000000000004d1-00000000000004d1 (prio 0, i/o): kvm-elcr
0000000000000510-0000000000000511 (prio 0, i/o): fwcfg
0000000000000514-000000000000051b (prio 0, i/o): fwcfg.dma
0000000000000600-000000000000063f (prio 0, i/o): piix4-pm
0000000000000600-0000000000000603 (prio 0, i/o): acpi-evt
0000000000000604-0000000000000605 (prio 0, i/o): acpi-cnt
0000000000000608-000000000000060b (prio 0, i/o): acpi-tmr
0000000000000700-000000000000073f (prio 0, i/o): pm-smbus
0000000000000cf8-0000000000000cfb (prio 0, i/o): pci-conf-idx
0000000000000cf9-0000000000000cf9 (prio 1, i/o): piix3-reset-control
0000000000000cfc-0000000000000cff (prio 0, i/o): pci-conf-data
0000000000005658-0000000000005658 (prio 0, i/o): vmport
000000000000ae00-000000000000ae13 (prio 0, i/o): acpi-pci-hotplug
000000000000af00-000000000000af0b (prio 0, i/o): acpi-mem-hotplug
000000000000afe0-000000000000afe3 (prio 0, i/o): acpi-gpe0
000000000000c040-000000000000c04f (prio 1, i/o): piix-bmdma-container
000000000000c040-000000000000c043 (prio 0, i/o): piix-bmdma
000000000000c044-000000000000c047 (prio 0, i/o): bmdma
000000000000c048-000000000000c04b (prio 0, i/o): piix-bmdma
000000000000c04c-000000000000c04f (prio 0, i/o): bmdma
通过对比mstree信息,可以总结如下:
| -cpu配置参数 |
Win7的ioport事件 |
Win10的ioport事件 |
| host |
1)0000000000000070-0000000000000071 (prio 0, i/o): rtc 2)0000000000000070-0000000000000070 (prio 0, i/o): rtc-index 3)0000000000000608-000000000000060b (prio 0, i/o): acpi-tmr |
0000000000000070-0000000000000071 (prio 0, i/o): rtc 0000000000000070-0000000000000070 (prio 0, i/o): rtc-index 0000000000000608-000000000000060b (prio 0, i/o): acpi-tmr |
| host , hv_vpindex, hv_time, hv_synic, hv_stimer |
1)00000000000001f0-00000000000001f7 (prio 0, i/o): ide 2)000000000000c040-000000000000c04f (prio 1, i/o): piix-bmdma-container 3)0000000000000070-0000000000000071 (prio 0, i/o): rtc 4)0000000000000070-0000000000000070 (prio 0, i/o): rtc-index |
1)00000000000001f0-00000000000001f7 (prio 0, i/o): ide 2)000000000000c040-000000000000c04f (prio 1, i/o): piix-bmdma-container |
| host , hv_vpindex, hv_time, hv_synic, hv_stimer, kvm=off |
1)0000000000000070-0000000000000071 (prio 0, i/o): rtc 2)0000000000000070-0000000000000070 (prio 0, i/o): rtc-index |
1)00000000000001f0-00000000000001f7 (prio 0, i/o): ide 2)000000000000c040-000000000000c04f (prio 1, i/o): piix-bmdma-container |
通过上表我们对比发现,无论win7虚拟机如何配置参数,系统运行时始终会去触发rtc的ioport事件,也就是去读取rtc时钟源时间。而win10虚拟机,在配置了hv相关配置后,在系统运行时就不会再去读取rtc时钟源时间,而会去读取00000000000001f0-00000000000001f7 (prio 0, i/o): ide中的数据,这个io其实是ide数据,即寄存器数据,这里可以理解为其他时钟源的数据。
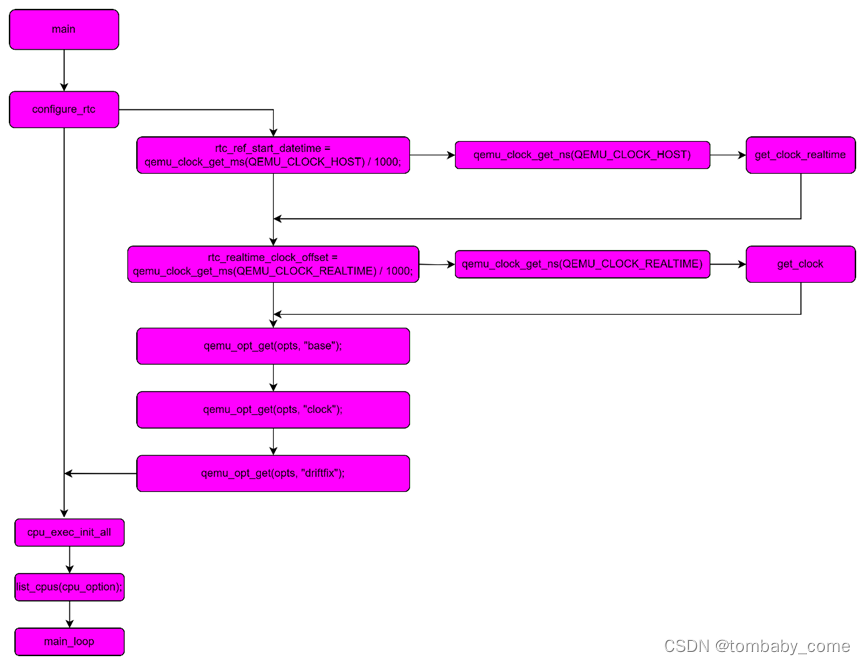
此外,我们还发现,一旦配置-rtc driftfix=none(不为slew)时,则win7的时钟时间,在stop后也不会得到补偿,这个原因可以看以下代码(重点位置已经标红加粗)
- /******************vl.c**************/
- static void configure_rtc(QemuOpts *opts)
- {
- const char *value;
- /* Set defaults */
- rtc_clock = QEMU_CLOCK_HOST;
- rtc_ref_start_datetime = qemu_clock_get_ms(QEMU_CLOCK_HOST) / 1000;
- rtc_realtime_clock_offset = qemu_clock_get_ms(QEMU_CLOCK_REALTIME) / 1000;
- value = qemu_opt_get(opts, "base");
- if (value) {
- if (!strcmp(value, "utc")) {
- rtc_base_type = RTC_BASE_UTC;
- } else if (!strcmp(value, "localtime")) {
- Error *blocker = NULL;
- rtc_base_type = RTC_BASE_LOCALTIME;
- error_setg(&blocker, QERR_REPLAY_NOT_SUPPORTED,
- "-rtc base=localtime");
- replay_add_blocker(blocker);
- } else {
- rtc_base_type = RTC_BASE_DATETIME;
- configure_rtc_base_datetime(value);
- }
- }
- value = qemu_opt_get(opts, "clock");
- if (value) {
- if (!strcmp(value, "host")) {
- rtc_clock = QEMU_CLOCK_HOST;
- } else if (!strcmp(value, "rt")) {
- rtc_clock = QEMU_CLOCK_REALTIME;
- } else if (!strcmp(value, "vm")) {
- rtc_clock = QEMU_CLOCK_VIRTUAL;
- } else {
- error_report("invalid option value '%s'", value);
- exit(1);
- }
- }
- value = qemu_opt_get(opts, "driftfix");
- if (value) {
- if (!strcmp(value, "slew")) {
- static GlobalProperty slew_lost_ticks = {
- .driver = "mc146818rtc",
- .property = "lost_tick_policy",
- .value = "slew",
- };
- qdev_prop_register_global(&slew_lost_ticks);
- } else if (!strcmp(value, "none")) {
- /* discard is default */
- } else {
- error_report("invalid option value '%s'", value);
- exit(1);
- }
- }
- }
可以发现,一旦我们未配置driftfix=slew,则不会设置mc146818rtc的lost_tick_policy策略,从而导致后续在rtc调用时钟时间更新接口时,在stop后,rtc时钟源不会重新从host获取。代码如下:
- static void
- periodic_timer_update(RTCState *s, int64_t current_time, uint32_t old_period, bool period_change)
- {
- ...
- /*
- * s->irq_coalesced can change for two reasons:
- *
- * a) if one or more periodic timer interrupts have been lost,
- * lost_clock will be more that a period.
- *
- * b) when the period may be reconfigured, we expect the OS to
- * treat delayed tick as the new period. So, when switching
- * from a shorter to a longer period, scale down the missing,
- * because the OS will treat past delayed ticks as longer
- * (leftovers are put back into lost_clock). When switching
- * to a shorter period, scale up the missing ticks since the
- * OS handler will treat past delayed ticks as shorter.
- */
- if (s->lost_tick_policy == LOST_TICK_POLICY_SLEW) {
- uint32_t old_irq_coalesced = s->irq_coalesced;
- lost_clock += old_irq_coalesced * old_period;
- s->irq_coalesced = lost_clock / s->period;
- lost_clock %= s->period;
- if (old_irq_coalesced != s->irq_coalesced ||
- old_period != s->period) {
- DPRINTF_C("cmos: coalesced irqs scaled from %d to %d, "
- "period scaled from %d to %d\n", old_irq_coalesced,
- s->irq_coalesced, old_period, s->period);
- rtc_coalesced_timer_update(s);
- }
- } else {
- /*
- * no way to compensate the interrupt if LOST_TICK_POLICY_SLEW
- * is not used, we should make the time progress anyway.
- */
- lost_clock = MIN(lost_clock, period);
- }
- ...
- }
- static void rtc_periodic_timer(void *opaque)
- {
- RTCState *s = opaque;
- periodic_timer_update(s, s->next_periodic_time, s->period, false);
- s->cmos_data[RTC_REG_C] |= REG_C_PF;
- if (s->cmos_data[RTC_REG_B] & REG_B_PIE) {
- s->cmos_data[RTC_REG_C] |= REG_C_IRQF;
- if (s->lost_tick_policy == LOST_TICK_POLICY_SLEW) {
- if (s->irq_reinject_on_ack_count >= RTC_REINJECT_ON_ACK_COUNT)
- s->irq_reinject_on_ack_count = 0;
- if (!rtc_policy_slew_deliver_irq(s)) {
- s->irq_coalesced++;
- rtc_coalesced_timer_update(s);
- DPRINTF_C("cmos: coalesced irqs increased to %d\n",
- s->irq_coalesced);
- }
- } else
- qemu_irq_raise(s->irq);
- }
- }
我们发现它会在更新rtc时间的时候,调用rtc_coalesced_timer_update以重新获取设置RTC时间,它的实现如下:
- static void rtc_coalesced_timer_update(RTCState *s)
- {
- if (s->irq_coalesced == 0) {
- timer_del(s->coalesced_timer);
- } else {
- /* divide each RTC interval to 2 - 8 smaller intervals */
- int c = MIN(s->irq_coalesced, 7) + 1;
- int64_t next_clock = qemu_clock_get_ns(rtc_clock) +
- periodic_clock_to_ns(s->period / c);
- timer_mod(s->coalesced_timer, next_clock);
- }
- }
正因为无论win7虚拟机如何配置参数,系统运行时始终会去触发rtc的ioport事件,也就是去读取rtc时钟源时间,且一旦我们不配置driftfix=slew,则win7的始终就不会得到补偿。因此,可以证明win7的始终时间是从rtc中获取的。这就是为什么win7时钟时间会在stop后得到补充了。