系列文章目录
文章目录
前言
昨天我们实现了自定义组件,今天我们来学习下CSS动画的实现,
1.属性样式动画
在关键帧(Keyframes)中动态设置父组件的width和height,实现组件变大缩小。子组件设置scale属性使父子组件同时缩放,再设置opacity实现父子组件的显示与隐藏。
<!-- xxx.hml -->
<div class="container">
    <div class="fade">
        <text>逐渐隐藏</text>
    </div>
    <div class="bigger">
        <text>组件变大</text>
    </div>
</div>
/* xxx.css */
.container {
    background-color:#F1F3F5;
    display: flex;
    justify-content: center;
    align-items: center;
    flex-direction: column;
}
.fade{
    width: 30%;
    height: 200px;
    left: 35%;
    top: 25%;
    position: absolute;
    animation: 2s change infinite friction;
}
.bigger{
    width: 20%;
    height: 100px;
    background-color: blue;
    animation: 2s change1 infinite linear-out-slow-in;
}
text{
    width: 100%;
    height: 100%;
    text-align: center;
    color: white;
    font-size: 35px;
    animation: 2s change2 infinite linear-out-slow-in;
}
/* 颜色变化 */
@keyframes change{
    from {
        background-color: #f76160;
        opacity: 1;
    }
    to {
        background-color: #09ba07;
        opacity: 0;
    }
}
/* 父组件大小变化 */
@keyframes change1{
    0% {
        width: 20%;
        height: 100px;
    }
    100% {
        width: 80%;
        height: 200px;
    }
}
/* 子组件文字缩放 */
@keyframes change2{
    0%{
        transform: scale(0);
    }
    100% {
        transform: scale(1.5);
    }
}
- animation取值不区分先后,duration (动画执行时间)/ delay (动画延迟执行时间)按照出现的先后顺序解析。
- 必须设置animation-duration样式,否则时长为0则不会有动画效果。当设置animation-fill-mode属性为forwards时,组件直接展示最后一帧的样式。

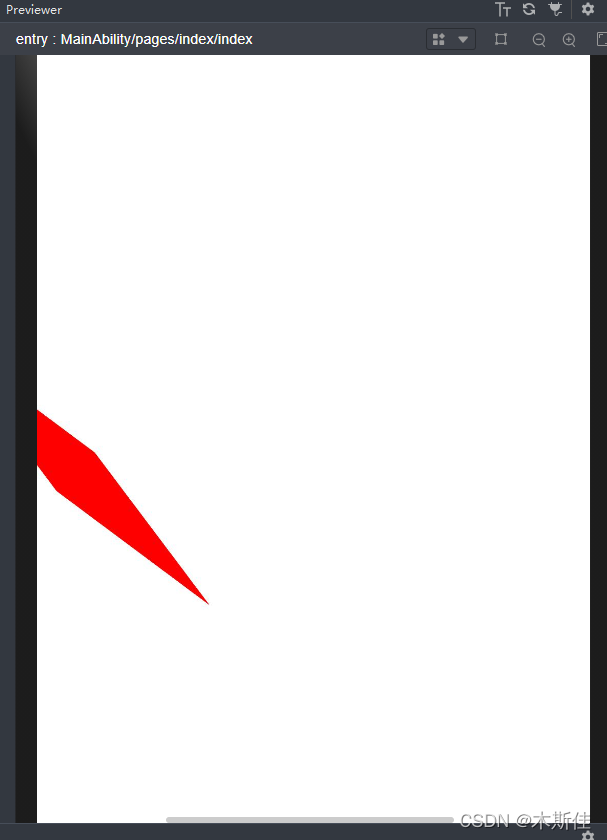
2 transform样式动画
1. 设置静态动画
设置transform属性对组件进行旋转、缩放、移动和倾斜。
创建一个正方形并旋转90°变成菱形,并用下方的长方形把菱形下半部分遮盖形成屋顶,设置长方形translate属性值为(150px,-150px)确定坐标位置形成门,再使用position属性使横纵线跟随父组件(正方形)移动到指定坐标位置,接着设置scale属性使父子组件一起变大形成窗户大小,最后使用skewX属性使组件倾斜后设置坐标translate(200px,-830px)得到烟囱。
<!-- xxx.hml -->
<div class="container">
  <div class="top"></div>
  <div class="content"></div>
  <div class="door"></div>
  <!-- 窗户 -->
  <div class="window">
    <div class="horizontal"></div>
    <div class="vertical"></div>
  </div>
  <div class="chimney"></div>
</div>
/* xxx.css */
.container {
  background-color:#F1F3F5;
  align-items: center;
  flex-direction: column;
}
.top{
  z-index: -1;
  position: absolute;
  width: 428px;
  height: 428px;
  background-color: #860303;
  transform: rotate(45deg);
  margin-top: 230px;
  margin-left: 266px;
}
.content{
  margin-top: 500px;
  width: 600px;
  height: 400px;
  background-color: white;
  border:  1px solid black;
}
.door{
  width: 100px;
  height: 150px;
  background-color: #1033d9;
  transform: translate(150px,-150px);
}
.window{
  z-index: 1;
  position: relative;
  width: 100px;
  height: 100px;
  background-color: white;
  border: 1px solid black;
  transform: translate(-150px,-400px) scale(1.5);
}
/* 窗户的横轴 */
.horizontal{
  position: absolute;
  top: 50%;
  width: 100px;
  height: 5px;
  background-color: black;
}
/* 窗户的纵轴 */
.vertical{
  position: absolute;
  left: 50%;
  width: 5px;
  height: 100px;
  background-color: black;
}
.chimney{
  z-index: -2;
  width: 40px;
  height: 100px;
  border-radius: 15px;
  background-color: #9a7404;
  transform: translate(200px,-830px) skewX(-5deg);
}

2. 设置平移动画
小球下降动画,改变小球的Y轴坐标实现小球下落,在下一段是时间内减小Y轴坐标实现小球回弹,让每次回弹的高度逐次减小直至回弹高度为0,就模拟出了小球下降的动画。
<!-- xxx.hml -->
<div class="container">
  <div class="circle"></div>
  <div class="flower"></div>
</div>
/* xxx.css */
.container {
  background-color:#F1F3F5;
  display: flex;
  justify-content: center;
}
.circle{
  width: 100px;
  height: 100px;
  border-radius: 50px;
  background-color: red;
  /* forwards停在动画的最后一帧 */
  animation: down 3s fast-out-linear-in forwards;
}
.flower{
  position: fixed;
  width: 80%;
  margin-left: 10%;
  height: 5px;
  background-color: black;
  top: 1000px;
}
@keyframes down {
  0%{
    transform: translate(0px,0px);
  }
  /* 下落 */
  15%{
    transform: translate(10px,900px);
  }
  /* 开始回弹 */
  25%{
    transform: translate(20px,500px);
  }
  /* 下落 */
  35%{
    transform: translate(30px,900px);
  }
  /* 回弹 */
  45%{
    transform: translate(40px,700px);
  }
  55%{
    transform: translate(50px,900px);
  }
  65%{
    transform: translate(60px,800px);
  }
  80%{
    transform: translate(70px,900px);
  }
  90%{
    transform: translate(80px,850px);
  }
  /* 停止 */
  100%{
    transform: translate(90px,900px);
  }
}

3设置旋转动画
设置不同的原点位置(transform-origin)改变元素所围绕的旋转中心。rotate3d属性前三个参数值分别为X轴、Y轴、Z轴的旋转向量,第四个值为旋转角度,旋转向角度可为负值,负值则代表旋转方向为逆时针方向。
<!-- xxx.hml -->
<div class="container">
  <div class="rotate">
    <div class="rect rect1"></div>
    <div class="rect rect2"></div>
    <div class="rect rect3"></div>
  </div>
  <!-- 3d属性 -->
  <div class="rotate3d">
    <div class="content">
        <div class="rect4"></div>
        <div class="rect5"> </div>
    </div>
    <div class="mouse"></div>
  </div>
</div>
/* xxx.css */
.container {
  flex-direction: column;
  background-color:#F1F3F5;
  display: flex;
  align-items: center;
  justify-content: center;
}
.rect{
  width: 100px;
  height: 100px;
  animation: rotate 3s infinite;
  margin-left: 100px;
}
.rect1{
  background-color: #f76160;
}
.rect2{
  background-color: #60f76f;
  /* 改变原点位置*/
  transform-origin: 10% 10px;
}
.rect3{
  background-color: #6081f7;
  /*  改变原定点置*/
  transform-origin: right bottom;
}
@keyframes rotate {
  from {
    transform: rotate(0deg)
  }
  to {
    transform: rotate(360deg);
  }
}
/* 3d示例样式 */
.rotate3d{
  margin-top: 150px;
  flex-direction: column;
  background-color:#F1F3F5;
  display: flex;
  align-items: center;
  width: 80%;
  height: 600px;
  border-radius: 300px;
  border: 1px solid #ec0808;
}
.content{
  padding-top: 150px;
  display: flex;
  align-items: center;
  justify-content: center;
}
/* react4 react5 翻转形成眼睛 */
.rect4{
  width: 100px;
  height: 100px;
  animation: rotate3d1 17ms infinite;
  background: linear-gradient(#e6c4ec, #be15d9)
}
.rect5{
  width: 100px;
  height: 100px;
  animation: rotate3d1 17ms infinite;
  margin-left: 100px;
  background: linear-gradient(#e6c4ec, #be15d9)
}
.mouse{
  margin-top: 150px;
  width: 200px;
  height: 100px;
  border-radius: 50px;
  border: 1px solid #e70303;
  animation: rotate3d2 17ms infinite;
}
/* 眼睛的动效 */
@keyframes rotate3d1{
  0% {
    transform:rotate3d(0,0,0,0deg)
  }
  50% {
    transform:rotate3d(20,20,20,360deg);
  }
  100% {
    transform:rotate3d(0,0,0,0deg);
  }
}
/* 嘴的动效 */
@keyframes rotate3d2{
  0% {
    transform:rotate3d(0,0,0,0deg)
  }
  33% {
    transform:rotate3d(0,0,10,30deg);
  }
  66% {
    transform:rotate3d(0,0,10,-30deg);
  }
  100% {
    transform:rotate3d(0,0,0,0deg);
  }
}
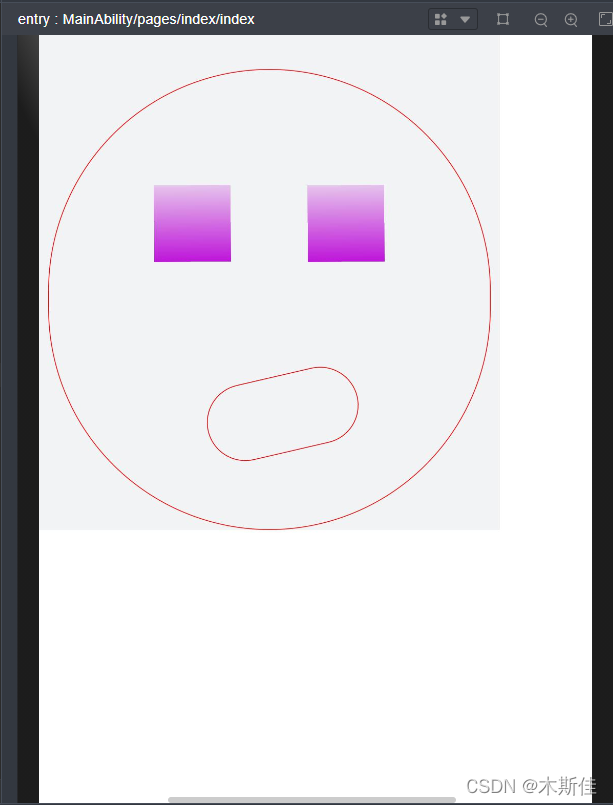
4.设置缩放动画
设置scale样式属性实现涟漪动画,先使用定位确定元素的位置,确定坐标后创建多个组件实现重合效果,再设置opacity属性改变组件不透明度实现组件隐藏与显示,同时设置scale值使组件可以一边放大一边隐藏,最后设置两个组件不同的动画执行时间,实现扩散的效果。
设置sacle3d中X轴、Y轴、Z轴的缩放参数实现动画。
<!-- xxx.hml -->
<div class="container">
  <div class="circle">
    <text>ripple</text>
  </div>
  <div class="ripple"></div>
  <div class="ripple ripple2"></div>
  <!-- 3d -->
  <div class="content">
    <text>spring</text>
  </div>
</div>
/* xxx.css */
.container {
  flex-direction: column;
  background-color:#F1F3F5;
  width: 100%;
  position: relative;
}
.circle{
  margin-top: 400px;
  margin-left: 40%;
  width: 100px;
  height: 100px;
  border-radius: 50px;
  background:linear-gradient(#dcaec1, #d3a8e3);
  z-index: 1;
  position: absolute;
}
.ripple{
  margin-top: 400px;
  margin-left: 40%;
  position: absolute;
  z-index: 0;
  width: 100px;
  height: 100px;
  border-radius: 50px;
  background:linear-gradient(#dcaec1,#d3a8e3);
  animation: ripple 5s infinite;
}
/* 设置不同的动画时间 */
.ripple2{
  animation-duration: 2.5s;
}
@keyframes ripple{
  0%{
    transform: scale(1);
    opacity: 0.5;
  }
  50%{
    transform: scale(3);
    opacity: 0;
  }
  100%{
    transform: scale(1);
    opacity: 0.5;
  }
}
text{
  color: white;
  text-align: center;
  height: 100%;
  width: 100%;
}
.content {
  margin-top: 700px;
  margin-left: 33%;
  width: 200px;
  height: 100px;
  animation:rubberBand 1s infinite;
  /* 设置渐变色 */
  background:linear-gradient(#e276aa,#ec0d66);
  position: absolute;
}
@keyframes rubberBand {
  0% {
    transform: scale3d(1, 1, 1);
  }
  30% {
    transform: scale3d(1.25, 0.75, 1.1);
  }
  40% {
    transform: scale3d(0.75, 1.25, 1.2);
  }
  50% {
    transform: scale3d(1.15, 0.85, 1.3);
  }
  65% {
    transform: scale3d(.95, 1.05, 1.2);
  }
  75% {
    transform: scale3d(1.05, .95, 1.1);
  }
  100%{
    transform: scale3d(1, 1, 1);
  }
}

5 .设置matrix属性
matrix是一个入参为六个值的矩阵,6个值分别代表:scaleX, skewY, skewX, scaleY, translateX, translateY。下面示例中设置 了matrix属性为matrix(1,0,0,1,0,200)使组件移动和倾斜。
<!-- xxx.hml -->
<div class="container">
  <div class="rect"> </div>
</div>
/* xxx.css */
.container{
  background-color:#F1F3F5;
  display: flex;
  justify-content: center;
}
.rect{
  width: 100px;
  height: 100px;
  background-color: red;
  animation: down 3s infinite forwards;
}
@keyframes down{
  0%{
    transform: matrix(1,0,0,1,0,0);
  }
  10%{
    transform: matrix(1,0,0,1,0,200);
  }
  60%{
    transform: matrix(2,1.5,1.5,2,0,700);
  }
  100%{
    transform: matrix(1,0,0,1,0,0);
  }
}
6.整合transform属性
学习了这么多内容,接下来我们把刚才学习的属性整合起来。
transform可以设置多个值并且多个值可同时设置,下面案例中展示同时设置缩放(scale),平移(translate),旋转(rotate)属性时的动画效果。
<!-- xxx.hml -->
<div class="container">
  <div class="rect1"></div>
  <div class="rect2"></div>
  <div class="rect3"></div>
  <div class="rect4"></div>
  <div class="rect5"></div>
</div>
/* xxx.css */
.container{
  flex-direction:column;
  background-color:#F1F3F5;
  padding:50px;
}
.rect1{
  width: 100px;
  height: 100px;
  background:linear-gradient(#e77070,#ee0202);
  animation: change1 3s infinite forwards;
}
.rect2{
  margin-top: 50px;
  width: 100px;
  height: 100px;
  background:linear-gradient(#95a6e8, #2739de);
  animation: change2 3s infinite forwards;
}
.rect3{
  margin-top: 50px;
  width: 100px;
  height: 100px;
  background:linear-gradient(#142ee2, #8cb1e5);
  animation: change3 3s infinite;
}
.rect4{
  align-self: center;
  margin-left: 50px;
  margin-top: 200px;
  width: 100px;
  height: 100px;
  background:linear-gradient(#e2a8df, #9c67d4,#8245d9,#e251c3);
  animation: change4 3s infinite;
}
.rect5{
  margin-top: 300px;
  width: 100px;
  height: 100px;
  background:linear-gradient(#e7ded7, #486ccd, #94b4d2);
  animation: change5 3s infinite;
}
/* change1 change2 对比 */
@keyframes change1{
  0%{
    transform: translate(0,0);
    transform: rotate(0deg)
  }
  100%{
    transform: translate(0,500px);
    transform: rotate(360deg)
  }
}
/* change2 change3 对比属性顺序不同的动画效果 */
@keyframes change2{
  0%{
    transform:translate(0,0) rotate(0deg) ;
  }
  100%{
    transform: translate(300px,0) rotate(360deg);
  }
}
@keyframes change3{
  0%{
    transform:rotate(0deg) translate(0,0);
  }
  100%{
    transform:rotate(360deg)  translate(300px,0);
  }
}
/* 属性值不对应的情况 */
@keyframes change4{
  0%{
    transform: scale(0.5);
  }
  100%{
    transform:scale(2) rotate(45deg);
  }
}
/* 多属性的写法 */
@keyframes change5{
  0%{
    transform:scale(0) translate(0,0) rotate(0);
  }
  100%{
    transform: scale(1.5) rotate(360deg) translate(200px,0);
  }
}
- 当设置多个transform时,后续的transform值会把前面的覆盖掉。若想同时使用多个动画样式可用复合写法,例:transform: scale(1) rotate(0) translate(0,0)。
- transform进行复合写法时,变化样式内多个样式值顺序的不同会呈现不一样的动画效果。
- transform属性设置的样式值要一一对应,若前后不对应,则该动画不生效。若设置多个样式值则只会呈现出已对应值的动画效果。