一、前言
用户输入主要有鼠标和键盘以及其他的遥感外接设备等,在虚幻中经常会用到这些输入设备的值,比如通过鼠标控制摄像头的方向、键盘控制人物移动等。本文主要讲解简单的输入绑定和虚幻5新增的”增强输入控制“两种方法。
二、实现
2.1、原始的输入
1、最早的时候虚幻的输入需要在”项目设置-》输入”中添加“操作映射”,如图2.1.1所示,添加
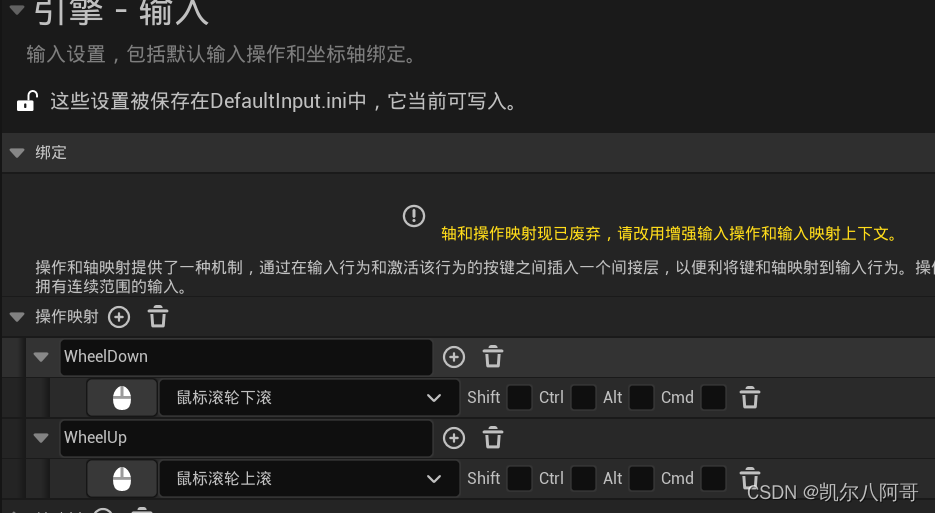
两个鼠标滚动的操作映射。
2、然后再在代码中进行绑定,如下,其中”WheelUpFunction“和”WheelDownFunction“方法是处理
	InputComponent->BindAction("WheelUp", IE_Pressed, this, &AMyPlayerController1::WheelUpFunction);
	InputComponent->BindAction("WheelDown", IE_Pressed, this, &AMyPlayerController1::WheelDownFunction);
两个方法,在其中就可以实现一些操作逻辑,比如下面的代码实现Pawn的摄像机Zoom的缩放
void AMyPlayerController1::WheelUpFunction()
{
	if (GetPawn())
	{
		AMyPawn1* tempPawn = Cast<AMyPawn1>(GetPawn());
		if (tempPawn)
		{
			tempPawn->ZoomCam(1, 10);
		}
	}
}

void AMyPlayerController1::WheelDownFunction()
{
	if (GetPawn())
	{
		AMyPawn1* tempPawn = Cast<AMyPawn1>(GetPawn());
		if (tempPawn)
		{
			tempPawn->ZoomCam(0, 10);
		}
	}
}
2.2、增强输入
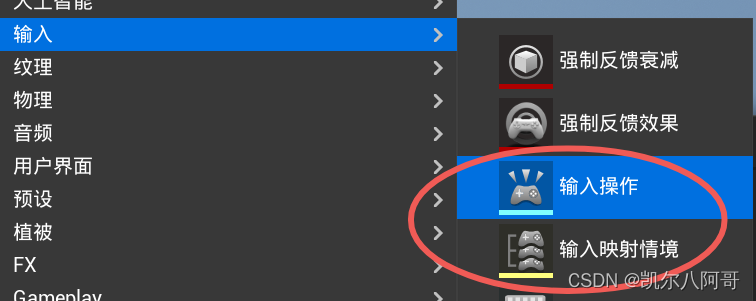
1、创建”输入操作“和”输入映射情境“
在图2.1.1中也可以看到虚幻5之后是准备要摒弃掉原始的输入映射,因为很不灵活,在虚幻5之后引入了一个增强输入的东西,增强输入有两部分组成:”输入操作“和”输入映射情境“,如图
2.2.1所示,首先要先创建输入操作”IA_Jump“,然后设置其值类型即可,如图2.2.2所示值类型包括
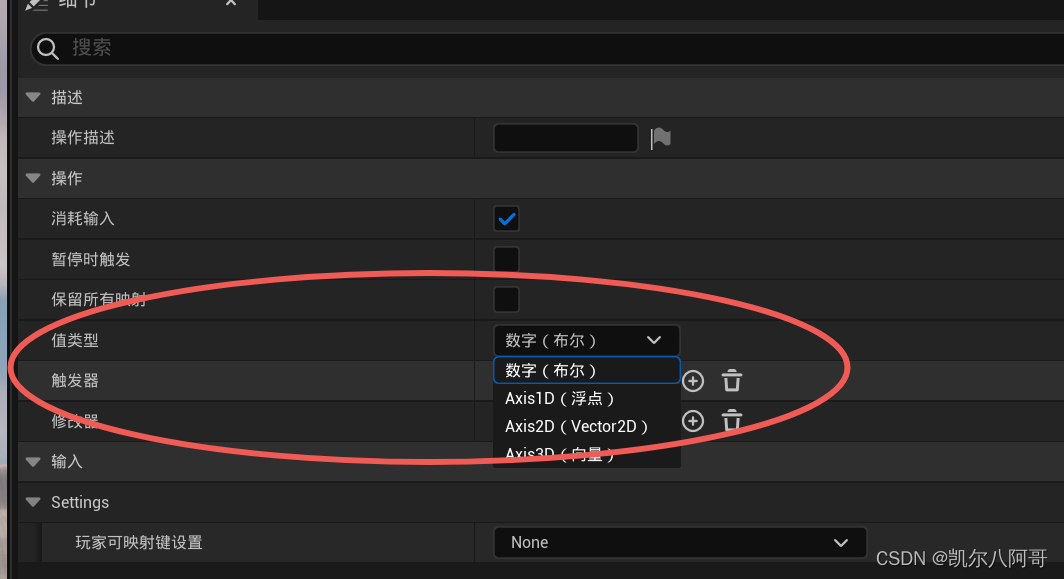
图中的布尔、浮点、向量等。布尔呢即实现是否按下,有数值的就可以获取按下后的值,然后创建”输入映射情境“IMC_Default,如图2.2.3所示,在IMC_Default中添加一个新的映射,并在映射中
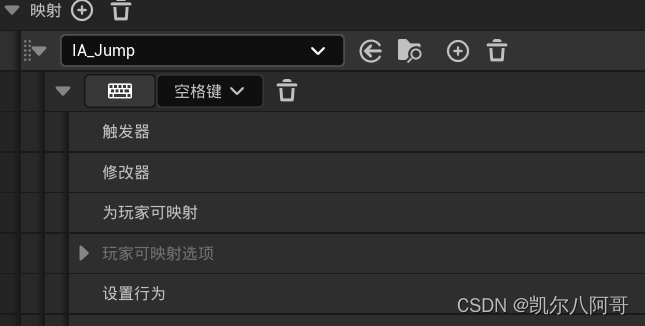
绑定之前创建的输入操作”IA_Jump“,然后再输入中选择”空格键“。重复上述步骤添加移动和旋转的输入操作。
2、在C++代码中使用增强输入
1)首先,要在Build.CS文件中增加模块"EnhancedInput" ,代码如下:
PublicDependencyModuleNames.AddRange(new string[] { "Core", "CoreUObject", "Engine", "InputCore", "EnhancedInput" });2)然后,即可以在头文件中添加增强输入的头文件,并添加输入上下文变量和输入操作的的方法
//增强输入头文件
#include "InputActionValue.h"
#include "EnhancedInputComponent.h"
#include "EnhancedInputSubsystems.h"
UCLASS()
class CHAPTER2_API AMyCharacter1 :public ACharacter, public IMyInterface1
{
GENERATED_BODY()
public:
// Sets default values for this character's properties
AMyCharacter1();
/// <summary>
/// 输入上下文
/// </summary>
UPROPERTY(EditAnywhere, BlueprintReadOnly, Category = "MyInput")
class UInputMappingContext* MyMappingContext;
/// <summary>
/// 一个移动的输入映射变量
/// </summary>
UPROPERTY(EditAnywhere, BlueprintReadOnly, Category = "MyInput")
class UInputAction* ActionMove;
//旋转映射
UPROPERTY(EditAnywhere, BlueprintReadOnly, Category = "MyInput")
class UInputAction* ActionRotate;
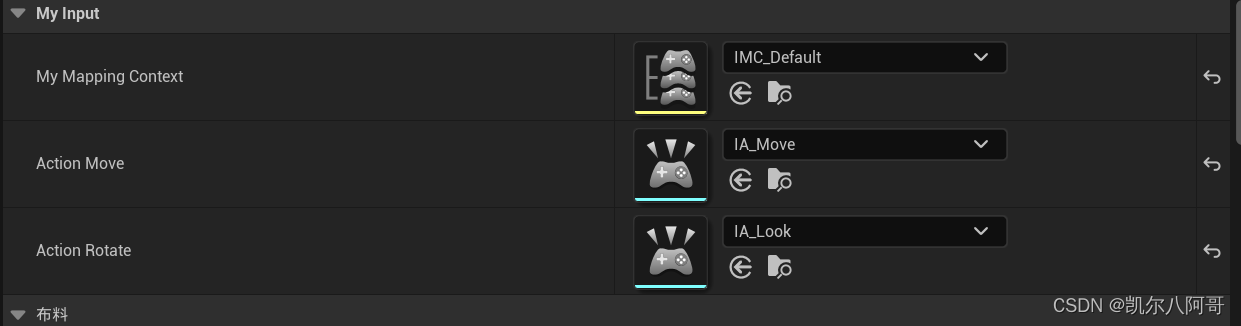
}3)在SetupPlayerInputComponent中实现最终绑定并处理移动和旋转的逻辑,代码如下:
void AMyCharacter1::SetupPlayerInputComponent(UInputComponent* PlayerInputComponent)
{
	Super::SetupPlayerInputComponent(PlayerInputComponent);

	//绑定映射,将玩家输入映射转化成增强输入映射
	UEnhancedInputComponent* tempEnhancedInputComponent = CastChecked<UEnhancedInputComponent>(PlayerInputComponent);
	if (tempEnhancedInputComponent)
	{
		//第一个参数是映射的变量,第二个是移动的方式,第三个是绑定的函数
		tempEnhancedInputComponent->BindAction(ActionMove, ETriggerEvent::Triggered, this, &AMyCharacter1::Move);
		tempEnhancedInputComponent->BindAction(ActionRotate, ETriggerEvent::Triggered, this, &AMyCharacter1::Rotate);
	}
}

void AMyCharacter1::Move(const FInputActionValue& value)
{
	FVector2D tempMoveVec = value.Get<FVector2D>();
	//如果控制器有输入
	if (nullptr != Controller)
	{
		const FRotator tempRot = Controller->GetControlRotation();
		const FRotator	tempYaw(0, tempRot.Yaw, 0);
		const FVector	tempForwardDir = FRotationMatrix(tempYaw).GetUnitAxis(EAxis::X);//前方向的方向向量
		const FVector tempRightDir = FRotationMatrix(tempYaw).GetUnitAxis(EAxis::Y);//获得右方向的向量

		//添加键盘输入
		AddMovementInput(tempForwardDir, tempMoveVec.Y);//Y方向的移动
		AddMovementInput(tempRightDir, tempMoveVec.X);
	}
}

void AMyCharacter1::Rotate(const FInputActionValue& value)
{
	FVector2D tempLookAxisVec = value.Get<FVector2D>();
	if (nullptr != Controller)
	{
		AddControllerYawInput(tempLookAxisVec.X);
		AddControllerPitchInput(tempLookAxisVec.Y);
	}

}
4)创建MyCharacter1类的蓝图,在蓝图的变量中添加之前创建的输入映射,如图2.2.4所示
三、总结
3.1、原始的输入虚幻5之后会渐渐摒弃掉,尽早学会使用新的“增强输入”。
3.2、增强输入可以针对性的设置和绑定输入,对比原始的输入更加系统和便捷。
3.3、增加输入在C++代码中一定要在Build.CS中添加“EnhancedInput”模块。