前言
正常情况下,nginx 做反向代理负载均衡的话,如果后端节点服务器宕掉的话,nginx 默认是不能把这台服务器踢出 upstream 负载集群的,所以还会有请求转发到后端的这台服务器上面,这样势必造成网站访问故障
注:实际上不仅是后端节点宕掉需要踢出集群,如果说我们发布服务,那么节点服务启动和关闭也是需要时间的,此时也需要踢出和加入集群操作
请求转发
最简单的做法就是使用 proxy_next_upstream,实现请求转发,就是在 localtion 中启用 proxy_next_upstream 来解决返回给用户的错误页面,示例如下:
location /
{


# 如果后端的服务器返回502、504、执行超时等错误
# 自动将请求转发到upstream负载均衡池中的另一台服务器,实现故障转移。
proxy_next_upstream http_502 http_504 http_404 error timeout invalid_header;
}
虽然这样问题可以解决,但是请求还是会转发给这台服务器,然后再转发给别的服务器,这样以来就浪费了一次转发,会损耗网站性能
健康检查
为了避免上述问题,我们可以对后端节点进行节点检查,目前主要有如下三种方式可以实现对 nginx 负载均衡的后端节点服务器进行健康检查
-
nginx 自带模块ngx_http_proxy_module 和 ngx_http_upstream_module
-
ngx_http_healthcheck_module 模块,这是 nginx 官方早期推出的健康检查的模块,但是目前仅支持 nginx 的 1.0.0 版本,1.1.0 版本以后均不支持,常见的生产环境上基本不会使用该模块
-
淘宝技术团队开发的 nginx_upstream_check_module 模块,更加专业
本次我们使用第三种方法实现节点健康检查
淘宝技术团队开发的 nginx 模快 nginx_upstream_check_module 可以检测后方 realserver 的健康状态,如果后端服务器不可用,则会将其踢出 upstream,所有的请求不转发到这台服务器。当期恢复正常时,将其加入 upstream
在淘宝自己的 tengine 上是自带了该模块的,大家可以访问淘宝 tengine 来获取安装,如果没有使用淘宝的 tengine 的话,也可以通过补丁的方式来添加该模块到 nginx 中
本文为了演示简便,将会使用 tengine 作为示例,当然文末也会附上如何在原生 nginx 集成该模块
安装 Tengine
系统:CentOS 7.6
环境准备
yum -y install gcc-c++
yum -y install pcre pcre-devel
yum -y install zlib zlib-devel
yum -y install openssl openssl-devel
下载解压
cd /usr/local/src/
wget http://tengine.taobao.org/download/tengine-2.3.2.tar.gz

tar -zxvf tengine-2.3.2.tar.gz
cd /usr/local/src/tengine-2.3.2
编译安装
使用下面命令,Tengine 默认将安装在 /usr/local/nginx 目录。你可以用’–prefix’来指定你想要的安装目录
$ ./configure --add-module=./modules/ngx_http_upstream_check_module --add-module=./modules/ngx_http_upstream_session_sticky_module --add-module=./modules/ngx_http_upstream_dynamic_module
$ make && sudo make install
注:淘宝的 Tengine 升级到 2.3.0 或者2.3.1 都不再默认安装健康检查模块
编译安装之后输出如下文件位置
  nginx path prefix: "/usr/local/nginx"
  nginx binary file: "/usr/local/nginx/sbin/nginx"
  nginx modules path: "/usr/local/nginx/modules"
  nginx configuration prefix: "/usr/local/nginx/conf"
  nginx configuration file: "/usr/local/nginx/conf/nginx.conf"
  nginx pid file: "/usr/local/nginx/logs/nginx.pid"
  nginx error log file: "/usr/local/nginx/logs/error.log"
  nginx http access log file: "/usr/local/nginx/logs/access.log"
  nginx http client request body temporary files: "client_body_temp"
  nginx http proxy temporary files: "proxy_temp"
  nginx http fastcgi temporary files: "fastcgi_temp"
  nginx http uwsgi temporary files: "uwsgi_temp"
  nginx http scgi temporary files: "scgi_temp"
配置后台
vim /usr/lib/systemd/system/nginx.service

[Unit]
Description=nginx
After=network.target

[Service]
Type=forking
ExecStart=/usr/local/nginx/sbin/nginx
ExecReload=/usr/local/nginx/sbin/nginx -s reload
ExecStop=/usr/local/nginx/sbin/nginx -s quit
PrivateTmp=true

[Install]
WantedBy=multi-user.target
之后即可使用 systemctl 设置 nginx 开启,关闭,开机自启等
nginx 配置文件路径 /usr/local/nginx/conf/nginx.conf
可以配置节点健康检查如下
http {


    upstream cluster1 {


        server 172.25.234.148:9001;
        server 172.25.234.148:9002;

        check interval=3000 rise=2 fall=3 timeout=1000 type=http;
        check_http_send "HEAD /actuator/health HTTP/1.0\r\n\r\n";
        check_http_expect_alive http_2xx http_3xx;
    }

    server {


        location /springboot {


            proxy_pass http://cluster1/;
        }

        location /status {


            check_status;

            access_log   off;
            #allow IP;
            #deny all;
        }
    }
}
我们配置了 server 172.25.234.148:9001 server 172.25.234.148:9002 两个服务开发端口
check interval=3000 rise=2 fall=3 timeout=1000 type=http
interval:向后端发送的健康检查包的间隔。fall:如果连续失败次数达到指定次数,服务器就被认为是DOWN。rise:如果连续成功次数达到指定次数,服务器就被认为是UP。timeout:后端健康请求的超时时间。type:健康检查包的类型,现在支持以下多种类型tcp、ssl_hello、http、mysql、ajp。
其实还可以配置 port:指定后端服务器的检查端口,并且最好和实际业务端口不同,防止将健康状态通过 nginx 暴露到外网中,但是这里为了方便没有指定,也就是将业务和健康检查接口配置在同一端口
check_http_send "HEAD /actuator/health HTTP/1.0\r\n\r\n"; 配置项,该指令可以配置 http 健康检查包发送的请求内容。为了减少传输数据量,推荐采用 "HEAD" 方法,该接口地址 /actuator/health 后面我们会使用 Spring Actuator 配置
check_http_expect_alive http_2xx http_3xx; 配置项,该指令指定 HTTP 回复的成功状态,默认认为 2XX 和 3XX 的状态是健康的。注意,在 Actuator 提供的 health 端点,在返回服务器是 UP 状态时的状态码为 200,在返回服务器是 DOWN 状态时的状态码为 503,满足该 check_http_expect_alive 配置项
location /springboot 配置项,我们创建了一个 Location,转发到我们配置的 Upstream。
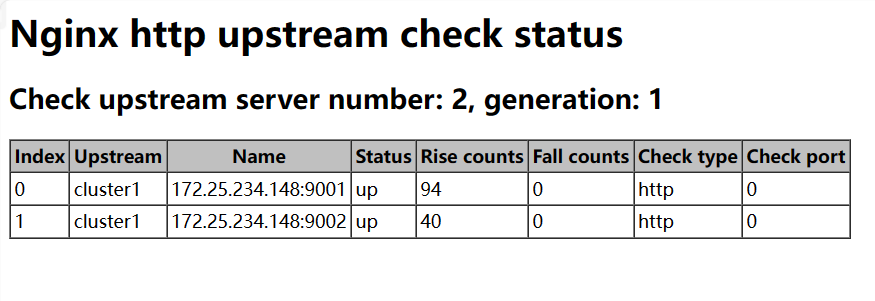
location /status 配置项,我们创建了一个 Location,转发到 Tengine 提供的服务器的健康状态页,之后可以访问 http://ip/status 就可以看到当前两台 realserver 实时的健康状态
之后重启 nginx 即可生效,后面我们配置 actuator 节点健康检查
注意
在生产环境的实施应用中需要注意下面两点
1)主要定义好 type。由于默认的 type 是 tcp 类型,因此假设服务启动,不管是否初始化完毕,它的端口都会起来,所以此时前段负载均衡器为认为该服务已经可用,其实是不可用状态。
2)注意 check_http_send 值的设定。由于它的默认值是GET / HTTP/1.0\r\n\r\n。
假设应用是通过 http://ip/name 访问的,那么这里 check_http_send 值就需要更改为GET /name HTTP/1.0\r\n\r\n才可以。
针对采用长连接进行检查的,这里增加 keep-alive 请求头,即HEAD /name HTTP/1.1\r\nConnection: keep-alive\r\n\r\n。
如果后端的 tomcat 是基于域名的多虚拟机,此时你需要通过 check_http_send 定义 host,不然每次访问都是失败,范例:
check_http_send "GET /mobileapi HTTP/1.0\r\n HOST www.redhat.sx\r\n\r\n" ;
配置 Actuator
示例仓库地址:ReturnTmp/spring-actuator-demo (github.com)
依赖配置 pom.xml
        <!-- actuator -->
        <dependency>
            <groupId>org.springframework.boot</groupId>
            <artifactId>spring-boot-starter-actuator</artifactId>
            <version>3.1.0</version>
        </dependency>
application.yml
server:
  port: 9000
# 需要开放的端点。默认值只打开 health 和 info 两个端点。通过设置 * ,可以开放所有端点。
management:
  endpoints:
    web:
      exposure:
        include: '*'
添加接口,可以输出服务端口
    @GetMapping("/port")
    public Object port() {


        return String.format("port=%s", env.getProperty("local.server.port"));
    }
可以单独配置 actuator 展示端口,防止 nginx 暴露,但是为了演示简便起见,本次不单独设置端口
management:
  server:
    port: 8078
启动项目即可通过 /actuator/health 接口查看健康状态
然后给项目 maven 打包 package ,给对应 jar 包上传服务器,分别在两个窗口运行两个服务(nohup 后台运行也可以)
java -jar spring-actuator-demo-0.0.1-SNAPSHOT.jar --server.port=9001
java -jar spring-actuator-demo-0.0.1-SNAPSHOT.jar --server.port=9002
此时访问 http://ip/springboot/port
通过输出的端口可以发现已经顺利实现负载均衡,然后给其中一个服务挂掉,可以发现并没有出现部分请求无法访问问题
然后重新启动挂掉的服务,访问接口,可以发现过了一段时间后节点自动添加到了负载均衡集群中
访问: http://ip/status 可以查看负载均衡集群节点
集成模块
编译安装
[root@localhost ~]# cd /usr/local/src
[root@localhost src]# wget https://github.com/yaoweibin/nginx_upstream_check_module/archive/master.zip
[root@localhost src]# unzip nginx_upstream_check_module-master.zip
[root@localhost src]# ls
master.zip  nginx_upstream_check_module-master

[root@localhost src]# wget http://nginx.org/download/nginx-1.8.0.tar.gz
[root@localhost src]# tar -zxvf nginx-1.8.0.tar.gz
[root@localhost src]# cd nginx-1.8.0

[root@localhost nginx-1.8.0]# patch -p1 < ../nginx_upstream_check_module-master/check_1.9.2+.patch
[root@localhost nginx-1.8.0]# ./configure --prefix=/usr/local/nginx --user=nginx --group=nginx --with-http_ssl_module --with-http_flv_module --with-http_stub_status_module --with-http_gzip_static_module --with-pcre --add-module=../nginx_upstream_check_module-master/
[root@node1 src]# make && make install
配置 nginx
[root@master-node ~]# vim /usr/local/nginx/conf/vhosts/LB.conf
upstream LB-WWW {


      server 192.168.1.101:80;
      server 192.168.1.102:80;
      check interval=3000 rise=2 fall=5 timeout=1000 type=http;
      check_keepalive_requests 100;
      check_http_send "HEAD / HTTP/1.1\r\nConnection: keep-alive\r\n\r\n";
      check_http_expect_alive http_2xx http_3xx;
    }

server {


     listen       80;
     server_name  www.wangshibo.com;

      access_log  /usr/local/nginx/logs/www-access.log main;
      error_log  /usr/local/nginx/logs/www-error.log;

     location / {


         proxy_pass http://LB-WWW;
         proxy_redirect off ;
         proxy_set_header Host $host;
         proxy_set_header X-Real-IP $remote_addr;
         proxy_set_header REMOTE-HOST $remote_addr;
         proxy_set_header X-Forwarded-For $proxy_add_x_forwarded_for;
         proxy_connect_timeout 300;
         proxy_send_timeout 300;
         proxy_read_timeout 600;
         proxy_buffer_size 256k;
         proxy_buffers 4 256k;
         proxy_busy_buffers_size 256k;
         proxy_temp_file_write_size 256k;
         proxy_next_upstream error timeout invalid_header http_500 http_503 http_404;
         proxy_max_temp_file_size 128m;
         proxy_cache mycache;
         proxy_cache_valid 200 302 60m;
         proxy_cache_valid 404 1m;
        }

       location /nstatus {


         check_status;
         access_log off;
         #allow IP;
         #deny all;
       }
}
参考链接
- Nginx 负载均衡中后端节点服务器健康检查 - 博客园 (cnblogs.com)
- 芋道 Spring Boot 持续交付 Jenkins 入门 | 芋道源码(验证码:coke)
- NGINX 负载均衡健康检查和会话保持 - 小丶凡 - 博客园 (cnblogs.com)
- 全网 Tengine 最新版本部署及原理 - 博客园 (cnblogs.com)
- NGINX笔记之: Tengine编译安装Tengine/2.3.1编译安装踩坑笔记
本文由博客一文多发平台 OpenWrite 发布!