文件的上传与下载在实际项目中用得挺多,所以,今天就在这里总结下。
这篇博客不仅仅是完成一个文件上传/下载的功能,更重要的是规范编码吧:日志记录、入参/返参校验、方法职责单一等。
开发环境:
1.IDEA 2020.2
2.Maven 3.6.0
3.SpringBoot 2.0.0.RELEASE
1. 单个文件的上传
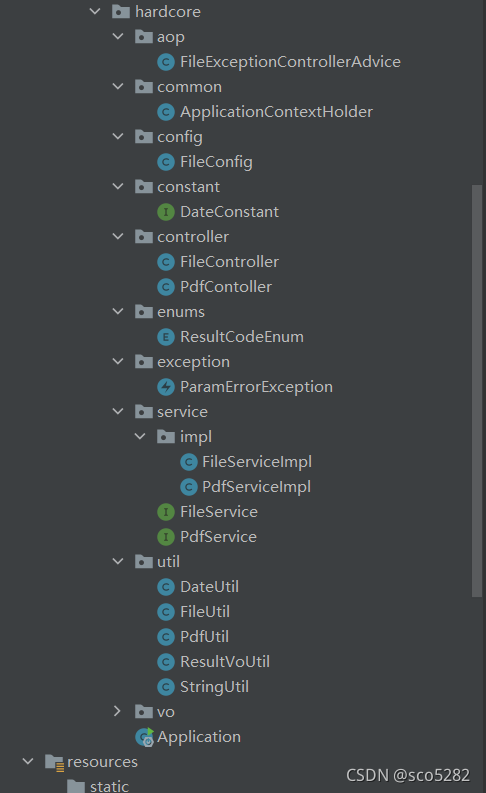
新建一个 SpringBoot 工程,工程结构图如下:
POM 依赖:
<dependency>
	<groupId>org.springframework.boot</groupId>
	<artifactId>spring-boot-starter-web</artifactId>
</dependency>
<dependency>
	<groupId>org.springframework.boot</groupId>
	<artifactId>spring-boot-configuration-processor</artifactId>
	<optional>true</optional>
</dependency>
<dependency>
	<groupId>joda-time</groupId>
	<artifactId>joda-time</artifactId>
	<version>2.9.7</version>
</dependency>
applicaiton.yml
spring:
  servlet:
    multipart:
      enabled: true
      max-file-size: 10MB       # 单个文件上传的最大上限
      max-request-size: 10MB    # 一次请求总大小上限
file:                           # 文件上传路径
  uploadPath: E:/upload
接下来正式地用代码实现了~~
文件上传的接口 FileController
@RestController
@RequestMapping("/file")
public class FileController {


    @Autowired
    private FileService fileService;

    // 上传单个文件
    @PostMapping("/upload")
    public ResultVo<String> uploadFile(@RequestParam("file") MultipartFile file) {


        return fileService.uploadFile(file);
    }

}
FileService
public interface FileService {


    // 上传文件
    ResultVo<String> uploadFile(MultipartFile file);

}
FileServiceImpl
@Service
@Slf4j
public class FileServiceImpl implements FileService {


    // 上传文件
    @Override
    public ResultVo<String> uploadFile(MultipartFile file) {


        log.info("【文件上传】进入到文件上传方法");
        // 1.参数校验
        if (null == file || file.isEmpty()) {


            log.error("【文件上传】文件为空!");
            throw new ParamErrorException();
        }
        // 2.上传文件
        ResultVo<String> resultVo = FileUtil.uploadFile(file);
        return resultVo;
    }

}
说明:
- 做日志记录
- 对参数进行校验
- 自定义异常
ParamErrorException处理 - 统一封装返回结果
ResultVo - 职责单一,使用工具类执行文件上传操作
FileUtil#uploadFile()
1》、自定义异常 ParamErrorException
@Data
public class ParamErrorException extends RuntimeException {


    // 错误码
    private Integer code;

    // 错误消息
    private String msg;

    public ParamErrorException() {


        this(ResultCodeEnum.PARAM_ERROR.getCode(), ResultCodeEnum.PARAM_ERROR.getMessage());
    }
    public ParamErrorException(String msg) {


        this(ResultCodeEnum.PARAM_ERROR.getCode(), msg);
    }
    public ParamErrorException(Integer code, String msg) {


        super(msg);
        this.code = code;
        this.msg = msg;
    }

}
ResultCodeEnum
在自定义异常中也使用了自定义的枚举类。
@Getter
public enum ResultCodeEnum {


    SUCCESS(200, "成功")
    ,
    ERROR(301, "错误")
    ,
    PARAM_ERROR(303, "参数错误")
    ,
    FILE_NOT_EXIST(304, "文件不存在")
    ,
    CLOSE_FAILD(305, "关闭流失败")
    ;

    private Integer code;
    private String message;

    ResultCodeEnum(Integer code, String message) {


        this.code = code;
        this.message = message;
    }

}
FileExceptionControllerAdvice
在 SpringBoot 中,不用对每一个抛出的异常进行 try {} catch(Exception e) {},而是使用注解 @RestControllerAdvice 对异常进行统一地处理:
@RestControllerAdvice
public class FileExceptionControllerAdvice {


    // 处理文件为空的异常
    @ExceptionHandler(ParamErrorException.class)
    public ResultVo<String> fileExceptionHandler(ParamErrorException exception) {


        return ResultVoUtil.error(exception.getCode(), exception.getMsg());
    }

}
2》、统一返回封装结果 ResultVo
@Data
public class ResultVo<T> {


    // 错误码
    private Integer code;

    // 提示信息
    private String msg;

    // 返回的数据
    private T data;

    // 判断是否成功
	public boolean checkSuccess() {


        return ResultCodeEnum.SUCCESS.getCode().equals(this.code);
    }

}
ResultVoUtil
封装一个工具类,进行返回成功/失败
public class ResultVoUtil {


    public static ResultVo success() {


        return success(null);
    }
    public static ResultVo success(Object object) {


        ResultVo result = new ResultVo();
        result.setCode(ResultCodeEnum.SUCCESS.getCode());
        result.setMsg("成功");
        result.setData(object);
        return result;
    }
    public static ResultVo success(Integer code, Object object) {


        return success(code, null, object);
    }
    public static ResultVo success(Integer code, String msg, Object object) {


        ResultVo result = new ResultVo();

        result.setCode(code);
        result.setMsg(msg);
        result.setData(object);
        return result;
    }

    public static ResultVo error(String msg) {


        ResultVo result = new ResultVo();
        result.setCode(ResultCodeEnum.ERROR.getCode());
        result.setMsg(msg);
        return result;
    }
    public static ResultVo error(Integer code, String msg) {


        ResultVo result = new ResultVo();
        result.setCode(code);
        result.setMsg(msg);
        return result;
    }

}
3》、文件上传
@Slf4j
public class FileUtil {


    private static FileConfig fileConfig = ApplicationContextHolder.getContext().getBean(FileConfig.class);

    // 下划线
    public static final String UNDER_LINE = "_";

    // 上传文件
    public static ResultVo<String> uploadFile(MultipartFile file) {


        // 1.获取一个新的文件名
        String newFileName = getNewFileName(file);
        if (StringUtil.isBlank(newFileName)) {


            log.error("【上传文件】转换文件名称失败");
            return ResultVoUtil.error("【上传文件】转换文件名称失败");
        }
        // 2.获取文件上传路径
        String uploadPath = fileConfig.getUploadPath();
        if (StringUtil.isBlank(uploadPath)) {


            log.error("【上传文件】获取文件上传路径失败");
            return ResultVoUtil.error("【上传文件】获取文件上传路径失败");
        }
        uploadPath = uploadPath + File.separator +  DateUtil.getCurrentDate();
        // 3.生成上传目录
        File uploadDir = mkdirs(uploadPath);
        if (!uploadDir.exists()) {


            log.error("【上传文件】生成上传目录失败");
            return ResultVoUtil.error("【上传文件】生成上传目录失败");
        }
        // 4.文件全路径
        String fileFullPath = uploadPath + File.separator + newFileName;
        log.info("上传的文件:" + file.getName() + "," + file.getContentType() + ",保存的路径为:" + fileFullPath);
        try {


            // 5.上传文件
            doUploadFile(file, fileFullPath);
        } catch (IOException e) {


            log.error("【上传文件】上传文件报IO异常,异常信息为{}", e.getMessage());
            return ResultVoUtil.error(e.getMessage());
        }
        return ResultVoUtil.success(fileFullPath);
    }

}
说明:
- 自己封装了一个字符串工具类
StringUtil,用来判断字符串是否为空; - 获取文件上传路径:
String uploadPath = fileConfig.getUploadPath();这个代码很有意思; DateUtil.getCurrentDate()方法获取当前日期。
StringUtil:字符串工具类
@Component
public class StringUtil {


    // 判断字符串是否为空
    public static boolean isBlank(String content) {


        if (null == content || "".equals(content)) {


            return true;
        }
        return false;
    }

}
为什么获取文件上传的路径要这样写? String uploadPath = fileConfig.getUploadPath();
仔细想想,我们把文件上传的路径配置在 application.yml 文件中:
file:
  uploadPath: E:/upload
那么,我们如何获取这个值呢?
有两种思路吧:@Value 注解;@ConfigurationProperties 注解
这里,我选择了第 2 种:
FileConfig 类:
@Data
@Component
@ConfigurationProperties(prefix = "file")
public class FileConfig {


    // 上传路径
    private String uploadPath;

}
这样,我就能给 FileConfig 类中的属性 uploadPath 赋上值了。然后,我们可以通过 fileConfig.getUploadPath() 获取了。
但是,这种方式在静态方法中行不通啊!!即:
public class FileUtil {


    @Autowired
    private FileConfig fileConfig;

	public static ResultVo<String> uploadFile(MultipartFile file) {


		...
		String uploadPath = fileConfig.getUploadPath();
		...
	}
}
这种编码编译期都过不了!!为什么?
因为 静态方法中是不能调用非静态属性/方法的。
所以,解决方案是:
private static FileConfig fileConfig = ApplicationContextHolder.getContext().getBean(FileConfig.class);
ApplicationContextHolder:静态变量保存 Spring ApplicationContext,,可在任何代码任何地方任何时候中取出 ApplicaitonContext:
@Component
public class ApplicationContextHolder implements ApplicationContextAware {


    private static ApplicationContext context;

    @Override
    public void setApplicationContext(ApplicationContext applicationContext) throws BeansException {


        context = applicationContext;
    }

    public static ApplicationContext getContext() {


        return context;
    }

    public static Object getBean(String name) {


        return context != null ? context.getBean(name) : null;
    }

    public static <T> T getBean(Class<T> clz) {


        return context != null ? context.getBean(clz) : null;
    }

    public static <T> T getBean(String name, Class<T> clz) {


        return context != null ? context.getBean(name, clz) : null;
    }

    public static void addApplicationListenerBean(String listenerBeanName) {


        if (context != null) {


            ApplicationEventMulticaster applicationEventMulticaster = (ApplicationEventMulticaster)context.getBean(ApplicationEventMulticaster.class);
            applicationEventMulticaster.addApplicationListenerBean(listenerBeanName);
        }
    }

}
DateUtil:日期工具类:
@Component
public class DateUtil {


    // 获取当前时间
    public static String getCurrentTime() {


        DateTime now = new DateTime();
        return now.toString(DateConstant.DEFAULT_FORMAT_PATTERN);
    }

    // 获取当前日期
    public static String getCurrentDate() {


        LocalDate localDate = new LocalDate();
        return localDate.toString();
    }

}
DateConstant:日期常量类
public interface DateConstant {


    // 默认的日期格式化格式
    String DEFAULT_FORMAT_PATTERN = "yyyy-MM-dd HH:mm:ss";

}
这里的日期,我选用的是 joda-time,这个组件是部门内的一个大佬推荐给我的,所以,我在这里简要地推荐一下吧!!
getNewFileName(MultipartFile) 方法:将上传的文件转换为一个新的文件名
// 将上传的文件转换为一个新的文件名
public static String getNewFileName(MultipartFile file) {


    // 1.获取上传的文件名称(包含后缀。如:test.jpg)
    String originalFilename = file.getOriginalFilename();
    log.info("【上传文件】上传的文件名为{}", originalFilename);
    // 2.以小数点进行分割
    String[] split = originalFilename.split("\\.");
    String newFileName = null;
    if (null == split || split.length == 0) {


        return null;
    }
    StringBuilder builder = new StringBuilder();
    if (1 == split.length) {


        // 3.此文件无后缀
        newFileName = builder.append(originalFilename).append(UNDER_LINE).append(System.nanoTime()).toString();
        return newFileName;
    }
    // 4.获取文件的后缀
    String fileSuffix = split[split.length - 1];
    for (int i = 0; i < split.length - 1; i++) {


        builder.append(split[i]);
        if (null != split[i + 1] && "" != split[i + 1]) {


            builder.append(UNDER_LINE);
        }
    }
    newFileName = builder.append(System.nanoTime()).append(".").append(fileSuffix).toString();
    return newFileName;
}
说明:
- 如果上传的文件无后缀名(通过“.”区分),则直接拼接一个下划线“_”,然后避免文件名重复,再拼接一个时间戳;
- 如果上传的文件有后缀名,则将文件名中的“.”转换为下划线“_”,再拼接时间戳。
mkdirs(String) 方法:生成相应的目录
// 生成相应的目录
public static File mkdirs(String path) {


    File file = new File(path);
    if(!file.exists() || !file.isDirectory()) {


        file.mkdirs();
    }
    return file;
}
doUploadFile(MultipartFile, String) 方法:上传文件
// 上传文件
public static void doUploadFile(MultipartFile file, String path) throws IOException {


    Streams.copy(file.getInputStream(), new FileOutputStream(path), true);
}
很显然,这是流的转化。
上传文件有多种实现方式,如下:
public static void doUploadFile(MultipartFile file, String path) throws IOException {


    // 法一:
    Streams.copy(file.getInputStream(), new FileOutputStream(path), true);

    // 法二: 通过MultipartFile#transferTo(File)
    // 使用此方法保存,必须要绝对路径且文件夹必须已存在,否则报错
    //file.transferTo(new File(path));

    // 法三:通过NIO将字节写入文件
    //Path filePath = Paths.get(path);
    //Files.write(filePath, file.getBytes());

    // 法四:
    /*try (InputStream in = file.getInputStream();
         FileOutputStream out = new FileOutputStream(path)) {
        IOUtils.copy(in, out);
    } catch (Exception e) {
        log.error("【上传文件】上传文件失败,失败信息为:{}", e.getMessage());
    }*/

    // 法五:
    /*InputStream in = file.getInputStream();
    OutputStream out = new FileOutputStream(path);
    int len = 0;
    byte[] bytes = new byte[1024];
    while ((len = in.read(bytes)) != -1) {
        out.write(bytes, 0, len);
    }
    in.close();
    out.close();*/

    // 法六:
    /*byte[] bytes = file.getBytes();
    OutputStream out = new FileOutputStream(path);
    out.write(bytes);
    out.close();*/
}
这里,笔者也不知道使用哪种方式,只知道这些方式可以实现文件上传的功能。但它们肯定各有利弊。
2. 多个文件上传
多个文件上传和单个文件上传本质上是一样。只不过多个文件上传的后台接口是用一个数组进行接收,然后循环调用文件上传方法,代码如下:
FileController:添加一个接口
@PostMapping("/uploadFiles")
public ResultVo uploadFiles(@RequestParam("files") MultipartFile[] files) {


    return fileService.uploadFiles(files);
}
FileServiceImpl:添加一个方法:
@Override
public ResultVo uploadFiles(MultipartFile[] files) {


    log.info("【批量上传】进入到批量上传文件");
    if (null == files || files.length == 0) {


        log.error("【批量上传】上传的文件为空,files={}", files);
        throw new ParamErrorException();
    }
    List<MultipartFile> multipartFiles = Arrays.asList(files);
    // 1.校验是否有空文件
    List<String> emptyFileNames = new ArrayList<>();
    List<MultipartFile> needUploadFiles = new ArrayList<>();
    int count = 0;
    for (MultipartFile file : multipartFiles) {


        if (null == file) {


            count++;
            continue;
        }
        if (file.isEmpty()) {


            emptyFileNames.add(file.getOriginalFilename());
            count++;
            continue;
        }
        needUploadFiles.add(file);
    }
    if (count == multipartFiles.size()) {


        log.error("【批量上传】批量上传的文件为空,无法正确上传");
        return ResultVoUtil.error("批量上传的文件为空,无法正确上传");
    }
    if (CollectionUtil.isNotEmpty(emptyFileNames)) {


        log.info("【批量上传】一共上传了{}个文件,其中,空文件数为{},空文件名分别是:{}", multipartFiles.size(), count, emptyFileNames);
    } else {


        log.info("【批量上传】一共上传了{}个文件", multipartFiles.size());
    }
    // 2.批量上传文件
    List<String> uploadFailFileNames = new ArrayList<>(needUploadFiles.size());
    needUploadFiles.forEach((file) -> {


        ResultVo<String> resultVo = FileUtil.uploadFile(file);
        // 如果没有上传成功
        if (!resultVo.checkSuccess()) {


            uploadFailFileNames.add(file.getName());
        }
    });
    if (CollectionUtil.isNotEmpty(uploadFailFileNames)) {


        log.error("一共上传了{}个文件,其中上传失败的文件数为{},文件名分别为:{}", needUploadFiles.size(), uploadFailFileNames.size(), uploadFailFileNames);
        return ResultVoUtil.success("一共上传了" + needUploadFiles.size() + "个文件,其中上传失败的文件数为" + uploadFailFileNames.size() + ",文件名分别为:" + uploadFailFileNames);
    }
    log.info("批量上传文件成功");
    return ResultVoUtil.success();
}
CollectionUtil:
public class CollectionUtil {


    public static boolean isNotEmpty(Collection<?> coll) {


        return !isEmpty(coll);
    }

    public static boolean isEmpty(Collection<?> coll) {


        return coll == null || coll.isEmpty();
    }
}
是用 POSTMAN 调用接口时,上传多个文件:
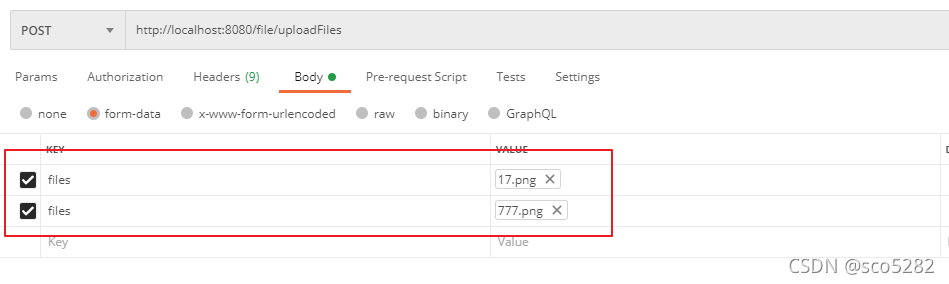
可自行测试!
3. 文件的下载
根据一个文件的路径,将这个文件下载下来。这里,为了方便,我就把这个路径通过接口传递过来。
FileController:
@PostMapping("/download")
public ResultVo<String> downloadFile(@RequestParam("filePath") String filePath, final HttpServletResponse response) {


    return fileService.downloadFile(filePath, response);
}
FileServiceImpl:
@Override
public ResultVo<String> downloadFile(String filePath, HttpServletResponse response) {


    File file = new File(filePath);
    // 1.参数校验
    if (!file.exists()) {


        log.error("【下载文件】文件路径{}不存在", filePath);
        return ResultVoUtil.error("文件不存在");
    }
    // 2.下载文件
    log.info("【下载文件】下载文件的路径为{}", filePath);
    return FileUtil.downloadFile(file, response);
}
FileUtil:下载文件
public static ResultVo<String> downloadFile(File file, HttpServletResponse response) {


    try {


        // 1.设置响应头
        setResponse(file, response);
    } catch (UnsupportedEncodingException e) {


        log.error("文件名{}不支持转换为字符集{}", file.getName(), "UTF-8");
        return ResultVoUtil.error(e.getMessage());
    }
    // 2.下载文件
    return doDownLoadFile(file, response);
}
setResponse():设置响应头
public static void setResponse(File file, HttpServletResponse response) throws UnsupportedEncodingException {


    // 清空response
    response.reset();
    response.setCharacterEncoding("UTF-8");
    // 返回给客户端类型,任意类型
    response.setContentType("application/octet-stream");
    // Content-Disposition的作用:告知浏览器以何种方式显示响应返回的文件,用浏览器打开还是以附件的形式下载到本地保存
    // attachment表示以附件方式下载 inline表示在线打开 "Content-Disposition: inline; filename=文件名.mp3"
    response.addHeader("Content-Disposition", "attachment;filename=" + URLEncoder.encode(file.getName(), "UTF-8"));
    // 告知浏览器文件的大小
    response.addHeader("Content-Length", String.valueOf(file.length()));
}
doDownLoadFile():下载文件
public static ResultVo<String> doDownLoadFile(File file, HttpServletResponse response) {


    // 法一:IOUtils
    /*try (FileInputStream in = new FileInputStream(file);
         OutputStream out = response.getOutputStream()) {
        // 2.下载文件
        IOUtils.copy(in, out);
        log.info("【文件下载】文件下载成功");
        return null;
    } catch (FileNotFoundException e) {
        log.error("【文件下载】下载文件时,没有找到相应的文件,文件路径为{}", file.getAbsolutePath());
        return ResultVoUtil.error(e.getMessage());
    } catch (IOException e) {
        log.error("【文件下载】下载文件时,出现文件IO异常");
        return ResultVoUtil.error(e.getMessage());
    }*/

    // 法二:将文件以流的形式一次性读取到内存,通过响应输出流输出到前端
    /*try (InputStream in = new BufferedInputStream(new FileInputStream(file));
         OutputStream out = new BufferedOutputStream(response.getOutputStream())) {
        byte[] buffer = new byte[in.available()];
        in.read(buffer);
        out.write(buffer);
        log.info("【文件下载】文件下载成功");
        return null;
    } catch (IOException e) {
        log.error("【文件下载】下载文件时,出现文件IO异常");
        return ResultVoUtil.error(e.getMessage());
    }*/

    // 法三:将输入流中的数据循环写入到响应输出流中,而不是一次性读取到内存,通过响应输出流输出到前端
    try (InputStream in = new FileInputStream(file);
         OutputStream out = response.getOutputStream()) {


        byte[] buffer = new byte[1024];
        int len = 0;
        while ((len = in.read(buffer)) != -1) {


            out.write(buffer, 0, len);
        }
        log.info("【文件下载】文件下载成功");
        return null;
    } catch (FileNotFoundException e){


        log.error("【文件下载】下载文件时,没有找到相应的文件,文件路径为{}", file.getAbsolutePath());
        return ResultVoUtil.error(e.getMessage());
    } catch (IOException e) {


        log.error("【文件下载】下载文件时,出现文件IO异常");
        return ResultVoUtil.error(e.getMessage());
    }
}
【注意】:下载完文件后,不要再次返回值,否则会抛异常 java.lang.IllegalStateException:
java.lang.IllegalStateException: Cannot call sendError() after the response has been committed
	at org.apache.catalina.connector.ResponseFacade.sendError(ResponseFacade.java:473) ~[tomcat-embed-core-8.5.28.jar:8.5.28]
	at org.springframework.web.servlet.mvc.support.DefaultHandlerExceptionResolver.handleHttpMediaTypeNotAcceptable(DefaultHandlerExceptionResolver.java:299) ~[spring-webmvc-5.0.4.RELEASE.jar:5.0.4.RELEASE]
	at org.springframework.web.servlet.mvc.support.DefaultHandlerExceptionResolver.doResolveException(DefaultHandlerExceptionResolver.java:180) ~[spring-webmvc-5.0.4.RELEASE.jar:5.0.4.RELEASE]
	at org.springframework.web.servlet.handler.AbstractHandlerExceptionResolver.resolveException(AbstractHandlerExceptionResolver.java:140) [spring-webmvc-5.0.4.RELEASE.jar:5.0.4.RELEASE]...
千万不要这样写!!
public static ResultVo<String> doDownLoadFile(File file, HttpServletResponse response) {


    try (InputStream in = new FileInputStream(file);
         OutputStream out = response.getOutputStream()) {


        byte[] buffer = new byte[1024];
        int len = 0;
        while ((len = in.read(buffer)) != -1) {


            out.write(buffer, 0, len);
        }
        log.info("【文件下载】文件下载成功");

        // 千万不要这样写,否则会报错
        return ResultVoUtil.success("【下载成功】");
    } catch (FileNotFoundException e){


    	....
    }
}