App启动
- 壹、App启动流程图
- 贰、流程图详细解读
-
- 2.1、系统操作
- 2.2、进程开始
- 叁、API
- 参考地址
壹、App启动流程图
Android 更新后方法略不同,如下是8左右的源码。
https://www.jianshu.com/p/538dcfac774d
简述:
-
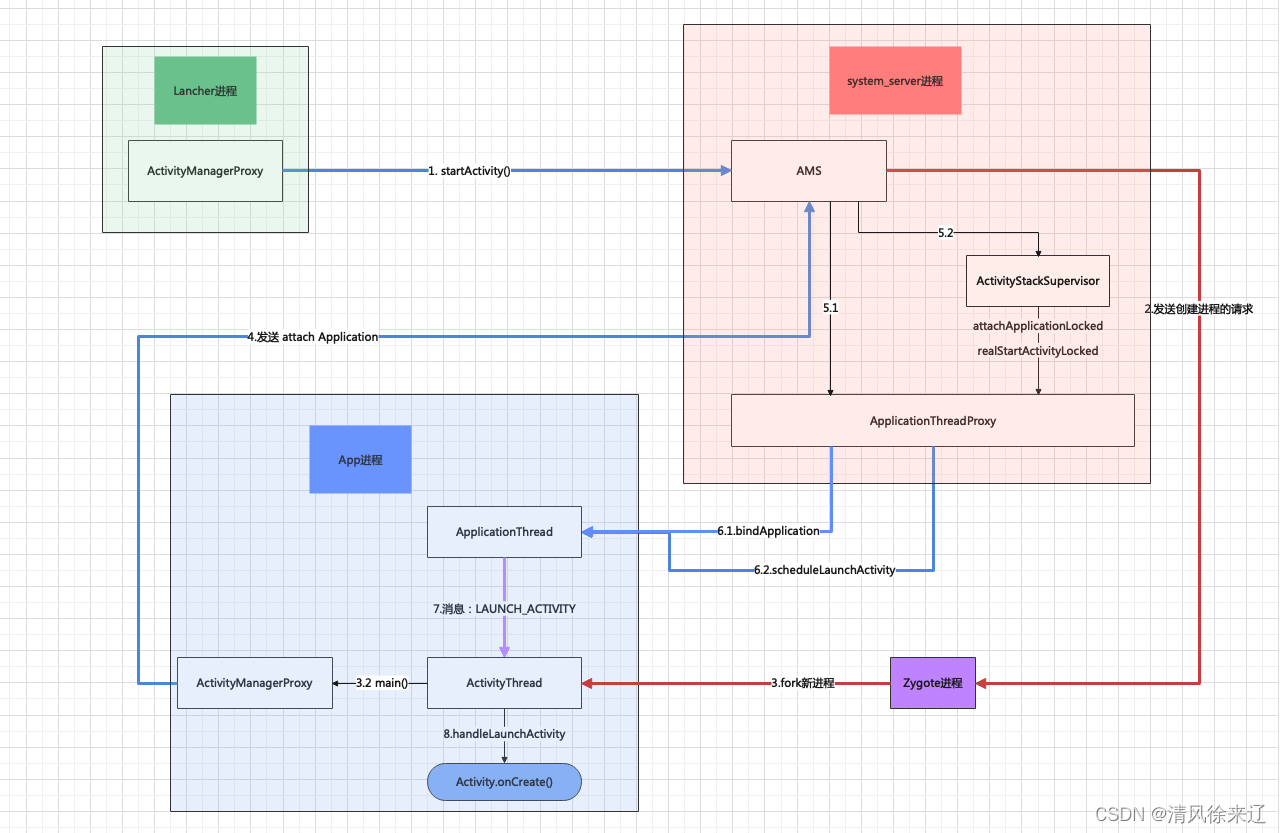
点击桌面应用程序图标时,Launcher的
startActivity()方法通过Binder通信调用系统进程中的ActivityManagerService(AMS)的startActivity方法,启动应用程序。 -
系统进程(system_server)收到请求后,向Zygote进程发送创建应用程序进程的请求。
-
Zygote进程根据请求fork出应用程序进程,并执行应用程序的
ActivityThread.main()方法。在此过程中,应用程序的主线程初始化了MainLooper和主线程Handler,并创建了ApplicationThread用于与AMS通信和协作。 -
应用程序进程通过Binder向system_server进程发送
attachApplication请求。这实际上是应用程序进程通过Binder调用system_server进程中AMS的attachApplication方法,用于将ApplicationThread对象与AMS绑定。 -
system_server进程在收到
attachApplication请求后,进行一些准备工作,然后通过Binder IPC向应用程序进程发送handleBindApplication请求(用于初始化Application并调用onCreate方法)和scheduleLaunchActivity请求(用于创建启动Activity)。 -
应用程序进程的Binder线程(
ApplicationThread)收到请求后,通过Handler向主线程发送BIND_APPLICATION和LAUNCH_ACTIVITY消息。这里要注意的是,AMS和主线程并不直接通信,而是通过AMS和主线程的内部类ApplicationThread之间通过Binder通信,然后再通过Handler消息交互。 -
主线程收到消息后,创建
Application并调用onCreate方法,然后通过反射机制创建目标Activity,并回调Activity的onCreate等方法。至此,应用程序正式启动,进入Activity的生命周期,依次执行onCreate、onStart、onResume方法,完成UI渲染并显示应用程序的主界面。
贰、流程图详细解读
2.1、系统操作
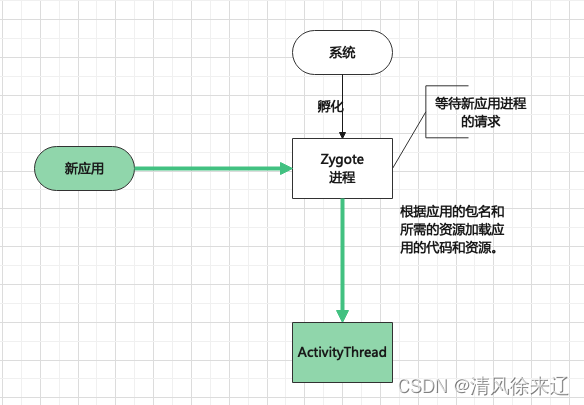
Zygote 进程的孵化
- 在应用启动之前,系统通常会先启动 Zygote 进程,Zygote 进程会在后台预加载一些系统类库和资源,以加速进程的创建。
- Zygote 进程在内部执行
main()方法,创建 Android Runtime 环境,并等待新应用进程的请求。
应用资源和类加载
- 当用户启动应用或触发其他应用组件时,Zygote 进程会根据应用的包名加载应用的资源(如布局文件、字符串资源等)和类。
- Zygote 进程会充当应用进程的模板,根据应用的包名和所需的资源加载应用的代码和资源。
App在启动后立即显示应用的空白启动窗口
空白窗口由谁创建??
在 Android 应用的启动过程中,这个短暂的背景通常是由系统自动创建和管理的,不需要开发者直接介入。具体来说,这个背景的创建和显示是由 Android 系统的窗口管理服务和系统框架负责处理的。
Android 系统会在应用启动时显示这个背景,以提供用户反馈并在后台进行应用的初始化。这个背景会在应用的主 Activity 准备好并开始显示用户界面之前显示。
开发者可以通过设置应用的主题和启动画面来自定义这个短暂的背景。主题和启动画面是应用外观和启动过程的一部分,允许开发者指定应用的标志、颜色、背景等。应用的主题和启动画面的设置可以在 AndroidManifest.xml 文件中进行定义。
总之,这个短暂的背景是由 Android 系统自动创建和管理的,以提供用户反馈和平滑的应用启动过渡。它不需要开发者直接创建或操作。
创建应用进程
应用进程(Application Process):
应用进程是 Android 操作系统中运行应用的一个独立的执行单元。
每个应用都运行在其自己的应用进程中,这意味着每个应用都有独立的内存空间,独立的虚拟机(Dalvik 或 ART),以及独立的运行环境。
应用进程负责执行应用的各个组件,如 Activity、Service、Broadcast Receiver 等。每个组件都在应用进程中运行。
应用进程的生命周期由 Android 系统管理,系统可以在需要时创建、销毁或重启应用进程。
2.2、进程开始
步骤3、ActivityThread 被加载到内存中
ActivityThread.main() 是进程被创建后就会被调用,但是不是主线程创建了就会立刻拉起Activity,而是继续和AMS通信。
https://www.cnblogs.com/mingfeng002/p/10323668.html
另外ActivityThread在Android中它就代表了Android的主线程,但是并不是一个Thread类。
严格来说,UI主线程不是ActivityThread。
ActivityThread类是Android APP进程的初始类,它的main函数是这个APP进程的入口。
APP进程中UI事件的执行代码段都是由ActivityThread提供的。
也就是说,Main Thread实例是存在的,只是创建它的代码我们不可见。ActivityThread的main函数就是在这个Main Thread里被执行的。
步骤3.2、ActivityThread.main()
public static void main(String[] args) {


    //各种初始化操作,省略


    //初始化主线程的Looper,一个线程只能有一个Looper
    Looper.prepareMainLooper();

    ActivityThread thread = new ActivityThread();
    //在attach方法中会完成Application对象的初始化,然后调用Application的onCreate()方法
    thread.attach(false, startSeq);

    if (sMainThreadHandler == null) {


        sMainThreadHandler = thread.getHandler();
    }
    //在主线程开启循环读取消息队列中的消息
    Looper.loop();
}
private void attach(boolean system, long startSeq) {


    sCurrentActivityThread = this;
    mSystemThread = system;
    if (!system) {


    	//如果应用进程
        android.ddm.DdmHandleAppName.setAppName("<pre-initialized>",
                                                UserHandle.myUserId());
        //将mAppThread放到RuntimeInit类中的静态变量,也就是ApplicationThreadNative中的 this
        RuntimeInit.setApplicationObject(mAppThread.asBinder());
        //跨进程通讯,获取AMS在APP进程的代理
        final IActivityManager mgr = ActivityManager.getService();
        try {


            //将mAppThread传入ActivityManagerService中
            mgr.attachApplication(mAppThread, startSeq);
        } catch (RemoteException ex) {


            throw ex.rethrowFromSystemServer();
        }
        // 监听内存限制
        BinderInternal.addGcWatcher(new Runnable() {


            @Override public void run() {


                if (!mSomeActivitiesChanged) {


                    return;
                }
                Runtime runtime = Runtime.getRuntime();
                long dalvikMax = runtime.maxMemory();
                long dalvikUsed = runtime.totalMemory() - runtime.freeMemory();
                //当虚拟机已使用内存超过最大内存的四分之三时,ActivityTaskManager释放一些Activity
                if (dalvikUsed > ((3*dalvikMax)/4)) {


                    mSomeActivitiesChanged = false;
                    try {


                        ActivityTaskManager.getService().releaseSomeActivities(mAppThread);
                    } catch (RemoteException e) {


                        throw e.rethrowFromSystemServer();
                    }
                }
            }
        });
    } else {


        //通过system_server启动ActivityThread对象
        ...
    }
	// 为 ViewRootImpl 设置配置更新回调,
    ViewRootImpl.ConfigChangedCallback configChangedCallback
            = (Configuration globalConfig) -> {


        synchronized (mResourcesManager) {


            ....
        }
    };
    //添加配置回调
    ViewRootImpl.addConfigCallback(configChangedCallback);
}
步骤4、ActivityManagerService.attachApplication()
7020      @Override
7021      public final void attachApplication(IApplicationThread thread) {


7022          synchronized (this) {


7023              int callingPid = Binder.getCallingPid();
7024              final long origId = Binder.clearCallingIdentity();
7025              attachApplicationLocked(thread, callingPid);
7026              Binder.restoreCallingIdentity(origId);
7027          }
7028      }
private boolean attachApplicationLocked(@NonNull IApplicationThread thread,
        int pid, int callingUid, long startSeq) {


	....

    //ApplicationThread调用bindApplication,ApplicationThread是ActivityThread的内部类
    thread.bindApplication(processName, appInfo, providerList,···);

	....

    //查看这个进程中是否有顶部可见的activity正在等待运行…(10以后的版本,之前跟这基本一致)
6955          // See if the top visible activity is waiting to run in this process...
6956          if (normalMode) {


6957              try {


6958                  if (mStackSupervisor.attachApplicationLocked(app)) {


6959                      didSomething = true;
6960                  }
6961              } catch (Exception e) {


6962                  Slog.wtf(TAG, "Exception thrown launching activities in " + app, e);
6963                  badApp = true;
6964              }
6965          }

6967          // Find any services that should be running in this process...
6968          if (!badApp) {


6969              try {


6970                  didSomething |= mServices.attachApplicationLocked(app, processName);
6971                  checkTime(startTime, "attachApplicationLocked: after mServices.attachApplicationLocked");
6972              } catch (Exception e) {


6973                  Slog.wtf(TAG, "Exception thrown starting services in " + app, e);
6974                  badApp = true;
6975              }
6976          }
    ....
}
步骤5.1
如上
thread.bindApplication(processName, appInfo, providerList,···);
方法中的thread就是IApplicationThread,就是ApplicationThread在AMS中的代理
步骤6.1、ApplicationThread.bindApplication()
给ActivityThread的Handler发送bindApplication消息
public final void bindApplication(String processName, ...
                ContentCaptureOptions contentCaptureOptions, long[] disabledCompatChanges) {


    if (services != null) {


        ServiceManager.initServiceCache(services);
    }

    setCoreSettings(coreSettings);

    AppBindData data = new AppBindData();
    data.processName = processName;
	....
    sendMessage(H.BIND_APPLICATION, data);
}
步骤7.1、ActivityThread.H 接收
BIND_APPLICATION
Handler接收到消息并处理BindApplication
1658                  case BIND_APPLICATION:
1659                      Trace.traceBegin(Trace.TRACE_TAG_ACTIVITY_MANAGER, "bindApplication");
1660                      AppBindData data = (AppBindData)msg.obj;
1661                      handleBindApplication(data);
1662                      Trace.traceEnd(Trace.TRACE_TAG_ACTIVITY_MANAGER);
1663                      break;
各种初始化,创建application实例并调用application的onCreate
private void handleBindApplication(AppBindData data) {


    //在运行时将当前执行线程注册为敏感线程
    VMRuntime.registerSensitiveThread();
    ...
    //标记进程起始时间
    Process.setStartTimes(SystemClock.elapsedRealtime(), SystemClock.uptimeMillis());
    ...
    //设置进程名字
    Process.setArgV0(data.processName);

    //设置一个标记位,androidQ及以上版本一些不明确数组相关的类会抛出数组越界异常
    //例如[SparseArray的keyAt和setValueAt在Q之前的版本不会抛出异常](/https://blog.csdn.net/wzz18749670290/article/details/109352466)
    UtilConfig.setThrowExceptionForUpperArrayOutOfBounds(
                data.appInfo.targetSdkVersion >= Build.VERSION_CODES.Q);
    //androidP之前用BitmapFactory解码Bitmap,会放大density。android P及以后,用ImageDecoder解码Bitmap,会跳过upscale节约内存
    ImageDecoder.sApiLevel = data.appInfo.targetSdkVersion;

    //重置系统时区
    TimeZone.setDefault(null);
    //断点调试相关
    if (data.debugMode != ApplicationThreadConstants.DEBUG_OFF) {


        // XXX should have option to change the port.
        ...
    }
    ...
    //渲染调试相关
    boolean isAppDebuggable = (data.appInfo.flags & ApplicationInfo.FLAG_DEBUGGABLE) != 0;
    HardwareRenderer.setDebuggingEnabled(isAppDebuggable || Build.IS_DEBUGGABLE);
    HardwareRenderer.setPackageName(data.appInfo.packageName);

    //初始化HTTP代理
    final IBinder b = ServiceManager.getService(Context.CONNECTIVITY_SERVICE);
    if (b != null) {


        final IConnectivityManager service = IConnectivityManager.Stub.asInterface(b);
        try {


            Proxy.setHttpProxySystemProperty(service.getProxyForNetwork(null));
        } catch (RemoteException e) {


            throw e.rethrowFromSystemServer();
        }
    }
    //创建Instrumentation并初始化
    // Continue loading instrumentation.
    if (ii != null) {


        ApplicationInfo instrApp;
        try {


            instrApp = getPackageManager().getApplicationInfo(ii.packageName, 0,
                    UserHandle.myUserId());
        } catch (RemoteException e) {


            instrApp = null;
        }
        if (instrApp == null) {


            instrApp = new ApplicationInfo();
        }
        ii.copyTo(instrApp);
        instrApp.initForUser(UserHandle.myUserId());
        final LoadedApk pi = getPackageInfo(instrApp, data.compatInfo,
                appContext.getClassLoader(), false, true, false);

        final ContextImpl instrContext = ContextImpl.createAppContext(this, pi,
                appContext.getOpPackageName());
        try {


            //通过ClassLoader创建Instrumentation
            final ClassLoader cl = instrContext.getClassLoader();
            mInstrumentation = (Instrumentation)
                cl.loadClass(data.instrumentationName.getClassName()).newInstance();
        } catch (Exception e) {


           ...
        }
        //初始化Instrumentation
        final ComponentName component = new ComponentName(ii.packageName, ii.name);
        mInstrumentation.init(this, instrContext, appContext, component,
                data.instrumentationWatcher, data.instrumentationUiAutomationConnection);
    } else {


        mInstrumentation = new Instrumentation();
        mInstrumentation.basicInit(this);
    }

    ...


    Application app;
    try {


        //创建application,这里面会调用application的attachBaseContext,这里的info对应的class是LoadedApk.java,最终也是通过classLoader创建Application
        app = data.info.makeApplication(data.restrictedBackupMode, null);
        ...
        if (!data.restrictedBackupMode) {


            if (!ArrayUtils.isEmpty(data.providers)) {


                //这里调用installProvider()->AppComponentFactory.instantiateProvider->
                //localProvider.attachInfo()->ContentProvider.onCreate();
                //看到这里就明白了为什么LeakCanary2.0不需要在Application中手动初始化
                installContentProviders(app, data.providers);
            }
        }

        //调用application的onCreate
        mInstrumentation.callApplicationOnCreate(app);
    }
    //预加载字体资源
    FontsContract.setApplicationContextForResources(appContext);
    ...
}
在mInstrumentation.newApplication之前,创建了App的Context,具体实现类是ContextImpl
然后创建App时传入了该Context,即App持有该Context
创建App之后ContextImpl调用了setOuterContext(app),使得该Context持有了App的引用。这也是为什么我们可以context.getApplicationContext()
LoadedApk.makeApplication()
http://androidxref.com/6.0.0_r1/xref/frameworks/base/core/java/android/app/LoadedApk.java
554    public Application makeApplication(boolean forceDefaultAppClass,
555            Instrumentation instrumentation) {


556        if (mApplication != null) {


557            return mApplication;
558        }
559
560        Application app = null;
561
562        String appClass = mApplicationInfo.className;
563        if (forceDefaultAppClass || (appClass == null)) {


564            appClass = "android.app.Application";
565        }
566
567        try {


568            java.lang.ClassLoader cl = getClassLoader();
569            if (!mPackageName.equals("android")) {


570                initializeJavaContextClassLoader();
571            }
572            ContextImpl appContext = ContextImpl.createAppContext(mActivityThread, this);
573            app = mActivityThread.mInstrumentation.newApplication(
574                    cl, appClass, appContext);
575            appContext.setOuterContext(app);
576        } catch (Exception e) {


577            if (!mActivityThread.mInstrumentation.onException(app, e)) {


578                throw new RuntimeException(
579                    "Unable to instantiate application " + appClass
580                    + ": " + e.toString(), e);
581            }
582        }
583        mActivityThread.mAllApplications.add(app);
584        mApplication = app;
585
586        if (instrumentation != null) {


587            try {


588                instrumentation.callApplicationOnCreate(app);
589            } catch (Exception e) {


590                if (!instrumentation.onException(app, e)) {


591                    throw new RuntimeException(
592                        "Unable to create application " + app.getClass().getName()
593                        + ": " + e.toString(), e);
594                }
595            }
596        }
597
598        // Rewrite the R 'constants' for all library apks.
599        SparseArray<String> packageIdentifiers = getAssets(mActivityThread)
600                .getAssignedPackageIdentifiers();
601        final int N = packageIdentifiers.size();
602        for (int i = 0; i < N; i++) {


603            final int id = packageIdentifiers.keyAt(i);
604            if (id == 0x01 || id == 0x7f) {


605                continue;
606            }
607
608            rewriteRValues(getClassLoader(), packageIdentifiers.valueAt(i), id);
609        }
610
611        return app;
612    }
Instrumentation.newApplication()
http://androidxref.com/6.0.0_r1/xref/frameworks/base/core/java/android/app/Instrumentation.java
public Application newApplication(ClassLoader cl, String className, Context context)
        throws InstantiationException, IllegalAccessException,
        ClassNotFoundException {


    Application app = getFactory(context.getPackageName())
            .instantiateApplication(cl, className);
    //调用Application的attach
    app.attach(context);
    return app;
}

public void callApplicationOnCreate(Application app) {


    //调用Application的onCreate
    app.onCreate();
}
步骤5.2、
(mStackSupervisor.attachApplicationLocked(app))
会调到ActivityStackSupervisor类中
957      boolean attachApplicationLocked(ProcessRecord app) throws RemoteException {


    			....

972                              if (realStartActivityLocked(hr, app, true, true)) {


973                                  didSomething = true;
974                              }

				....

984          if (!didSomething) {


985              ensureActivitiesVisibleLocked(null, 0, !PRESERVE_WINDOWS);
986          }
987          return didSomething;
988      }
1325      final boolean realStartActivityLocked(ActivityRecord r, ProcessRecord app,
1326              boolean andResume, boolean checkConfig) throws RemoteException {


1327  		  //等到所有的onPause()方法执行结束才会去启动新的Activity
1328          if (!allPausedActivitiesComplete()) {


1335              return false;
1336          }

				....

1466  			//调用ApplicationThread的scheduleLaunchActivity用于启动一个Activity
1467              app.thread.scheduleLaunchActivity(new Intent(r.intent), r.appToken,
1468                      System.identityHashCode(r), r.info,
1469                      // TODO: Have this take the merged configuration instead of separate global and
1470                      // override configs.
1471                      mergedConfiguration.getGlobalConfiguration(),
1472                      mergedConfiguration.getOverrideConfiguration(), r.compat,
1473                      r.launchedFromPackage, task.voiceInteractor, app.repProcState, r.icicle,
1474                      r.persistentState, results, newIntents, !andResume,
1475                      mService.isNextTransitionForward(), profilerInfo);

				....

1548
1549          return true;
1550      }
步骤6.2、ApplicationThread.scheduleLaunchActivity()
748          // we use token to identify this activity without having to send the
749          // activity itself back to the activity manager. (matters more with ipc)
750          @Override
751          public final void scheduleLaunchActivity(Intent intent, IBinder token, int ident,
752                  ActivityInfo info, Configuration curConfig, Configuration overrideConfig,
753                  CompatibilityInfo compatInfo, String referrer, IVoiceInteractor voiceInteractor,
754                  int procState, Bundle state, PersistableBundle persistentState,
755                  List<ResultInfo> pendingResults, List<ReferrerIntent> pendingNewIntents,
756                  boolean notResumed, boolean isForward, ProfilerInfo profilerInfo) {


757
					....

783              sendMessage(H.LAUNCH_ACTIVITY, r);
784          }
步骤7.2、ActivityThread.H 接收
LAUNCH_ACTIVITY
1584          public void handleMessage(Message msg) {


1585              if (DEBUG_MESSAGES) Slog.v(TAG, ">>> handling: " + codeToString(msg.what));
1586              switch (msg.what) {


1587                  case LAUNCH_ACTIVITY: {


1588                      Trace.traceBegin(Trace.TRACE_TAG_ACTIVITY_MANAGER, "activityStart");
1589                      final ActivityClientRecord r = (ActivityClientRecord) msg.obj;
1590
1591                      r.packageInfo = getPackageInfoNoCheck(
1592                              r.activityInfo.applicationInfo, r.compatInfo);
1593                      handleLaunchActivity(r, null, "LAUNCH_ACTIVITY");
1594                      Trace.traceEnd(Trace.TRACE_TAG_ACTIVITY_MANAGER);
1595                  } break;
步骤8.2、handleLaunchActivity
2872      private void handleLaunchActivity(ActivityClientRecord r, Intent customIntent, String reason) {


2874          //如果我们在进入后台后准备gc,那么我们回到活动状态,所以跳过它。

				....

2883          //确保我们正在运行最新的配置。

2889          // 创建活动之前进行初始化
2890          WindowManagerGlobal.initialize();
2891
2892          Activity a = performLaunchActivity(r, customIntent);
2893
				// 一些关于onResume还是finish的判断
2894          if (a != null) {


2895              r.createdConfig = new Configuration(mConfiguration);
2896              reportSizeConfigurations(r);
2897              Bundle oldState = r.state;

				// 这里会调用到 ActivityClientRecord.activity.performResume(),判断是否 onResume调用
2898              handleResumeActivity(r.token, false, r.isForward,
2899                      !r.activity.mFinished && !r.startsNotResumed, r.lastProcessedSeq, reason);
2900
2901              if (!r.activity.mFinished && r.startsNotResumed) {


2902                  // The activity manager actually wants this one to start out paused, because it
2903                  // needs to be visible but isn't in the foreground. We accomplish this by going
2904                  // through the normal startup (because activities expect to go through onResume()
2905                  // the first time they run, before their window is displayed), and then pausing it.
2906                  // However, in this case we do -not- need to do the full pause cycle (of freezing
2907                  // and such) because the activity manager assumes it can just retain the current
2908                  // state it has.
2909                  performPauseActivityIfNeeded(r, reason);
2910
2911                  // We need to keep around the original state, in case we need to be created again.
2912                  // But we only do this for pre-Honeycomb apps, which always save their state when
2913                  // pausing, so we can not have them save their state when restarting from a paused
2914                  // state. For HC and later, we want to (and can) let the state be saved as the
2915                  // normal part of stopping the activity.
2916                  if (r.isPreHoneycomb()) {


2917                      r.state = oldState;
2918                  }
2919              }
2920          } else {


2921              // If there was an error, for any reason, tell the activity manager to stop us.
2922              try {


2923                  ActivityManager.getService()
2924                      .finishActivity(r.token, Activity.RESULT_CANCELED, null,
2925                              Activity.DONT_FINISH_TASK_WITH_ACTIVITY);
2926              } catch (RemoteException ex) {


2927                  throw ex.rethrowFromSystemServer();
2928              }
2929          }
2930      }
performLaunchActivity
2683      private Activity performLaunchActivity(ActivityClientRecord r, Intent customIntent) {


2684          // System.out.println("##### [" + System.currentTimeMillis() + "] ActivityThread.performLaunchActivity(" + r + ")");
2685
				....
2703
2704          ContextImpl appContext = createBaseContextForActivity(r);
2705          Activity activity = null;
2706          try {


				//通过Instrumentation反射获取Activity实例
2707              java.lang.ClassLoader cl = appContext.getClassLoader();
2708              activity = mInstrumentation.newActivity(
2709                      cl, component.getClassName(), r.intent);
2710              StrictMode.incrementExpectedActivityCount(activity.getClass());
2711              r.intent.setExtrasClassLoader(cl);
2712              r.intent.prepareToEnterProcess();
2713              if (r.state != null) {


2714                  r.state.setClassLoader(cl);
2715              }
2716          } catch (Exception e) {


2717              if (!mInstrumentation.onException(activity, e)) {


2718                  throw new RuntimeException(
2719                      "Unable to instantiate activity " + component
2720                      + ": " + e.toString(), e);
2721              }
2722          }
2723
2724          try {


					//如果是多进程就创建,不是多进程就不创建
2725              Application app = r.packageInfo.makeApplication(false, mInstrumentation);
2726
				....

					//回调activity的attach方法
2749                  appContext.setOuterContext(activity);
2750                  activity.attach(appContext, this, getInstrumentation(), r.token,
2751                          r.ident, app, r.intent, r.activityInfo, title, r.parent,
2752                          r.embeddedID, r.lastNonConfigurationInstances, config,
2753                          r.referrer, r.voiceInteractor, window, r.configCallback);
2754
2755                  if (customIntent != null) {


2756                      activity.mIntent = customIntent;
2757                  }

						....

						//设置主题
2761                  int theme = r.activityInfo.getThemeResource();
2762                  if (theme != 0) {


2763                      activity.setTheme(theme);
2764                  }
2765
						//通过Instrumentation来回调activity的onCreate()方法
2766                  activity.mCalled = false;
2767                  if (r.isPersistable()) {


2768                      mInstrumentation.callActivityOnCreate(activity, r.state, r.persistentState);
2769                  } else {


2770                      mInstrumentation.callActivityOnCreate(activity, r.state);
2771                  }
2772                  if (!activity.mCalled) {


2773                      throw new SuperNotCalledException(
2774                          "Activity " + r.intent.getComponent().toShortString() +
2775                          " did not call through to super.onCreate()");
2776                  }
2777                  r.activity = activity;
2778                  r.stopped = true;

						//start
2779                  if (!r.activity.mFinished) {


2780                      activity.performStart();
2781                      r.stopped = false;
2782                  }

						//RestoreInstanceState
2783                  if (!r.activity.mFinished) {


2784                      if (r.isPersistable()) {


2785                          if (r.state != null || r.persistentState != null) {


2786                              mInstrumentation.callActivityOnRestoreInstanceState(activity, r.state,
2787                                      r.persistentState);
2788                          }
2789                      } else if (r.state != null) {


2790                          mInstrumentation.callActivityOnRestoreInstanceState(activity, r.state);
2791                      }
2792                  }

						//OnPostCreate
2793                  if (!r.activity.mFinished) {


2794                      activity.mCalled = false;
2795                      if (r.isPersistable()) {


2796                          mInstrumentation.callActivityOnPostCreate(activity, r.state,
2797                                  r.persistentState);
2798                      } else {


2799                          mInstrumentation.callActivityOnPostCreate(activity, r.state);
2800                      }
2801                      if (!activity.mCalled) {


2802                          throw new SuperNotCalledException(
2803                              "Activity " + r.intent.getComponent().toShortString() +
2804                              " did not call through to super.onPostCreate()");
2805                      }
2806                  }
2807              }
2808              r.paused = true;
2809  				//加入mActivities Map统一管理
2810              mActivities.put(r.token, r);
2811
2812          } catch (SuperNotCalledException e) {


2813              throw e;
2814
2815          } catch (Exception e) {


2816              if (!mInstrumentation.onException(activity, e)) {


2817                  throw new RuntimeException(
2818                      "Unable to start activity " + component
2819                      + ": " + e.toString(), e);
2820              }
2821          }
2822
2823          return activity;
2824      }
叁、API
3.1、ActivityThread
http://aospxref.com/android-14.0.0_r2/xref/frameworks/base/core/java/android/app/ActivityThread.java
以下是 Android 8 版本中的 ActivityThread 类的一些方法:
-
main():应用进程的主入口点,用于初始化应用的全局状态,包括创建
Application实例,启动应用的主 Activity,处理消息队列等。 -
attach():将
ActivityThread附加到应用的进程,以进行应用的初始化和生命周期管理。 -
bindApplication():绑定应用到应用进程,包括创建
Application实例和调用其onCreate方法,启动应用的主 Activity。 -
schedulePauseActivity():请求暂停指定 Activity 的生命周期。
-
scheduleStopActivity():请求停止指定 Activity 的生命周期。
-
scheduleWindowVisibility():处理窗口可见性的变化。
-
scheduleLaunchActivity():请求启动一个新的 Activity。
-
scheduleReceiver():处理广播接收器的注册和调度。
-
scheduleCreateService():请求创建服务。
-
scheduleBindService():请求绑定服务。
-
scheduleUnbindService():请求解绑服务。
-
scheduleServiceArgs():传递参数给服务。
-
scheduleStopService():请求停止服务。
-
scheduleRegisteredReceiver():处理已注册的广播接收器。
-
scheduleLowMemory():处理系统内存不足的情况。
-
dispatchPackageBroadcast():分发应用程序包的广播。
-
dumpService():输出服务信息。
-
scheduleCrash():请求应用进程崩溃。
-
dumpHeap():输出堆转储信息。
-
attachAgent():附加代理。
-
setSchedulingGroup():设置调度组。
-
requestAssistContextExtras():请求辅助上下文信息。
-
updatePackageCompatibilityInfo():更新应用包的兼容性信息。
-
scheduleTrimMemory():请求内存修剪。
-
scheduleOnNewActivityOptions():通知新的 Activity 选项。
这些方法用于管理应用的生命周期、处理消息和事件,以确保应用能够正常启动、运行和响应用户操作。请注意,这些方法可能会在不同的 Android 版本中有所变化,而且可能还有其他私有方法用于实现不同版本中的新功能。如果需要了解特定 Android 版本的 ActivityThread 方法,请查阅相应版本的 Android 源代码或官方文档。
3.2、ApplicationThread
以下是 Android 8 版本中的 ApplicationThread 类的一些方法:
-
bindApplication():用于绑定应用程序到应用程序进程。这个方法负责创建应用程序的
Application实例并调用其onCreate()方法,同时启动应用程序的主 Activity。 -
schedulePauseActivity():请求暂停指定 Activity 的生命周期。
-
scheduleStopActivity():请求停止指定 Activity 的生命周期。
-
scheduleWindowVisibility():处理窗口可见性的变化。
-
scheduleResumeActivity():请求恢复指定 Activity 的生命周期。
-
scheduleSendResult():用于发送 Activity 的结果。
-
scheduleLaunchActivity():请求启动新的 Activity。
-
scheduleCreateService():请求创建服务。
-
scheduleBindService():请求绑定服务。
-
scheduleUnbindService():请求解绑服务。
-
scheduleServiceArgs():传递参数给服务。
-
scheduleStopService():请求停止服务。
-
scheduleLowMemory():处理系统内存不足的情况。
-
scheduleCrash():请求应用进程崩溃。
-
dumpHeap():用于输出堆转储信息。
-
dumpActivity():用于输出 Activity 信息。
-
scheduleRegisteredReceiver():处理已注册的广播接收器。
-
scheduleCreateBackupAgent():用于请求创建备份代理,通常在应用需要进行数据备份和还原时调用。
-
scheduleDestroyBackupAgent():用于请求销毁备份代理,通常在备份操作完成后调用。
-
scheduleSuicide():请求应用进程自杀。
-
scheduleConfigurationChanged():用于处理配置更改。
-
scheduleSleeping():用于处理应用进程的休眠状态。
-
dispatchPackageBroadcast():分发应用程序包的广播。
-
requestThumbnail():请求获取 Activity 的缩略图。
-
profilerControl():用于性能分析控制。
这些方法用于管理应用的生命周期、处理消息和事件,以确保应用能够正常启动、运行和响应用户操作。请注意,这些方法在不同的 Android 版本中可能会有所变化,而且可能还有其他私有方法用于实现不同版本中的新功能。如果需要了解特定 Android 版本的 ApplicationThread 方法,请查阅相应版本的 Android 源代码或官方文档。
3.3、ActivityManagerService
ActivityManagerService:
http://aospxref.com/android-8.0.0_r36/xref/frameworks/base/services/core/java/com/android/server/am/ActivityManagerService.java#attachApplicationLocked
3.4、ActivityStackSupervisor
ActivityStackSupervisor:
http://aospxref.com/android-8.0.0_r36/xref/frameworks/base/services/core/java/com/android/server/am/ActivityStackSupervisor.java
参考地址
文章大部分内容转自:
https://www.jianshu.com/p/643aa7c8e3dd
https://blog.csdn.net/sinat_31057219/article/details/132452043
https://blog.51cto.com/u_16213631/7298774
启动流程详细解析!!
https://blog.csdn.net/weixin_43093006/article/details/128699383