提示:个人学习总结
一:红点系统设计
1、红点系统规则
红点系统规则一般如下:
- 红点的显示方式分两种:带数字和不带数字;
- 如果子节点有红点,父节点也要显示红点,父节点红点数为子节点红点数的和;
- 当子节点红点更新时,对应的父节点也要更新;
- 当所有子节点都没有红点时,父节点才不显示红点
我们可以使用树这种数据结构来组织红点数据,要实现高效搜索和修改操作,前缀树 可以满足我们的需求。
2、前缀树
前缀树,也叫Trie树,即字典树,又称单词查找树或键树,是一种树形结构,是一种哈希树的变种。
它的优点是:最大限度地减少无谓的字符串比较,查询效率比哈希表高。
比如我们插入abc、abh、acg三个单词,在树中的结构是这样:

那如果我再插入abc,结构依然是上面那样,节点本身会记录字母出现的次数,比如我们设计节点存储的信息如下: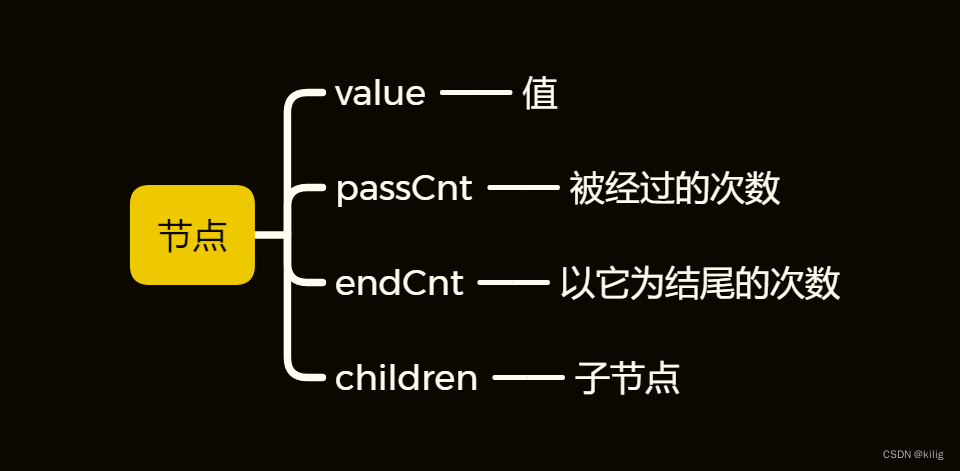
所以插入两次abc后,树节点的信息如下:
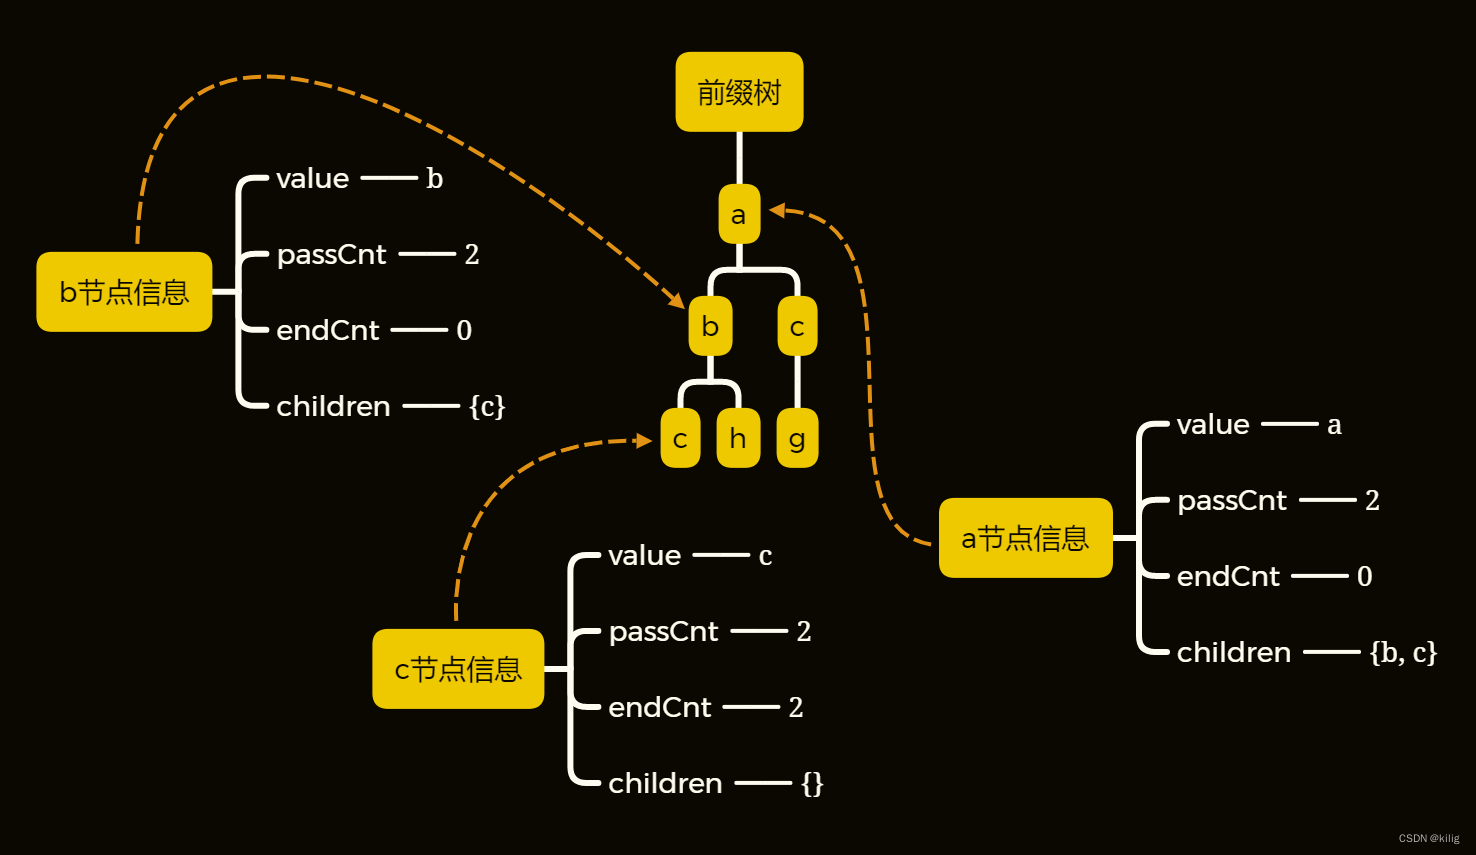
当我们要去树中查询abc出现过几次的时候,只需要把abc分割成a、b、c,从根节点依次往下查询是否存在a、b、c,最终返回c节点的endCnt(以它为结尾的次数)即可,如果想查询以ab为前缀的单词在树中出现了多少次,则分割为a、b后,从根节点往下查询a、b,然后返回b节点的passCnt(被经过的次数)即可,这也是前缀树的命名的由来。
3、用前缀树组织红点
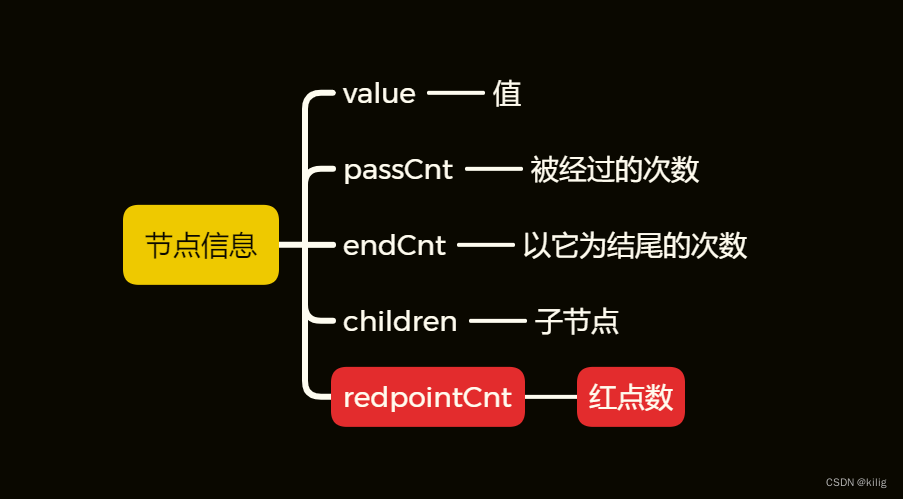
我们只需要在上面的基础上,给节点加一个红点数的数据即可,如下:
另外我们通过逻辑来实现父节点的红点数为子节点红点数之和即可。
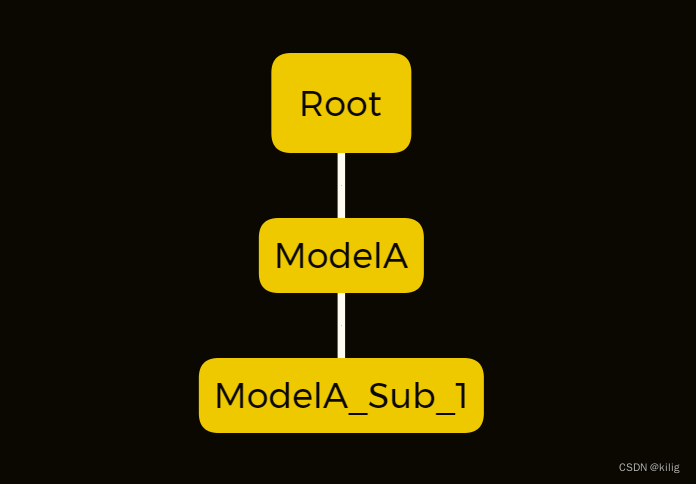
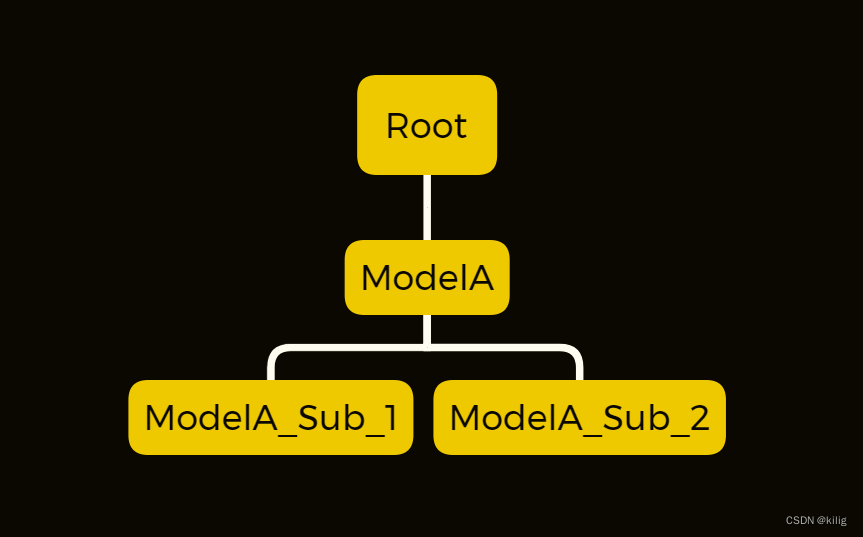
我们将红点进行规范命名:层级1|层级2|层级3,例Root|ModelA|ModelA_Sub_1,我们把它以|符号分割,然后插入树中,树变成这样子:
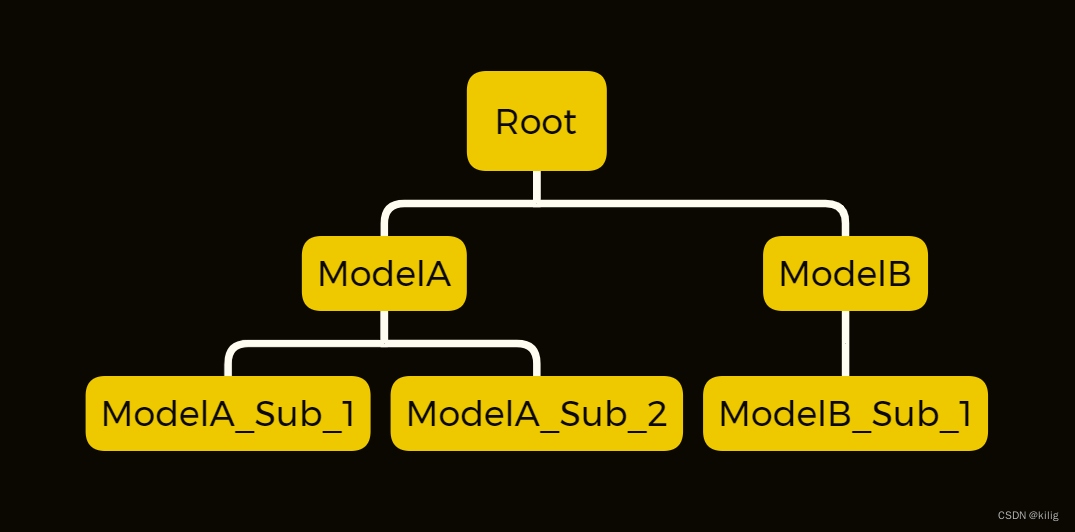
我们再插入一个Root|ModelA|ModelA_Sub_2,树变成这样子:
我们再插入Root|ModelB|ModelB_Sub_1,树变成这样子:
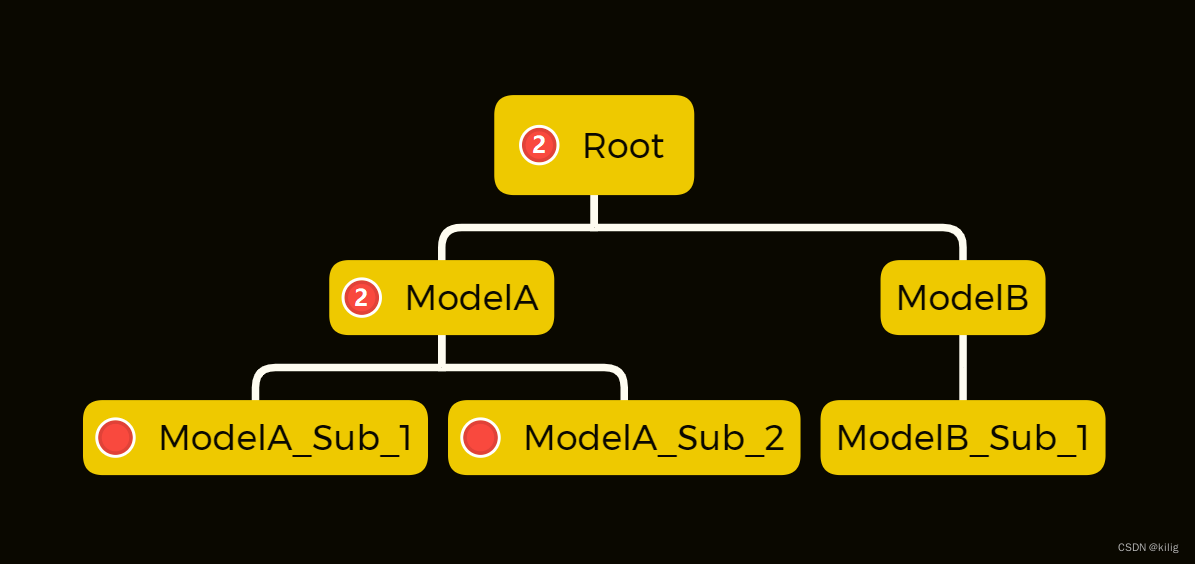
假设ModelA_Sub_1节点有一个红点,那么它的父节点ModelA也会有一个红点,同理Root也会有一个红点,如下:

如果ModelA_Sub_2节点也有一个红点,那么树的状态就是这样子:
当我们要查询ModelA有多少个红点的时候,则通过Root|ModelA来查询,以|为分割符,从根节点出发,找到ModelA节点后,返回ModelA的redpointCnt即为对应的红点数。
四、红点系统具体实现
1、前缀树封装
分别创建RedpointNode脚本和RedpointTree脚本,如下:

1.1、节点:RedpointNode
using System;
using System.Collections;
using System.Collections.Generic;
using UnityEngine;

public class RedpointNode
{
    /// <summary>
    /// 节点名
    /// </summary>
    public string name;

    /// <summary>
    /// 节点被经过的次数
    /// </summary>
    public int passCnt = 0;

    /// <summary>
    /// 节点作为尾结点的次数
    /// </summary>
    public int enCnt = 0;

    /// <summary>
    /// 红点数
    /// </summary>
    public int redpoinCnt = 0;

    public Dictionary<string, RedpointNode> children = new Dictionary<string, RedpointNode>();
    public Dictionary<string, Action<int>> updateCb = new Dictionary<string, Action<int>>();

    public RedpointNode(string name)
    {
        this.name = name;
        this.passCnt = 0;
        this.enCnt = 0;
        this.redpoinCnt = 0;
        this.children = new Dictionary<string, RedpointNode>();
        this.updateCb = new Dictionary<string, Action<int>>();
    }

    public static RedpointNode New(string name)
    {
        return new RedpointNode(name);
    }
}
1.2、树:RedpointTree
RedpointTree脚本封装树的行为
1.2.1、创建根节点
先定义一个根节点root,如下:
private RedPointNode root;

public RedpointTree()
    {
        root=new RedpointNode("Root");
    }
    /// <summary>
    /// 初始化
    /// </summary>
    public void Init()
    {
        //创建根节点
        this.root = new RedpointNode("Root");
        //TODO 构建树结构

    }
1.2.2、定义节点名
上面TODO要构建树结构,我们需要先定义树节点的名,按层级1|层级2|层级3这种格式命名:
/// <summary>
/// 节点名
/// </summary>
public class NodeNames
{
    public const string Root = "Root";

    public const string ModelA = "Root|ModelA";
    public const string ModelA_Sub_1 = "Root|ModelA|ModelA_Sub_1";
    public const string ModelA_Sub_2 = "Root|ModelA|ModelA_Sub_2";

    public const string ModelB = "Root|ModelB";
    public const string ModelB_Sub_1 = "Root|ModelB|ModelB_Sub_1";
    public const string ModelB_Sub_2 = "Root|ModelB|ModelB_Sub_2";

    public static List<string> NodeList = new List<string>() {
        Root,ModelA,ModelA_Sub_1,ModelA_Sub_2,ModelB,ModelB_Sub_1,ModelB_Sub_2
    };
}
1.2.3、插入节点
封装一个InsertNode方法,提供插入节点的功能,如下:
  /// <summary>
    /// 插入节点
    /// </summary>
    /// <param name="name"></param>
    public void InsterNode(string name)
    {
        if (string.IsNullOrEmpty(name))
        {
            return;
        }
        if (SearchNode(name) != null)
        {
            //如果已经存在 则不重复插入
            Debug.Log("你已经插入了该节点" + name);
            return;
        }

        //node从根节点出发
        RedpointNode node = root;
        node.passCnt += 1;
        //将名字按|符合分割
        string[] pathList = name.Split('|');
        foreach (var path in pathList)
        {
            if(!node.children.ContainsKey(path))
            {
                node.children.Add(path, RedpointNode.New(path));
            }
            node = node.children[path];
            node.passCnt = node.passCnt+1;
        }
        node.enCnt = node.enCnt + 1;
    }
1.2.4、查询节点
其中SearchNode是搜索节点,代码如下:
    /// <summary>
    /// 查询节点是否在树中并返回节点
    /// </summary>
    /// <param name="name"></param>
    /// <returns></returns>
    public RedpointNode SearchNode(string name)
    {
        if (string.IsNullOrEmpty(name))
        {
            return null;
        }
        RedpointNode node=this.root;
        string[] pathList=name.Split('|');
        foreach (var path in pathList)
        {
            if(!node.children.ContainsKey(path))
            {
                return null;
            }
            node = node.children[path];
        }
        if (node.enCnt > 0)
        {
            return node;
        }
        return null;
    }
1.2.5、删除节点
再封装一个删除节点的方法:
    /// <summary>
    /// 删除节点
    /// </summary>
    /// <param name="name"></param>
    public void DeleteNode(string name)
    {
        if (SearchNode(name) == null)
        {
            return;
        }

        RedpointNode node= this.root;
        node.passCnt = node.passCnt - 1;
        string[] pathList = name.Split('|');
        foreach (var path in pathList)
        {
            RedpointNode childNode = node.children[path];
            childNode.passCnt = childNode.passCnt - 1;
            if (childNode.passCnt == 0)
            {
                //如果该节点没有任何孩子,则直接删除
                node.children.Remove(path);
                return;
            }
            node = childNode;
        }
        node.enCnt=node.enCnt - 1;
    }
1.2.6、修改节点红点数
上面我们提供了节点的插入、查询和删除操作,并没有操作节点的红点数,我们还需要封装一个修改节点红点数的方法,这里我使用的是增量操作,你也可以使用赋值操作:
    /// <summary>
    /// 修改节点的和点数
    /// </summary>
    /// <param name="name"></param>
    /// <param name="delta"></param>
    public void ChangeRedPointCnt(string name, int delta)
    {
        RedpointNode targetNode = SearchNode(name);
        if (targetNode == null)
        {
            return;
        }
        //如果是减红点 并且和点数不够减了 则调整delta 使其不减为0
        if (delta < 0 && targetNode.redpoinCnt + delta < 0)
        {
            delta = -targetNode.redpoinCnt;
        }
        RedpointNode node=this.root;
        string[] pathList= name.Split('|');
        foreach (var path in pathList)
        {
            RedpointNode childNode = node.children[path];
            childNode.redpoinCnt = childNode.redpoinCnt + delta;
            node = childNode;
            //调用回调函数
            foreach (var cb in node.updateCb.Values)
            {
                cb?.Invoke(node.redpoinCnt);
            }
        }
    }
1.2.7、设置红点更新回调函数
上面修改红点数时,会调用节点的updateCb回调,方便我们更新UI界面的红点,这里我们封装一个设置回调的方法:
    /// <summary>
    /// 设置红点更新回调函数
    /// </summary>
    /// <param name="name">节点名</param>
    /// <param name="key">回调key 自定义字符串</param>
    /// <param name="cb">回调函数</param>
    public void SetCallBack(string name, string key, Action<int> cb)
    {
        RedpointNode node = this.root;
        if (node == null)
        {
            return;
        }
        node.updateCb.Add(key, cb);
    }
1.2.8、查询节点红点数
我们UI上要显示红点数量,需要查询模块的红点数,我们封装一个查询红点的方法,如下:
    /// <summary>
    /// 查询节点红点数
    /// </summary>
    /// <param name="name"></param>
    /// <returns></returns>
    public int GetRedPointCnt(string name)
    {
        RedpointNode node=SearchNode(name);

        if (node == null)
        {
            return 0;
        }
        return node.redpoinCnt;
    }
1.2.9、构建树
我们回到Init方法中,构建整颗前缀树,并插入一些红点数据,如下:
    /// <summary>
    /// 初始化
    /// </summary>
    public void Init()
    {
        //创建根节点
        this.root = new RedpointNode("Root");

        // 构建前缀树
        foreach (var name in NodeNames.Values)
        {
            this.InsterNode(name);
        }

        //塞入红点数据
        ChangeRedPointCnt(NodeNames["ModelA_Sub_1"], 1);
        ChangeRedPointCnt(NodeNames["ModelA_Sub_2"], 1);
        ChangeRedPointCnt(NodeNames["ModelB_Sub_1"], 1);
        ChangeRedPointCnt(NodeNames["ModelB_Sub_2"], 1);

    }
1.2.10、调用初始化方法
我们在启动脚本中加上红点树的Init方法调用,如下:
redpointTree.Init();2、UI界面制作
2.1、大厅界面
我们在大厅界面加上红点UI,如下,这个红点系统模块的入口,就是Root节点:
2.2、红点系统界面
ModelA和ModelB,分别作为两个模块。
模块里面又有两个子按钮,比如ModelA模块中有ModelA_Sub_1和ModelA_Sub_2,
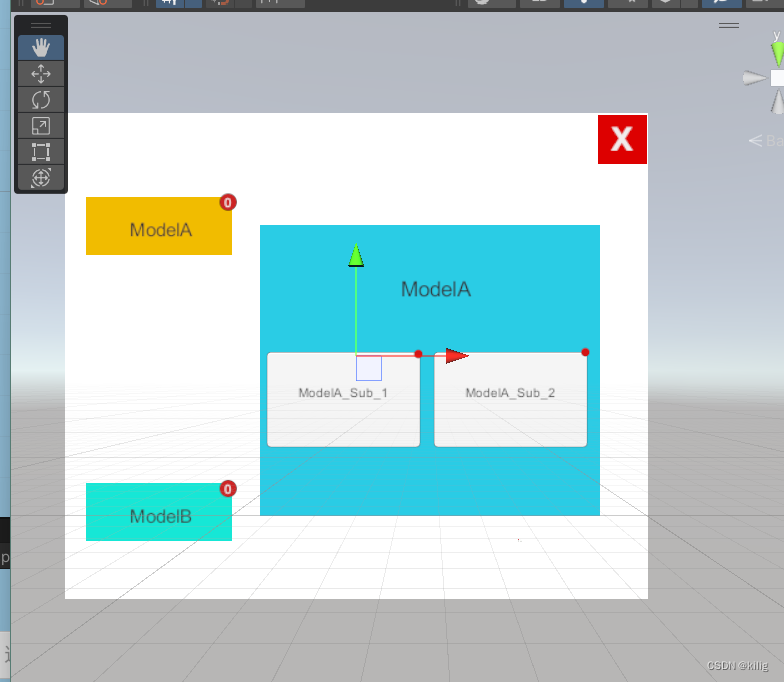
节点关系如下:

3、UI代码
3.1、大厅入口红点
using System;
using System.Collections;
using System.Collections.Generic;
using UnityEngine;
using UnityEngine.UI;

public class GameHallPanel : MonoBehaviour
{

    [SerializeField] Text reqpionText;
    [SerializeField] Button showRedBtn;


    RedpointTree redpointTree;
    // Start is called before the first frame update
    void Start()
    {
        redpointTree= Main.instance.redpointTree;
        //注册红点回调
        redpointTree.SetCallBack(NodeNames.Root, "Root", (redpointCnt) => { UpdateRedPoint( redpointCnt); });
        UpdateRedPoint(redpointTree.GetRedPointCnt(NodeNames.Root));
        showRedBtn.onClick.AddListener(() =>
        {
            this.gameObject.SetActive(false);
            //RedpointPanel.SetActive(true);
            Main.instance.ShowRedPanel();
        });
    }
    //更新红点
    private void UpdateRedPoint(int redpointCnt)
    {
        //throw new NotImplementedException();
        reqpionText.text=redpointCnt.ToString();
        reqpionText.transform.parent.gameObject.SetActive(redpointCnt > 0);
    }

}
运行看看:

3.2、红点系统界面
————————————————
参考链接:https://blog.csdn.net/linxinfa/article/details/121899276