作者 | Oldpan 编辑 | oldpan博客
点击下方卡片,关注“自动驾驶之心”公众号
ADAS巨卷干货,即可获取
点击进入→自动驾驶之心【全栈算法】技术交流群
本文只做学术分享,如有侵权,联系删文

Pytorch模型的高性能部署一直是大家讨论的问题,有两点比较重要:
高度优化的算子
可以高效率运行计算图的架构和runtime
高度优化的算子不用多说,TensorRT为什么那么快,因为engine在构建的时候,在每个平台(A10、A100、T4等)上搜索到了最优最快的kernel(实现了一些op)。高效率运行计算图也是很关键的一点,TensorRT构建好engine后,需要libnvinfer.so来驱动,其中实现了什么,在使用过程中很容易猜到:
序列化和反序列化,也就是所谓的生成engine,读取engine
推理engine、多stream运行计算图,管理engine所需要的一些环境,比如显存和中间变量等
为了达到极致的性能,TensorRT的整个运行时都是在C++环境中,虽然提供了Python-API,但实际调用执行的操作都是在C++中,Python只提供包了一层的作用,算子和执行整个计算图的地方都是C++。
python有快速开发以及验证的优点,但是相比C++来说速度较慢而且比较费内存,一般高性能场景都是使用C++去部署,尽量避免使用python环境。
TORCH 1.x时期的C++部署
torch1.x的实际场景中,一般是搭配使用libtorch + torchscript,这俩在很多生产环境中已经验证过了。
libtorch可以使用C++ API去完成和python中使用pytorch-op实现一样的功能,比如:
#include <ATen/ATen.h>

at::Tensor a = at::ones({2, 2}, at::kInt);
at::Tensor b = at::randn({2, 2});
auto c = a + b.to(at::kInt);
转化为Pytorch就是:
import torch

a = torch.ones((2, 2), dtype=torch.int32)
b = torch.randn((2, 2))
c = a + b.to(torch.int32)而torchscript则用于trace或者script我们的模型到C++环境中部署,速度方面变化不大,主要是通过torchscript导出的模型可以在C++环境中加载并运行,不需要依赖python了,可以减少一些python的over head:
#include <torch/script.h> // One-stop header.

#include <iostream>
#include <memory>

int main(int argc, const char* argv[]) {
  if (argc != 2) {
    std::cerr << "usage: example-app <path-to-exported-script-module>\n";
    return -1;
  }


  torch::jit::script::Module module;
  try {
    // Deserialize the ScriptModule from a file using torch::jit::load().
    module = torch::jit::load(argv[1]);
  }
  catch (const c10::Error& e) {
    std::cerr << "error loading the model\n";
    return -1;
  }

  std::cout << "ok\n";
}
关于torchscript的解读有不少,这里不赘述了,感兴趣的可以参阅:
https://zhuanlan.zhihu.com/p/486914187
https://zhuanlan.zhihu.com/p/489090393
https://zhuanlan.zhihu.com/p/363319763
https://zhuanlan.zhihu.com/p/652193676
https://zhuanlan.zhihu.com/p/410507557
TORCH 2.x的C++部署
torch2.0出来的时候,最主要的就是torch.compile的新API,可以直接优化模型。
torch.compile核心是dynamo,dynamo相比torch.jit.trace和torch.jit.script,是一个功能更强大的trace工具[1],trace模型从而优化模型。dynamo出现后,我也很好奇torchscript是否会被废弃?

目前看来torchscript还是会继续存在,只是freeze了,功能还会维护,bug还会修,但不会有新功能了。
基于torch.jit.trace的模型导出路径成为过去式了,那么新的基于pt2.0的C++导出方案是啥?
torch官方前一周发了一篇新blog,正式提到了cpp wrapper,核心就是torch.export[2] + cpp wrapper[3]:
PyTorch 2.1 Contains New Performance Features for AI Developers[4]
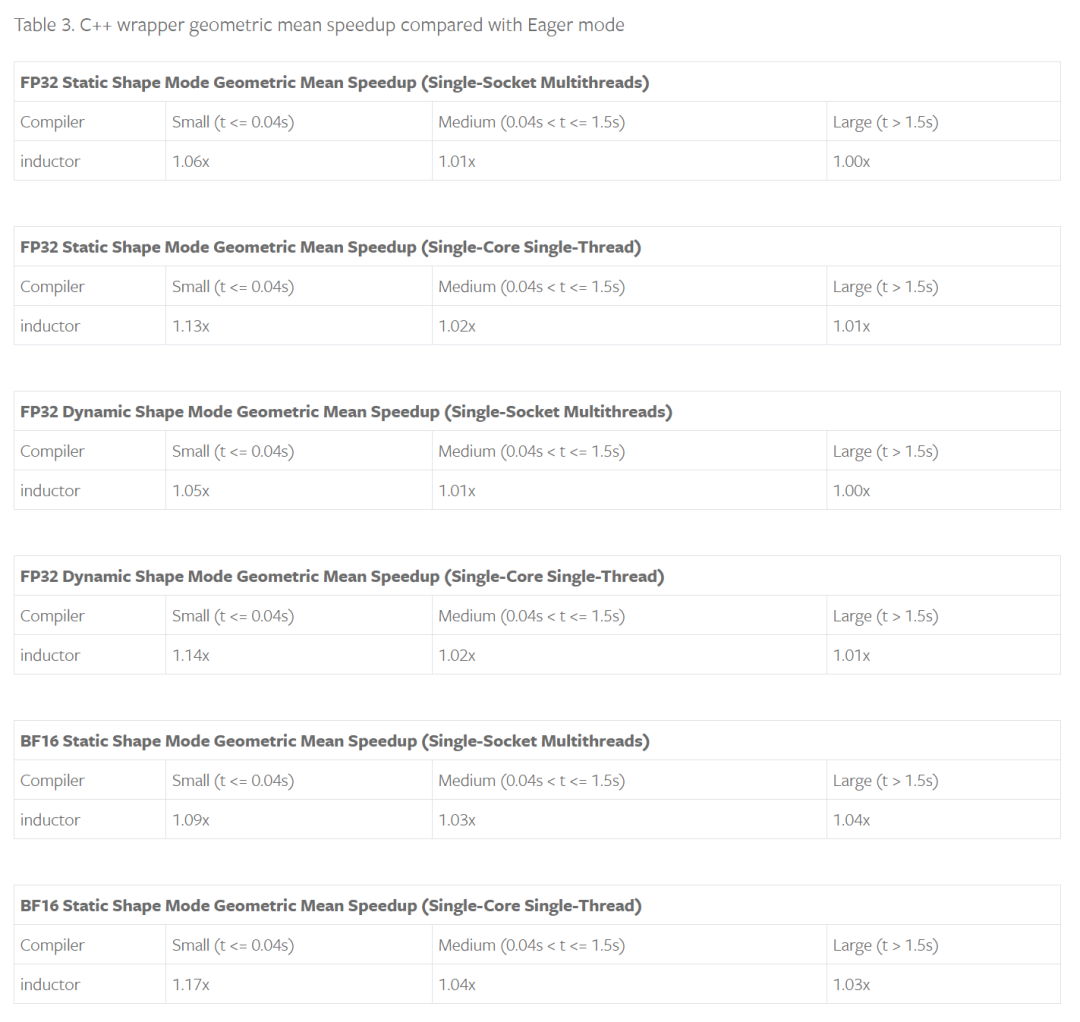
使用cpp wrapper去invoke the generated kernels and external kernels in TorchInductor,可以减少python的overhead,实际测试中,模型速度越快,python overhead占比越大,提升也就越大:
我们都知道torch2.0可以基于triton生成高性能的kernel,例如:
@torch.compile
def opt_foo(x, y):
    a = torch.sin(x)
    b = torch.cos(y)
    return a + b

for _ in range(100):
opt_foo(torch.randn(10).cuda(), torch.randn(10).cuda())定义好一个函数后,加上@torch.compile装饰器,执行几次即可得到优化后的模型,默认使用的优化器是TorchInductor,借助depyf[5],我们可以看到优化好后生成的triton代码(GPU端):
import triton
import triton.language as tl
from torch._inductor.ir import ReductionHint
from torch._inductor.ir import TileHint
from torch._inductor.triton_heuristics import AutotuneHint, pointwise
from torch._inductor.utils import instance_descriptor
from torch._inductor import triton_helpers

@pointwise(
    size_hints=[16],
    filename=__file__,
    triton_meta={'signature': {0: '*fp32', 1: '*fp32', 2: '*fp32', 3: 'i32'}, 'device': 0, 'device_type': 'cuda', 'constants': {}, 'configs': [instance_descriptor(divisible_by_16=(0, 1, 2), equal_to_1=(), ids_of_folded_args=(), divisible_by_8=())]},
    inductor_meta={'autotune_hints': set(), 'kernel_name': 'triton_poi_fused_add_cos_sin_0', 'mutated_arg_names': []},
    min_elem_per_thread=0
)
@triton.jit
def triton_(in_ptr0, in_ptr1, out_ptr0, xnumel, XBLOCK : tl.constexpr):
    xnumel = 10
    xoffset = tl.program_id(0) * XBLOCK
    xindex = xoffset + tl.arange(0, XBLOCK)[:]
    xmask = xindex < xnumel
    x0 = xindex
    tmp0 = tl.load(in_ptr0 + (x0), xmask)
    tmp2 = tl.load(in_ptr1 + (x0), xmask)
    tmp1 = tl.sin(tmp0)
    tmp3 = tl.cos(tmp2)
    tmp4 = tmp1 + tmp3
    tl.store(out_ptr0 + (x0), tmp4, xmask)
这个triton代码可以直接调用,但是依赖python环境,如果想要切换到C++端,则修改下config:
import torch._inductor.config as config
config.cpp_wrapper = True
后重新执行几次,可以得到生成的cpp调用代码:
#include <ATen/ATen.h>
#include <ATen/core/dispatch/Dispatcher.h>
#include <ATen/native/BinaryOps.h>
#include <torch/csrc/inductor/aoti_torch/tensor_converter.h>
#include <torch/csrc/inductor/inductor_ops.h>
#define reinterpret_tensor torch::inductor::_reinterpret_tensor
#define alloc_from_pool torch::inductor::_alloc_from_pool
#include <c10/util/generic_math.h>

[[maybe_unused]] static int64_t align(int64_t nbytes) {
  return (nbytes + 64 - 1) & -64;
}
#include <filesystem>

#include <c10/cuda/CUDAGuard.h>
#include <c10/cuda/CUDAStream.h>

#define CUDA_DRIVER_CHECK(EXPR)                    \
do {                                               \
    CUresult code = EXPR;                          \
    const char *msg;                               \
    cuGetErrorString(code, &msg);                  \
    if (code != CUDA_SUCCESS) {                    \
        throw std::runtime_error(                  \
            std::string("CUDA driver error: ") +   \
            std::string(msg));                     \
    }                                              \
} while (0);

namespace {

struct Grid {
    Grid(uint32_t x, uint32_t y, uint32_t z)
      : grid_x(x), grid_y(y), grid_z(z) {}
    uint32_t grid_x;
    uint32_t grid_y;
    uint32_t grid_z;

    bool is_non_zero() {
        return grid_x > 0 && grid_y > 0 && grid_z > 0;
    }
};

}  // anonymous namespace

static inline CUfunction loadKernel(
        std::string filePath,
        const std::string &funcName,
        uint32_t sharedMemBytes,
        const std::optional<std::string> &cubinDir = std::nullopt) {
    if (cubinDir) {
        std::filesystem::path p1{*cubinDir};
        std::filesystem::path p2{filePath};
        filePath = (p1 / p2.filename()).string();
    }

    CUmodule mod;
    CUfunction func;
    CUDA_DRIVER_CHECK(cuModuleLoad(&mod, filePath.c_str()));
    CUDA_DRIVER_CHECK(cuModuleGetFunction(&func, mod, funcName.c_str()));
    if (sharedMemBytes > 0) {
        CUDA_DRIVER_CHECK(cuFuncSetAttribute(
            func,
            CU_FUNC_ATTRIBUTE_MAX_DYNAMIC_SHARED_SIZE_BYTES,
            sharedMemBytes
        ))
    }
    return func;
}

static inline void launchKernel(
        CUfunction func,
        uint32_t gridX,
        uint32_t gridY,
        uint32_t gridZ,
        uint32_t numWarps,
        uint32_t sharedMemBytes,
        void* args[],
        cudaStream_t stream) {
    CUDA_DRIVER_CHECK(cuLaunchKernel(
        func, gridX, gridY, gridZ, 32*numWarps, 1, 1, sharedMemBytes, stream, args, nullptr
    ));
}

static CUfunction triton_poi_fused_add_cos_sin_0 = nullptr;

std::vector<at::Tensor> inductor_entry_cpp(const std::vector<at::Tensor>& inputs) {

    py::gil_scoped_release release;
    auto arg0_1 = std::move(inputs[0]);
    auto arg1_1 = std::move(inputs[1]);

    at::cuda::CUDAGuard device_guard(0);
    auto buf0 = at::empty_strided({10L, }, {1L, }, at::TensorOptions(c10::Device(at::kCUDA, 0)).dtype(at::kFloat));
    // Source Nodes: [a, add, b], Original ATen: [aten.add, aten.cos, aten.sin]
    if (triton_poi_fused_add_cos_sin_0 == nullptr) {
        triton_poi_fused_add_cos_sin_0 = loadKernel("/tmp/torchinductor_oldpan/rg/crgz7xmq52z337gwizafhl5xeujixy6bjenwk4nrtrulwqolpnzf.cubin", "triton__0d1d2d3", 0);
    }
    CUdeviceptr var_0 = reinterpret_cast<CUdeviceptr>(arg0_1.data_ptr());
    CUdeviceptr var_1 = reinterpret_cast<CUdeviceptr>(arg1_1.data_ptr());
    CUdeviceptr var_2 = reinterpret_cast<CUdeviceptr>(buf0.data_ptr());
    auto var_3 = 10;
    void* kernel_args_var_0[] = {&var_0, &var_1, &var_2, &var_3};
    cudaStream_t stream0 = at::cuda::getCurrentCUDAStream(0);
    Grid triton_poi_fused_add_cos_sin_0_grid_0 = Grid(1L, 1L, 1L);
    launchKernel(triton_poi_fused_add_cos_sin_0, triton_poi_fused_add_cos_sin_0_grid_0.grid_x, triton_poi_fused_add_cos_sin_0_grid_0.grid_y, triton_poi_fused_add_cos_sin_0_grid_0.grid_z, 1, 0, kernel_args_var_0, stream0);
    arg0_1.reset();
    arg1_1.reset();
    return {buf0};
}其中调用的cubin就是上述生成triton代码编译出来的/tmp/torchinductor_oldpan/rg/xxx.cubin,这样的话就可以直接拿这个cpp代码去no-python环境跑起来了。
不过实际中我们更多用的是整个模型,例如resnet50,并且带有权重参数,当然这种也是支持的。torch官方也提供了aot工具可以导出整个模型为so:
import torch
from torch._export import aot_compile, dynamic_dim

torch.manual_seed(1337)

class Net(torch.nn.Module):
    def __init__(self):
        super().__init__()
        self.fc = torch.nn.Linear(64, 10)

    def forward(self, x, y):
        return self.fc(torch.sin(x) + torch.cos(y))

data = {}

for device in ["cpu", "cuda"]:
    model = Net().to(device=device)
    x = torch.randn((32, 64), device=device)
    y = torch.randn((32, 64), device=device)
    with torch.no_grad():
        ref_output = model(x, y)

    torch._dynamo.reset()
    with torch.no_grad():
        constraints = [
            dynamic_dim(x, 0) >= 1,
            dynamic_dim(x, 0) <= 1024,
            dynamic_dim(x, 0) == dynamic_dim(y, 0),
        ]
        model_so_path = aot_compile(model, (x, y), constraints=constraints)

    data.update({
        f"model_so_path_{device}": model_so_path,
        f"inputs_{device}": [x, y],
        f"outputs_{device}": [ref_output],
    })

# Use this to communicate tensors to the cpp code
class Serializer(torch.nn.Module):
    def __init__(self, data):
        super().__init__()
        for key in data:
            setattr(self, key, data[key])

torch.jit.script(Serializer(data)).save("data.pt")通过这个aot_compile可以直接导出带有模型入口的so,因为是aot,需要提前指定输入的一些维度信息,对于支持dynamic来说是必要的。
导出的so可以通过以下C++方式读取:
void test_aoti(const std::string& device) {
  torch::NoGradGuard no_grad;

  std::string data_path =
      (std::filesystem::path(STRINGIZE(CMAKE_CURRENT_BINARY_DIR)) / "data.pt")
           .string();
  torch::jit::script::Module data_loader = torch::jit::load(data_path);
  std::string path_attr = "model_so_path_" + device;
  std::string inputs_attr = "inputs_" + device;
  std::string outputs_attr = "outputs_" + device;
  const auto& model_so_path = data_loader.attr(path_attr.c_str()).toStringRef();
  const auto& input_tensors =
      data_loader.attr(inputs_attr.c_str()).toTensorList().vec();
  const auto& ref_output_tensors =
      data_loader.attr(outputs_attr.c_str()).toTensorList().vec();

  std::unique_ptr<torch::inductor::AOTIModelContainerRunner> runner;
  if (device == "cuda") {
    runner = std::make_unique<torch::inductor::AOTIModelContainerRunnerCuda>(
        model_so_path.c_str());
  } else if (device == "cpu") {
    runner = std::make_unique<torch::inductor::AOTIModelContainerRunnerCpu>(
        model_so_path.c_str());
  } else {
    std::cout << "unsupported device: " << device << std::endl;
  }
  auto actual_output_tensors = runner->run(input_tensors);
  assert(actual_output_tensors.size() == ref_output_tensors.size());
}核心就是AOTIModelContainerRunnerCpu。
torch针对inductor设计了AOTIModelContainerRunnerCpu类去加载和运行生成的so,so中会包含一些计算图的执行步骤。
具体例子在pytorch/test/cpp/aot_inductor中,有两个例子,一个是
torch::CustomClassHolder包一层AOTIModelContainerRunnerCuda跑,也就是和torchscript的结合,另一个是单独的AOTIModelContainerRunnerCuda去跑,搭配API直接C++调用。
对于一些常见的op,比如全连接self.fc = torch.nn.Linear(64, 10),可以直接调用外部算子不需要triton去codegen,上述例子中直接调用的是torch.ops.aten.addmm,更多细节可以看pytorch/torch/_inductor/select_algorithm.py。
整体来说,这种导出方式也比较符合常识,常见的op可以直接调用已经高度优化的版本,未见过的一些算子可以使用triton去生成,fuse等图融合操作可以通过fx pass去做,导出c++也可以通过aot的方式导出,还有一些提升性能的runtime细节设计,整体潜力还是蛮大的。
还有很多细节没有来得及看,比如模型中的某些可以并行的op是如何多stream运行的,dynamic的情况是怎么处理的,中间变量如何存放的,显存是如何管理的,都需要花时间去看看。
如果有疑问欢迎交流。
参考
https://pytorch.org/tutorials/prototype/inductor_cpp_wrapper_tutorial.html
https://www.youtube.com/watch?v=eN5fqBNrjOo&list=PL_lsbAsL_o2BivkGLiDfHY9VqWlaNoZ2O&index=33
https://pytorch.org/blog/new-features-for-ai/
https://github.com/pytorch/pytorch/pull/111124
https://github.com/pytorch/pytorch/pull/88167
https://discuss.pytorch.org/t/pytorch-2-and-the-c-interface/168034/4
https://github.com/pytorch/TensorRT/discussions/1743
https://github.com/pytorch/TensorRT/discussions/1557
https://github.com/pytorch/TensorRT/issues/1404
https://github.com/pytorch/TensorRT/discussions/1372
https://discuss.pytorch.org/t/pytorch-2-and-the-c-interface/168034/2
https://discuss.pytorch.org/t/torch-compiles-deployment-story-to-non-python-host-processes/180943
https://dev-discuss.pytorch.org/t/using-nsight-systems-to-profile-gpu-workload/59/10
参考资料
[1]
dynamo相比torch.jit.trace和torch.jit.script,是一个功能更强大的trace工具: https://pytorch.org/tutorials/intermediate/torch_compile_tutorial.html?highlight=torch%20compile
[2]torch.export: https://pytorch.org/docs/main/export.html
[3]cpp wrapper: https://pytorch.org/tutorials/prototype/inductor_cpp_wrapper_tutorial.html
[4]PyTorch 2.1 Contains New Performance Features for AI Developers: https://pytorch.org/blog/new-features-for-ai/
[5]depyf: https://github.com/thuml/depyf
① 全网独家视频课程
BEV感知、毫米波雷达视觉融合、多传感器标定、多传感器融合、多模态3D目标检测、点云3D目标检测、目标跟踪、Occupancy、cuda与TensorRT模型部署、协同感知、语义分割、自动驾驶仿真、传感器部署、决策规划、轨迹预测等多个方向学习视频(扫码即可学习)
 视频官网:www.zdjszx.com
② 国内首个自动驾驶学习社区
近2000人的交流社区,涉及30+自动驾驶技术栈学习路线,想要了解更多自动驾驶感知(2D检测、分割、2D/3D车道线、BEV感知、3D目标检测、Occupancy、多传感器融合、多传感器标定、目标跟踪、光流估计)、自动驾驶定位建图(SLAM、高精地图、局部在线地图)、自动驾驶规划控制/轨迹预测等领域技术方案、AI模型部署落地实战、行业动态、岗位发布,欢迎扫描下方二维码,加入自动驾驶之心知识星球,这是一个真正有干货的地方,与领域大佬交流入门、学习、工作、跳槽上的各类难题,日常分享论文+代码+视频,期待交流!

③【自动驾驶之心】技术交流群
自动驾驶之心是首个自动驾驶开发者社区,聚焦目标检测、语义分割、全景分割、实例分割、关键点检测、车道线、目标跟踪、3D目标检测、BEV感知、多模态感知、Occupancy、多传感器融合、transformer、大模型、点云处理、端到端自动驾驶、SLAM、光流估计、深度估计、轨迹预测、高精地图、NeRF、规划控制、模型部署落地、自动驾驶仿真测试、产品经理、硬件配置、AI求职交流等方向。扫码添加汽车人助理微信邀请入群,备注:学校/公司+方向+昵称(快速入群方式)

④【自动驾驶之心】平台矩阵,欢迎联系我们!