一般情况下,我们创建了一个Spring Boot程序之后,按照默认的配置就可以启动了,但是我们还是可以自定义一些配置以及修改一些配置
一:多个环境的文件配置
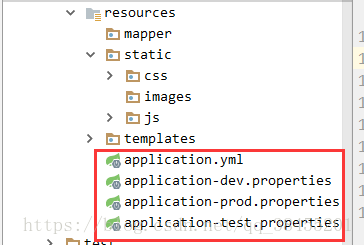
由于一个项目在开发的过程当中,需要经历开发测试以及正式部署三个阶段,我们可以根据不同的环境作不同的配置,配置的格式严格遵循下面的规则:application-{profile}.properties,其中{profile}对应你的环境标识。然后不同的配置文件进行不同的配置,比如dev配置的端口号是8081,prod配置的端口号是8082,test配置的端口号是8083。
我们如何使用这三个文件呢?只需要在application.yml文件当中引入即可,按照下图引入了dev的开发配置,运行程序,程序就会运行在8081端口。

在配置yml文件的时候,出现了异常,最后排查发现:使用yml文件格式进行配置的时候,冒号后面必须要有一个空格,否则运行出错。
二:自定义一些属性
比如我们需要在配置文件当中保存一些信息,比如系统的默认登录账号和默认的登录密码,我们在application.yml文件定义:
system:
     login:
       username: admin
       password: 123456
    @Value("${system.login.username}")
    private String username;
    @Value("${system.login.password}")
    private int password;

    @ResponseBody
    @RequestMapping("/info")
    public String getInfo(){
        return username+":"+password;
    }
启动工程,访问:localhost:8018/info,浏览器显示:

三:如何将配置文件的属性赋予给实体对象
我们在application.yml文件当中配置一些属性如下:
  my:
    name: king james
    age: 33
    number: ${random.int}
    uuid: ${random.uuid}
    max: ${random.int(10)}
    value: ${random.value}
    greeting: hi,i'm  ${my.name}
建议与之对应的实体类
@ConfigurationProperties(prefix = "my")
@Component//虽然不加没事,但是最好加上,因为接下来用的时候IDEA不会报找不到类
public class Player {
    private String name;
    private int age;
    private int number;
    private String uuid;
    private int max;
    private String value;
    private String greeting;
    //省略set和get方法....
    @Autowired
    private Player player;

    @ResponseBody
    @RequestMapping("/player")
    public String player(){
        return JSON.toJSONString(player);
    }
启动工程,访问:localhost:8018/player,浏览器显示如下,说明已经正确的注入了对应的数据

在这当中遇到了两个问题,首先在player类中弹出:Spring Boot Configuration Annotion Processor not found in classpath

解决这个问题,在pom文件当中添加如下依赖:
<dependency>
	<groupId>org.springframework.boot</groupId>
	<artifactId>spring-boot-configuration-processor</artifactId>
	<optional>true</optional>
</dependency>
然后会出现:Re-run Spring Boot Configuration Annotation Processor to update generated metadata

这个问题可以忽略,不影响代码执行。只是提醒用户,进行必要的重新编译。
四:自定义一个配置文件
比如我们不想把所有的配置信息都写在application.yml文件当中,我们想单独出一个文件出来进行这些额外的配置,比如新建一个文件text.properties,里面加入如下配置信息:
system.login.username=admin
system.login.password=123456
@PropertySource(value = "classpath:test.properties")
@ConfigurationProperties(prefix = "system.login")
@Component
public class User {
    private String username;
    private String password;

    public String getUsername() {
        return username;
    }

    public void setUsername(String username) {
        this.username = username;
    }

    public String getPassword() {
        return password;
    }

    public void setPassword(String password) {
        this.password = password;
    }
}
    @Autowired
    private User user;

    @ResponseBody
    @RequestMapping("/user")
    public String user(){
        return JSON.toJSONString(user);
    }
启动工程,访问:localhost:8018/user,浏览器显示如下,说明已经正确的注入了对应的数据

五:Spring Boot常用注解
@SpingBootApplication:声明这是一个SpringBoot的应用,放在主类上面
@SpringBootApplication
public class FourApplication {

	public static void main(String[] args) {
		SpringApplication.run(FourApplication.class, args);
	}
}
@ComponentScan:自动扫描和装配bean,一般用在主类上面
@Configuration:初始化一些配置,需要在项目当中进行很多初始化的工作,比如数据库连接池等
@EnableTransactionManagement:开启事务管理,然后访问数据库的Service方法上添加注解 @Transactional 便可
@MapperScan(value="com.xxx.xxx"):自动扫描某个包下面的dao文件,这里使用的是mybatis操作数据库
@Configuration
@MapperScan("com.xxx.xxx.xxx")
@EnableTransactionManagement
public class DuridConfig implements EnvironmentAware {}
@EnableAutoConfiguration:自动初始化一些可能需要的配置和bean,一般放在主类上面
@Repository:添加在dao层,用于标注数据访问组件
@Repository
public interface UserDao {
    /**
     * 用来保存用户信息的方法
     * @param user
     */
    void save(User user);
}
@Service:用于标注业务层的组件
@Service("userService")
public class UserServiceImpl implements UserService {

    @Autowired
    private UserDao userDao;

    @Override
    public void save(User user) {
        userDao.save(user);
    }
}
@Component:泛指组件,当这个组件不好归类的时候使用
@ConfigurationProperties(prefix="xxx"):导入配置 文件当中的一些属性
@Component
@ConfigurationProperties(prefix = "my")
public class Player {}
@Bean:声明一个bean
    @Bean
    public JedisPool redisPoolFactory() {
        logger.info("redis地址:" + host + ":" + port);
        JedisPoolConfig jedisPoolConfig = new JedisPoolConfig();
        jedisPoolConfig.setMaxIdle(maxIdle);
        jedisPoolConfig.setMaxWaitMillis(maxWaitMillis);
        jedisPoolConfig.setMinIdle(poolMinIdle);
        //JedisPool jedisPool = new JedisPool(jedisPoolConfig, host, port, timeout, password);
        JedisPool jedisPool = new JedisPool(jedisPoolConfig, host, port, timeout);
        logger.info("JedisPool注入成功!!");
        return jedisPool;
    }
@Controller:用于标注控制层组件
@ResponseBody:表示返回的结果直接写入HTTP response body中
@RequestMapping(""/xxx):请求地址映射
@Autowired:自动注入bean
@Controller
public class HelloController {

    @Autowired
    private User user;

    @ResponseBody
    @RequestMapping("/user")
    public String user(){
        return JSON.toJSONString(user);
    }
}
@RestController:相当于@Controller+@ResponseBody
@RestController
public class UserController {
    @Autowired
    private User user;
    @RequestMapping("/user")
    public String user(){
        return JSON.toJSONString(user);
    }
}
@RequestParam:用来处理Content-Type: 为 application/x-www-form-urlencoded编码的内容,提交方式GET、POST
@PathVariable:处理REST ful风格的URI时候使用
@RequestBody:该注解用来处理Content-Type: 为application/json, application/xml编码的内容
@CookieValue:cookie里面包含的信息
@RequestHeader:请求头里面的信息
@PostMapping:专门处理为Post请求, @RequestMapping(value = "/xxx",method = RequestMethod.POST)简化版
@GetMapping:专门处理为Get请求, @RequestMapping(value = "/xxx",method = RequestMethod.Get)简化版
@RestController
public class UserController {
    @Autowired
    private User user;

    @GetMapping("/user1")
    public String user1(@RequestHeader("Accept-Encoding") String encoding, @RequestHeader("Keep-Alive")long keepAlive){
        return JSON.toJSONString(user);
    }
    @PostMapping("/user2")
    public String user2(@RequestParam Map<String, Object> params){
        return JSON.toJSONString(user);
    }
    @PostMapping("/user3/{id}")
    public String user3(@PathVariable("id")Integer id,@CookieValue("JSESSIONID") String cookie){
        return JSON.toJSONString(user);
    }
    @PostMapping("/user4")
    public String user4(@RequestBody(required = false) String requestJson){
        return JSON.toJSONString(user);
    }
}
@EnableScheduling:代表会去扫描带有 @Scheduled(cron="0/10 * * * * ?")注解并执行,加在主类上面
@Scheduled(cron="0/10 * * * * ?"):定时器,按照cron规则执行的定时方法,标注在方法之上。