相关资源:
1+X云计算平台运维与开发认证(中级)-A卷
1+X云计算平台运维与开发认证(中级)-B卷
1+X云计算平台运维与开发认证(中级)-C卷
1+X云计算平台运维与开发认证(中级)-D卷
1+X云计算平台运维与开发认证(中级)-E卷
单选题(200分)
1、项目部署与测试阶段中,不需要参与的角色是(10分)
A、系统运维人员
B、测试人员
C、项目经理
D、开发人员(正确答案)
2、在项目立项启动阶段,开发经理不需要验证哪份报告(10分)
A、《用户需求说明书》
B、《项目立项建议书》
C、《可行分析报告》
D、《项目计划书》(正确答案)
3、在交换机中可以VLAN的取值范围是多少 (10分)
A、1-4094(正确答案)
B、0-4096
C、1-4096
D、1-4095
4、二层以太网交换机在MAC地址表中查找与帧目的MAC地址匹配的表项,从而将帧从相应接口转发出去,如果查找失败,交换机将 (10分)
A、查找路由表
B、把帧丢弃
C、查找快速转发表
D、把帧由除入端口以外的所有其他端口发送出去(正确答案)
5、下面哪个命令不是用来查看网络故障?(10分)
A、telnet
B、ping
C、init(正确答案)
D、netstat
6、在Linux系统的vi编辑器中,如果不保存对文件进行的修改,应使用什么命令强制退出vi编辑器(10分)
A、:q
B、:wq
C、:q!(正确答案)
D、:!q
7、如果使用SQLite,Zabbix Web界面必须要跟Zabbix Server满足什么条件?(10分)
A、运行在同一台物理机器上(正确答案)
B、不能在同一台物理机器上
C、需要在同一局域网
D、无需在同一局域网
8、主从数据库复制整体来说分为几个步骤?(10分)
A、1
B、2
C、3(正确答案)
D、4
9、当Leader崩溃或者Leader失去大多数的Follower,这时候ZK(ZooKeeper)会进行什么操作。(10分)
A、停机模式
B、重新启动
C、恢复模式(正确答案)
D、修复模式
10、关于Keystone认证服务下列说法中错误的是?(10分)

A、认证是确认允许一个用户访问的进程。
B、证书用于确认用户身份的数据。
C、令牌的有效期是无限的,可以随时被撤回。(正确答案)
D、使用服务的用户,可以是人、服务或系统使用OpenStack相关服务的一个组织。
11、Openstack系统架构不包含以下哪个组件?(10分)
A、Hive(正确答案)
B、Neutron
C、Glance
D、Heat
12、OpenStack中的计算模块是以下哪个模块?(10分)
A、Nova(正确答案)
B、Glance
C、Swift
D、Cinder
13、某客户为快速开展业务,需要一个开箱即用的业务系统,要求统一服务、流程、模型和体验,那么应该选择哪一类型的云计算服务?(10分)
A、基础设施即服务(IaaS)
B、平台即服务(PaaS)
C、软件即服务(SaaS)(正确答案)
D、云即服务(CaaS)
14、下列哪个不是上云业务的需求特征?(10分)
A、广泛的网络访问
B、按需使用服务
C、超大的资源池
D、拥有更多的固定资产(正确答案)
15、以下关于跨地域网络设计的描述中,正确的选项是?(10分)
A、同一个子网可以跨地域部署
B、同一个子网不可以跨地域部署(正确答案)
C、将同一个子网部署到多地域可以提供容灾能力
D、将同一个子网部署到多地域可以提供网络性能
16、关于腾讯云的CDN加速功能,主要包括全面加速和安全防护两个方面,下列哪个选项不属于全面加速?(10分)
A、静态内容加速
B、直播加速(正确答案)
C、下载分发加速
D、海外加速
17、Yml是一种什么语言?(10分)
A、标记
B、非标记(正确答案)
C、静态
D、动态
18、在K8S的核心组件中负责维护集群状态的组件是(10分)
A、controller manage(正确答案)
B、scheduler
C、kubelet
D、etcd
19、关于Keystone认证服务下列说法中错误的是?(10分)
A、认证是确认允许一个用户访问的进程。
B、证书用于确认用户身份的数据。
C、令牌的有效期是无限的,可以随时被撤回。(正确答案)
D、使用服务的用户,可以是人、服务或系统使用OpenStack相关服务的一个组织。
20、Ansible自动化运维工具是基于以下哪种语言开发?(10分)
A、Java
B、C语言
C、Python(正确答案)
D、C++
多选题(200分)
1、下面关于原生NAT方案中叙述正确的是(10分)
A、同一宿主机上不同容器在宿主机上的映射端口必须区分开以避免端口冲突;(正确答案)
B、容器迁移到不同宿主机时,很可能需要改变所映射的宿主机端口,控制比较麻烦(正确答案)
C、通过NAT通信使得容器网络数据包在骨干网上使用的不是自身的IP,给防火墙策略带来不便(正确答案)
D、端口映射带来的网络性能损失,笔者自己的环境下测试结果是,使用NAT方式的容器在进行跨宿主机通信是,吞吐率只能达到宿主机间吞吐率的1/2
2、下面关于隧道方案中,叙述正确的是(10分)
A、隧道方案是借助容器宿主机网络,构建出一个对于容器来说三层路由可达虚拟网络(正确答案)
B、隧道方案的好处是没有NAT方案的端口冲突问题、不消耗额外的骨干网络IP(正确答案)
C、隧道方案的实施、定制化、维护的成本比较低(正确答案)
D、如果容器平台中运行业务与其它平台上运行业务需要通信,则需要配置从容器外部访问容器的路由,否则容器的地址从容器平台外部不能直接路由访问(正确答案)
3、在计算机局域网中,常用通信设备有 (10分)
A、集线器(正确答案)
B、交换机(正确答案)
C、调制解调器
D、路由器(正确答案)
4、交换机的主要功能有哪些 (10分)
A、环路避免(正确答案)
B、路由转发
C、转发\过滤(正确答案)
D、地址学习(正确答案)
5、将文件file1复制为file2可以用下面哪些命令(10分)
A、cp file1 file2(正确答案)
B、cat file1 >file2(正确答案)
C、cat < file1 >file2(正确答案)
D、dd if=file1 of=file2(正确答案)
6、在将/目录下的www文件权限改为只有主用户有执行的权限的有(10分)
A、chmod 100 /www(正确答案)
B、chmod 001 /www
C、chmod u+x ,g-x,o-x /www(正确答案)
D、chmod o-x,g-x,u-x /www
7、下列哪些是zookeeper的选举算法(10分)
A、basic paxos(正确答案)
B、fast paxos(正确答案)
C、master paxos
D、slaver paxos
8、Zabbix是一款能够监控各种网络参数以及服务器__和__的软件。(10分)
A、健康性(正确答案)
B、完整性(正确答案)
C、运行速度
D、漏洞修复
9、在OpenStack平台中,下面哪些不是用于定义可以访问资源的集合(10分)
A、User(正确答案)
B、Project
C、Role(正确答案)
D、Domain(正确答案)
10、下列选项当中,哪些不是Neutron查询网络详情的命令(10分)
A、neutron agent-list(正确答案)
B、neutron net-list
C、neutron agent-show(正确答案)
D、neutron net-show(正确答案)
11、一个典型的HOT模板由下列哪些元素构成?(10分)
A、模板版本(正确答案)
B、参数列表(正确答案)
C、资源列表(正确答案)
D、输出列表(正确答案)
12、下列关于地域和可用区的描述中,正确的是?(10分)
A、每个地域(region)都是一个独立的地理区域(正确答案)
B、每个地域都是完全独立的(正确答案)
C、每个可用区都是不独立的,同一地域下的可用区通过低时延的内网链路相连
D、每个可用区都是独立的,但同一地域下的可用区不提供互相通信能力
13、以下哪些是黑石服务器的应用场景?(10分)
A、游戏应用(正确答案)
B、直播应用(正确答案)
C、低频应用
D、政企应用(正确答案)
14、使用云计算的好处有哪些?(10分)
A、无需关注规划建设类工作,包括:机房设计、土建施工、机柜摆放、UPS供电、精密空调温湿度调整等(正确答案)
B、无需关注部署类工作,包括:服务器、存储、网络等物理设备的上架和安装、基础架构部署、业务系统部署等(正确答案)
C、无需关注运维类工作,包括:安全运维、可用性、可靠性管理等(正确答案)
D、任何工作都无需自己做
15、在NIST(美国国家标准技术研究院)的“The NIST Definition of Cloud Computing”文档中,定义了云的哪几种模式?(10分)
A、公有云(正确答案)
B、私有云(正确答案)
C、混合云(正确答案)
D、行业云(正确答案)
16、Kubernetes可以实现容器集群的__等功能(10分)
A、自动化部署(正确答案)
B、自动扩缩容(正确答案)
C、维护(正确答案)
D、状态动态协调及负载均衡
17、下面关于Docker Registry的说法,错误的是?(10分)
A、一个集中的存储、分发镜像的服务
B、一个Docker Registry中可以包含多个仓库,每个仓库可以包含多个标签(Tag);每个标签对应多个镜像(正确答案)
C、仓库名经常以两段式路径形式出现
D、Docker Registry服务可以分为三种(正确答案)
18、下面关于OpenShift核心流程的说法,正确的是?(10分)
A、OpenShift项目,最核心的流程就是将应用从静态的源代码变成动态的应用服务的过程(正确答案)
B、应用构建分为部署应用、触发构建、实例化构建、生成镜像、更新Image Stream几个步骤(正确答案)
C、应用部署分为触发镜像部署、实例化镜像部署、生成Replication Cotroller、部署容器几个步骤(正确答案)
D、请求处理分为用户访问、请求处理并返回两个步骤(正确答案)
19、OpenStack项目作为一个IaaS平台,提供了哪几种使用方式_。(10分)
A、通过Web界面(正确答案)
B、通过命令行(正确答案)
C、通过API(正确答案)
D、通过实时编译
20、Requests库中提供了如下哪些常用的类_。(10分)
A、requests.Request(正确答案)
B、requests.Response(正确答案)
C、request.Session(正确答案)
D、class
实操题(600分)
1、网络管理(40分)
通过一条命令在S1交换机上创建vlan100、vlan101,配置vlan100网关为:172.16.100.254/24。配置vlan101网关为:172.16.101.254/24。配置g0/0/1端口为trunk模式,放行vlan100。配置g0/0/2端口为access模式,所属vlan101。将上述操作命令及返回结果以文本形式提交到答题框。
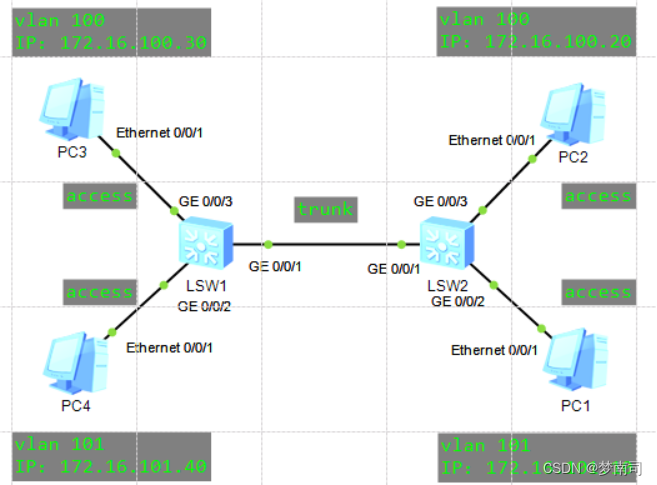
SW1:
<Huawei>system-view
[Huawei]sysname SW1
[SW1]vlan batch 100 101
[SW1]interface Vlanif 100
[SW1-Vlanif100]ip address 172.16.100.254 24
[SW1-Vlanif100]quit
[SW1]interface Vlanif 101
[SW1-Vlanif101]ip address 172.16.101.254 24
[SW1-Vlanif101]quit
[SW1]interface GigabitEthernet 0/0/1
[SW1-GigabitEthernet0/0/1]port link-type trunk
[SW1-GigabitEthernet0/0/1]port trunk allow-pass vlan 100
[SW1-GigabitEthernet0/0/1]quit
[SW1]interface GigabitEthernet 0/0/2
[SW1-GigabitEthernet0/0/2]port link-type access
[SW1-GigabitEthernet0/0/2]port default vlan 101
[SW1-GigabitEthernet0/0/2]quit
[SW1]interface GigabitEthernet 0/0/3
[SW1-GigabitEthernet0/0/3]port link-type access
[SW1-GigabitEthernet0/0/3]port default vlan 100
[SW1-GigabitEthernet0/0/3]quit
SW2:
<Huawei>system-view
[Huawei]sysname SW2
[SW2]vlan batch 100 101
[SW2]interface Vlanif 100
[SW2-Vlanif100]ip address 172.16.100.1 24
[SW2-Vlanif100]quit
[SW2]interface Vlanif 101
[SW2-Vlanif101]ip address 172.16.101.1 24
[SW2-Vlanif101]quit
[SW2]interface GigabitEthernet 0/0/1
[SW2-GigabitEthernet0/0/1]port link-type trunk
[SW2-GigabitEthernet0/0/1]port trunk allow-pass vlan 100
[SW2-GigabitEthernet0/0/1]quit
[SW2]interface GigabitEthernet 0/0/2
[SW2-GigabitEthernet0/0/2]port link-type access
[SW2-GigabitEthernet0/0/2]port default vlan 101
[SW2-GigabitEthernet0/0/2]quit
[SW2]interface GigabitEthernet 0/0/3
[SW2-GigabitEthernet0/0/3]port link-type access
[SW2-GigabitEthernet0/0/3]port default vlan 100
[SW2-GigabitEthernet0/0/3]quit
测试:
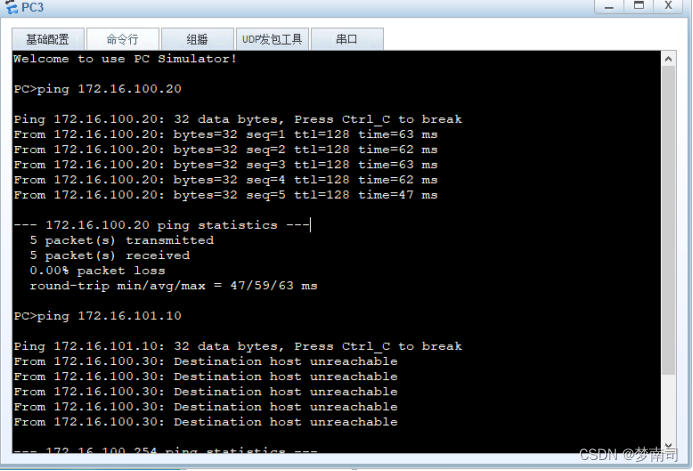
- 在两台交换机之间设置trunk,但只允许vlan100的通过,ping一下看是否生效:
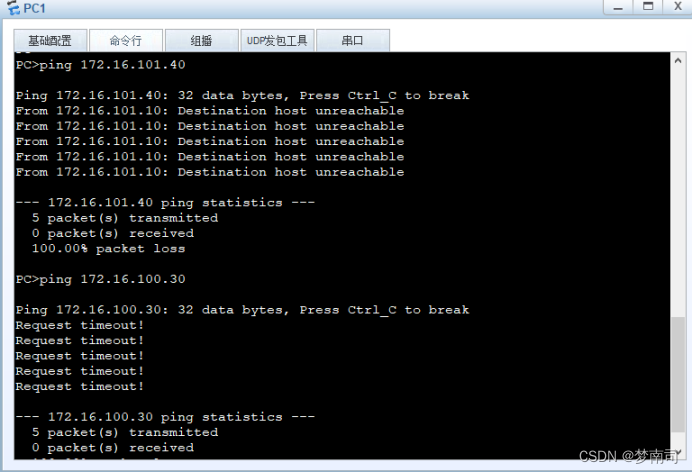
修改:
SW1:
[SW1]interface GigabitEthernet 0/0/1
[SW1-GigabitEthernet0/0/1]port trunk allow-pass vlan 100 101
[SW1-GigabitEthernet0/0/1]quit
SW2:
[SW2]interface GigabitEthernet 0/0/1
[SW2-GigabitEthernet0/0/1]port trunk allow-pass vlan 100 101
[SW2-GigabitEthernet0/0/1]quit
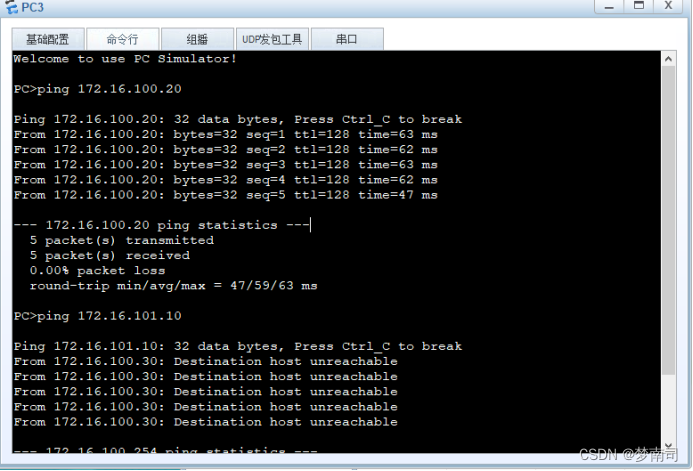
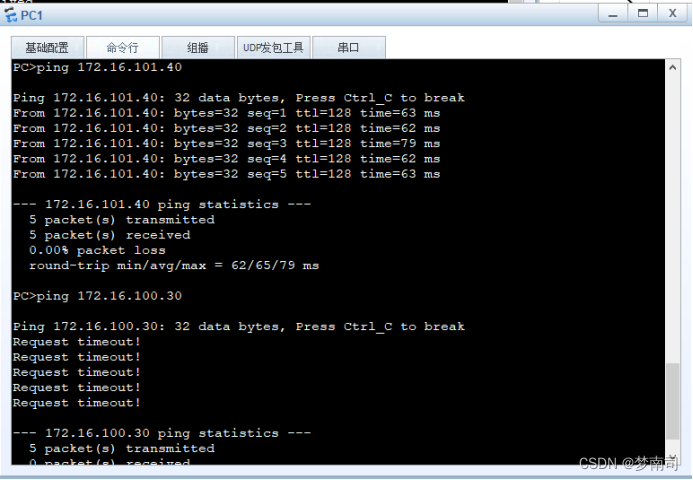
在交换机之间将vlan101加入trunk(现在同一vlan应该可以ping通了,但因为未配置ospf路由协议,不通vlan应该无法互通):
2、防火墙管理(40分)
配置防火墙g0/0/2为trust域,配置g0/0/1为untrust域,配置g0/0/2地址为10.10.5.1/24,配置g0/0/1端口地址为192.168.10.254/24,配置默认路由下一跳为192.168.10.1,配置从trust域到untrust域策略,匹配放行内部地址为172.16.0.0/16网段,配置从trust域到untrust域nat策略,匹配内部地址为172.16.0.0/16网段,使用g0/0/1端口地址。将上述操作命令及返回结果以文本形式提交到答题框。
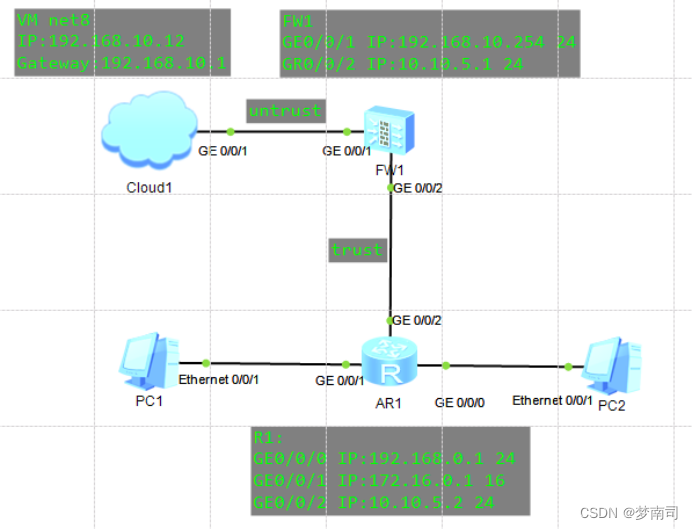
FW1:
<SRG>system-view
[SRG]firewall zone trust
[SRG-zone-trust]add interface GigabitEthernet 0/0/2
[SRG-zone-trust]quit
[SRG]firewall zone untrust
[SRG-zone-untrust]add interface GigabitEthernet 0/0/1
[SRG-zone-untrust]quit
[SRG]interface GigabitEthernet 0/0/2
[SRG-GigabitEthernet0/0/2]ip address 10.10.5.1 24
[SRG-GigabitEthernet0/0/2]quit
[SRG]interface GigabitEthernet 0/0/1
[SRG-GigabitEthernet0/0/1]ip address 192.168.10.254 24
[SRG-GigabitEthernet0/0/1]
[SRG-GigabitEthernet0/0/1]quit
[SRG]ip route-static 0.0.0.0 0 192.168.10.1
[SRG]policy interzone trust untrust outbound
[SRG-policy-interzone-trust-untrust-outbound]policy 0
[SRG-policy-interzone-trust-untrust-outbound-0]action permit
[SRG-policy-interzone-trust-untrust-outbound-0]policy source 172.16.0.0 0.0.255.255
[SRG-policy-interzone-trust-untrust-outbound-0]quit
[SRG-policy-interzone-trust-untrust-outbound]quit
[SRG]nat-policy interzone trust untrust outbound
[SRG-nat-policy-interzone-trust-untrust-outbound]policy 1
[SRG-nat-policy-interzone-trust-untrust-outbound-1]action source-nat
[SRG-nat-policy-interzone-trust-untrust-outbound-1]policy source 172.16.0.0 0.0.255.255
[SRG-nat-policy-interzone-trust-untrust-outbound-1]easy-ip GigabitEthernet 0/0/1
[SRG-nat-policy-interzone-trust-untrust-outbound-1]quit
[SRG-nat-policy-interzone-trust-untrust-outbound]quit
[SRG]ospf 1
[SRG-ospf-1]area 0
[SRG-ospf-1-area-0.0.0.0]network 10.10.5.0 0.0.0.255
[SRG-ospf-1-area-0.0.0.0]network 192.168.10.0 0.0.0.255
[SRG-ospf-1-area-0.0.0.0]quit
[SRG-ospf-1]quit
R1:
<Huawei>system-view
[Huawei]sysname R1
[R1]interface GigabitEthernet 0/0/2
[R1-GigabitEthernet0/0/2]ip address 10.10.5.2 24
[R1-GigabitEthernet0/0/2]quit
[R1]interface GigabitEthernet 0/0/1
[R1-GigabitEthernet0/0/1]ip address 172.16.0.1 16
[R1-GigabitEthernet0/0/1]quit
[R1]interface GigabitEthernet 0/0/0
[R1-GigabitEthernet0/0/0]ip address 192.168.0.1 24
[R1-GigabitEthernet0/0/0]quit
[R1]ospf 1
[R1-ospf-1]area 0
[R1-ospf-1-area-0.0.0.0]network 172.16.0.0 0.0.255.255
[R1-ospf-1-area-0.0.0.0]network 192.168.0.0 0.0.0.255
[R1-ospf-1-area-0.0.0.0]network 10.10.5.0 0.0.0.255
[R1-ospf-1-area-0.0.0.0]quit
[R1-ospf-1]quit
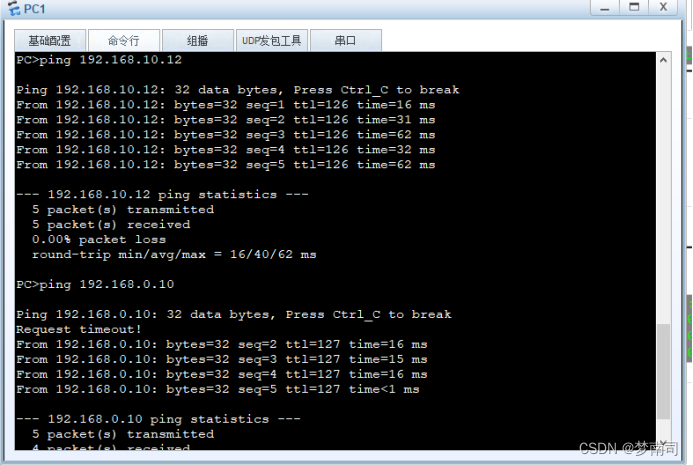
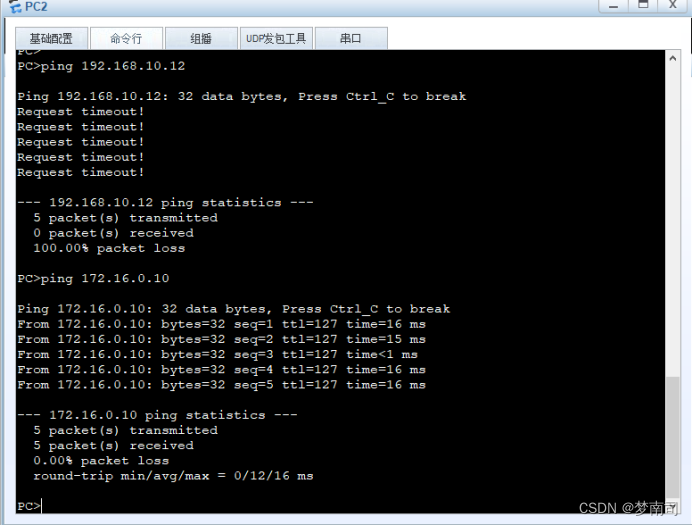
测试:
- 先使用PC1去ping与一下Cloud1的地址
- 再使用PC2去ping与一下Cloud1的地址
3、YUM源管理(40分)
假设当前有一个centos7.2-1511.iso的镜像文件,使用这个文件配置yum源,要求将这个镜像文件挂载在/opt/centos目录。还存在一个ftp源,IP地址为192.168.100.200,ftp配置文件中配置为anon_root=/opt,/opt目录中存在一个iaas目录(该目录下存在一个repodata目录)请问如何配置自己的local.repo文件,使得可以使用这两个地方的软件包,安装软件。请将local.repo文件的内容以文本形式提交到答题框。
该题是假设有这些资源,配置写对即可,或者使用一个xserver1做vsftpd服务,将centos7.2-1511.iso上传到xserver2
Xserver1:
[root@xserver2 ~]# systemctl stop firewalld
[root@xserver2 ~]# systemctl disable firewalld
# 注释:selinux防火墙,设置访问模式(得重启才生效):
[root@xserver2 ~]# vim /etc/selinux/config
# 注释:将SELINUX=enforcing改成SELINUX=Permissive
SELINUX=Permissive
# 注释:配置临时访问模式(无需重启):
[root@xserver2 ~]# setenforce 0
[root@xserver2 ~]# getenforce
Permissive
[root@xserver2 ~]# mount  -o loop CentOS-7-x86_64-DVD-1511.iso /opt/centos/
mount: /dev/loop0 is write-protected, mounting read-only
[root@xserver2 ~]# cat /etc/yum.repos.d/local.repo
[centos]
name=centos
baseurl=file:///opt/centos
enabled=1
gpgcheck=0
[iaas]
name=iaas
baseurl=ftp://192.168.100.200/iaas
enabled=1
gpgcheck=0
4、Raid管理(40分)
使用提供的虚拟机和软件包,完成Raid磁盘阵列的创建。当前虚拟机存储在一个大小为20G的磁盘vdb,利用磁盘分区新建4个磁盘分区,每个大小为5 GB。用3个5 GB的分区来模拟一个名为md5,级别为raid 5,外加一个热备盘的磁盘阵列。创建完成后将mdadm -D /dev/md5的返回结果以文本形式提交到答题框。
[root@localhost ~]# fdisk /dev/sdb
Welcome to fdisk (util-linux 2.23.2).

Changes will remain in memory only, until you decide to write them.
Be careful before using the write command.

Device does not contain a recognized partition table
Building a new DOS disklabel with disk identifier 0x1fd6d2de.

Command (m for help): n
Partition type:
   p   primary (0 primary, 0 extended, 4 free)
   e   extended
Select (default p): p
Partition number (1-4, default 1):
First sector (2048-41943039, default 2048):
Using default value 2048
Last sector, +sectors or +size{

    K,M,G} (2048-41943039, default 41943039): +5G
Partition 1 of type Linux and of size 5 GiB is set

Command (m for help): n
Partition type:
   p   primary (1 primary, 0 extended, 3 free)
   e   extended
Select (default p): p
Partition number (2-4, default 2):
First sector (10487808-41943039, default 10487808):
Using default value 10487808
Last sector, +sectors or +size{

    K,M,G} (10487808-41943039, default 41943039): +5G
Partition 2 of type Linux and of size 5 GiB is set

Command (m for help): n
Partition type:
   p   primary (2 primary, 0 extended, 2 free)
   e   extended
Select (default p): p
Partition number (3,4, default 3):
First sector (20973568-41943039, default 20973568):
Using default value 20973568
Last sector, +sectors or +size{

    K,M,G} (20973568-41943039, default 41943039): +5G
Partition 3 of type Linux and of size 5 GiB is set

Command (m for help): n
Partition type:
   p   primary (3 primary, 0 extended, 1 free)
   e   extended
Select (default e): p
Selected partition 4
First sector (31459328-41943039, default 31459328):
Using default value 31459328
Last sector, +sectors or +size{

    K,M,G} (31459328-41943039, default 41943039):
Using default value 41943039
Partition 4 of type Linux and of size 5 GiB is set

Command (m for help): w
The partition table has been altered!

Calling ioctl() to re-read partition table.
Syncing disks.

[root@localhost ~]# lsblk
NAME            MAJ:MIN RM  SIZE RO TYPE MOUNTPOINT
sda               8:0    0   40G  0 disk
├─sda1            8:1    0  500M  0 part /boot
└─sda2            8:2    0 39.5G  0 part
  ├─centos-root 253:0    0 35.6G  0 lvm  /
  └─centos-swap 253:1    0  3.9G  0 lvm  [SWAP]
sdb               8:16   0   20G  0 disk
├─sdb1            8:17   0    5G  0 part
├─sdb2            8:18   0    5G  0 part
├─sdb3            8:19   0    5G  0 part
└─sdb4            8:20   0    5G  0 part
sr0              11:0    1    4G  0 rom
[root@localhost ~]# mdadm -Cv /dev/md5 -l5 -n3 /dev/sdb[1-3] --spare-devices=1 /dev/sdb4
mdadm: layout defaults to left-symmetric
mdadm: layout defaults to left-symmetric
mdadm: chunk size defaults to 512K
mdadm: size set to 5236736K
mdadm: Fail create md5 when using /sys/module/md_mod/parameters/new_array
mdadm: Defaulting to version 1.2 metadata
mdadm: array /dev/md5 started.
[root@localhost ~]# mdadm -D /dev/md5
/dev/md5:
           Version : 1.2
     Creation Time : Fri May 22 21:35:09 2020
        Raid Level : raid5
        Array Size : 10473472 (9.99 GiB 10.72 GB)
     Used Dev Size : 5236736 (4.99 GiB 5.36 GB)
      Raid Devices : 3
     Total Devices : 4
       Persistence : Superblock is persistent
       Update Time : Fri May 22 21:35:36 2020
             State : clean
    Active Devices : 3
   Working Devices : 4
    Failed Devices : 0
     Spare Devices : 1
            Layout : left-symmetric
        Chunk Size : 512K
Consistency Policy : unknown
              Name : localhost.localdomain:5  (local to host localhost.localdomain)
              UUID : 52a85acc:77f25bda:9af98a9f:c85aae38
            Events : 18
    Number   Major   Minor   RaidDevice State
       0       8       17        0      active sync   /dev/sdb1
       1       8       18        1      active sync   /dev/sdb2
       4       8       19        2      active sync   /dev/sdb3
       3       8       20        -      spare   /dev/sdb4
5、应用商城系统(40分)
使用提供的软件包和提供的虚拟机,完成单节点应用系统部署。部署完成后,进行登录,(订单中填写的收货地址填写自己学校的地址,收货人填写自己的实际联系方式)最后使用curl命令去获取商城首页的返回信息,将curl http://你自己的商城IP/#/home获取到的结果以文本形式提交到答题框。
- 将所需的zookeeper,kafka和gpmall-repo的包上传到mall虚拟机
[root@mall ~]# vim /etc/hosts
127.0.0.1   localhost localhost.localdomain localhost4 localhost4.localdomain4
::1         localhost localhost.localdomain localhost6 localhost6.localdomain6
192.168.1.111   mall
192.168.1.111   kafka.mall
192.168.1.111   redis.mall
192.168.1.111   mysql.mall
192.168.1.111   zookeeper.mall
[root@mall ~]# vim /etc/yum.repos.d/local.repo
[centos]
name=centos
baseurl=file:///opt/centos
enabled=1
gpgcheck=0
[gpmall]
name=gpmall
baseurl=file:///root/gpmall-repo
enabled=1
gpgcheck=0
[root@mall ~]# yum install -y java-1.8.0-openjdk java-1.8.0-openjdk-devel
[root@mall ~]# java -version
openjdk version "1.8.0_252"
OpenJDK Runtime Environment (build 1.8.0_252-b09)
OpenJDK 64-Bit Server VM (build 25.252-b09, mixed mode)
[root@mall ~]# yum install -y redis
[root@mall ~]# yum install -y nginx
[root@mall ~]# yum install -y mariadb mariadb-server
[root@mall ~]# tar -zvxf zookeeper-3.4.14.tar.gz
[root@mall ~]# cd zookeeper-3.4.14/conf
[root@mall conf]# mv zoo_sample.cfg zoo.cfg
[root@mall conf]# cd /root/zookeeper-3.4.14/bin/
[root@mall bin]# ./zkServer.sh start
[root@mall bin]# ./zkServer.sh status
ZooKeeper JMX enabled by default
Using config: /root/zookeeper-3.4.14/bin/../conf/zoo.cfg
Mode: standalone
[root@mall bin]# cd
[root@mall ~]# tar -zvxf kafka_2.11-1.1.1.tgz
[root@mall ~]# cd kafka_2.11-1.1.1/bin/
[root@mall bin]# ./kafka-server-start.sh -daemon ../config/server.properties
[root@mall bin]# jps
7249 Kafka
17347 Jps
6927 QuorumPeerMain
[root@mall bin]# cd
[root@mall ~]# vim /etc/my.cnf
# This group is read both both by the client and the server
# use it for options that affect everything
#
[client-server]
#
# include all files from the config directory
#
!includedir /etc/my.cnf.d
[mysqld]
init_connect='SET collation_connection = utf8_unicode_ci'
init_connect='SET NAMES utf8'
character-set-server=utf8
collation-server=utf8_unicode_ci
skip-character-set-client-handshake
[root@mall ~]# systemctl restart mariadb
[root@mall ~]# systemctl enable mariadb
[root@mall ~]# mysqladmin -uroot password 123456
[root@mall ~]# mysql -uroot -p123456
Welcome to the MariaDB monitor.  Commands end with ; or \g.
Your MariaDB connection id is 9
Server version: 10.3.18-MariaDB MariaDB Server

Copyright (c) 2000, 2018, Oracle, MariaDB Corporation Ab and others.

Type 'help;' or '\h' for help. Type '\c' to clear the current input statement.
MariaDB [(none)]> create database gpmall;
Query OK, 1 row affected (0.002 sec)
MariaDB [(none)]> grant all privileges on *.* to root@localhost identified by '123456' with grant option;
Query OK, 0 rows affected (0.001 sec)
MariaDB [(none)]> grant all privileges on *.* to root@'%' identified by '123456' with grant option;
Query OK, 0 rows affected (0.001 sec)
MariaDB [(none)]> use gpmall;
Database changed
MariaDB [gpmall]> source /root/gpmall-xiangmubao-danji/gpmall.sql
MariaDB [gpmall]> Ctrl-C -- exit!
[root@mall ~]# vim /etc/redis.conf
将bind 127.0.0.1这一行注释掉;将protected-mode yes 改为 protected-mode no
#bind 127.0.0.1
Protected-mode no
[root@mall ~]# systemctl restart redis
[root@mall ~]# systemctl enable redis
Created symlink from /etc/systemd/system/multi-user.target.wants/redis.service to /usr/lib/systemd/system/redis.service.
[root@mall ~]# rm -rf /usr/share/nginx/html/*
[root@mall ~]# cp -rf gpmall-xiangmubao-danji/dist/* /usr/share/nginx/html/
[root@mall ~]# vim /etc/nginx/conf.d/default.conf
# 注释:在server块中添加三个location块
server {


...
    location /user {


        proxy_pass http://127.0.0.1:8082;
    }

    location /shopping {


        proxy_pass http://127.0.0.1:8081;
    }

    location /cashier {


        proxy_pass http://127.0.0.1:8083;
    }
...
}
[root@mall ~]# systemctl restart nginx
[root@mall ~]# systemctl enable nginx
Created symlink from /etc/systemd/system/multi-user.target.wants/nginx.service to /usr/lib/systemd/system/nginx.service.
[root@mall ~]# cd gpmall-xiangmubao-danji/
[root@mall gpmall-xiangmubao-danji]# nohup java -jar shopping-provider-0.0.1-SNAPSHOT.jar &
[1] 3531
[root@mall gpmall-xiangmubao-danji]# nohup: ignoring input and appending output to ‘nohup.out’

[root@mall gpmall-xiangmubao-danji]# nohup java -jar user-provider-0.0.1-SNAPSHOT.jar &
[2] 3571
[root@mall gpmall-xiangmubao-danji]# nohup: ignoring input and appending output to ‘nohup.out’

[root@mall gpmall-xiangmubao-danji]# nohup java -jar gpmall-shopping-0.0.1-SNAPSHOT.jar &
[3] 3639
[root@mall gpmall-xiangmubao-danji]# nohup: ignoring input and appending output to ‘nohup.out’

[root@mall gpmall-xiangmubao-danji]# nohup java -jar gpmall-user-0.0.1-SNAPSHOT.jar &
[4] 3676
[root@mall gpmall-xiangmubao-danji]# nohup: ignoring input and appending output to ‘nohup.out’

[root@mall gpmall-xiangmubao-danji]# jobs
[1]   Running          nohup java -jar shopping-provider-0.0.1-SNAPSHOT.jar &
[2]   Running          nohup java -jar user-provider-0.0.1-SNAPSHOT.jar &
[3]-   Running          nohup java -jar gpmall-shopping-0.0.1-SNAPSHOT.jar &
[4]+  Running          nohup java -jar gpmall-user-0.0.1-SNAPSHOT.jar &
[root@mall gpmall-xiangmubao-danji]# curl http://192.168.1.111/#/home
<!DOCTYPE html><html><head><meta charset=utf-8><title>1+x-示例项目</title><meta name=keywords content=""><meta name=description content=""><meta http-equiv=X-UA-Compatible content="IE=Edge"><meta name=wap-font-scale content=no><link rel="shortcut icon " type=images/x-icon href=/static/images/favicon.ico><link href=/static/css/app.8d4edd335a61c46bf5b6a63444cd855a.css rel=stylesheet></head><body><div id=app></div><script type=text/javascript src=/static/js/manifest.2d17a82764acff8145be.js></script><script type=text/javascript src=/static/js/vendor.4f07d3a235c8a7cd4efe.js></script><script type=text/javascript src=/static/js/app.81180cbb92541cdf912f.js></script></body></html><style>body{


min-width:1250px;}</style>
6、数据库运维(40分)
使用上一题安装的数据库,进行数据库备份操作,要求使用mysqldump命令将gpmall数据库导出进行备份,备份名为gpmall_bak.sql,并存放在/opt目录下(使用绝对路径),将上述所有操作命令和返回结果以文本形式提交到答题框。
[root@mall ~]# cd /opt/
[root@mall opt]# mysqldump -uroot -p123456 gpmall > /opt/gpmall_bak.sql
[root@mall opt]# ll
total 60
drwxr-xr-x. 8 root root  4096 May 18 11:35 centos
-rw-r--r--. 1 root root 54217 May 23 00:48 gpmall_bak.sql
drwxr-xr-x. 5 root root    50 May 22 21:38 gpmall-repo
7、主从数据库管理(40分)
使用提供的两台虚拟机,在虚拟机上安装mariadb数据库,并配置为主从数据库,实现两个数据库的主从同步。配置完毕后,请在从节点上的数据库中执行“show slave status \G”命令查询从节点复制状态,将查询到的结果以文本形式提交到答题框。
上传gpmall-repo中有mariadb子文件的文件到/root目录下
mysql1:
[root@xiandian ~]# hostnamectl set-hostname mysql1
[root@mysql1 ~]# login
[root@mysql1 ~]# vim /etc/hosts
127.0.0.1   localhost localhost.localdomain localhost4 localhost4.localdomain4
::1         localhost localhost.localdomain localhost6 localhost6.localdomain6
192.168.1.111    mysql1
192.168.1.112    mysql2
[root@mysql1 ~]# systemctl stop firewalld
[root@mysql1 ~]# systemctl disable firewalld
[root@mysql1 ~]# setenforce 0
[root@mysql1 ~]# vim /etc/selinux/config
SELINUX=Permissive
[root@mysql1~]# vim /etc/yum.repos.d/local.repo
[centos]
name=centos
baseurl=file:///opt/centos
enabled=1
gpgcheck=0
[mariadb]
name=mariadb
baseurl=file:///root/gpmall-repo
enabled=1
gpgcheck=0
[root@mysql1 ~]# yum install -y mariadb mariadb-server
[root@mysql1 ~]# systemctl restart mariadb
[root@mysql1 ~]# mysql_secure_installation
[root@mysql1 ~]# vim /etc/my.cnf
# 注释:在[mysqld]下添加:
log_bin = mysql-bin
binlog_ignore_db = mysql
server_id = 10
[root@mysql1 ~]# mysql -uroot -p000000
Welcome to the MariaDB monitor.  Commands end with ; or \g.
Your MariaDB connection id is 3
Server version: 5.5.65-MariaDB MariaDB Server

Copyright (c) 2000, 2018, Oracle, MariaDB Corporation Ab and others.

Type 'help;' or '\h' for help. Type '\c' to clear the current input statement.

MariaDB [(none)]> grant all privileges on *.* to 'root'@'%' identified by '000000';
Query OK, 0 rows affected (0.00 sec)

# 注释:如果你不想配置上面的host文件可以不使用主机名mysql2的形式,可以直接打IP地址,用户可以随意指定,只是一个用于连接的而已
MariaDB [(none)]> grant replication slave on *.* to 'user'@'mysql2' identified by '000000';
Query OK, 0 rows affected (0.00 sec)
mysql2:
[root@xiandian ~]# hostnamectl set-hostname mysql2
[root@mysql2 ~]# login
[root@mysql2 ~]# vim /etc/hosts
127.0.0.1   localhost localhost.localdomain localhost4 localhost4.localdomain4
::1         localhost localhost.localdomain localhost6 localhost6.localdomain6
192.168.1.111   mysql1
192.168.1.112   mysql2
[root@mysql2 ~]# systemctl stop firewalld
[root@mysql2 ~]# systemctl disable firewalld
[root@mysql2 ~]# setenforce 0
[root@mysql2 ~]# vim /etc/selinux/config
SELINUX=Permissive
[root@mysql2~]# vim /etc/yum.repos.d/local.repo
[centos]
name=centos
baseurl=file:///opt/centos
enabled=1
gpgcheck=0
[mariadb]
name=mariadb
baseurl=file:///root/gpmall-repo
enabled=1
gpgcheck=0
[root@mysql2 ~]# yum install -y mariadb mariadb-server
[root@mysql2 ~]# systemctl restart mariadb
[root@mysql2 ~]# mysql_secure_installation
[root@mysql2 ~]# vim /etc/my.cnf
# 注释:在[mysqld]下添加:
log_bin = mysql-bin
binlog_ignore_db = mysql
server_id = 20
[root@mysql2 ~]# mysql -uroot -p000000
Welcome to the MariaDB monitor.  Commands end with ; or \g.
Your MariaDB connection id is 3
Server version: 5.5.65-MariaDB MariaDB Server

Copyright (c) 2000, 2018, Oracle, MariaDB Corporation Ab and others.

Type 'help;' or '\h' for help. Type '\c' to clear the current input statement.

# 注释:如果你不想配置上面的host文件可以不使用主机名mysql1的形式,可以直接打IP地址,这里的用户,密码必须和上面mysql1配置的user一致
MariaDB [(none)]> change master to master_host='mysql1',master_user='user',master_password='000000';
Query OK, 0 rows affected (0.02 sec)
MariaDB [(none)]> start slave;
MariaDB [(none)]> show slave status\G
*************************** 1. row ***************************
Slave_IO_State: Waiting for master to send event
Master_Host: mysql1
Master_User: user
Master_Port: 3306
Connect_Retry: 60
Master_Log_File: mysql-bin.000003
Read_Master_Log_Pos: 245
Relay_Log_File: mariadb-relay-bin.000005
Relay_Log_Pos: 529
Relay_Master_Log_File: mysql-bin.000003
Slave_IO_Running: Yes
Slave_SQL_Running: Yes
Replicate_Do_DB:
Replicate_Ignore_DB:
Replicate_Do_Table:
Replicate_Ignore_Table:
Replicate_Wild_Do_Table:
Replicate_Wild_Ignore_Table:
Last_Errno: 0
Last_Error:
Skip_Counter: 0
Exec_Master_Log_Pos: 245
Relay_Log_Space: 1256
Until_Condition: None
Until_Log_File:
Until_Log_Pos: 0
Master_SSL_Allowed: No
Master_SSL_CA_File:
Master_SSL_CA_Path:
Master_SSL_Cert:
Master_SSL_Cipher:
Master_SSL_Key:
Seconds_Behind_Master: 0
Master_SSL_Verify_Server_Cert: No
Last_IO_Errno: 0
Last_IO_Error:
Last_SQL_Errno: 0
Last_SQL_Error:
Replicate_Ignore_Server_Ids:
Master_Server_Id: 30
1 row in set (0.00 sec)
验证结果(主从是否同步):
mysql1:
[root@mysql1 ~]# mysql -uroot -p000000
Welcome to the MariaDB monitor.  Commands end with ; or \g.
Your MariaDB connection id is 26
Server version: 5.5.65-MariaDB MariaDB Server

Copyright (c) 2000, 2018, Oracle, MariaDB Corporation Ab and others.

Type 'help;' or '\h' for help. Type '\c' to clear the current input statement.

MariaDB [(none)]> create database test;
Query OK, 0 rows affected (0.00 sec)
MariaDB [(none)]> use test;
Database changed
MariaDB [test]> create table demotables(id int not null primary key,name varchar(10),addr varchar(20));
Query OK, 0 rows affected (0.01 sec)
MariaDB [test]> insert into demotables values(1,'zhangsan','lztd');
Query OK, 0 rows affected (0.00 sec)
MariaDB [test]> select * from demotables;
+----+----------+------+
| id | name     | addr |
+----+----------+------+
|  1 | zhangsan | lztd |
+----+----------+------+
1 rows in set (0.00 sec)
mysql2:
[root@mysql2 ~]# mysql -uroot -p000000
Welcome to the MariaDB monitor.  Commands end with ; or \g.
Your MariaDB connection id is 24
Server version: 5.5.65-MariaDB MariaDB Server

Copyright (c) 2000, 2018, Oracle, MariaDB Corporation Ab and others.

Type 'help;' or '\h' for help. Type '\c' to clear the current input statement.

MariaDB [(none)]> show databases;
+--------------------+
| Database           |
+--------------------+
| information_schema |
| mysql              |
| performance_schema |
| test               |
+--------------------+
4 rows in set (0.00 sec)
MariaDB [(none)]> use test;
Reading table information for completion of table and column names
You can turn off this feature to get a quicker startup with -A
Database changed
MariaDB [test]> show tables;
+----------------+
| Tables_in_test |
+----------------+
| demotables     |
+----------------+
1 row in set (0.00 sec)
MariaDB [test]> select * from demotables;
+----+----------+------+
| id | name     | addr |
+----+----------+------+
|  1 | zhangsan | lztd |
+----+----------+------+
1 rows in set (0.00 sec)
8、读写分离数据库管理(40分)
使用提供的虚拟机与软件包,基于上一题构建的主从数据库,进一步完成Mycat读写分离数据库的配置安装。需要用的配置文件schema.xml文件如下所示(server.xml文件不再给出): select user() 配置读写分离数据库完毕后,使用netstat -ntpl命令查询端口启动情况。最后将netstat -ntpl命令的返回结果以文本形式提交到答题框。
Mycat & Mysql1 & Mysql2都执行以下操作:
# 注释:这个其实配不配都可以,看个人喜欢用主机名还是IP地址咯
[root@mycat ~]# vim /etc/hosts
127.0.0.1   localhost localhost.localdomain localhost4 localhost4.localdomain4
::1         localhost localhost.localdomain localhost6 localhost6.localdomain6
192.168.1.111    mysql1
192.168.1.112    mysql2
192.168.1.113    mycat
Mycat:
- 上传gpmall-repo中有mariadb子文件的文件和
Mycat-server-1.6-RELEASE-20161028204710-linux.gz到/root目录下,并配置yum源
[root@mycat ~]# cat /etc/hosts
127.0.0.1   localhost localhost.localdomain localhost4 localhost4.localdomain4
::1         localhost localhost.localdomain localhost6 localhost6.localdomain6
192.168.1.111   mysql1
192.168.1.112   mysql2
192.168.1.113   mycat
[root@mycat~]# vim /etc/yum.repos.d/local.repo
[centos]
name=centos
baseurl=file:///opt/centos
enabled=1
gpgcheck=0
[mariadb]
name=mariadb
baseurl=file:///root/gpmall-repo
enabled=1
gpgcheck=0
[root@mycat ~]# yum install -y java-1.8.0-openjdk java-1.8.0-openjdk-devel
[root@mycat ~]# tar -zvxf Mycat-server-1.6-RELEASE-20161028204710-linux.gz -C /usr/local/
[root@mycat ~]# chown -R 777 /usr/local/mycat/
[root@mycat ~]# vim /etc/profile
export MYCAT_HOME=/usr/local/mycat/
[root@mycat ~]# source /etc/profile
[root@mycat ~]# vim /usr/local/mycat/conf/schema.xml
<?xml version='1.0'?>
<!DOCTYPE mycat:schema SYSTEM "schema.dtd">
<mycat:schema xmlns:mycat="http://io.mycat/">
<!--注释:name=USERDB指的是逻辑数据库,在后面添加一个dataNode="dn1",dn1上绑定的是真是数据库-->
<schema name="USERDB" checkSQLschema="true" sqlMaxLimit="100"
dataNode="dn1"></schema>
<!--注释:name="dn1"上面与逻辑数据库引用的名称,database="test"真实数据库名字-->
<dataNode name="dn1" dataHost="localhost1" database="test" />
<dataHost name="localhost1" maxCon="1000" minCon="10" balance="3" dbType="mysql"
dbDriver="native" writeType="0" switchType="1" slaveThreshold="100">
 <heartbeat>select user()</heartbeat>
 <writeHost host="hostM1" url="192.168.1.111:3306" user="root" password="000000">
 <readHost host="hostS1" url="192.168.1.112:3306" user="root" password="000000" />
 </writeHost>
</dataHost>
</mycat:schema>
[root@mycat ~]# chown root:root /usr/local/mycat/conf/schema.xml
# 注释:修改root用户的访问密码与数据库
[root@mycat ~]# vim /usr/local/mycat/conf/server.xml
        <user name="root">
                <property name="password">000000</property>
                <property name="schemas">USERDB</property>

                <!-- 表级 DML 权限设置 -->
                <!--
                <privileges check="false">
                        <schema name="TESTDB" dml="0110" >
                                <table name="tb01" dml="0000"></table>
                                <table name="tb02" dml="1111"></table>
                        </schema>
                </privileges>
                 -->
        </user>
# 注释:删除之后的<user name="user"></user>的标签与内容
[root@mycat ~]# /bin/bash /usr/local/mycat/bin/mycat start
Starting Mycat-server...
[root@mycat ~]# netstat -ntlp
Active Internet connections (only servers)
Proto Recv-Q Send-Q Local Address           Foreign Address         State       PID/Program name
tcp        0      0 0.0.0.0:22              0.0.0.0:*               LISTEN      1114/sshd
tcp        0      0 127.0.0.1:25            0.0.0.0:*               LISTEN      1992/master
tcp        0      0 127.0.0.1:32000         0.0.0.0:*               LISTEN      3988/java
tcp6       0      0 :::45929                :::*                    LISTEN      3988/java
tcp6       0      0 :::9066                 :::*                    LISTEN      3988/java
tcp6       0      0 :::40619                :::*                    LISTEN      3988/java
tcp6       0      0 :::22                   :::*                    LISTEN      1114/sshd
tcp6       0      0 ::1:25                  :::*                    LISTEN      1992/master
tcp6       0      0 :::1984                 :::*                    LISTEN      3988/java
tcp6       0      0 :::8066                 :::*                    LISTEN      3988/java
# 注释:验证结果(读写分离是否成功):
[root@mycat ~]# yum install -y MariaDB-client
# 注释:查看逻辑库
[root@mycat ~]# mysql -h 127.0.0.1 -P8066 -uroot -p000000
Welcome to the MariaDB monitor.  Commands end with ; or \g.
Your MySQL connection id is 2
Server version: 5.6.29-mycat-1.6-RELEASE-20161028204710 MyCat Server (OpenCloundDB)

Copyright (c) 2000, 2018, Oracle, MariaDB Corporation Ab and others.

Type 'help;' or '\h' for help. Type '\c' to clear the current input statement.

MySQL [(none)]> show databases;
+----------+
| DATABASE |
+----------+
| USERDB   |
+----------+
1 row in set (0.003 sec)

MySQL [(none)]> use USERDB
Reading table information for completion of table and column names
You can turn off this feature to get a quicker startup with -A

Database changed
MySQL [USERDB]> show tables;
+----------------+
| Tables_in_test |
+----------------+
| demotables     |
+----------------+
1 row in set (0.007 sec)

MySQL [USERDB]> select * from demotables;
+----+----------+------+
| id | name     | addr |
+----+----------+------+
|  1 | zhangsan | lztd |
|  2 | xiaohong | lztd |
|  3 | xiaoli   | lztd |
|  4 | lihua    | nnzy |
+----+----------+------+
4 rows in set (0.060 sec)

MySQL [USERDB]> insert into demotables values(5,'tomo','hfdx');
Query OK, 1 row affected (0.013 sec)

MySQL [USERDB]> select * from demotables;
+----+----------+------+
| id | name     | addr |
+----+----------+------+
|  1 | zhangsan | lztd |
|  2 | xiaohong | lztd |
|  3 | xiaoli   | lztd |
|  4 | lihua    | nnzy |
|  5 | tomo     | hfdx |
+----+----------+------+
5 rows in set (0.004 sec)

MySQL [USERDB]> exit;
Bye
# 注释:查询对数据库读写操作的分离信息
[root@mycat ~]# mysql -h 127.0.0.1 -P9066 -uroot -p000000 -e 'show @@datasource;'
+----------+--------+-------+---------------+------+------+--------+------+------+---------+-----------+------------+
| DATANODE | NAME   | TYPE  | HOST          | PORT | W/R  | ACTIVE | IDLE | SIZE | EXECUTE | READ_LOAD | WRITE_LOAD |
+----------+--------+-------+---------------+------+------+--------+------+------+---------+-----------+------------+
| dn1      | hostM1 | mysql | 192.168.1.111 | 3306 | W    |      0 |   10 | 1000 |      45 |         0 |          1 |
| dn1      | hostS1 | mysql | 192.168.1.112 | 3306 | R    |      0 |    6 | 1000 |      43 |         4 |          0 |
+----------+--------+-------+---------------+------+------+--------+------+------+---------+-----------+------------+
部分参数说明:
sqlMaxLimit:配置默认查询数量
database:为真实数据库名
balance=“0”:不开启读写分离机制,所有读操作都发送到当前可用的writeHost上
balance=“1”:全部的readHost与stand by writeHost参与select语句的负载均衡,简单来说,当双主双从模式(M1->S1,M2->S2,并且M1与M2互为主备),正常情况下,M2、S1、S2都参与select语句的负载均衡
balance=“2”:所有读操作都随机的在writeHost、readhost上分发
balance=“3”:所有读请求随机地分发到wiriterHost对应的readhost执行,writerHost不负担读压力,注意balance=3只在1.4及其以后版本有,1.3版本没有
writeType=“0”:所有写操作发送到配置的第一个writeHost,第一个挂了需要切换到还生存的第二个writeHost,重新启动后已切换后的为准,切换记录在配置文件dnindex.properties中
writeType=“1”:所有写操作都随机的发送到配置的writeHost
9、Keystone服务运维(40分)
使用提供的“all-in-one”虚拟机,使用openstack命令,创建一个名称为“alice”账户,密码为“mypassword123”,邮箱为“[email protected]”。并且创建一个名为“acme”项目。创建一个角色“compute-user”。给用户“alice”分配“acme”项目下的“compute-user”角色。将以上操作命令及结果以文本形式填入答题框。
[root@controller ~]# source /etc/keystone/admin-openrc.sh
[root@controller ~]# openstack user create --domain demo --password mypassword123 --email [email protected] alice
+-----------+----------------------------------+
| Field     | Value                            |
+-----------+----------------------------------+
| domain_id | ac0be8c125cb40dc83acf0ccd74bc008 |
| email     | [email protected]                |
| enabled   | True                             |
| id        | 7c78906b6dd5426fac1f72e331f6dee2 |
| name      | alice                            |
+-----------+----------------------------------+
[root@controller ~]# openstack project create --domain demo acme
+-------------+----------------------------------+
| Field       | Value                            |
+-------------+----------------------------------+
| description |                                  |
| domain_id   | ac0be8c125cb40dc83acf0ccd74bc008 |
| enabled     | True                             |
| id          | bf977ceb37f44317b07130b63f6d3fb3 |
| is_domain   | False                            |
| name        | acme                             |
| parent_id   | ac0be8c125cb40dc83acf0ccd74bc008 |
+-------------+----------------------------------+
[root@controller ~]# openstack role create compute-user
+-----------+----------------------------------+
| Field     | Value                            |
+-----------+----------------------------------+
| domain_id | None                             |
| id        | 48e2c5a1764f40a5a330513bcbc0befb |
| name      | compute-user                     |
+-----------+----------------------------------+
[root@controller ~]# openstack role add --project acme --user alice compute-user
10、Glance服务运维(40分)
使用提供的“all-in-one”虚拟机,使用Glance命令,创建一个名称为“cirros”镜像,镜像文件使用提供的为“cirros-0.3.4-x86_64-disk.img”。通过glance 命令查看镜像“cirros”的详细信息。使用glance 命令更新镜像信息min-disk(min-disk默认单位为G)为1G。将以上操作命令及结果以文本形式填入答题框。
镜像请自行上传
[root@controller ~]# glance image-create --name cirros --disk-format qcow2 --container-format bare --progress < cirros-0.3.4-x86_64-disk.img
[=============================>] 100%
+------------------+--------------------------------------+
| Property         | Value                                |
+------------------+--------------------------------------+
| checksum         | ee1eca47dc88f4879d8a229cc70a07c6     |
| container_format | bare                                 |
| created_at       | 2020-12-11T17:04:24Z                 |
| disk_format      | qcow2                                |
| id               | 9ceee9fb-f1ee-4441-b88d-3349aed9f7d3 |
| min_disk         | 0                                    |
| min_ram          | 0                                    |
| name             | cirros                               |
| owner            | 0b3ef282c4e64838a39a99c01e6dc964     |
| protected        | False                                |
| size             | 13287936                             |
| status           | active                               |
| tags             | []                                   |
| updated_at       | 2020-12-11T17:04:25Z                 |
| virtual_size     | None                                 |
| visibility       | private                              |
+------------------+--------------------------------------+
[root@controller ~]# glance image-update --min-disk=1 9ceee9fb-f1ee-4441-b88d-3349aed9f7d3
+------------------+--------------------------------------+
| Property         | Value                                |
+------------------+--------------------------------------+
| checksum         | ee1eca47dc88f4879d8a229cc70a07c6     |
| container_format | bare                                 |
| created_at       | 2020-12-11T17:04:24Z                 |
| disk_format      | qcow2                                |
| id               | 9ceee9fb-f1ee-4441-b88d-3349aed9f7d3 |
| min_disk         | 1                                    |
| min_ram          | 0                                    |
| name             | cirros                               |
| owner            | 0b3ef282c4e64838a39a99c01e6dc964     |
| protected        | False                                |
| size             | 13287936                             |
| status           | active                               |
| tags             | []                                   |
| updated_at       | 2020-12-11T17:09:20Z                 |
| virtual_size     | None                                 |
| visibility       | private                              |
+------------------+--------------------------------------+
11、Nova服务运维(40分)
使用提供的“all-in-one”虚拟机,使用Nova命令,创建一个名为test的安全组,描述为’test the nova command about the rules’。并且使用命令创建一个名为test,ID为6,内存为2048 MB,磁盘为20 GB,vcpu数量为2的云主机类型,查看test云主机类型的详细信息。将以上操作命令及结果以文本形式填入答题框。
[root@controller ~]# nova secgroup-create test 'test the nova command about the rules'
+--------------------------------------+------+---------------------------------------+
| Id                                   | Name | Description                           |
+--------------------------------------+------+---------------------------------------+
| a9e13b0e-0b09-4979-96c4-cc774b6b2ae2 | test | test the nova command about the rules |
+--------------------------------------+------+---------------------------------------+
[root@controller ~]# nova flavor-create test 6 2048 20 2
+----+------+-----------+------+-----------+------+-------+-------------+-----------+
| ID | Name | Memory_MB | Disk | Ephemeral | Swap | VCPUs | RXTX_Factor | Is_Public |
+----+------+-----------+------+-----------+------+-------+-------------+-----------+
| 6  | test | 2048      | 20   | 0         |      | 2     | 1.0         | True      |
+----+------+-----------+------+-----------+------+-------+-------------+-----------+
[root@controller ~]# nova flavor-show test
+----------------------------+-------+
| Property                   | Value |
+----------------------------+-------+
| OS-FLV-DISABLED:disabled   | False |
| OS-FLV-EXT-DATA:ephemeral  | 0     |
| disk                       | 20    |
| extra_specs                | {

    }    |
| id                         | 6     |
| name                       | test  |
| os-flavor-access:is_public | True  |
| ram                        | 2048  |
| rxtx_factor                | 1.0   |
| swap                       |       |
| vcpus                      | 2     |
+----------------------------+-------+
12、Docker安装(40分)
使用提供的虚拟机和软件包,自行配置YUM源,安装docker-ce服务。安装完毕后执行docker info命令的返回结果以文本形式提交到答题框。
先上传Docker.tar.gz到/root目录,并解压
[root@xiandian ~]# tar -zvxf Docker.tar.gz
[root@xiandian ~]# vim /etc/yum.repos.d/local.repo
[centos]
name=centos
baseurl=file:///opt/centos
enabled=1
gpgcheck=0
[docker]
name=docker
baseurl=file:///root/Docker
enabled=1
gpgcheck=0
[root@xiandian ~]# iptables -F
[root@xiandian ~]# iptables -X
[root@xiandian ~]# iptables -Z
[root@xiandian ~]# iptables-save
# Generated by iptables-save v1.4.21 on Fri May 15 02:00:29 2020
*filter
:INPUT ACCEPT [20:1320]
:FORWARD ACCEPT [0:0]
:OUTPUT ACCEPT [11:1092]
COMMIT
# Completed on Fri May 15 02:00:29 2020
[root@xiandian ~]# vim /etc/selinux/config
SELINUX=disabled
# 注释:关闭交换分区:
[root@xiandian ~]# vim /etc/fstab
#/dev/mapper/centos-swap swap            swap    defaults        0 0
[root@xiandian ~]# free -m
              total        used        free      shared  buff/cache   available
Mem:           1824          95        1591           8         138        1589
Swap:             0           0           0
# 注释:在配置路由转发前,先升级系统并重启,不然会有两条规则可能报错:
[root@xiandian ~]# yum upgrade -y
[root@xiandian ~]# reboot
[root@xiandian ~]# vim /etc/sysctl.conf
net.ipv4.ip_forward = 1
net.bridge.bridge-nf-call-ip6tables = 1
net.bridge.bridge-nf-call-iptables = 1
[root@xiandian ~]# modprobe br_netfilter
[root@xiandian ~]# sysctl -p
net.ipv4.ip_forward = 1
net.bridge.bridge-nf-call-ip6tables = 1
net.bridge.bridge-nf-call-iptables = 1
[root@xiandian ~]# yum install -y yum-utils device-mapper-persistent-data
[root@xiandian ~]# yum install -y docker-ce-18.09.6 docker-ce-cli-18.09.6 containerd.io
[root@xiandian ~]# systemctl daemon-reload
[root@xiandian ~]# systemctl restart docker
[root@xiandian ~]# systemctl enable docker
Created symlink from /etc/systemd/system/multi-user.target.wants/docker.service to /usr/lib/systemd/system/docker.service.
[root@xiandian ~]# docker info
Containers: 0
 Running: 0
 Paused: 0
 Stopped: 0
Images: 0
Server Version: 18.09.6
Storage Driver: devicemapper
 Pool Name: docker-253:0-100765090-pool
 Pool Blocksize: 65.54kB
 Base Device Size: 10.74GB
 Backing Filesystem: xfs
 Udev Sync Supported: true
 Data file: /dev/loop0
 Metadata file: /dev/loop1
 Data loop file: /var/lib/docker/devicemapper/devicemapper/data
 Metadata loop file: /var/lib/docker/devicemapper/devicemapper/metadata
 Data Space Used: 11.73MB
 Data Space Total: 107.4GB
 Data Space Available: 24.34GB
 Metadata Space Used: 17.36MB
 Metadata Space Total: 2.147GB
 Metadata Space Available: 2.13GB
 Thin Pool Minimum Free Space: 10.74GB
 Deferred Removal Enabled: true
 Deferred Deletion Enabled: true
 Deferred Deleted Device Count: 0
 Library Version: 1.02.164-RHEL7 (2019-08-27)
Logging Driver: json-file
Cgroup Driver: cgroupfs
Plugins:
 Volume: local
 Network: bridge host macvlan null overlay
 Log: awslogs fluentd gcplogs gelf journald json-file local logentries splunk syslog
Swarm: inactive
Runtimes: runc
Default Runtime: runc
Init Binary: docker-init
containerd version: b34a5c8af56e510852c35414db4c1f4fa6172339
runc version: 3e425f80a8c931f88e6d94a8c831b9d5aa481657
init version: fec3683
Security Options:
 seccomp
  Profile: default
Kernel Version: 3.10.0-1127.8.2.el7.x86_64
Operating System: CentOS Linux 7 (Core)
OSType: linux
Architecture: x86_64
CPUs: 2
Total Memory: 1.777GiB
Name: xiandian
ID: OUR6:6ERV:3UCH:WJCM:TDLL:5ATV:E7IQ:HLAR:JKQB:OBK2:HZ7G:JC3Q
Docker Root Dir: /var/lib/docker
Debug Mode (client): false
Debug Mode (server): false
Registry: https://index.docker.io/v1/
Labels:
Experimental: false
Insecure Registries:
 127.0.0.0/8
Live Restore Enabled: false
Product License: Community Engine
WARNING: the devicemapper storage-driver is deprecated, and will be removed in a future release.
WARNING: devicemapper: usage of loopback devices is strongly discouraged for production use.
         Use `--storage-opt dm.thinpooldev` to specify a custom block storage device.
13、部署Swarm集群(40分)
使用提供的虚拟机和软件包,安装好docker-ce。部署Swarm集群,并安装Portainer图形化管理工具,部署完成后,使用浏览器登录ip:9000界面,进入Swarm控制台。将curl swarm ip:9000返回的结果以文本形式提交到答题框。
Master:
[root@master ~]# vim /etc/hosts
127.0.0.1   localhost localhost.localdomain localhost4 localhost4.localdomain4
::1         localhost localhost.localdomain localhost6 localhost6.localdomain6
192.168.1.111   master
192.168.1.112   node
[root@master ~]# yum install -y chrony
[root@master ~]# vim /etc/chrony.conf
# 注释:注释前面的四条server,并找个空白的地方写入以下内容:
#server 0.centos.pool.ntp.org iburst
#server 1.centos.pool.ntp.org iburst
#server 2.centos.pool.ntp.org iburst
#server 3.centos.pool.ntp.org iburst
local stratum 10
server master iburst
allow all
[root@master ~]# systemctl restart chronyd
[root@master ~]# systemctl enable chronyd
[root@master ~]# timedatectl set-ntp true
[root@master ~]# vim /lib/systemd/system/docker.service
# 注释:将
ExecStart=/usr/bin/dockerd -H fd:// --containerd=/run/containerd/containerd.sock
# 注释:修改为
ExecStart=/usr/bin/dockerd -H tcp://0.0.0.0:2375 -H unix:///var/run/docker.sock
[root@master ~]# systemctl daemon-reload
[root@master ~]# systemctl restart docker
[root@master ~]# ./image.sh
[root@master ~]# docker swarm init --advertise-addr 192.168.1.111
Swarm initialized: current node (vclsb89nhs306kei93iv3rwa5) is now a manager.

To add a worker to this swarm, run the following command:

    docker swarm join --token SWMTKN-1-6d9c93ecv0e1ux4u8z5wj4ybhbkt2iadlnh74omjipyr3dwk4u-euf7iax6ubmta5qbcrbg4t3j4 192.168.1.111:2377

To add a manager to this swarm, run 'docker swarm join-token manager' and follow the instructions.
[root@master ~]# docker swarm join-token worker
To add a worker to this swarm, run the following command:

    docker swarm join --token SWMTKN-1-6d9c93ecv0e1ux4u8z5wj4ybhbkt2iadlnh74omjipyr3dwk4u-euf7iax6ubmta5qbcrbg4t3j4 192.168.1.111:2377
[root@master ~]# docker node ls
ID                            HOSTNAME            STATUS              AVAILABILITY        MANAGER STATUS      ENGINE VERSION
vclsb89nhs306kei93iv3rwa5 *   master              Ready               Active              Leader              18.09.6
j98yunqmdkh1ztr7thhbzumcw     node                Ready               Active                                  18.09.6
[root@master ~]# docker volume create portainer_data
portainer_data
[root@master ~]# docker service create --name portainer --publish 9000:9000 --replicas=1 --constraint 'node.role == manager' --mount  type=bind,src=//var/run/docker.sock,dst=/var/run/docker.sock --mount
type=volume,src=portainer_data,dst=/data portainer/portainer -H unix:///var/run/docker.sock

k77m7aydf2idm1x02j60cmwsj
overall progress: 1 out of 1 tasks
1/1: running
verify: Service converged
Node:
[root@node ~]# vim /etc/hosts
127.0.0.1   localhost localhost.localdomain localhost4 localhost4.localdomain4
::1         localhost localhost.localdomain localhost6 localhost6.localdomain6
192.168.1.111   master
192.168.1.112   node
[root@node ~]# yum install -y chronyc
[root@node ~]# vim /etc/chrony.conf
# 注释:注释前面的四条server,并找个空白的地方写入以下内容:
#server 0.centos.pool.ntp.org iburst
#server 1.centos.pool.ntp.org iburst
#server 2.centos.pool.ntp.org iburst
#server 3.centos.pool.ntp.org iburst
server 192.168.1.111 iburst
local stratum 10
server master iburst
allow all
[root@node ~]# systemctl restart chronyd
[root@node ~]# systemctl enable chronyd
[root@node ~]# chronyc sources
210 Number of sources = 1
MS Name/IP address         Stratum Poll Reach LastRx Last sample
===============================================================================
^* master                       11   6   177    42    +17us[  +60us] +/-   52ms
[root@node ~]# vim /lib/systemd/system/docker.service
# 注释:将
ExecStart=/usr/bin/dockerd -H fd:// --containerd=/run/containerd/containerd.sock
# 注释:修改为
ExecStart=/usr/bin/dockerd -H tcp://0.0.0.0:2375 -H unix:///var/run/docker.sock
[root@master ~]# systemctl daemon-reload
[root@master ~]# systemctl restart docker
[root@node ~]#     docker swarm join --token SWMTKN-1-6d9c93ecv0e1ux4u8z5wj4ybhbkt2iadlnh74omjipyr3dwk4u-euf7iax6ubmta5qbcrbg4t3j4 192.168.1.111:2377
This node joined a swarm as a worker.
[[root@master ~]# curl 192.168.1.111:9000
<!DOCTYPE html><html lang="en" ng-app="portainer">
<head>
  <meta charset="utf-8">
  <title>Portainer</title>
  <meta name="description" content="">
  <meta name="author" content="Portainer.io">
14、Kubernetes平台搭建(40分)
使用提供的虚拟机和软件包,搭建Kubernetes平台,平台的两个节点分别为master和node节点,在将node节点加入到集群后,登录master节点,使用kubectl get nodes查询各节点状态。将查询节点状态的返回结果以文本形式提交到答题框。
上传K8S.tar.gz包到两个节点的/root目录下解压,配置yum源,并升级内核(也可以做vsftp进行共享)
Master:
[root@master ~]# tar -zvxf K8S.tar.gz
[root@master ~]# vim /etc/yum.repos.d/local.repo
[centos]
name=centos
baseurl=file:///opt/centos
enabled=1
gpgcheck=0
[kubernetes]
name=kubernetes
baseurl=file:///root/Kubernetes
enabled=1
gpgcheck=0
[root@master ~]# yum upgrade -y
[root@master ~]# vim /etc/hosts
127.0.0.1   localhost localhost.localdomain localhost4 localhost4.localdomain4
::1         localhost localhost.localdomain localhost6 localhost6.localdomain6
192.168.1.111   master
192.168.1.112   node
[root@master ~]# systemctl stop firewalld
[root@master ~]# systemctl disable firewalld
[root@master ~]# iptables -F
[root@master ~]# iptables -X
[root@master ~]# iptables -Z
[root@master ~]# iptables-save
# Generated by iptables-save v1.4.21 on Sat May 16 02:46:58 2020
*filter
:INPUT ACCEPT [3:380]
:FORWARD ACCEPT [0:0]
:OUTPUT ACCEPT [2:232]
COMMIT
# Completed on Sat May 16 02:46:58 2020
[root@master ~]# vim /etc/selinux/config
SELINUX=disabled
[root@master ~]# reboot
[root@master ~]# swapoff -a
[root@master ~]# vim /etc/fstab
#/dev/mapper/centos-swap swap                    swap    defaults        0 0
[root@master ~]# yum install -y chrony
# 注释:将下面四行注释掉,并添加新的内容
#server 0.centos.pool.ntp.org iburst
#server 1.centos.pool.ntp.org iburst
#server 2.centos.pool.ntp.org iburst
#server 3.centos.pool.ntp.org iburst
local   stratum         10
server  master  iburst
allow   all
[root@master ~]# systemctl restart chronyd
[root@master ~]# systemctl enable chronyd
[root@master ~]# timedatectl set-ntp true
[root@master ~]# chronyc sources
210 Number of sources = 1
MS Name/IP address         Stratum Poll Reach LastRx Last sample
===============================================================================
^* master                       10   6   377   277     -8ns[-5470ns] +/-   18us
[root@master ~]# vim /etc/sysctl.d/K8S.conf
net.ipv4.ip_forward = 1
net.bridge.bridge-nf-call-ip6tables = 1
net.bridge.bridge-nf-call-iptables = 1
[root@master ~]# modprobe br_netfilter
[root@master ~]# sysctl -p /etc/sysctl.d/K8S.conf
net.ipv4.ip_forward = 1
net.bridge.bridge-nf-call-ip6tables = 1
net.bridge.bridge-nf-call-iptables = 1
[root@master ~]# vim /etc/sysconfig/modules/ipvs.modules
#!/bin/bash
modprobe -- ip_vs
modprobe -- ip_vs_rr
modprobe -- ip_vs_wrr
modprobe -- ip_vs_sh
modprobe -- nf_conntrack_ipv4
[root@master ~]# bash /etc/sysconfig/modules/ipvs.modules
[root@master ~]# lsmod | grep -e ip_vs -e nf_conntrack_ipv4
nf_conntrack_ipv4      15053  0
nf_defrag_ipv4         12729  1 nf_conntrack_ipv4
ip_vs_sh               12688  0
ip_vs_wrr              12697  0
ip_vs_rr               12600  0
ip_vs                 145497  6 ip_vs_rr,ip_vs_sh,ip_vs_wrr
nf_conntrack          139264  2 ip_vs,nf_conntrack_ipv4
libcrc32c              12644  3 xfs,ip_vs,nf_conntrack
[root@master ~]# yum install -y ipset ipvsadm
[root@master ~]# yum install -y yum-utils device-mapper-persistent-data lvm2
[root@master ~]# yum install docker-ce-18.09.6 docker-ce-cli-18.09.6 containerd.io -y
[root@master ~]# mkdir -p /etc/docker
[root@master ~]# vim /etc/docker/daemon.json
{


        "exec-opts":["native.cgroupdriver=systemd"]
}
"/etc/docker/daemon.json" [New] 3L, 49C written
[root@master ~]# systemctl daemon-reload
[root@master ~]# systemctl restart docker
[root@master ~]# systemctl enable docker
[root@master ~]# ./kubernetes_base.sh
[root@master ~]# docker info | grep Cgroup
WARNING: the devicemapper storage-driver is deprecated, and will be removed in a future release.
WARNING: devicemapper: usage of loopback devices is strongly discouraged for production use.
         Use `--storage-opt dm.thinpooldev` to specify a custom block storage device.
Cgroup Driver: systemd
[root@master ~]# yum install -y kubelet-1.14.1 kubeadm-1.14.1 kubectl-1.14.1
[root@master ~]# systemctl enable kubelet
[root@master ~]# systemctl start kubelet
[root@master ~]# kubeadm init --apiserver-advertise-address 192.168.1.111 --kubernetes-version="v1.14.1" --pod-network-cidr=10.16.0.0/16 --image-repository=registry.aliyuncs.com/google_containers
……
…
kubeadm join 192.168.1.111:6443 --token 7v2qmb.hv0lw6mf89t808ow \
--discovery-token-ca-cert-hash sha256:ab385b4a56dc19dbf470a915f32067378cb1f08983464f593db84e609c264f20
[root@master ~]# mkdir -p $HOME/.kube
[root@master ~]# sudo cp -i /etc/kubernetes/admin.conf $HOME/.kube/config
[root@master ~]# sudo chown $(id -u):$(id -g) $HOME/.kube/config
[root@master ~]#  kubectl get cs
NAME                 STATUS    MESSAGE             ERROR
controller-manager   Healthy   ok
scheduler            Healthy   ok
etcd-0               Healthy   {

    "health":"true"}
[root@master ~]# kubectl apply -f yaml/kube-flannel.yaml
podsecuritypolicy.policy/psp.flannel.unprivileged created
clusterrole.rbac.authorization.k8s.io/flannel created
clusterrolebinding.rbac.authorization.k8s.io/flannel created
serviceaccount/flannel created
configmap/kube-flannel-cfg created
daemonset.apps/kube-flannel-ds-amd64 created
daemonset.apps/kube-flannel-ds-arm64 created
daemonset.apps/kube-flannel-ds-arm created
daemonset.apps/kube-flannel-ds-ppc64le created
daemonset.apps/kube-flannel-ds-s390x created
[root@master ~]# kubectl get pods -n kube-system
NAME                             READY   STATUS    RESTARTS   AGE
coredns-8686dcc4fd-5gxc4         1/1     Running   0          155m
coredns-8686dcc4fd-dw7bl         1/1     Running   0          155m
etcd-master                      1/1     Running   0          154m
kube-apiserver-master            1/1     Running   0          154m
kube-controller-manager-master   1/1     Running   0          154m
kube-flannel-ds-amd64-ft5zd      1/1     Running   0          66s
kube-proxy-7w2fd                 1/1     Running   0          155m
kube-scheduler-master            1/1     Running   0          154m
# 注释:这一步是node节点也弄好才执行的
[root@master ~]# kubectl get node
NAME     STATUS   ROLES    AGE     VERSION
master   Ready    master   159m    v1.14.1
node     Ready    <none>   2m26s   v1.14.1
Node:
[root@node ~]# tar -zvxf K8S.tar.gz
[root@node ~]# vim /etc/yum.repos.d/local.repo
[centos]
name=centos
baseurl=file:///opt/centos
enabled=1
gpgcheck=0
[kubernetes]
name=kubernetes
baseurl=file:///root/Kubernetes
enabled=1
gpgcheck=0
[root@node ~]# yum upgrade -y
[root@node ~]# vim /etc/hosts
127.0.0.1   localhost localhost.localdomain localhost4 localhost4.localdomain4
::1         localhost localhost.localdomain localhost6 localhost6.localdomain6
192.168.1.111   master
192.168.1.112   node
[root@node ~]# systemctl stop firewalld
[root@node ~]# systemctl disable firewalld
[root@node ~]# iptables -F
[root@node ~]# iptables -X
[root@node ~]# iptables -Z
[root@node ~]# iptables-save
# Generated by iptables-save v1.4.21 on Sat May 16 02:45:39 2020
*filter
:INPUT ACCEPT [3:380]
:FORWARD ACCEPT [0:0]
:OUTPUT ACCEPT [2:232]
COMMIT
# Completed on Sat May 16 02:45:39 2020
[root@node ~]# vim /etc/selinux/config
SELINUX=disabled
[root@node ~]# reboot
[root@node ~]# swapoff -a
[root@node ~]# vim /etc/fstab
#/dev/mapper/centos-swap swap                    swap    defaults        0 0
[root@node ~]# yum install -y chrony
[root@node ~]# vim /etc/chrony.conf
# 注释:将下面四行注释掉,并添加新的内容
#server 0.centos.pool.ntp.org iburst
#server 1.centos.pool.ntp.org iburst
#server 2.centos.pool.ntp.org iburst
#server 3.centos.pool.ntp.org iburst
server  192.168.1.111   iburst
[root@node ~]# systemctl restart chronyd
[root@node ~]# systemctl enable chronyd
[root@node ~]# chronyc sources
210 Number of sources = 1
MS Name/IP address         Stratum Poll Reach LastRx Last sample
===============================================================================
^* master                       11   6    37    29   -123ns[-1061us] +/-   44ms
[root@node ~]# vim /etc/sysctl.d/K8S.conf
net.ipv4.ip_forward = 1
net.bridge.bridge-nf-call-ip6tables = 1
net.bridge.bridge-nf-call-iptables = 1
[root@node ~]# modprobe br_netfilter
[root@node ~]# sysctl -p /etc/sysctl.d/K8S.conf
net.ipv4.ip_forward = 1
net.bridge.bridge-nf-call-ip6tables = 1
net.bridge.bridge-nf-call-iptables = 1
[root@node ~]# vim /etc/sysconfig/modules/ipvs.modules
#!/bin/bash
modprobe -- ip_vs
modprobe -- ip_vs_rr
modprobe -- ip_vs_wrr
modprobe -- ip_vs_sh
modprobe -- nf_conntrack_ipv4
[root@node ~]# bash /etc/sysconfig/modules/ipvs.modules
[root@node ~]# lsmod | grep -e ip_vs -e nf_conntrack_ipv4
nf_conntrack_ipv4      15053  0
nf_defrag_ipv4         12729  1 nf_conntrack_ipv4
ip_vs_sh               12688  0
ip_vs_wrr              12697  0
ip_vs_rr               12600  0
ip_vs                 145497  6 ip_vs_rr,ip_vs_sh,ip_vs_wrr
nf_conntrack          139264  2 ip_vs,nf_conntrack_ipv4
libcrc32c              12644  3 xfs,ip_vs,nf_conntrack
[root@node ~]# yum install -y ipset ipvsadm
[root@node ~]# yum install docker-ce-18.09.6 docker-ce-cli-18.09.6 containerd.io -y
[root@node ~]# mkdir /etc/docker
[root@node ~]# vim /etc/docker/daemon.json
{


        "exec-opts":["native.cgroupdriver=systemd"]
}
"/etc/docker/daemon.json" [New] 3L, 49C written
[root@node ~]# systemctl daemon-reload
[root@node ~]# systemctl restart docker
[root@node ~]# systemctl enable docker
[root@node ~]# ./kubernetes_base.sh
[root@node ~]# docker info | grep Cgroup
WARNING: the devicemapper storage-driver is deprecated, and will be removed in a future release.
WARNING: devicemapper: usage of loopback devices is strongly discouraged for production use.
         Use `--storage-opt dm.thinpooldev` to specify a custom block storage device.
Cgroup Driver: systemd
[root@node ~]# yum install -y kubelet-1.14.1 kubeadm-1.14.1 kubectl-1.14.1
[root@node ~]# systemctl enable kubelet
[root@node ~]# systemctl start kubelet
# 注释:直接把之前初始化集群最后生成的那个命令复制粘贴过来就行了:
[root@node ~]# kubeadm join 192.168.1.111:6443 --token 7v2qmb.hv0lw6mf89t808ow \
> --discovery-token-ca-cert-hash sha256:ab385b4a56dc19dbf470a915f32067378cb1f08983464f593db84e609c264f20
[preflight] Running pre-flight checks
[preflight] Reading configuration from the cluster...
[preflight] FYI: You can look at this config file with 'kubectl -n kube-system get cm kubeadm-config -oyaml'
[kubelet-start] Downloading configuration for the kubelet from the "kubelet-config-1.14" ConfigMap in the kube-system namespace
[kubelet-start] Writing kubelet configuration to file "/var/lib/kubelet/config.yaml"
[kubelet-start] Writing kubelet environment file with flags to file "/var/lib/kubelet/kubeadm-flags.env"
[kubelet-start] Activating the kubelet service
[kubelet-start] Waiting for the kubelet to perform the TLS Bootstrap...

This node has joined the cluster:
* Certificate signing request was sent to apiserver and a response was received.
* The Kubelet was informed of the new secure connection details.

Run 'kubectl get nodes' on the control-plane to see this node join the cluster.
15、Shell脚本补全(40分)
下面有一段脚本,作用是自动配置redis服务,由于工程师的失误,将脚本中的某些代码删除了,但注释还在,请根据注释,填写代码。最后将填写的代码按照顺序以文本形式提交至答题框。
脚本:
redis(){


cd
#修改redis的配置文件,将bind 127.0.0.1注释 sed -i
(此处填写)
/etc/redis.conf
#修改redis的配置文件,将protected-mode yes改为protected-mode no sed -i
(此处填写)
/etc/redis.conf
#启动redis服务
systemctl start redis
#设置开机自启
systemctl enable redis
if [ $? -eq 0 ]
then sleep 3
echo -e "\033[36m==========redis启动成功==========\033[0m"
else
echo -e "\033[31mredis启动失败,请检查\033[0m"
exit 1
fi
sleep 2
}
作答:
sed -i 's/bind 127.0.0.1/#bind 127.0.0.1/g' /etc/redis.conf
sed -i 's/protected-mode yes/protected-mode no/g' /etc/redis.conf