介绍
官网介绍:Pixyz 支持超过 45 种工业文件格式,包括 CATIA、JT、STEP、IFC、PVZ、NWD、USD 及 glTF。包括 CAD、曲面细分/网格模型、点云等。Unity 中的资产将实时关联到原始数据,可自动更新文件的修改。在 Unity 中创建 LOD 和 UV、合并和拆解网格、更改枢轴等,构建随时可用的资产。无需重新导入即可在 Unity 编辑器中优化任何数据。
有 4 条产品线:
- pixyz studio:独立的软件工具
- 导入/转换 CAD、网格和点云数据
- 优化/导出数据
- 利用 Python API 自动完成任务
- pixyz plugin:安装于 unity 的插件,专门为 unity 定制,在导出CAD模型并导入unity的流程上优于从 studio 导出再导入unity
- 将 CAD/3D/BIM 数据导入到 Unity
- 保留层级结构与元数据
- 用规则引擎自动运行脚本
- Pixyz Review
- 拖放 CAD、网格或点云数据
- 一键进入虚拟现实
- 在模型上进行研究与互动
- Pixyz Scenario Processor
- 批量转换、优化模型
- 在 AWS Cloud 或单机上运行
- 提供扩展可能
版本对比
版本的不同版本对比,可以看到每次的更新内容和情况
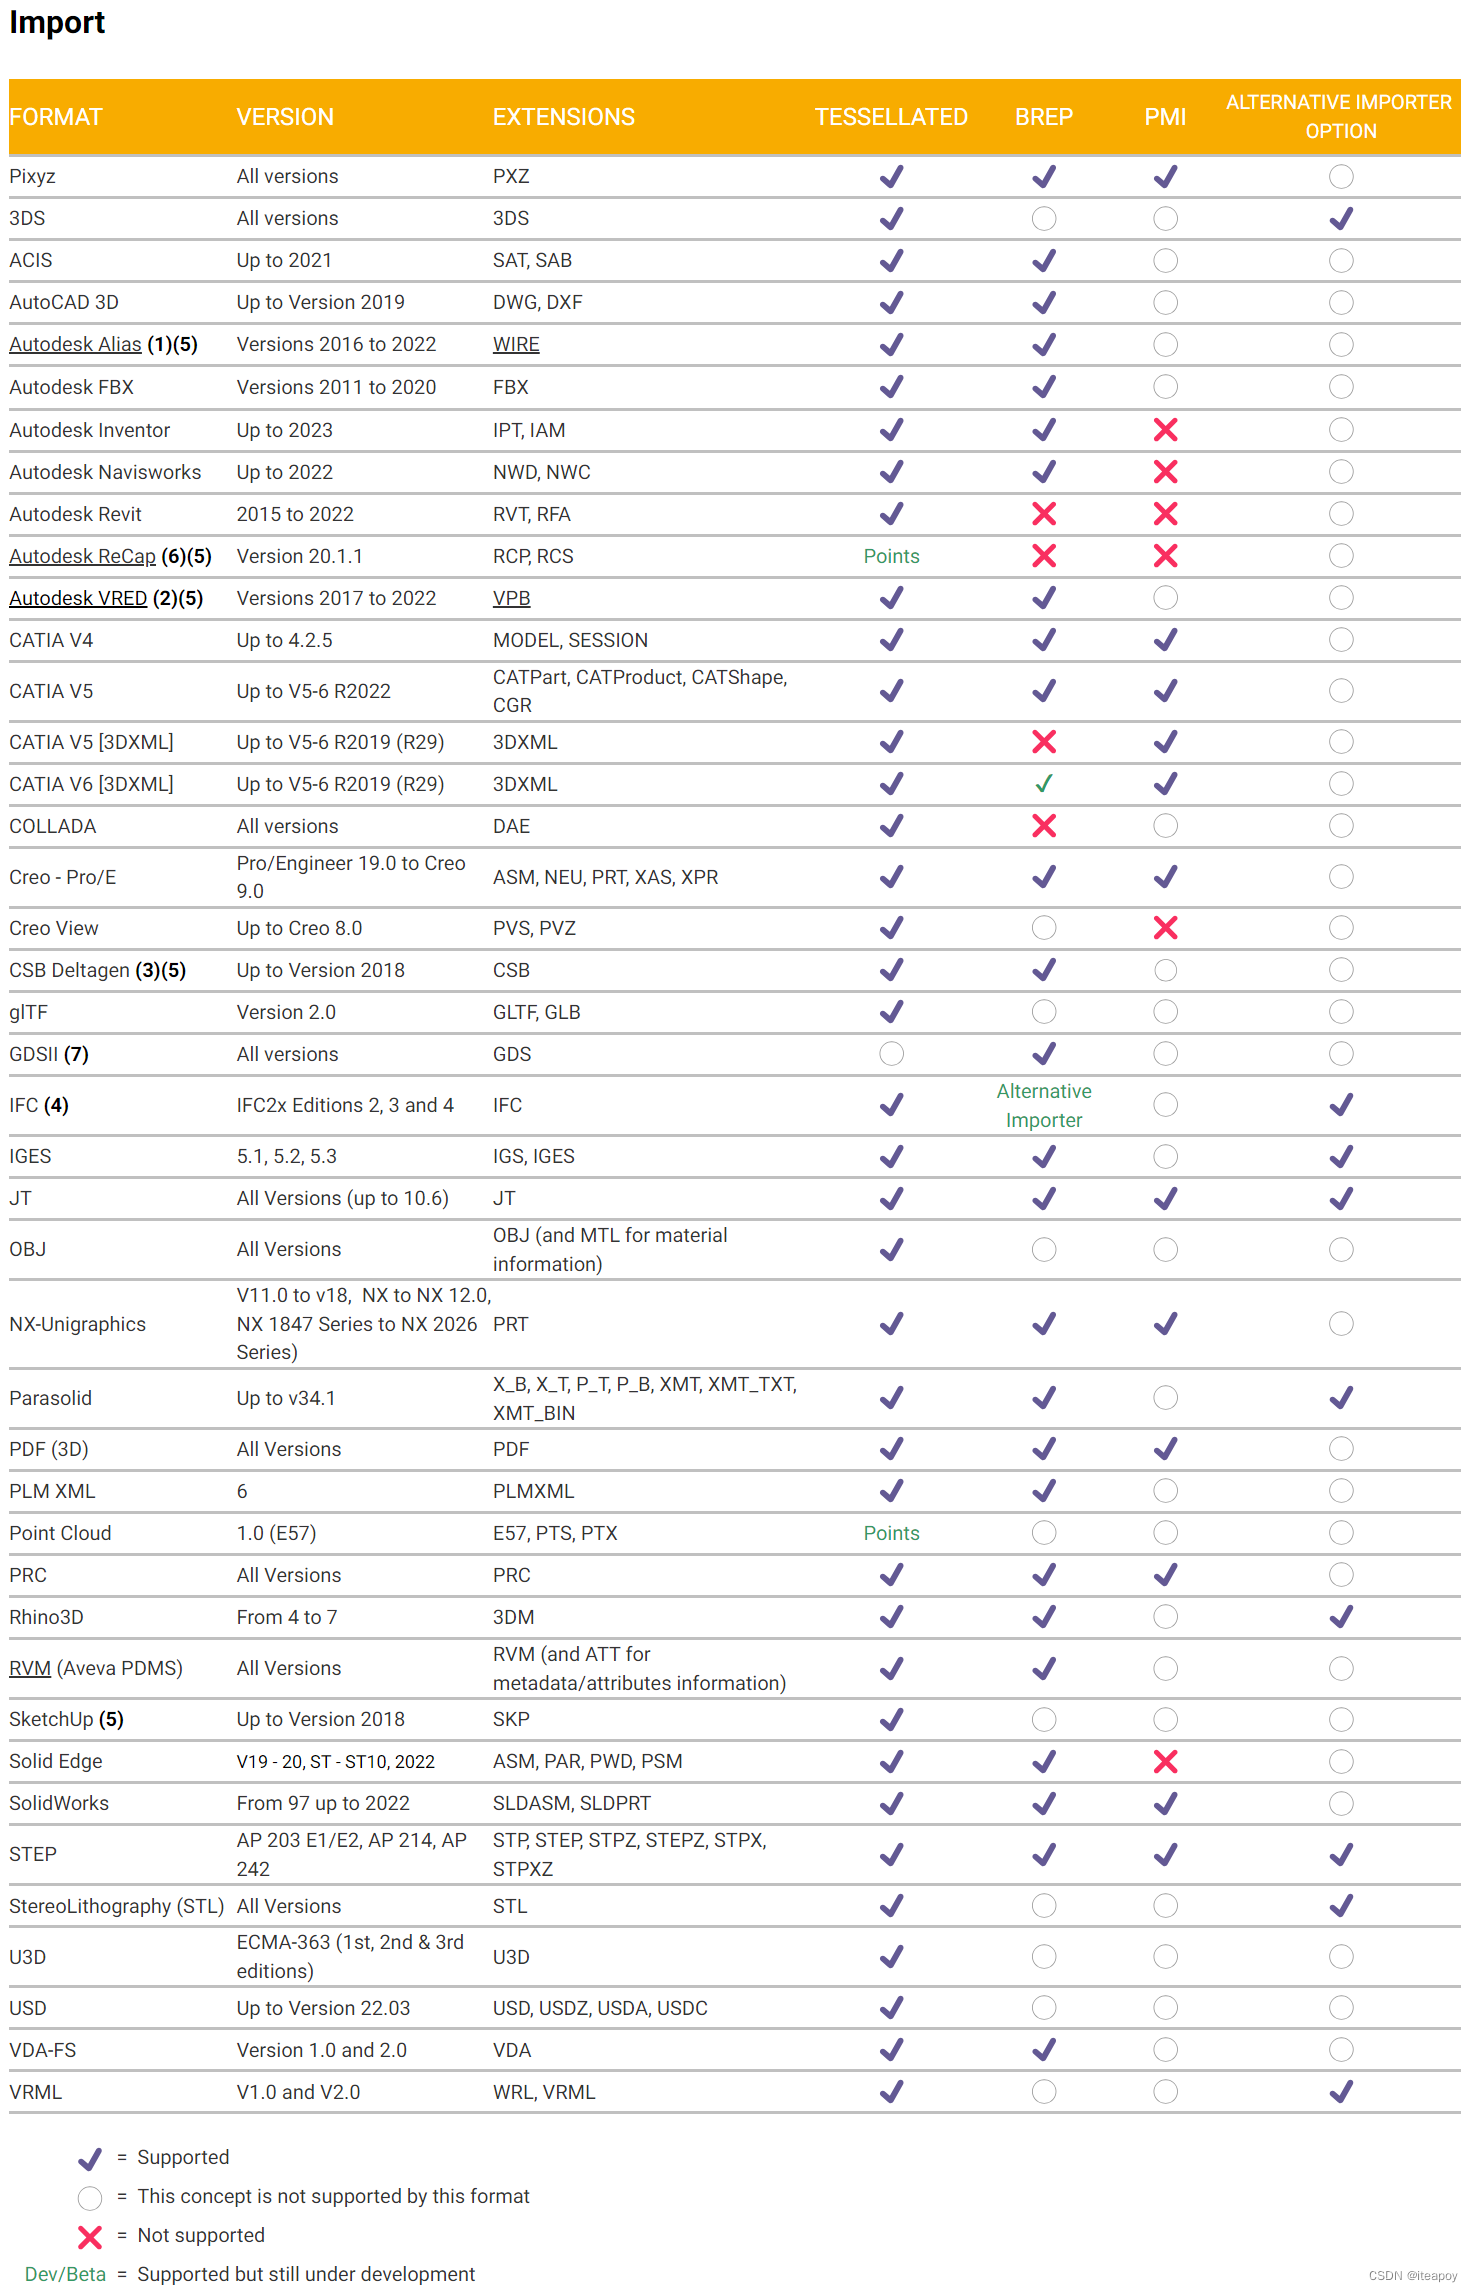
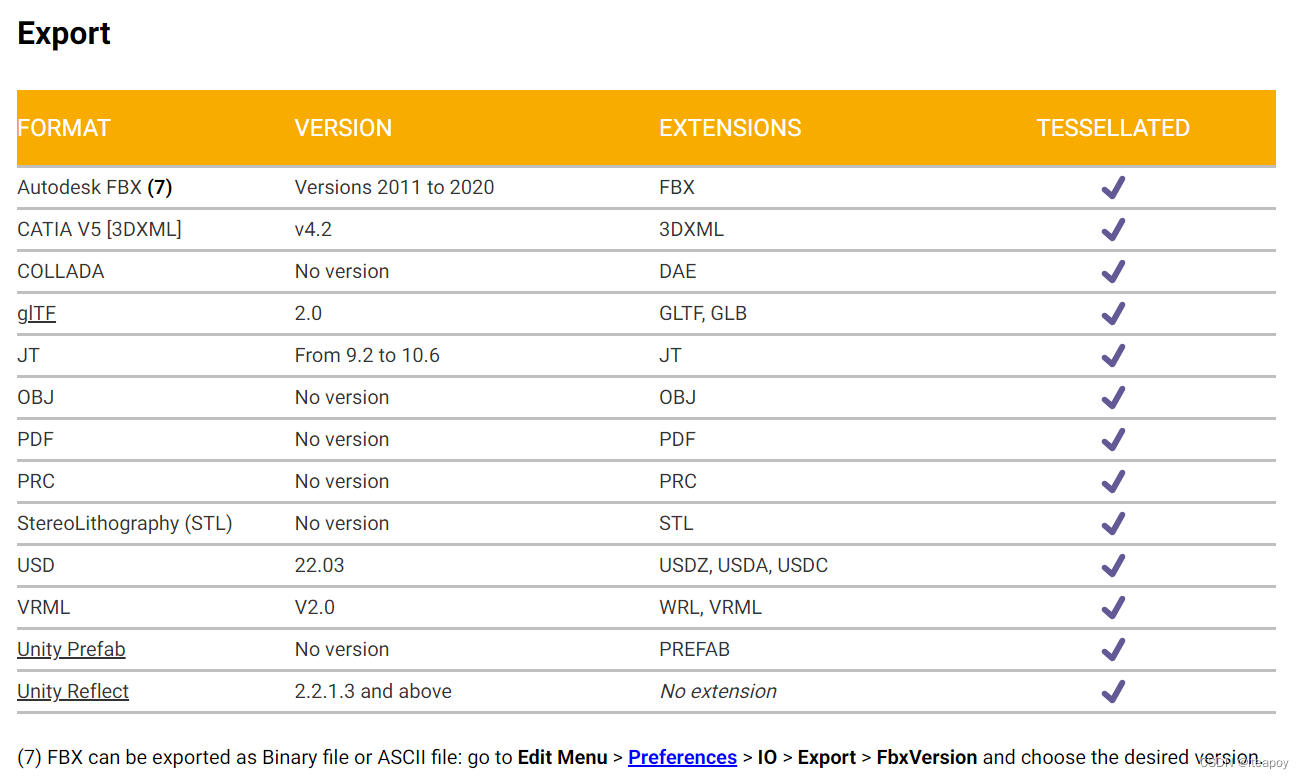
支持的文件格式
支持导入、导出的文件格式可见文档:Import/Export 的文件格式
入门使用
只介绍pixyz studio、pixyz Scenario Processor的一些简单的内容。
Pixyz Studio
独立的软件,拥有可视化界面,安装完成并且激活(可以免费试用)后,可以进行模型处理。
包含最基本的导入、导出等功能
导入
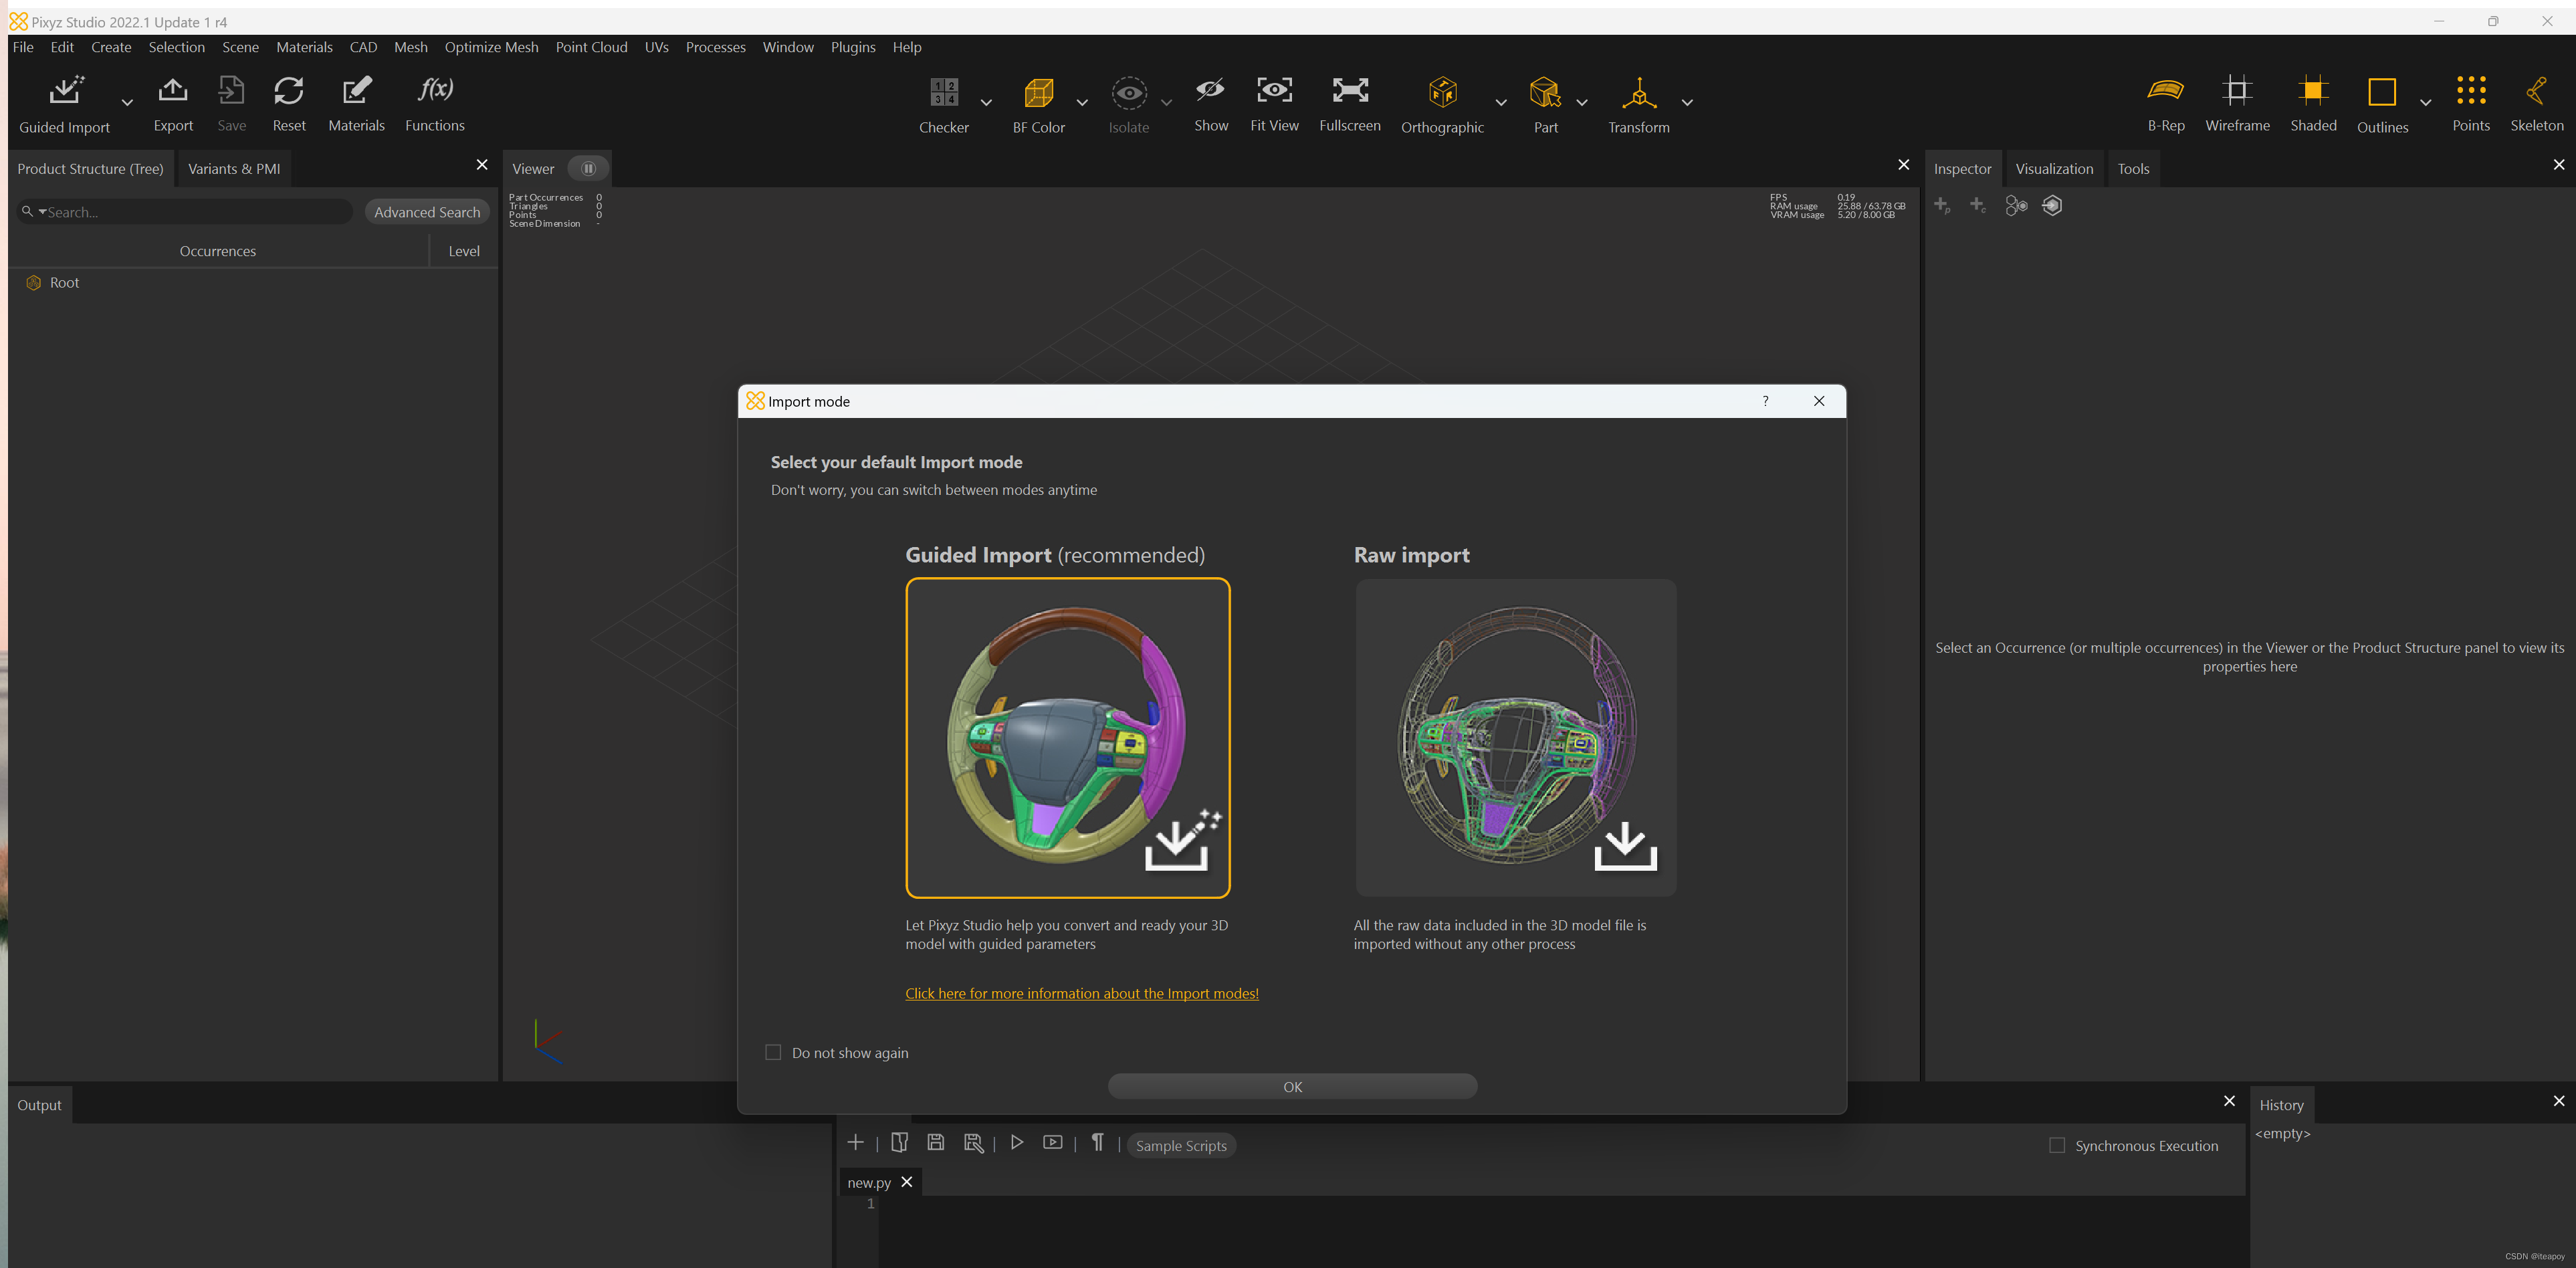
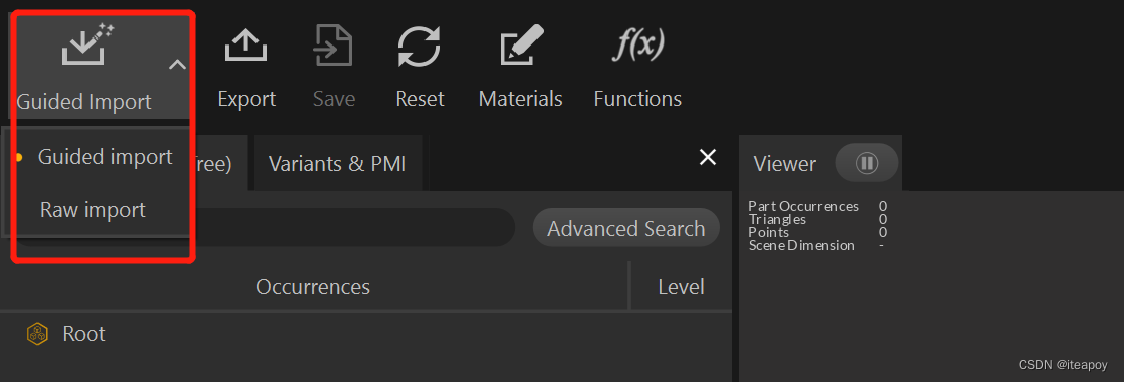
左上角,点击小箭头,可以选择 Guided import 或者 Raw import
选择 Guided Import 之后,可以选择文件,并且根据预设进行配置,选择读取的质量、坐标设置、导入点线等
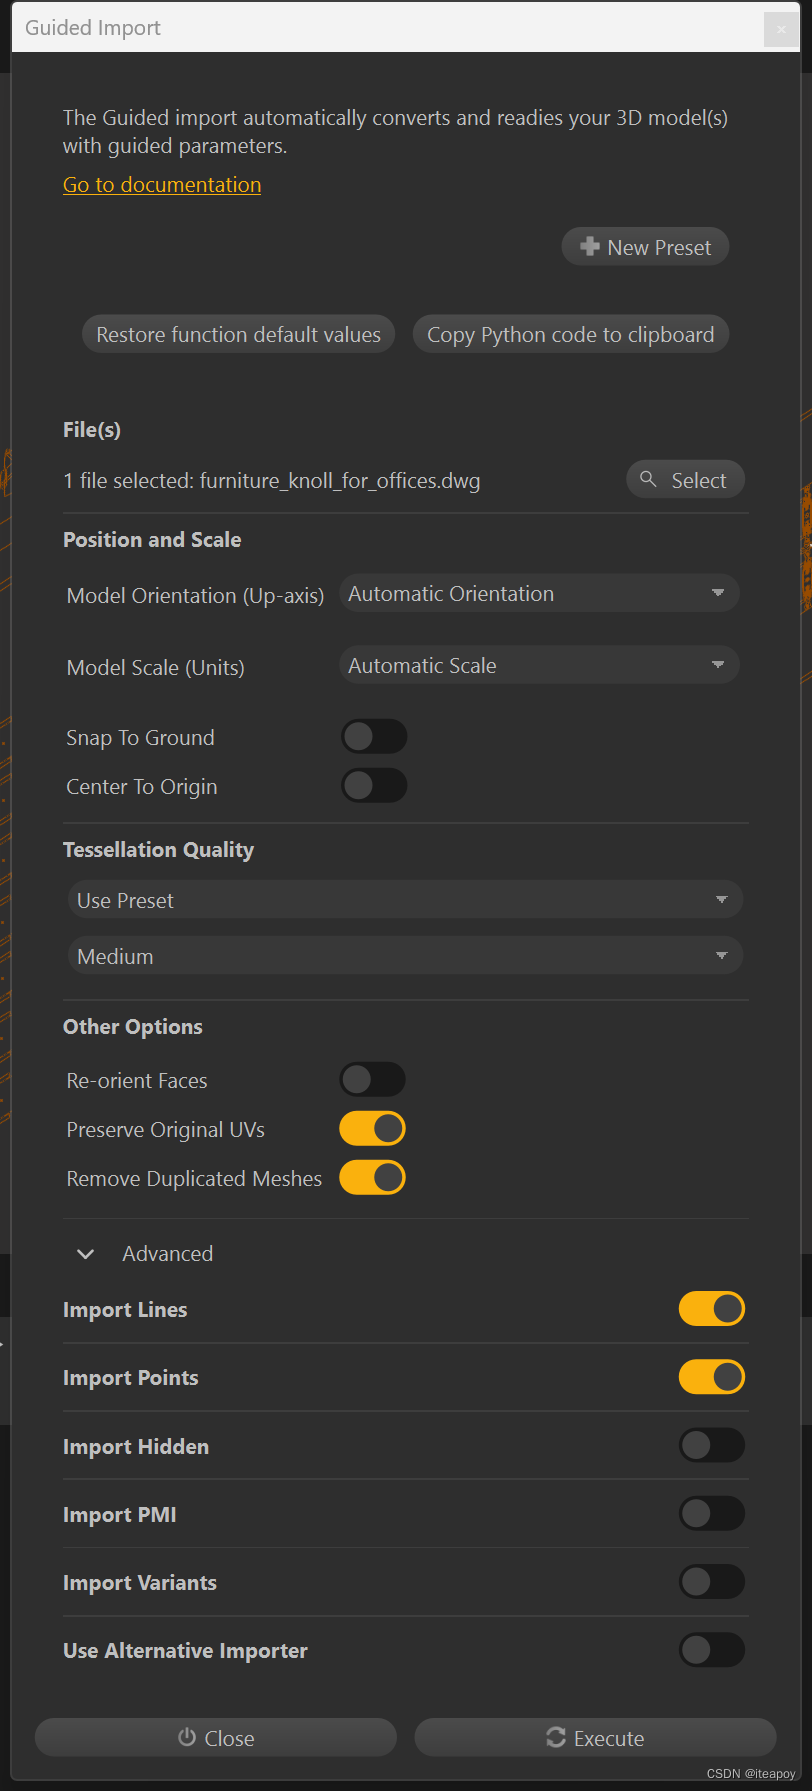
点击 Execute 开始导入模型
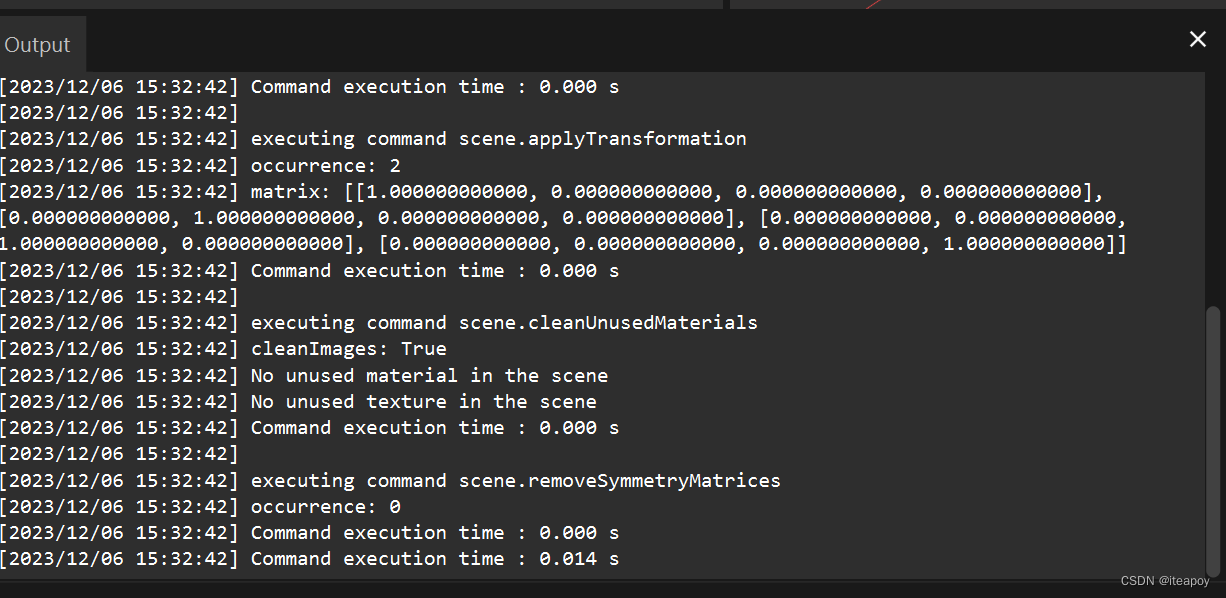
此时,可以看到模型的左下角 Output 开始输出,是在导入模型过程中执行的命令(executing command xxxxx),例如,这里导入执行了:
executing command process.guidedImport
executing command scene.deleteEmptyAnimation
executing command scene.applyTransformation
executing command scene.cleanUnusedMaterials
executing command scene.removeSymmetryMatrices
导入后,可以在左侧 Occurrences 中看到模型的树状结构:
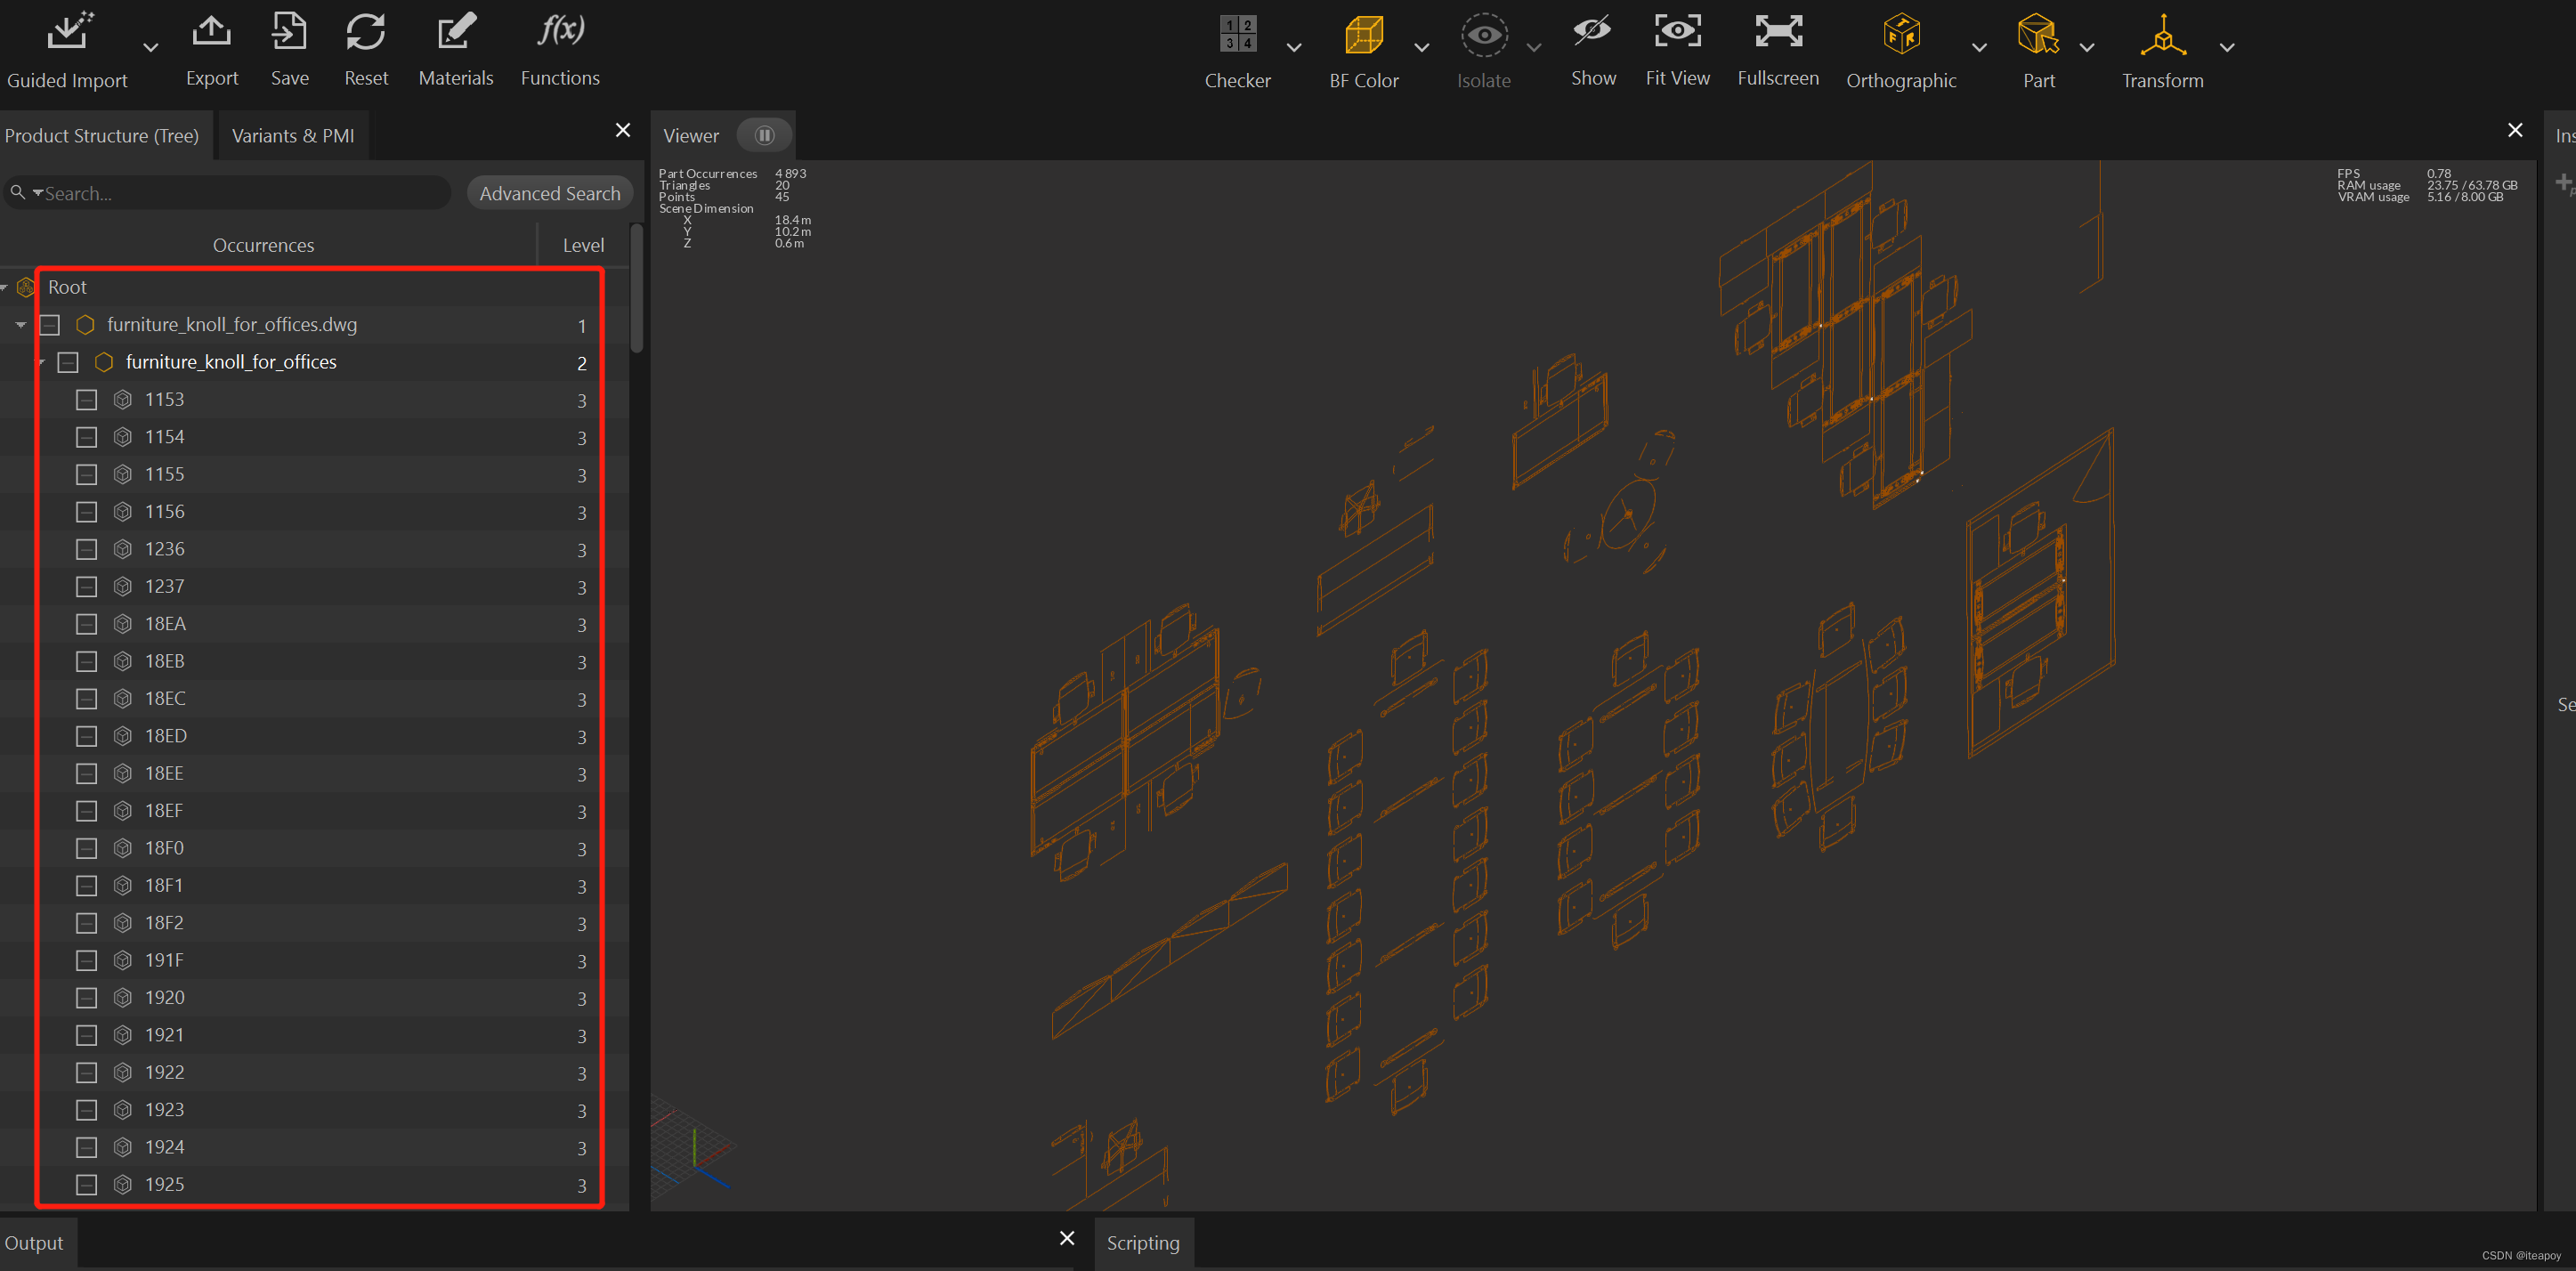
在中间最大的 Viewer 窗口中可视化地看见模型
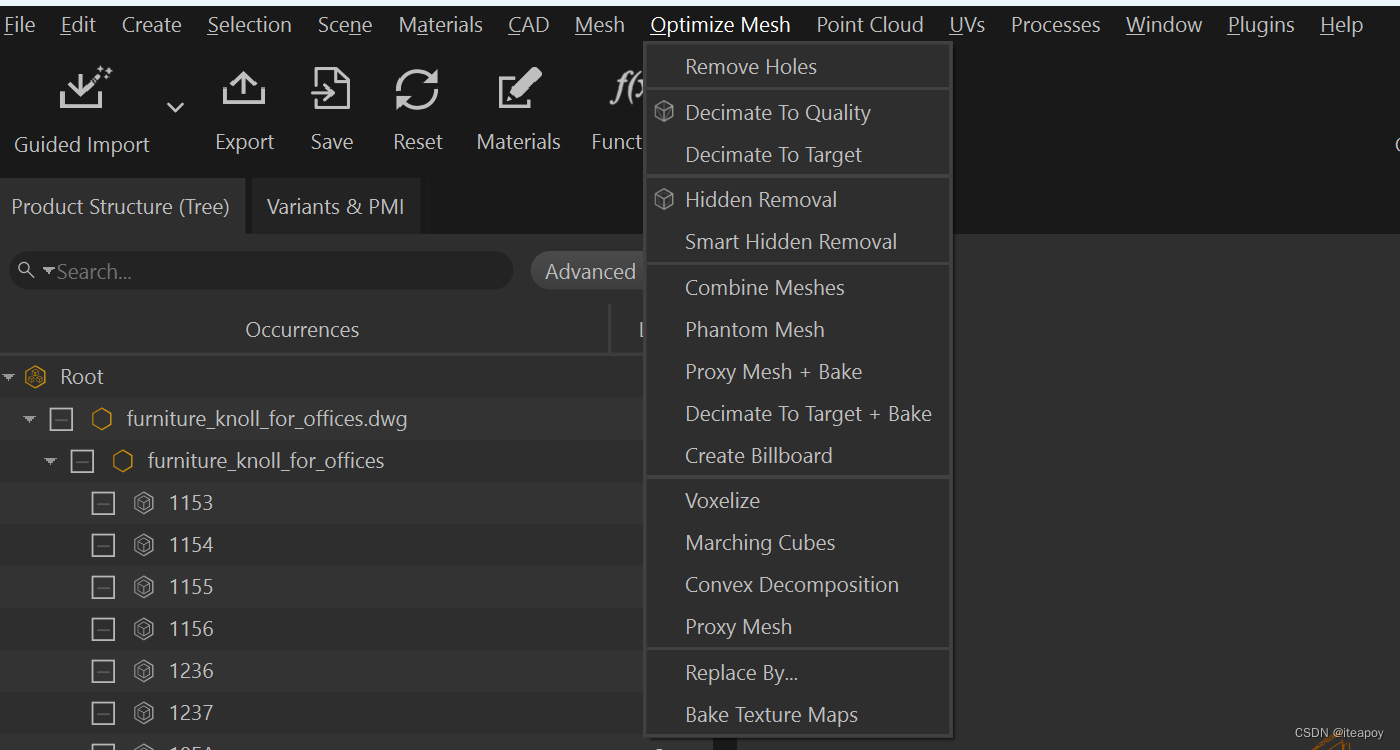
其它功能
顶部导航栏有常见的CAD、面片、模型优化等功能
下面以减面为例(Decimate To Target):
可以选择对某个 occurrence 下所属的子结构进行减面,如果不选的话默认就是根目录(Root),减面策略(Target Strategy)可以选择:
- Triangle Count:减到某个数量的三角面片(默认10000个)
- Ratio:减到一定比例(默认50%)
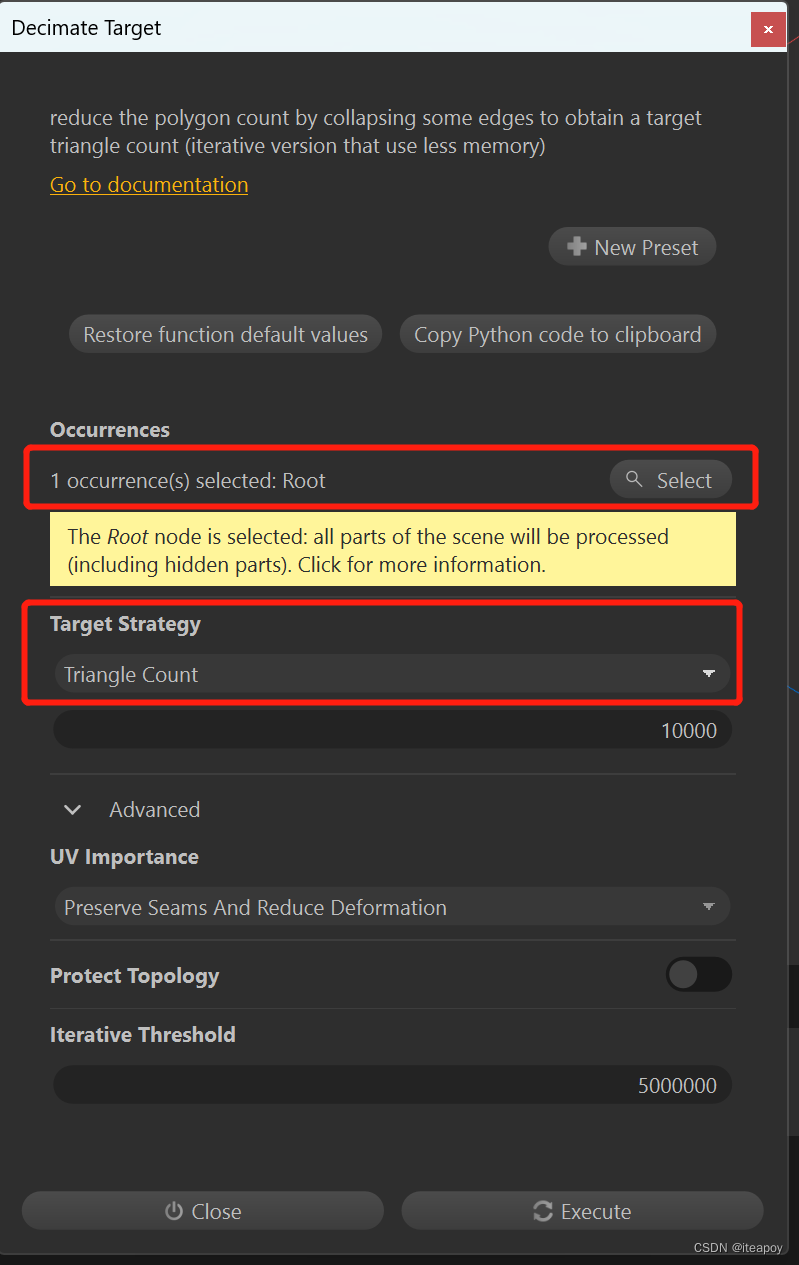
这里设置减面到50%(Ratio),选择 Execute 之后,开始减面。
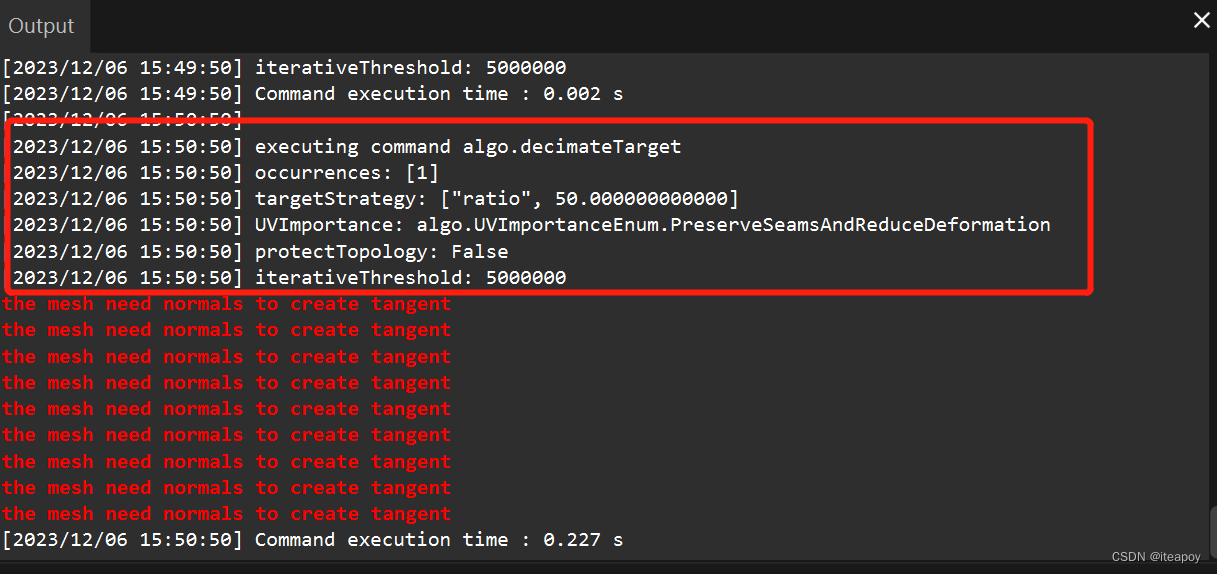
同样,在Output中可以看到减面的执行过程和结果:
导出
点击Export可以将导入的模型导出,导出的时候会根据你设置的文件类型进行转换
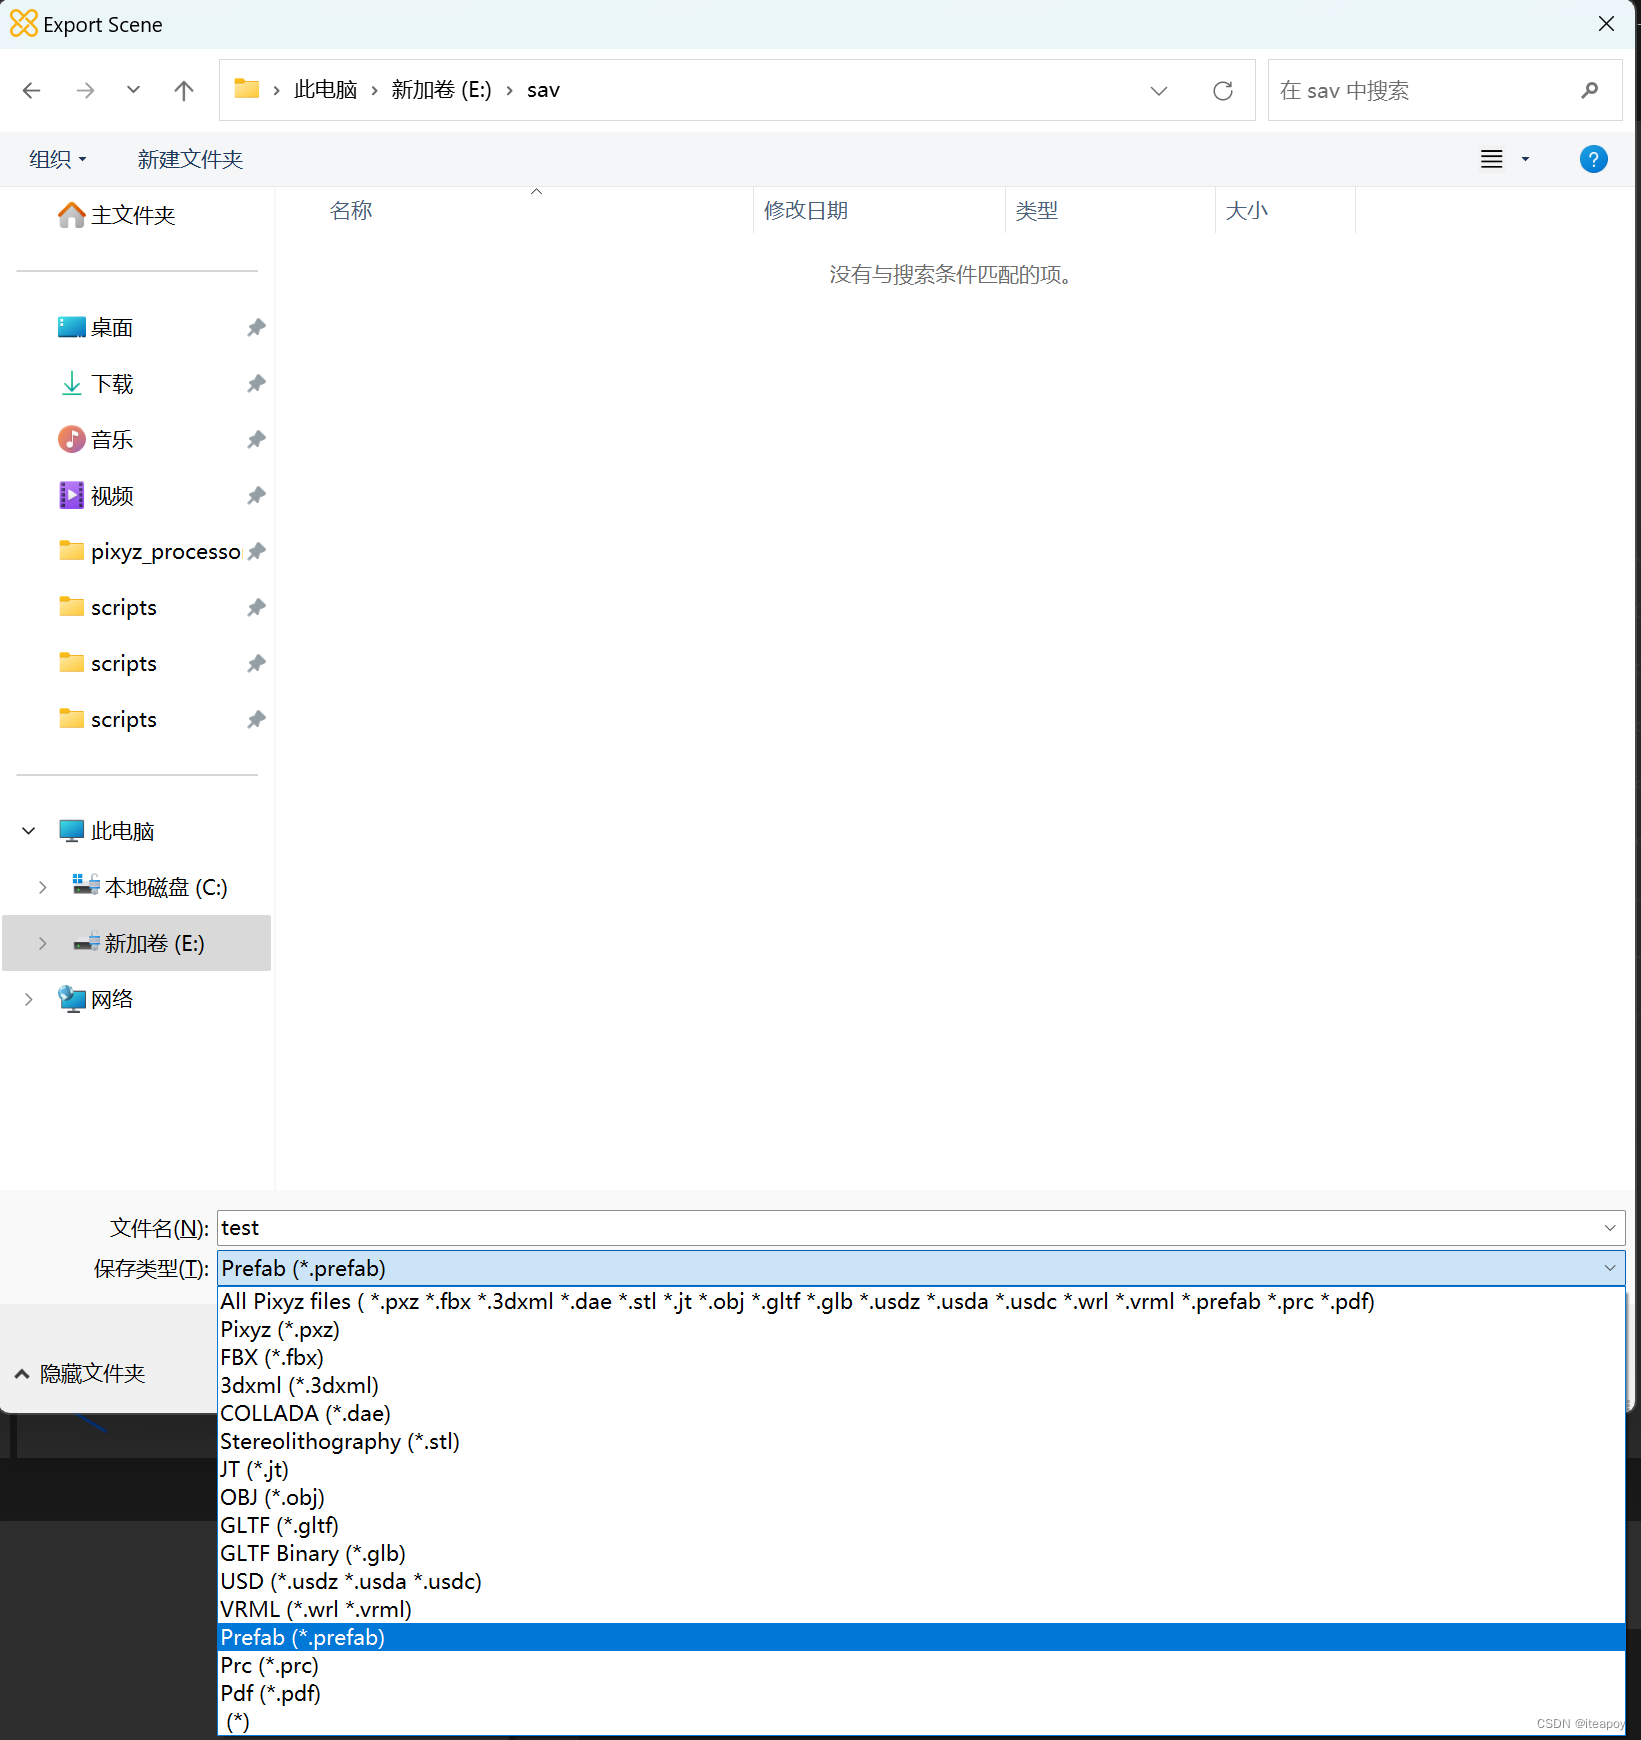
因此,只要先导入某个格式的模型再导出另一个格式,即可完成模型的类型转换
例如,导入’.fbx’,导出 ‘.prefab’,即可以把 fbx 的模型转化成为 unity 的预制体(prefab)
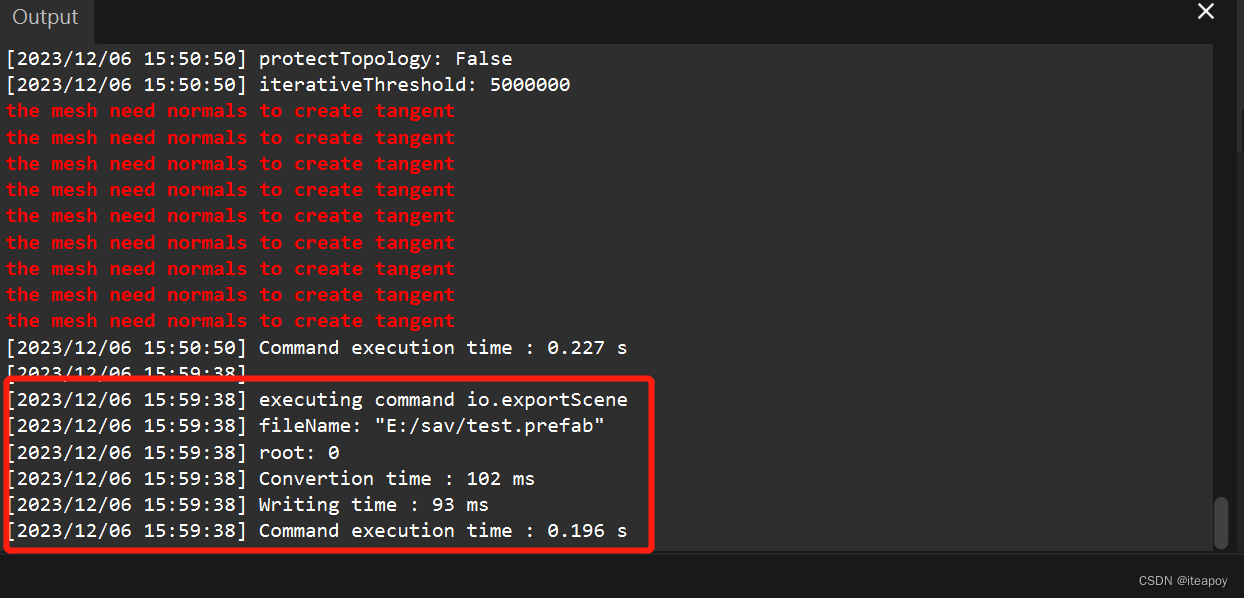
在左下角的 Output中可以看到执行了导出命令:
执行 python 脚本
可以看到在 Output 旁边有一个 Scripting 窗口,可以用于编写和运行python脚本
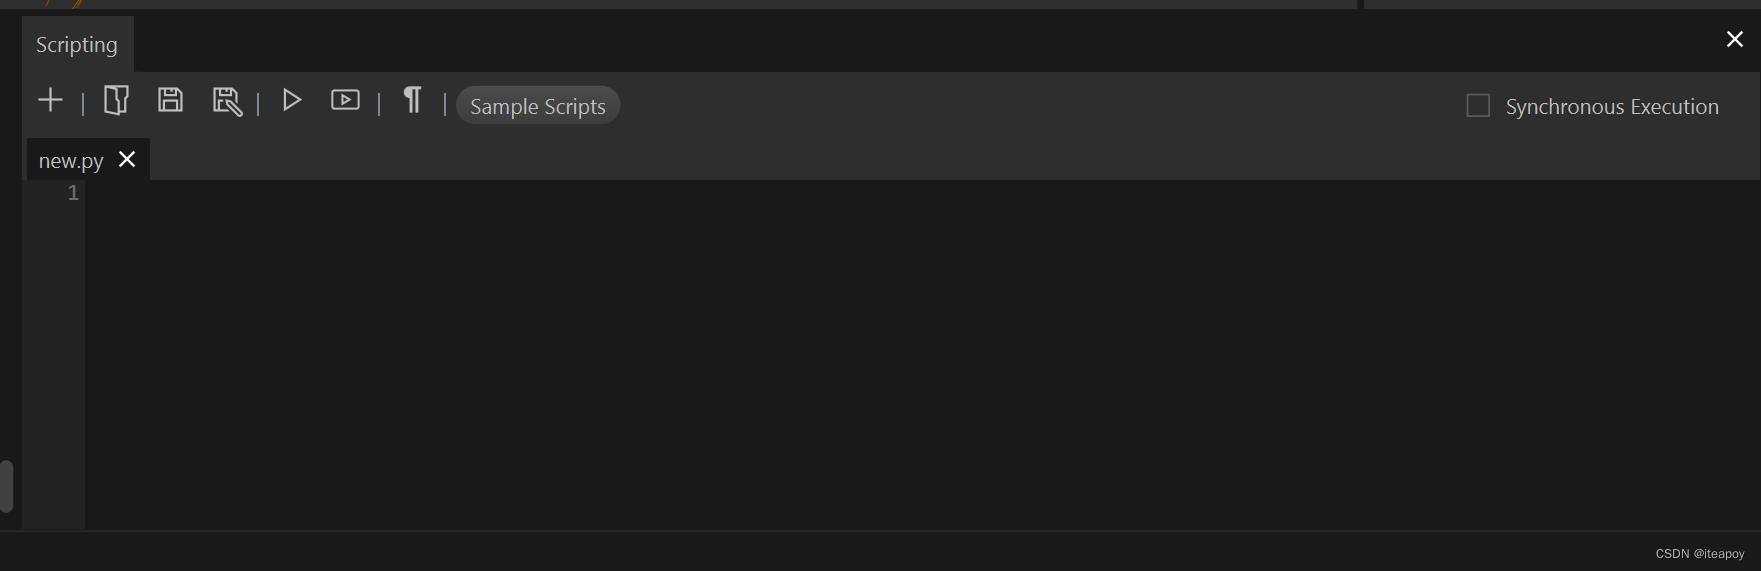
点击 “+” 可以新建一个python脚本,点击 Sample Scripts 会打开本地的文件夹,在安装 Pixyz Studio 时,同时也下载了脚本样例,可以打开每个样例查看学习
例如,101_GenericProcess.py:
# Pixyz Python API sample (2022.1)
#
# 101 Generic Process
#
# Example of a typical simple process to transform a CAD model into optimized mesh(es)

from pxz import *

def process():
	allScene = [scene.getRoot()]

	# repair CAD with 0.1mm tolerance
	algo.repairCAD(allScene, 0.1, True)

	# tessellates with maxSag=0.2mm and maxAngle=10deg
	algo.tessellate(allScene, 0.2, -1, 10)

	# repairs with a tolerance of 0.1mm
	algo.repairMesh(allScene, 0.1)

	# removes through holes with diameter under 10mm
	algo.removeHoles(allScene, True, False, False, 10)

	# removes hidden patches
	algo.hiddenRemoval(allScene,algo.SelectionLevel.Patches, 1024, 16)

	# deletes patches to allow the decimation to remesh over the base CAD patches
	algo.deletePatches(allScene)

	# decimates with surfacic tolerance to 1mm, lineic tolerance to 0.1mm and normal distorsion tolerance to 5mm
	algo.decimate(allScene, 1, 0.1, 5)

# processes the model
process()
可以把这行代码复制到 Script 窗口中执行
更多可以查看官方给出的 Python 的 api
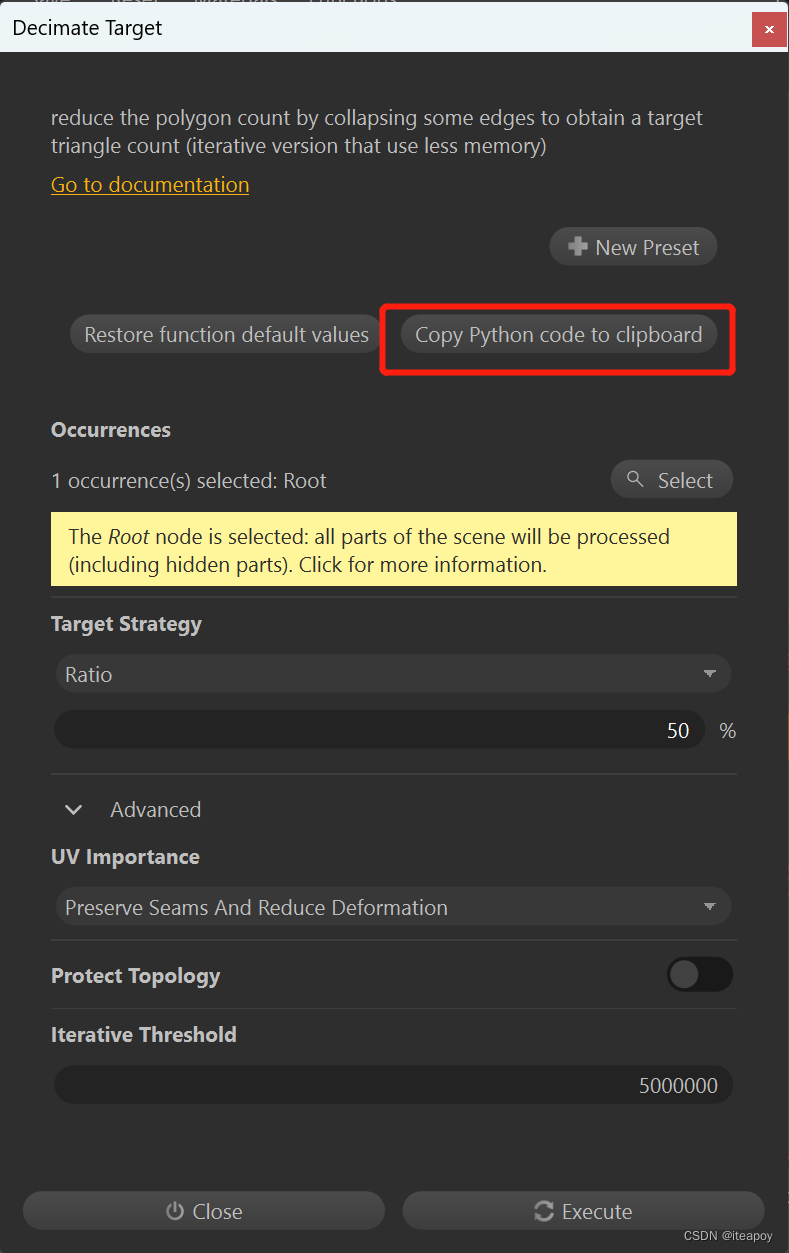
但是在 Pixyz Studio 中有一个更为简单的方法,在之前的界面执行任务的过程中,可以看到每一个单独的窗口上都有一个按钮:Copy python code to clipboard,比如导入窗口、减面窗口:
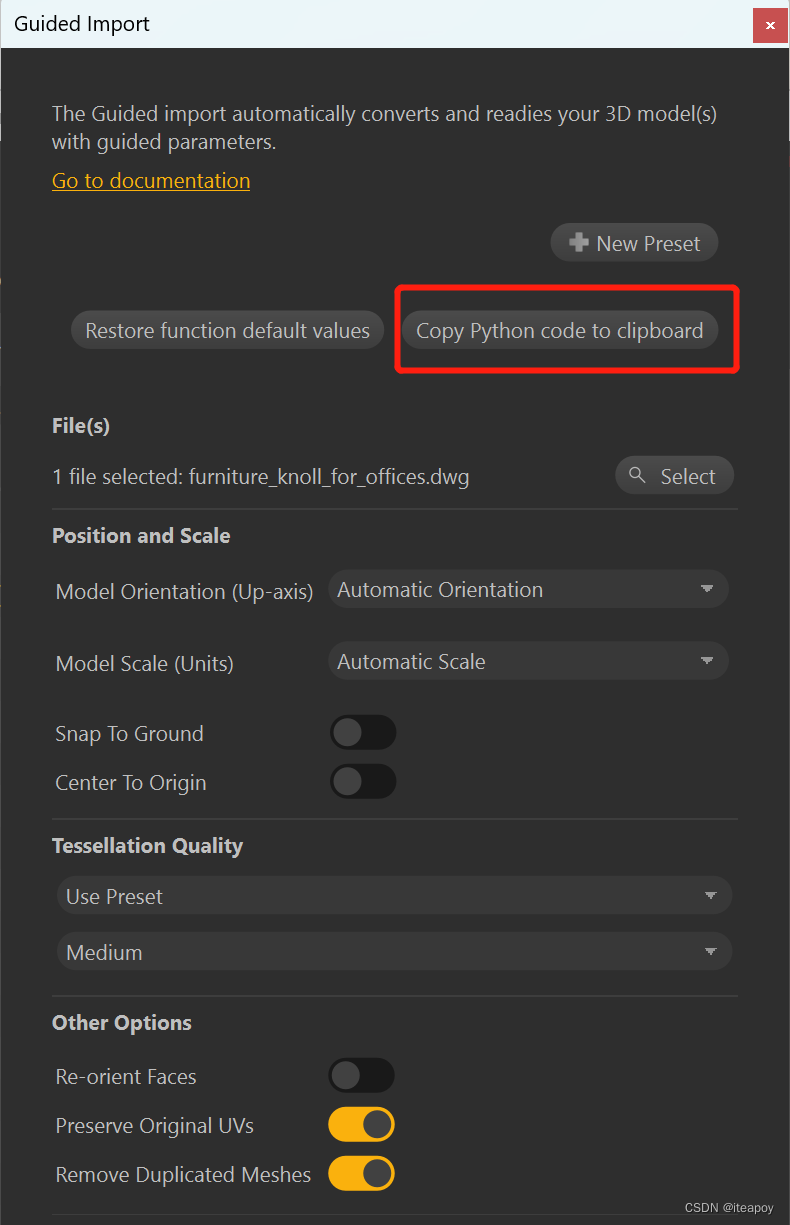
点击Copy python code to clipboard 按钮后,可以将代码复制到 Script 窗口中:
导入模型的 python 代码:
_ret_ = process.guidedImport(["D:/furniture_knoll_for_offices.dwg"], pxz.process.CoordinateSystemOptions(["automaticOrientation",0], ["automaticScale",0], False, False), ["usePreset",2], pxz.process.ImportOptions(False, True, True), True, True, False, False, False, False)
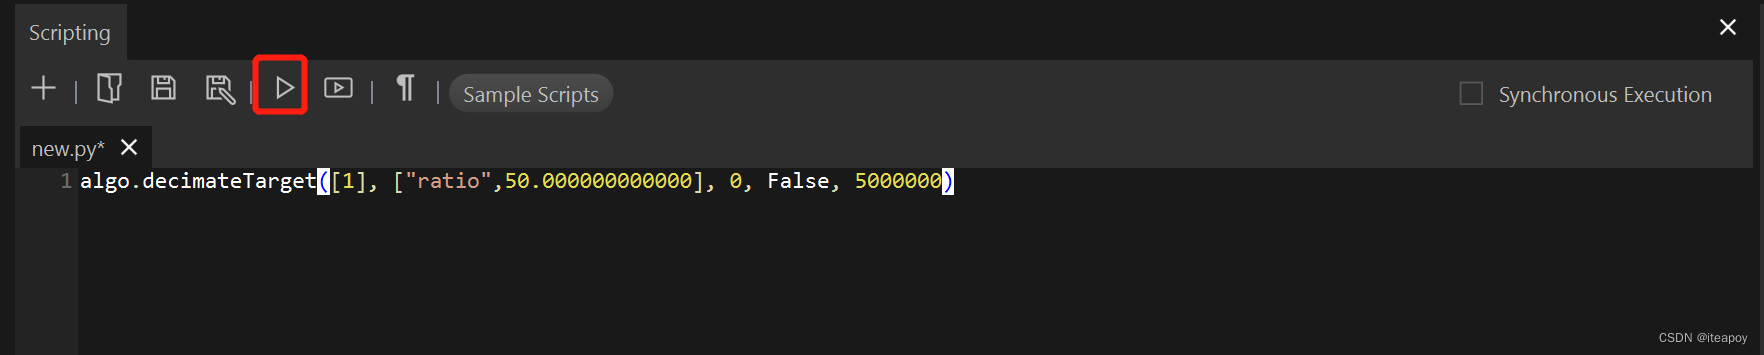
对模型减面的 python 代码:
algo.decimateTarget([1], ["ratio",50.000000000000], 0, False, 5000000)
点击运行后,可以得到与用可视化面板来减面相同的效果:
通过脚本可以进行统一流程化的处理,但是在导入导出时还是会有一些小问题。
想要对多个模型进行批处理,可以使用 Pixyz Scenario Processor
Pixyz Scenario Processor
如何运行 Pixyz Scenario Processor
参考官方文档: 如何运行 Pixyz Scenario Processor
目前参考 windows 的命令,有两种执行方式:
- python script:直接当成 python 脚本执行
- plugin:编译成
.pxzext的插件使用
它还给出了 Scenario 的脚本样例,下面直接参考 gitlab 库内的代码进行魔改。
Scenario Processor sample
仓库内有三个主要的文件夹,readme 里给了一段介绍(写得很抽象),根据个人理解解释一下:
- Folder Watcher : 监测本地硬盘上的文件夹,所有放到这个文件夹里的文件都会执行某个 python 脚本,进行相应的操作
2a. Scenario sample:把某个 python 脚本发布(publish)成插件执行
2b. Folder watcher with Scenario:配合 2a 发布的插件,执行插件内的脚本,进行相应的操作

总而言之,1 和 2a+2b 的效果是一样的,一个是 python script,一个是 plugin,可以根据个人需要选择不同的执行方法
必备软件:
- Pixyz Scenario Processor
- Pixyz Studio:用于创建和发布插件
- 记得安装和配置好 python 的路径,保证可以在命令行中通过
python xxx.py执行脚本。
准备工作:
- 把整个仓库拉到本地
- 去申请 Pixyz Scenario Processor 的试用许可证,申请与激活方法,很重要!!!
Python Script
打开 1_Folder watcher, 它的目录结构为:
│   config.json
│   run.bat
├───scripts
│       sampleScript.py
│       watcher.py
├───_input
└───_output
运行 run.bat 即可执行 sampleScript.py,对模型进行处理
文件的运行逻辑:
run.bat是批处理脚本,双击运行run.bat,用编辑器打开可以看到:
python scripts/watcher.py config.json
pause
其中调用的是python命令,输入的第0个参数是脚本 scripts/watcher.py,运行 scripts 目录下的 watcher.py 脚本,输入的第1个参数是 config.json,一个配置文件
如果没有把python配置为系统的默认环境,也可以在能够运行python的命令行(cmd,powershell)中输入python scripts/watcher.py config.json来执行代码
config.json:配置文件,打开可以看到它的配置
{
    "input_folder":  "_input/",
    "output_folder": "_output/",
    "optimization":  "True",
    "extensions":
    [
        ".pxz",
        ".fbx",
        ".glb",
        ".pdf",
        ".usdz",
        ".obj",
        ".3dxml"
    ]
}
- 输入文件夹为:
_input/ - 输出文件夹为:
_output/ - optimization为True,表示需要优化
- extensions表示接受的模型的类型为:
.pxz、.fbx、.glb、.pdf、.usdz、.obj、.3dxml,如果有额外需要的类型,可以在这里添加,可以删除不需要的类型
watcher.py:对文件夹进行监控,while(1) 的死循环,只要_input文件夹中有文件,且已经复制完毕(isCopyFinished),就执行executeScenarioProcessor
import sys
import json
import os
import subprocess
from ctypes import windll

def main(config_file):
    # 读取输入参数
    # 输入文件夹 input_folder、输出文件 output_folder、后缀 extensions、是否要优化 optimization
    input_folder, output_folder, extensions, optimization = read_config(config_file)

    waiting = False

    while(1):
	    # 从 input_folder 中读取文件文件 input_files
        input_files = [file for file in os.listdir(input_folder)\
                        if (os.path.isfile(input_folder + '/' + file)\
                        and getFileExtension(file) not in ['.xml', ''])]

		# 如果 input_folder 中没有文件了,就不处理,继续等待
        if len(input_files) == 0:
            if not waiting:
                print('\n')
                print('Waiting for files to process...\n')
                waiting = True
            continue
        # 如果 input_folder 有文件,但是还没有复制完,不处理,继续等待
        elif not isCopyFinished(input_folder + '/' + input_files[0]):
            continue
        # 如果 input_folder 有文件,且已经复制完了,停止等待,开始处理文件
        else:
            waiting = False

		# 目前正在处理的文件 input_file 的路径:输入文件夹路径 + 第0个文件名
        input_file = input_folder + '/' + input_files[0]
        # 开始处理文件
        executeScenarioProcessor(input_file, output_folder, extensions, optimization)

		# 处理完文件后,把文件删除,否则会一直处理这个文件,真的陷入死循环了
        os.remove(input_file)

def read_config(config_file):
	# 打开配置文件 config.json,加载内容到 inputs
    with open(config_file) as config:
        inputs = json.load(config)

    # 读取输入文件夹 "input_folder" 对应的字段
    input_folder = inputs['input_folder']
    input_folder = os.path.abspath(input_folder)
    # 读取输出文件夹 "output_folder" 对应的字段
    output_folder = inputs['output_folder']
    output_folder = os.path.abspath(output_folder)
    # 读取输出后缀 "extensions" 对应的字段
    extensions = inputs['extensions']
    # 读取输出优化选项 "optimization" 对应的字段
    optimization = inputs['optimization']

    print('\n')
    print('Input folder: %s\n' % input_folder)
    print('Output folder: %s\n' % output_folder)
    print('Extensions: %s\n' % ' '.join(extensions))
    print('Optimization: %s\n' % optimization)

    return input_folder, output_folder, extensions, optimization

# 判断文件是否复制完成的函数
def isCopyFinished(inputFile):
    """
    Check if the file that was dropped in the input folder has finished being copied
    """
    GENERIC_WRITE         = 1 << 30
    FILE_SHARE_READ       = 0x00000001
    OPEN_EXISTING         = 3
    FILE_ATTRIBUTE_NORMAL = 0x80
    handle = windll.Kernel32.CreateFileW(inputFile, GENERIC_WRITE, FILE_SHARE_READ, None, OPEN_EXISTING,\
            FILE_ATTRIBUTE_NORMAL, None)
    if handle != -1:
        windll.Kernel32.CloseHandle(handle)
        return True
    return False

# 获取文件的后缀
def getFileExtension(file):
    return os.path.splitext(file)[1]

# 用 PiXYZScenarioProcessor 执行命令,核心步骤
def executeScenarioProcessor(input_file, output_folder, extensions, optimization):
	# 注意:把 PiXYZScenarioProcessor.exe 的路径换成自己本地的路径
    args = ['C:\Program Files\PiXYZScenarioProcessor\PiXYZScenarioProcessor.exe', 'scripts/sampleScript.py', input_file, output_folder, str(extensions), str(optimization)]
    print(sys.argv[0])
    print(args)
    # 启动子进程运行指令
    p = subprocess.Popen(args, shell=True, stdout=subprocess.PIPE, stderr=subprocess.STDOUT, universal_newlines=True)
    while p.poll() is None:
        l = str(p.stdout.readline().rstrip()) # This blocks until it receives a newline.
        print(l)
    print(p.stdout.read())

if __name__ == "__main__":
    main(sys.argv[1])
如果不需要对 input 文件夹实时监控,不需要删除 input 文件夹里的模型,只是将 input 里所有的模型转化成 output 文件夹里的,可以简化上述代码为:
import sys
import json
import os
import subprocess

def main(config_file):
    input_folder, output_folder = read_config(config_file)

    input_files = [file for file in os.listdir(input_folder)\
                    if (os.path.isfile(input_folder + '/' + file)\
                    and getFileExtension(file) not in ['.xml', ''])]

    print(input_files)

    if len(input_files)>0:
        for i in range(len(input_files)):
            print("-"*30, i, input_files[i], "-"*30)
            input_file = input_folder + '/' + input_files[i]
            executeScenarioProcessor(input_file, output_folder)

def read_config(config_file):

    with open(config_file) as config:
        inputs = json.load(config)

    input_folder = inputs['input_folder']
    input_folder = os.path.abspath(input_folder)

    output_folder = inputs['output_folder']
    output_folder = os.path.abspath(output_folder)

    print('\n')
    print('Input folder: %s\n' % input_folder)
    print('Output folder: %s\n' % output_folder)

    return input_folder, output_folder

def getFileExtension(file):
    return os.path.splitext(file)[1]

def try_decode_bytes(b):
    for encoding in ['utf-8', 'gbk']:
        try:
            return b.decode(encoding, errors="ignore")
        except Exception as e:
            pass

    return '{}'.format(b)

def executeScenarioProcessor(input_file, output_folder, extensions, optimization):
    args = ['C:\Program Files\PiXYZScenarioProcessor\PiXYZScenarioProcessor.exe', 'scripts/sampleScript.py', input_file, output_folder, str(extensions), str(optimization)]
    print(sys.argv[0])
    print(args)
    p = subprocess.Popen(args, shell=True, stdout=subprocess.PIPE, stderr=subprocess.STDOUT, universal_newlines=True)
    while p.poll() is None:
        l = str(p.stdout.readline().rstrip()) # This blocks until it receives a newline.
        print(l)
    print(p.stdout.read())


if __name__ == "__main__":
    main(sys.argv[1])
sampleScript.py:
import os
import time
import sys

def convertFile(inputFile, outputFolder, extensions, optimization):
	fileName = getFileNameWithoutExtension(inputFile)

	# Set log file in output folder for debug purposes (otherwise it will be overwritten by next 3d file processing)
	core.setLogFile(outputFolder + '/' + fileName + '.log')

	# Imports and prepares the input_files using the automatic "Guided import" process (see documentation)
	roots = process.guidedImport([inputFile], pxz.process.CoordinateSystemOptions(["automaticOrientation",0], ["automaticScale",0], False, True), ["usePreset",2], pxz.process.ImportOptions(False, True, True), False, False, False, False, False, False)

	if optimization:# Comment or delete the lines not necessary to your workflow, adjust parameters' values if necessary

		t0, n_triangles, n_vertices, n_parts = getStats(roots[0])

		# Automatically selects and deletes parts in the scene, whose size is lower than a maximum size defined in by the parameter Size (in millimeters)
		SIZE = 20
		scene.selectByMaximumSize(roots, SIZE, -1, False)
		scene.deleteSelection()

		# Removes through holes from CAD models whose diameter is below the defined diameter
		DIAMETER = 10
		algo.removeHoles(roots, True, False, False, DIAMETER, 0)

		# Deletes patches borders (black lines delimiting CAD models' faces) to allow decimation (run in the next step) to be more efficient. Otherwise, patches borders are considered as important information to preserve.
		algo.deletePatches(roots, True)

		# Reduces meshes density (triangles count) by decimating them, using the "Decimate To Quality" function (see documentation). The values used here are meant to decimate meshes just enough to lower the triangles count without affecting the visual quality too much, especially on CAD models.
		algo.decimate(roots, 1, 0.1, 3, -1, False)

		# Removes triangles not visible from a set of cameras automatically placed around the model.
		algo.hiddenRemoval(roots, 2, 1024, 16, 90, False, 1)

		t1, _n_triangles, _n_vertices, _n_parts = getStats(roots[0])

	# Export files
	for extension in extensions:
		io.exportScene(outputFolder + '/' + fileName + extension)

	if optimization:
		printStats(fileName, t1 - t0, n_triangles, _n_triangles, n_vertices, _n_vertices, n_parts, _n_parts)


def getFileNameWithoutExtension(file):
	return os.path.splitext(os.path.basename(file))[0]

def getStats(root):
	core.configureInterfaceLogger(False, False, False) # hide next lines from logs

	t = time.time()
	n_triangles = scene.getPolygonCount([root], True, False, False)
	n_vertices = scene.getVertexCount([root], False, False, False)
	n_parts = len(scene.getPartOccurrences(root))

	core.configureInterfaceLogger(True, True, True) # reenable logs

	return t, n_triangles, n_vertices, n_parts

def printStats(fileName, t, n_triangles, _n_triangles, n_vertices, _n_vertices, n_parts, _n_parts):
	print('\n')
	print('{:<20s}{:<3s}\n'.format('file ', fileName))
	print('{:<20s}{:<8.3f}{:<3s}\n'.format('optimization ', t, ' s'))
	print('{:<20s}{:<3s}\n'.format('triangles ', str(n_triangles) + ' -> ' + str(_n_triangles)))
	print('{:<20s}{:<3s}\n'.format('vertices ', str(n_vertices) + ' -> ' + str(_n_vertices)))
	print('{:<20s}{:<3s}\n'.format('parts ', str(n_parts) + ' -> ' + str(_n_parts)))

# Get arguments passed in command line and call main function
if __name__ == "__main__":
	convertFile(sys.argv[1], sys.argv[2], eval(sys.argv[3]), eval(sys.argv[4]))
解读:
在 watcher.py 的 executeScenarioProcessor 函数中,封装了输入参数:
args = ['C:\Program Files\PiXYZScenarioProcessor\PiXYZScenarioProcessor.exe', 'scripts/sampleScript.py', input_file, output_folder, str(extensions), str(optimization)]
分别对应 sampleScript.py 中的 argv:
if __name__ == "__main__":
	convertFile(sys.argv[1], sys.argv[2], eval(sys.argv[3]), eval(sys.argv[4]))
即:
- sys.argv[1] = input_file
- sys.argv[2] = output_folder
- eval(sys.argv[3]) = extensions
- eval(sys.argv[4])) = optimization
利用 guidedImport ,将 inputFile 导入,返回存储到 roots 中
	# Imports and prepares the input_files using the automatic "Guided import" process (see documentation)
	roots = process.guidedImport([inputFile], pxz.process.CoordinateSystemOptions(["automaticOrientation",0], ["automaticScale",0], False, True), ["usePreset",2], pxz.process.ImportOptions(False, True, True), False, False, False, False, False, False)
之后便是对 roots 的一系列操作,例如:统计 roots 下的三角面片数量、顶点数量、part数量(也许part可以翻译成部件?)
t0, n_triangles, n_vertices, n_parts = getStats(roots[0])

def getStats(root):
	core.configureInterfaceLogger(False, False, False) # hide next lines from logs

	t = time.time()
	n_triangles = scene.getPolygonCount([root], True, False, False)
	n_vertices = scene.getVertexCount([root], False, False, False)
	n_parts = len(scene.getPartOccurrences(root))

	core.configureInterfaceLogger(True, True, True) # reenable logs

	return t, n_triangles, n_vertices, n_parts
选择并删除某些parts
SIZE = 20
scene.selectByMaximumSize(roots, SIZE, -1, False)
scene.deleteSelection()
其它的可以参考官方给出的 Python 的 api 和 studio 里自带的样例
Plugin
发布成插件的脚本和上述是一个脚本,但是需要分两步:
- 打开 2a_Scenario sample,把
sampleScript.py发布插件,把插件放到PiXYZScenarioProcessor\plugins目录下 - 打开 2b_Folder watcher with Scenario,用
run.bat执行watcher.py,运行插件
2a_Scenario sample 的目录结构如下:
│   publish.bat
│   sample.pxzext
└───sample
    │   plugin.xml
    └───scripts
            sampleScript.py
sampleScript.py和 1_Folder watcher 最大的差别就是,少了执行代码:
# Get arguments passed in command line and call main function
if __name__ == "__main__":
	convertFile(sys.argv[1], sys.argv[2], eval(sys.argv[3]), eval(sys.argv[4]))
plugin.xml中指定了执行的函数function为convertFile,输入的参数 parameters:
<?xml version="1.0" encoding="utf-8" ?>
<module name="sample" version="2021.1.1.5">
  <include module="Core"/>
  <include module="IO"/>
  <function name="convertFile" state="Stable" scriptable="true" guiable="true" description="" logName="" scriptFile="sampleScript.py">
    <parameters>
      <parameter name="inputFile" type="ImportFilePath" state="Stable"/>
      <parameter name="outputFolder" type="OutputDirectoryPath" state="Stable"/>
      <parameter name="extensions" type="StringList" state="Stable"/>
      <parameter name="optimization" type="Bool" state="Stable"/>
    </parameters>
  </function>
</module>
publish.bat中指定了使用PiXYZStudio的PiXYZStudioPublishPlugin来发布插件(注意:这里需要用到PiXYZStudio下的PiXYZStudioPublishPlugin.exe,而不是之前的PiXYZScenarioProcessor.exe)
编译的文件夹为 sample,编译出的插件名字为 sample.pxzext,并且之后将 sample.pxzext 复制到 PiXYZScenarioProcessor 目录下的 plugins 目录中
将 PiXYZStudio 和 PiXYZScenarioProcessor 的路径都改为自己本地的,也可以依次执行,然后手动把编译出的 sample.pxzext 放到 PiXYZScenarioProcessor\plugins 下面
rem Compile plugin sources
"C:\Program Files\PiXYZStudio\PiXYZStudioPublishPlugin.exe" "%cd%\sample" "%cd%\sample.pxzext"

rem Copy scenario plugin in SP installation folder
copy "%cd%\sample.pxzext" "C:\ProgramData\PiXYZScenarioProcessor\plugins\"

pause
编译完成,将 sample.pxzext 放到 PiXYZScenarioProcessor\plugins 下面之后,可以打开2b_Folder watcher with Scenario
2b_Folder watcher with Scenario 的目录结构为:
│   config.json
│   run.bat
├───scripts
│       watcher.py
├───_input
└───_output
和 1 的差别是在scripts下面的 sampleScript.py 此时变成了PiXYZScenarioProcessor\plugins\sample.pxzext
watcher.py 和 1 的最大差别是输入的参数 args 变了:
1_Folder watcher\scripts\watcher.py
args = ['C:\Program Files\PiXYZScenarioProcessor\PiXYZScenarioProcessor.exe', 'scripts/sampleScript.py', input_file, output_folder, str(extensions), str(optimization)]
2b_Folder watcher with Scenario\scripts\watcher.py
args = ['C:\Program Files\PiXYZScenarioProcessor\PiXYZScenarioProcessor.exe', 'sample', 'convertFile', "\"" + input_file.replace("\\", "\\\\") + "\"", "\"" + output_folder.replace("\\", "\\\\") + "\"", str(extensions), "\"" + str(optimization) + "\""]
输入的 sample, convertFile 和 plugin.xml 中指定的 module 和 function 对应