关于SpringCloud的相关知识在此不做讨论 , 直接一步步完成一套简单完整的SpringCloud微服务注册与调用的Demo .
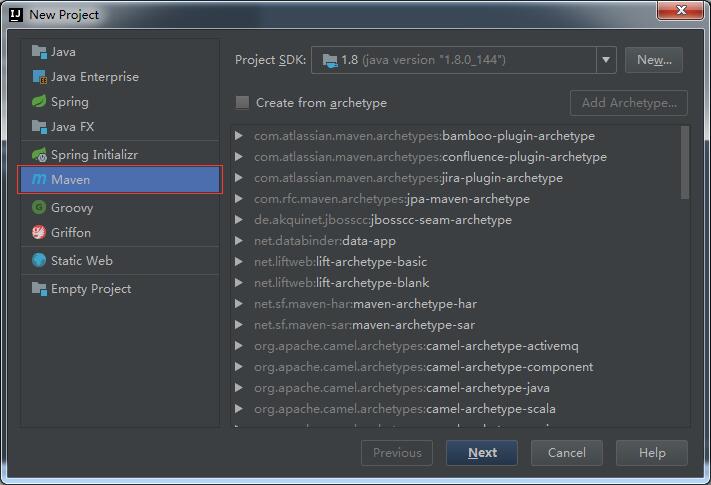
1 . 创建一个maven主工程 , 填写工程信息 , Finish
2 . 创建一个新的model作为服务注册中心
在这里 , 我们需要用的组件是Spring Cloud Netflix的Eureka , Eureka是一个服务注册和发现的模块 .
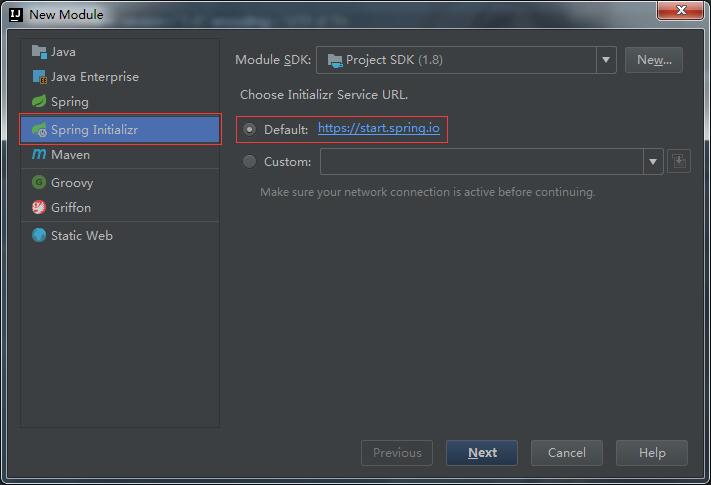
2.1 首先创建一个新模块 , 选择SpringInitializr模板 , 填写模块信息
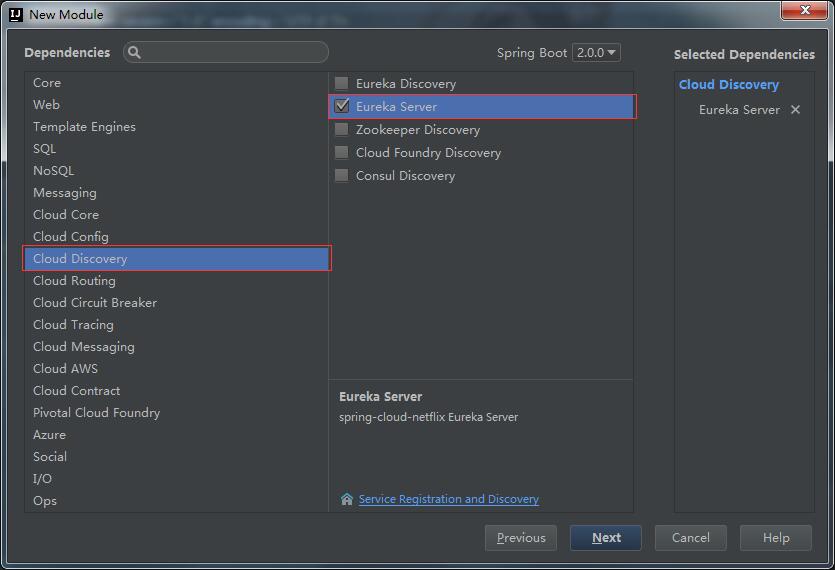
2.2 选择Cloud Discovery -> Eureka Server , 然后一直下一步 , 直到模块创建完毕 . (如果是第一次创建Spring Cloud项目 , 此时maven会自动下载一些Cloud依赖 , 请耐心等待)
2.3 创建完后模块的pom文件如下
<?xml version="1.0" encoding="UTF-8"?>
<project xmlns="http://maven.apache.org/POM/4.0.0" xmlns:xsi="http://www.w3.org/2001/XMLSchema-instance"
	xsi:schemaLocation="http://maven.apache.org/POM/4.0.0 http://maven.apache.org/xsd/maven-4.0.0.xsd">
	<modelVersion>4.0.0</modelVersion>

	<groupId>com.xbz</groupId>
	<artifactId>eurekaserver</artifactId>
	<version>0.0.1-SNAPSHOT</version>
	<packaging>jar</packaging>

	<name>eurekaserver</name>
	<description>服务注册中心</description>

	<parent>
		<groupId>org.springframework.boot</groupId>
		<artifactId>spring-boot-starter-parent</artifactId>
		<version>2.0.0.RELEASE</version>
		<relativePath/> <!-- lookup parent from repository -->
	</parent>

	<properties>
		<project.build.sourceEncoding>UTF-8</project.build.sourceEncoding>
		<project.reporting.outputEncoding>UTF-8</project.reporting.outputEncoding>
		<java.version>1.8</java.version>
		<spring-cloud.version>Finchley.M9</spring-cloud.version>
	</properties>

	<dependencies>
		<!--eureka server -->
		<dependency>
			<groupId>org.springframework.cloud</groupId>
			<artifactId>spring-cloud-starter-netflix-eureka-server</artifactId>
		</dependency>

		<!-- SpringBoot test-->
		<dependency>
			<groupId>org.springframework.boot</groupId>
			<artifactId>spring-boot-starter-test</artifactId>
			<scope>test</scope>
		</dependency>
	</dependencies>

	<dependencyManagement>
		<dependencies>
			<dependency>
				<groupId>org.springframework.cloud</groupId>
				<artifactId>spring-cloud-dependencies</artifactId>
				<version>${spring-cloud.version}</version>
				<type>pom</type>
				<scope>import</scope>
			</dependency>
		</dependencies>
	</dependencyManagement>

	<build>
		<plugins>
			<plugin>
				<groupId>org.springframework.boot</groupId>
				<artifactId>spring-boot-maven-plugin</artifactId>
			</plugin>
		</plugins>
	</build>

	<repositories>
		<repository>
			<id>spring-milestones</id>
			<name>Spring Milestones</name>
			<url>https://repo.spring.io/milestone</url>
			<snapshots>
				<enabled>false</enabled>
			</snapshots>
		</repository>
	</repositories>
</project>
2.4 编写服务中心启动类 , 使用@EnableEurekaServe注解来表示这是一个eureka中心
package com.xbz.eurekaserver;

import org.springframework.boot.SpringApplication;
import org.springframework.boot.autoconfigure.SpringBootApplication;
import org.springframework.cloud.netflix.eureka.server.EnableEurekaServer;

/**
 * 服务注册中心 , 只需要在启动类上添加@EnableEurekaServer注解
 */
@EnableEurekaServer
@SpringBootApplication
public class EurekaserverApplication {

    public static void main(String[] args) {
        try {
            SpringApplication.run(EurekaserverApplication.class, args);
        } catch (Exception e) {
            e.printStackTrace();
        }
    }
}
2.5 在resources目录下新建Eureka注册中心配置文件 application.yml
server:
  port: 9999 #服务端口

eureka:
  instance:
    hostname: localhost
  client:
    registerWithEureka: false #是否将eureka自身作为应用注册到eureka注册中心
    fetchRegistry: false #为true时可以启动 , 但抛异常 : Cannot execute request on any known server
    #通过eureka.client.registerWithEureka:false和fetchRegistry:false来表明自己是一个eureka server.

    serviceUrl:
      defaultZone: http://${eureka.instance.hostname}:${server.port}/eureka/
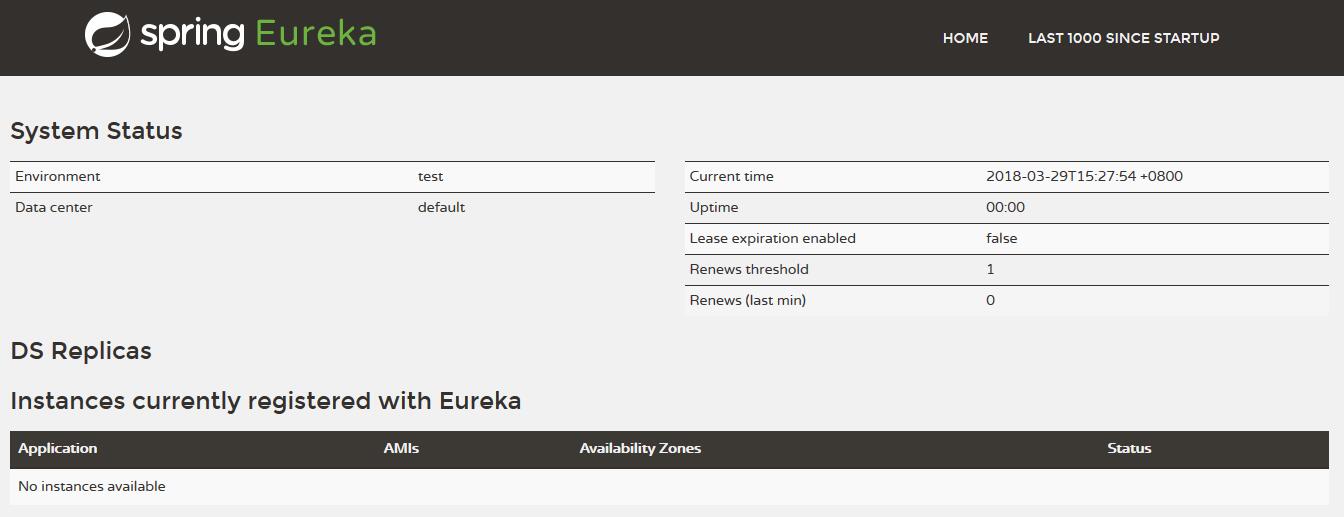
2.6 运行启动类 , 在浏览器访问 http://localhost:9999 , 打开如下页面说明启动成功
可以看到最先面有一行No application available , 即没有服务被发现 , 因为当前没有任何服务
3 . 创建一个服务提供者 (eureka client)
3.1 新建模块service-hello , 过程同server一样
3.2 创建完毕pom文件如下(版本不同文件内容可能有所不同 , 但不影响正常运行)
<?xml version="1.0" encoding="UTF-8"?>
<project xmlns="http://maven.apache.org/POM/4.0.0" xmlns:xsi="http://www.w3.org/2001/XMLSchema-instance"
	xsi:schemaLocation="http://maven.apache.org/POM/4.0.0 http://maven.apache.org/xsd/maven-4.0.0.xsd">
	<modelVersion>4.0.0</modelVersion>

	<groupId>com.xbz</groupId>
	<artifactId>service-hello</artifactId>
	<version>0.0.1-SNAPSHOT</version>
	<packaging>jar</packaging>

	<name>service-hello</name>
	<description>Demo project for Spring Boot</description>

	<parent>
		<groupId>org.springframework.boot</groupId>
		<artifactId>spring-boot-starter-parent</artifactId>
		<version>2.0.0.RELEASE</version>
		<relativePath/> <!-- lookup parent from repository -->
	</parent>

	<properties>
		<project.build.sourceEncoding>UTF-8</project.build.sourceEncoding>
		<project.reporting.outputEncoding>UTF-8</project.reporting.outputEncoding>
		<java.version>1.8</java.version>
		<spring-cloud.version>Finchley.M9</spring-cloud.version>
	</properties>

	<dependencies>
		<dependency>
			<groupId>org.springframework.cloud</groupId>
			<artifactId>spring-cloud-starter-netflix-eureka-server</artifactId>
		</dependency>

		<dependency>
			<groupId>org.springframework.boot</groupId>
			<artifactId>spring-boot-starter-test</artifactId>
			<scope>test</scope>
		</dependency>
	</dependencies>

	<dependencyManagement>
		<dependencies>
			<dependency>
				<groupId>org.springframework.cloud</groupId>
				<artifactId>spring-cloud-dependencies</artifactId>
				<version>${spring-cloud.version}</version>
				<type>pom</type>
				<scope>import</scope>
			</dependency>
		</dependencies>
	</dependencyManagement>

	<build>
		<plugins>
			<plugin>
				<groupId>org.springframework.boot</groupId>
				<artifactId>spring-boot-maven-plugin</artifactId>
			</plugin>
		</plugins>
	</build>

	<repositories>
		<repository>
			<id>spring-milestones</id>
			<name>Spring Milestones</name>
			<url>https://repo.spring.io/milestone</url>
			<snapshots>
				<enabled>false</enabled>
			</snapshots>
		</repository>
	</repositories>
</project>
3.3 编写注册者启动类 , @EnableDiscoveryClient来表示是一个eureka client
package com.xbz.servicehello;

import org.springframework.beans.factory.annotation.Value;
import org.springframework.boot.SpringApplication;
import org.springframework.boot.autoconfigure.SpringBootApplication;
import org.springframework.cloud.netflix.eureka.EnableEurekaClient;
import org.springframework.web.bind.annotation.RequestMapping;
import org.springframework.web.bind.annotation.RequestParam;
import org.springframework.web.bind.annotation.RestController;

@SpringBootApplication
@EnableEurekaClient
@RestController
public class ServiceHelloApplication {

    public static void main(String[] args) {
        SpringApplication.run(ServiceHelloApplication.class, args);
    }

    @Value("${spring.application.name}")
    private String name;

    @Value("${server.port}")
    private String port;

    @RequestMapping("/hello")
    public String hello(@RequestParam String id) {
        return "hello " + id + " , " + name + " , I am from port:" + port;
    }
}
3.4 只添加@EnableEurekaClient是不够的 , 还需要在配置文件中注明自己的服务注册中心的地址 . application.yml配置文件如下
spring:
  application:
    name: service-hello

server:
  port: 8900

eureka:
  client:
    serviceUrl:
      defaultZone: http://localhost:9999/eureka/ #eureka服务注册地址
其中 , spring.application.name很重要 , 这在以后的服务与服务之间相互调用一般都是根据这个name .
3.5 启动提供者 , 再次打开页面或刷新即可看到服务已经注册到中心
服务名称是我们之前配置的service-hello , 端口号是8900
4 . 调用服务
Spring cloud有两种服务调用方式 , 一种是ribbon+restTemplate , 另一种是feign .
Ribbon是一个基于HTTP和TCP客户端的负载均衡器 , 其实feign也使用了ribbon , 只要使用@FeignClient时 , ribbon就会自动使用 .
4.1 ribbon方式调用
ribbon 已经默认实现了这些配置bean:
- IClientConfig ribbonClientConfig: DefaultClientConfigImpl
- IRule ribbonRule: ZoneAvoidanceRule
- IPing ribbonPing: NoOpPing
- ServerList ribbonServerList: ConfigurationBasedServerList
- ServerListFilter ribbonServerListFilter: ZonePreferenceServerListFilter
- ILoadBalancer ribbonLoadBalancer: ZoneAwareLoadBalancer
4.1.1 新建模块client-ribbon , 在pom中引入起步依赖spring-cloud-starter-ribbon
<?xml version="1.0" encoding="UTF-8"?>
<project xmlns="http://maven.apache.org/POM/4.0.0" xmlns:xsi="http://www.w3.org/2001/XMLSchema-instance"
         xsi:schemaLocation="http://maven.apache.org/POM/4.0.0 http://maven.apache.org/xsd/maven-4.0.0.xsd">
    <modelVersion>4.0.0</modelVersion>

    <groupId>com.xbz</groupId>
    <artifactId>client-ribbon</artifactId>
    <version>0.0.1-SNAPSHOT</version>
    <packaging>jar</packaging>

    <name>client-ribbon</name>
    <description>Demo project for Spring Boot</description>

    <parent>
        <groupId>org.springframework.boot</groupId>
        <artifactId>spring-boot-starter-parent</artifactId>
        <version>2.0.0.RELEASE</version>
        <relativePath/> <!-- lookup parent from repository -->
    </parent>

    <properties>
        <project.build.sourceEncoding>UTF-8</project.build.sourceEncoding>
        <project.reporting.outputEncoding>UTF-8</project.reporting.outputEncoding>
        <java.version>1.8</java.version>
        <spring-cloud.version>Finchley.M9</spring-cloud.version>
    </properties>

    <dependencies>
        <dependency>
            <groupId>org.springframework.cloud</groupId>
            <artifactId>spring-cloud-starter-netflix-eureka-server</artifactId>
        </dependency>

        <dependency>
            <groupId>org.springframework.cloud</groupId>
            <artifactId>spring-cloud-starter-ribbon</artifactId>
            <version>1.4.4.RELEASE</version>
        </dependency>

        <dependency>
            <groupId>org.springframework.boot</groupId>
            <artifactId>spring-boot-starter-test</artifactId>
            <scope>test</scope>
        </dependency>
    </dependencies>

    <dependencyManagement>
        <dependencies>
            <dependency>
                <groupId>org.springframework.cloud</groupId>
                <artifactId>spring-cloud-dependencies</artifactId>
                <version>${spring-cloud.version}</version>
                <type>pom</type>
                <scope>import</scope>
            </dependency>
        </dependencies>
    </dependencyManagement>

    <build>
        <plugins>
            <plugin>
                <groupId>org.springframework.boot</groupId>
                <artifactId>spring-boot-maven-plugin</artifactId>
            </plugin>
        </plugins>
    </build>

    <repositories>
        <repository>
            <id>spring-milestones</id>
            <name>Spring Milestones</name>
            <url>https://repo.spring.io/milestone</url>
            <snapshots>
                <enabled>false</enabled>
            </snapshots>
        </repository>
    </repositories>
</project>
4.1.2 在配置文件中指定服务的注册中心地址
spring:
  application:
      name: client-ribbon

server:
  port: 8910

eureka:
  client:
    serviceUrl:
          defaultZone: http://localhost:9999/eureka/
4.1.3 编写调用者启动类 , 通过@EnableDiscoveryClient向服务中心注册 . 并且向程序的IOC注入一个bean : restTemplate , 并通过@LoadBalanced注解表明这个restRemplate开启负载均衡的功能
package com.xbz.clientribbon;

import org.springframework.boot.SpringApplication;
import org.springframework.boot.autoconfigure.SpringBootApplication;
import org.springframework.cloud.client.discovery.EnableDiscoveryClient;
import org.springframework.cloud.client.loadbalancer.LoadBalanced;
import org.springframework.context.annotation.Bean;
import org.springframework.web.client.RestTemplate;

@SpringBootApplication
@EnableDiscoveryClient
public class ClientRibbonApplication {

	public static void main(String[] args) {
		SpringApplication.run(ClientRibbonApplication.class, args);
	}

    @Bean
    @LoadBalanced
    RestTemplate restTemplate() {
        return new RestTemplate();
    }
}
4.1.4 编写测试Controller . 通过之前注入IOC容器的restTemplate来消费service-hello服务的"/hello"接口 , 在这里我们直接用的程序名替代了具体的url地址 , 在ribbon中它会根据服务名来选择具体的服务实例 , 根据服务实例在请求的时候会用具体的url替换掉服务名
package com.xbz.clientribbon;

import org.springframework.beans.factory.annotation.Autowired;
import org.springframework.web.bind.annotation.RequestMapping;
import org.springframework.web.bind.annotation.RequestParam;
import org.springframework.web.bind.annotation.RestController;
import org.springframework.web.client.RestTemplate;

@RestController
public class HelloController {

    @Autowired
    RestTemplate restTemplate;

    @RequestMapping("/hello")
    public String hello(@RequestParam String id) {
        return restTemplate.getForObject("http://service-hello/hello?id=" + id, String.class);
    }
}
4.1.5 为了测试负载功能 , 我们还需要一个服务提供者 . 在这将service-hello复制一份service-hello-a , 将端口改了就行
然后再把service-hello-a和client-ribbon和都启动成功 . 注意此时项目结构如下 , 共运行了4个模块然后打开eureka中心应该看到 :
service-hello服务一共有两个 , 此时我们在浏览器上访问 http://localhost:8910/hello?id=123 , 可以看到服务已经调用成功
刷新页面多次访问该请求 , 浏览器交替显示
hello 123 , service-hello , I am from port:8900
hello 123 , service-hello , I am from port:8901
这说明当我们通过调用restTemplate.getForObject("http://service-hello/hello?id=" + id, String.class);方法时,已经做了负载均衡,访问了不同的端口的服务实例。
4.2 feign调用
Feign是一个声明式的伪Http客户端 , 它使得写Http客户端变得更简单 . 使用Feign , 只需要创建一个接口并注解 . 它具有可插拔的注解特性 , 可使用Feign注解和JAX-RS注解 . Feign支持可插拔的编码器和解码器 . Feign默认集成了Ribbon , 并和Eureka结合 , 默认实现了负载均衡的效果 .
简单来说 :
- Feign 采用的是基于接口的注解
- Feign 整合了ribbon
4.2.1 新建模块client-feign , 在pom中引入起步依赖spring-cloud-starter-feign
<?xml version="1.0" encoding="UTF-8"?>
<project xmlns="http://maven.apache.org/POM/4.0.0" xmlns:xsi="http://www.w3.org/2001/XMLSchema-instance"
	xsi:schemaLocation="http://maven.apache.org/POM/4.0.0 http://maven.apache.org/xsd/maven-4.0.0.xsd">
	<modelVersion>4.0.0</modelVersion>

	<groupId>com.xbz</groupId>
	<artifactId>client-feign</artifactId>
	<version>0.0.1-SNAPSHOT</version>
	<packaging>jar</packaging>

	<name>client-feign</name>
	<description>Demo project for Spring Boot</description>

	<parent>
		<groupId>org.springframework.boot</groupId>
		<artifactId>spring-boot-starter-parent</artifactId>
		<version>2.0.0.RELEASE</version>
		<relativePath/> <!-- lookup parent from repository -->
	</parent>

	<properties>
		<project.build.sourceEncoding>UTF-8</project.build.sourceEncoding>
		<project.reporting.outputEncoding>UTF-8</project.reporting.outputEncoding>
		<java.version>1.8</java.version>
		<spring-cloud.version>Finchley.M9</spring-cloud.version>
	</properties>

	<dependencies>
		<dependency>
			<groupId>org.springframework.cloud</groupId>
			<artifactId>spring-cloud-starter-netflix-eureka-server</artifactId>
		</dependency>

        <dependency>
            <groupId>org.springframework.cloud</groupId>
            <artifactId>spring-cloud-starter-feign</artifactId>
            <version>1.4.4.RELEASE</version>
        </dependency>

        <dependency>
			<groupId>org.springframework.boot</groupId>
			<artifactId>spring-boot-starter-test</artifactId>
			<scope>test</scope>
		</dependency>
	</dependencies>

	<dependencyManagement>
		<dependencies>
			<dependency>
				<groupId>org.springframework.cloud</groupId>
				<artifactId>spring-cloud-dependencies</artifactId>
				<version>${spring-cloud.version}</version>
				<type>pom</type>
				<scope>import</scope>
			</dependency>
		</dependencies>
	</dependencyManagement>

	<build>
		<plugins>
			<plugin>
				<groupId>org.springframework.boot</groupId>
				<artifactId>spring-boot-maven-plugin</artifactId>
			</plugin>
		</plugins>
	</build>

	<repositories>
		<repository>
			<id>spring-milestones</id>
			<name>Spring Milestones</name>
			<url>https://repo.spring.io/milestone</url>
			<snapshots>
				<enabled>false</enabled>
			</snapshots>
		</repository>
	</repositories>
</project>
4.2.2 在配置文件中指定服务的注册中心地址
spring:
  application:
    name: client-feign

server:
  port: 8911

eureka:
  client:
    serviceUrl:
      defaultZone: http://localhost:9999/eureka/
4.2.3 编写调用者启动类 , 通过@EnableDiscoveryClient向服务中心注册 . 并使用@EnableFeignClients开启feiginClient功能
package com.xbz.clientfeign;

import org.springframework.boot.SpringApplication;
import org.springframework.boot.autoconfigure.SpringBootApplication;
import org.springframework.cloud.client.discovery.EnableDiscoveryClient;
import org.springframework.cloud.openfeign.EnableFeignClients;

@SpringBootApplication
@EnableDiscoveryClient
@EnableFeignClients
public class ClientFeignApplication {

	public static void main(String[] args) {
		SpringApplication.run(ClientFeignApplication.class, args);
	}
}
4.2.4 定义一个feign接口 , 通过@FeignClient("服务名") , 来指定调用哪个服务
package com.xbz.clientfeign;

import org.springframework.cloud.openfeign.FeignClient;
import org.springframework.stereotype.Component;
import org.springframework.web.bind.annotation.RequestMapping;
import org.springframework.web.bind.annotation.RequestParam;

@Component
@FeignClient(value = "service-hello") //这里的name对应调用服务的spring.applicatoin.name
public interface IFeignClientService {

    @RequestMapping(value = "/hello")
    String hello(@RequestParam("id") String id);
}
4.2.5 在Web层的controller , 对外暴露一个"/hello"的API接口 , 通过上面定义的Feign接口来消费服务
package com.xbz.clientfeign;

import org.springframework.beans.factory.annotation.Autowired;
import org.springframework.web.bind.annotation.RequestMapping;
import org.springframework.web.bind.annotation.RequestParam;
import org.springframework.web.bind.annotation.RestController;

@RestController
public class HelloController {
    @Autowired
    private IFeignClientService feignClientService;

    @RequestMapping("/hello")
    public String hello(@RequestParam String id){
        return feignClientService.hello(id);
    }
}
4.2.6 启动之后 , 可以发现注册中心又多了一个client-feign
多次访问 http://localhost:8911/hello?id=123的结果和ribbon相同 .


