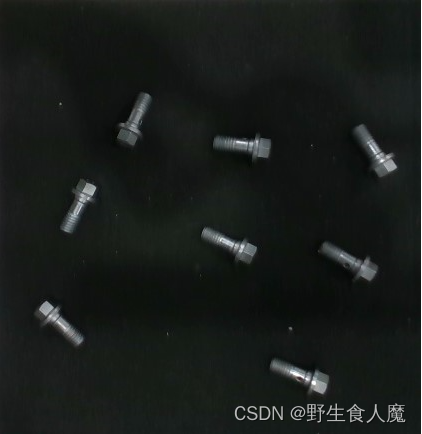
原图:
框选后:
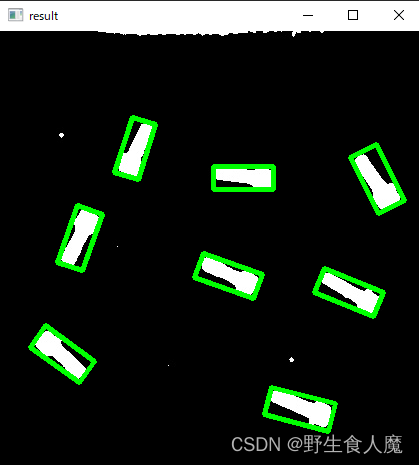
整体思路:将图片进行 高斯滤波 + 灰度处理 + 二值化 等操作,获取处理后图片的HSV值;根据HSV值的范围使用cv2.inRange函数去除背景,查找轮廓线,框选最小矩形,获取坐标信息及面积信息;设置面积范围,在范围内再进行框选,(也可在图片中显示坐标信息并将矩形按面积大小排序),最后保存框选后的图片。
高斯滤波后:

灰度处理后:

二值化:

处理后显示坐标等信息的结果:

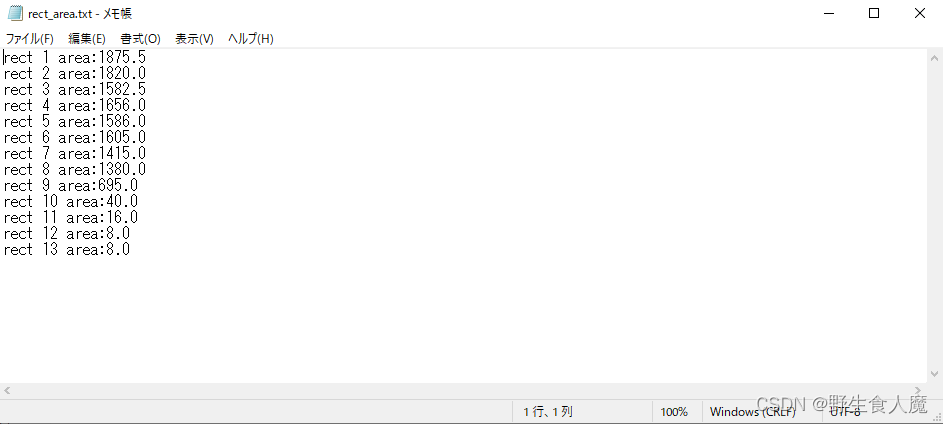
保存的坐标信息文件:
 面积信息文件:
添加面积限制条件前的结果:
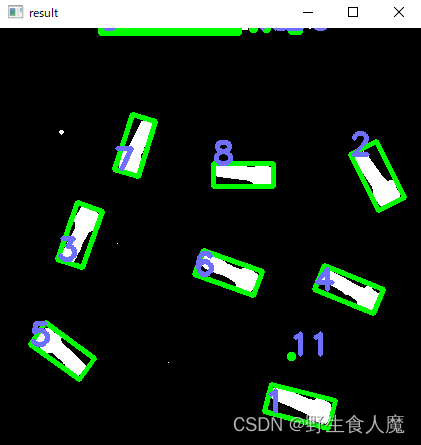
发现在灰度图像上使用cv2.putText时BGR颜色并不能正常显示,所以传给process的图像转到了BGR。
image = cv2.cvtColor(thres_img, cv2.COLOR_GRAY2BGR)
源代码:
import cv2
import numpy as np
import os


# 高斯滤波
def GausBlur(src):
    dst = cv2.GaussianBlur(src, (5, 5), 1.5)
    cv2.imshow('GausBlur', dst)
    return dst


# 灰度处理
def Gray_img(src):
    gray = cv2.cvtColor(src, cv2.COLOR_BGR2GRAY)
    cv2.imshow('gray', gray)
    return gray


# 二值化
def threshold_img(src):
    ret, binary = cv2.threshold(src, 0, 255, cv2.THRESH_BINARY | cv2.THRESH_TRIANGLE)
    # print("threshold value %s" % ret)
    cv2.imshow('threshold', binary)
    return binary


# 轮廓绘制
def process(image):
    hsv = cv2.cvtColor(image, cv2.COLOR_BGR2HSV)
    hsv = cv2.medianBlur(hsv, 5)

    mask = cv2.inRange(hsv, (0, 0, 1), (0, 0, 255))  # inrange

    line = cv2.getStructuringElement(cv2.MORPH_RECT, (5, 5), (-1, -1))
    mask = cv2.morphologyEx(mask, cv2.MORPH_OPEN, line)
    # cv2.imshow("mask", mask)

    img, contours, hierarchy = cv2.findContours(mask, cv2.RETR_EXTERNAL, cv2.CHAIN_APPROX_SIMPLE)
    contours_num = len(contours)
    # print('hierarchy', hierarchy)
    # print(contours_num)

    i = 0
    while i < contours_num:
        c = sorted(contours, key=cv2.contourArea, reverse=True)[i]  # 排序,key为排序比较元素,true为降序
        rect = cv2.minAreaRect(c)
        box = np.int0(cv2.boxPoints(rect))
        # print(box)

        file_path = os.path.join(os.getcwd(), r".\information\coordinate_information.txt")
        file = open(file_path, "a+")
        file.write(str(box) + ',' + '\n')

        area = cv2.contourArea(box)
        file_path = os.path.join(os.getcwd(), r".\information\rect_area.txt")
        file = open(file_path, "a+")
        file.write("rect " + str(i + 1) + " area:" + str(area) + '\n')

        if area >= 1000 and area <= 2000:
            cv2.drawContours(image, [box], -1, (0, 255, 0), 3)
            cv2.putText(image, str(i+1), (box[0][0], box[0][1]), cv2.FONT_HERSHEY_SIMPLEX, 1, (255, 111, 111), 3)
            cv2.putText(image, "1." + str(box[0]), (box[0][0], box[0][1]), cv2.FONT_HERSHEY_SIMPLEX, 0.3, (0, 0, 255), 1)
            cv2.putText(image, "2." + str(box[1]), (box[1][0], box[1][1]), cv2.FONT_HERSHEY_SIMPLEX, 0.3, (0, 0, 255), 1)
            cv2.putText(image, "3." + str(box[2]), (box[2][0], box[2][1]), cv2.FONT_HERSHEY_SIMPLEX, 0.3, (0, 0, 255), 1)
            cv2.putText(image, "4." + str(box[3]), (box[3][0], box[3][1]), cv2.FONT_HERSHEY_SIMPLEX, 0.3, (0, 0, 255), 1)
            save_path = r".\images\screenshot\target_rect.jpg"
            cv2.imencode('.jpg', image)[1].tofile(save_path)

        i += 1

    return image

def main(f_path):
    color_image = cv2.imread(f_path + r"\images\target_sliced.jpg", 1)
    gaus_img = GausBlur(color_image)
    gray_img = Gray_img(gaus_img)
    thres_img = threshold_img(gray_img)
    cv2.imencode('.jpg', thres_img)[1].tofile(f_path + r"\images\targets.jpg")
    image = cv2.cvtColor(thres_img, cv2.COLOR_GRAY2BGR)
    result = process(image, f_path)
    # img = cv2.imread(f_path + r"\images\targets.jpg")
    # img_rect = cv2.imread(f_path + r"\images\target_rect.jpg")
#     return result
#
# result = main(r".\test\test3")
# cv2.imshow('result', result)
# key = cv2.waitKey(0)