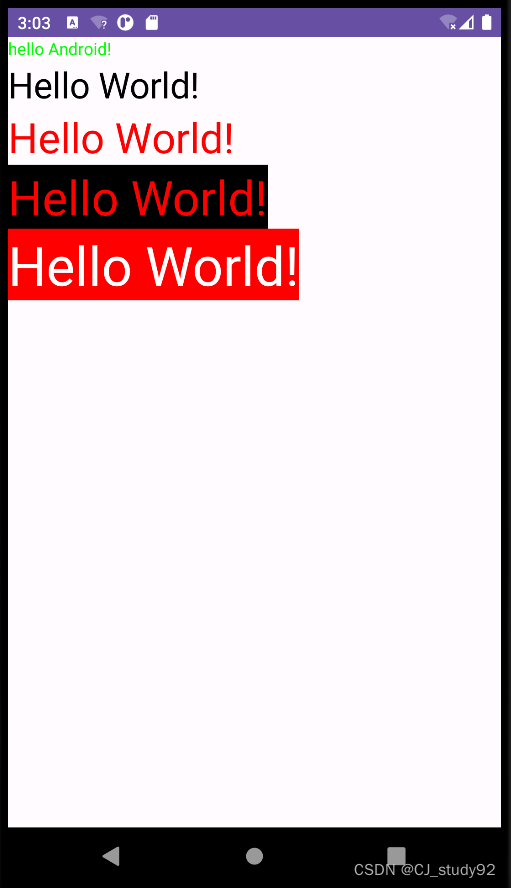
如图所示,我们可以在Android手机中设置文本字体的大小、颜色,以及背景颜色。
一、TextView 设置内容
我们前面章节已经提到过,如何利用TextView模块显示文本内容,在这里再简单提及一次吧。
//strings.xml
<string name="hello">Hello World!</string>
<string name="android">hello Android!</string>

// activity_main.xml
<TextView
    android:id="@+id/text1"
    android:layout_width="wrap_content"
    android:layout_height="wrap_content"
    android:text="@string/hello" />

// MainActivity.java
TextView textView = findViewById(R.id.text1);
textView.setText(R.string.android);
想必,通过前面的学习,你已经能够读懂以上代码的含义,并且,能够在对应的文件中创建对应的值。在上面的代码中,就给出了两种设置内容的方式。
第一种,通过xml布局文件中,通过 text= 的方式设置内容。
第二种,就是通过TextView对象利用 setText 函数设置内容。注意,类的优先级大于布局文件,即两种同时定义了内容,最终显示的是类中设置的内容。
二、TextView 设置字体大小
1、字体字号单位
我们先了解一下字号单位:
px(pixel像素): 它是手机屏幕的最小显示单位,手机屏幕就是由多个像素构成的
dp(设备独立像素) : 同一单位在不同设备上有不同的显示效果。当你设置字体大小单位为dp,其实它最终还是会转换为px。
现在你可以不用太清楚他们之间的转换关系,只要知道dp以下两点特性:
1、对于相同分辨率的手机,屏幕尺寸越大,同dp的组件占用的屏幕比例越小。
2、对于相同尺寸的手机,分辨率不同,同dp的组件占用屏幕的比例是相同的。
因此,我们可以看到,当我们使用dp作为单位时,只要在同一尺寸的手机上,无论其分辨率如何,可以得到很好的适配。如果你不能够很清晰的理解,你利用Android studio创建不同尺寸,不同分辨率的手机进行实验。
除此之外,还有一个 sp ,它与dp类似,区别在于它的大小会跟随系统设置的字体大小改变。
2、设置字体大小
// MainActivity.java
TextView textView2 = findViewById(R.id.text2);
textView2.setTextSize(30);

// activity_main.xml
<TextView
    android:id="@+id/text3"
    android:layout_width="wrap_content"
    android:layout_height="wrap_content"
    android:text="@string/hello"
    android:textSize="35sp"/>
设置字体大小也有两种方式:
1、通过TextView对象利用 setTextSize 函数设置大小,你可以看到,在这里不用给出单位,它默认单位为sp
2、通过xml布局文件设置, textSize=
三、TextView 设置字体颜色
    <TextView
        android:id="@+id/text3"
        android:layout_width="wrap_content"
        android:layout_height="wrap_content"
        android:text="@string/hello"
        android:textSize="35sp"
        android:textColor="#ff0000"/>

    <TextView
        android:id="@+id/text4"
        android:layout_width="wrap_content"
        android:layout_height="wrap_content"
        android:text="@string/hello"
        android:textSize="40sp"
        android:textColor="@color/red"/>

// colors.xml
    <color name="red">#FFFF0000</color>
从上面的代码可以看到,我们可以从xml布局文件中通过textColor设置字体颜色,也可以在res/values/colors.xml文件中定义颜色,并通过“@color/... ”进行引用。其中,颜色的值是#号+16进制的数字,且数字可以是8位,也可以是6位。
例如“#12345678”,数字位从左往右数,第一位和二位“12”,表示字体的透明度,00表示完全透明,ff表示完全不透明;第3、4位,5、6位,7、8位分别表示红、绿、蓝三种颜色,其代表的值越高,颜色越深,例如:00 00 00 黑色,ff 00 00 红色,00 ff 00 绿色,00 00 ff 蓝色, ff ff ff 白色。其中,1、2位可以省略不写,则系统默认为ff完全不透明。
        TextView textView2 = findViewById(R.id.text2);
        textView2.setTextSize(30);
        textView2.setTextColor(0xff0000ff);
        //textView2.setTextColor(getResources().getColor(R.color.black));
如上代码所示,我们也可以在java文件中实现设置字体颜色,即通过TextView对象调用setTextColor接口。其中,这里设置颜色使用的是8位的16进制数,如果前两位不写,则默认为00完全透明,这与xml文件中的默认设定相反。此外,我们还可以通过getResources().getColor(R.color.black)获取colors.xml文件中的颜色定义来设置颜色。
四、TextView 设置字体背景颜色
// xml
    <TextView
        android:layout_width="wrap_content"
        android:layout_height="wrap_content"
        android:text="@string/hello"
        android:textSize="45sp"
        android:textColor="@color/white"
        android:background="@color/red"/>
// java
        TextView textView4 = findViewById(R.id.text4);
        //textView4.setBackgroundColor(Color.GREEN);
        textView4.setBackgroundResource(R.color.black);
如代码所示,设置背景颜色同样可以通过xml或Java文件设置。在xml文件中,通过background设置;在java中,通过setBackgroundColor设置,传入的参数可以是Color类中的静态成员变量,或者静态函数接口定义颜色。也可以通过setBackgroundResource接口获取colors.xml文件中的定义来设置颜色。
五、总结
通过本章的学习,掌握通过TextView 来设置字体内容、大小、颜色、背景,来满足不同的需求。