重心坐标(Barycentric Coordinates)在 CG 中尤为重要。 它们有一些功能,是 Möller-Trumbore 提出的下一个射线三角形相交算法的关键,该算法将在下一章中研究。 本章最后将讨论如何在 CG 中使用重心坐标。
NSDT工具推荐: Three.js AI纹理开发包 - YOLO合成数据生成器 - GLTF/GLB在线编辑 - 3D模型格式在线转换 - 可编程3D场景编辑器 - REVIT导出3D模型插件 - 3D模型语义搜索引擎
1、重心坐标的定义
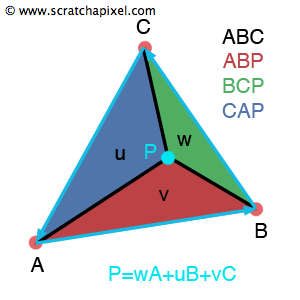
图 1:重心坐标可以看作是子三角形 CAP(u)、ABP(v)和 BCP(w)在三角形 ABC 上的面积,这就是为什么它们也被称为面积坐标。
重心坐标可以用三个标量来表示位于三角形上的任意点的位置。 该点的位置包括三角形内的任意位置、三角形的任意三个边上的任意位置、或者三个三角形的顶点本身中的任意一个。 为了使用重心坐标计算该点的位置,我们使用以下方程(1):

其中 A、B 和 C 是三角形的顶点,u、v和w是重心坐标,三个实数满足 u+v+w=1 。请注意,从其中两个坐标我们可以找到第三个坐标: w=1-u-v 。由此我们可以确定u+v<=1(稍后我们将使用这个简单但重要的属性)。
方程 1 定义了点 P 在由顶点 A、B 和 C 形成的三角形平面上的位置。如果满足条件 0<=u, v , w <=1,则该点位于三角形 (A, B, C) 内。 如果任何一个坐标小于0或大于1,则该点位于三角形之外。 如果其中任何一个为零,则 P 位于连接三角形顶点的直线之一上。
你还可以简单地使用两个坐标(假设 u 和 v)来表示 点P 在由原点 (A) 和边 AB 和 AC 定义的二维坐标系中的坐标(非常类似于在正交坐标系中表示 2D 点) 由 x 轴和 y 轴定义的二维坐标系。在我们的例子中唯一的区别是 AB 和 AC 不一定正交,并且该坐标系的原点是 A)。 可以用方程 P=A+u*AB+v*AC定义三角形内的位置,其中 u>=0, v>=0, u+v<=1 。这个方程可以理解为:
从A开始,向AB方向移动一点,然后向AC方向移动一点,你就会找到P。
现在,如果建立这个方程,你可以写:

该方程与方程 1 类似,除了当 w=1-u-v 时,得到公式 P=w*A+u*B+v*C 而不是 P=u*A+v*B+w*C。
2、重心坐标的计算方法
重心坐标也称为面积坐标(Areal Coordinates)。 尽管不太常用,但该术语表示坐标 u、v 和 w 与 P 定义的三个子三角形的面积、位于三角形上的点以及三角形的顶点(A、B、C)成正比。 这三个子三角形分别表示为 ABP、BCP 和 CAP(见图 1)。
这引出了用于计算重心坐标的公式:
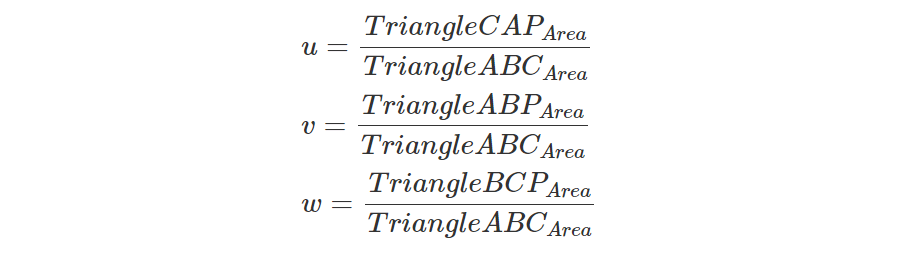
在本课的其余部分中,我们将假设 u 使我们沿着边 AB 移动(如果 u=1 则 P=B),v 使我们沿着边 AC 移动(如果 v=1 则 P=C)。 这就是为什么我们会使用子三角形 CAP 的面积来计算 u,使用子三角形 ABP 的面积来计算 v。这是 CG 编程社区中大多数人遵循的约定如何使用重心坐标来插值顶点数据,你将有一个直观的示例(图 3)以更好地理解这一点。
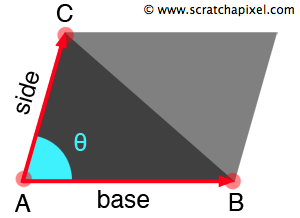
图 2:为了计算三角形的面积,我们从计算平行四边形的公式开始(底乘以高度 H)。 为了计算 H,我们将向量AC的长度乘以 sin(theta)
计算三角形的面积很简单。 如果复制三角形并沿其最长边镜像它,你将得到一个平行四边形。 要计算平行四边形的面积,只需计算其底和边,然后将这两个数字乘以 sin(theta), 其中theta是向量 AB 和 AC 所对的角度(图 2)。 为了创建平行四边形,我们使用了两个三角形,因此一个三角形的面积是平行四边形面积的一半。
有了这个,计算 u 和 v 就变得很容易,w 是根据 u 和 v 计算出来的,如前所述:

为了让事情变得更简单,我们可以利用以下事实以找到交点 P:子三角形 ABP、BCP 和 CAP 的面积与我们在上一章中计算的叉积的长度成正比。 这是叉积的性质之一:叉积的大小可以解释为平行四边形的面积。 因此,我们不需要显式计算前面的公式,其中包括了sin(theta)的计算。我们可以简单地使用:

请注意,在数学术语中,双杠符号 (|| ||) 表示“长度”(第 4 课)。 换句话说,我们需要计算叉积 (C-B)x(P-B) 产生的向量的长度。 我们知道如何计算两个向量的叉积和向量的长度,因此我们现在拥有计算交点的重心坐标所需的一切:
bool rayTriangleIntersect(
    const Vec3f &orig, const Vec3f &dir,
    const Vec3f &v0, const Vec3f &v1, const Vec3f &v2,
    float &t, float &u, float &v)
{
    // compute the plane's normal
    Vec3f v0v1 = v1 - v0;
    Vec3f v0v2 = v2 - v0;
    // no need to normalize
    Vec3f N = v0v1.crossProduct(v0v2); // N
    float area = N.length() / 2; // area of the triangle

    ...

    // Step 2: inside-outside test
    Vec3f C; // vector perpendicular to triangle's plane

    // edge 0
    ...

    // edge 1
    Vec3f edge1 = v2 - v1;
    Vec3f vp1 = P - v1;
    C = edge1.crossProduct(vp1);
    u = (C.length() / 2) / area;
    if (N.dotProduct(C) < 0)  return false; // P is on the right side

    // edge 2
    Vec3f edge2 = v0 - v2;
    Vec3f vp2 = P - v2;
    C = edge2.crossProduct(vp2);
    v = (C.length() / 2) / area;
    if (N.dotProduct(C) < 0) return false; // P is on the right side;

    return true; // this ray hits the triangle
}
平面法线不应标准化,因为我们使用向量的长度来计算三角形面积。
3、重心坐标在顶点数据插值中的应用
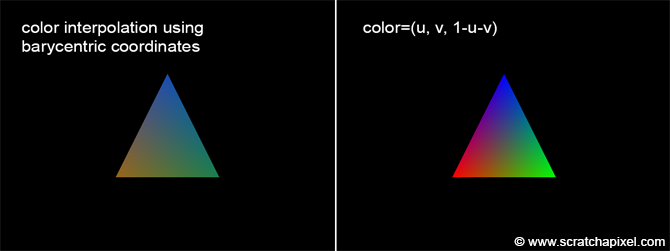
重心坐标在着色中最有用。 三角形是一个平坦的表面,我们可以将任何附加信息或数据(点、颜色、向量等)与其每个顶点相关联。 该信息通常称为顶点数据。 例如,假设你希望顶点 A 为红色,顶点 B 为绿色,顶点 C 为蓝色:
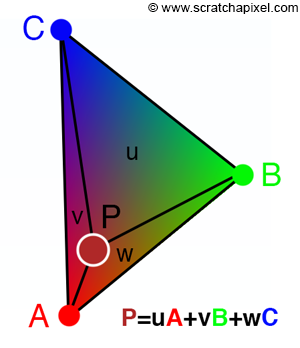
图 3:重心坐标可用于在命中点位置插入顶点数据。 例如,在本例中,我们使用顶点颜色计算 P 处的颜色。
如果交点与三角形的顶点之一重合,则交点处对象的颜色就是与该顶点关联的颜色。 够简单的。 问题是当光线与三角形在其他任何地方(无论是在边上还是在三角形内部)相交时会发生什么? 如果使用重心坐标通过三角形顶点计算位于三角形上的点的位置,我们可以以相同的方式插入在三角形顶点定义的任何其他数据(例如颜色)。 换句话说,重心坐标用于在三角形表面上插入顶点数据(该技术可以应用于任何数据类型、浮点数、颜色等)。 该技术对于着色非常有用,例如在交点处插值法线。 对象的法线可以在每个面或顶点的基础上定义(我们所说的面法线或顶点法线)。 如果它们是按顶点定义的,我们可以使用这种插值技术来模拟三角形表面的平滑阴影,即使三角形“数学上”是平坦的(命中点处的法线是顶点法线的组合,因此如果顶点法线彼此不同,该插值的结果在三角形表面上不是恒定的):
// vertex position
Vec3f triVertex[3] = {

   {-3,-3,5}, {0,3,5}, {3,-3,5}};
// vertex data
Vec3f triColor[3] = {

   {1,0,0}, {0,1,0}, {0,0,1}};
if (rayTriangleIntersect(...)) {
    // compute pixel color
    // col = w*col0 + u*col1 + v*col2 where w = 1-u-v
    Vec3f PhitColor = u * triColor[0] + v * triColor[1] + (1 - u - v) * triColor[2];
}
重心坐标也用于计算纹理坐标(我们将在纹理课程中研究这一点)。
4、优化重心坐标的计算
你会注意到,在我们到目前为止描述的算法版本中,我们使用 AB 和 AP 的叉积以及 CA 和 CP 的叉积来计算 u 和 v。但是如果查看代码你还会再次注意到,我们已经为内部-外部测试计算了这些叉积。 它们被用来计算P是在edge0 (ABxAP)和edge2 (CAxCP)的右侧还是左侧的结果。 当然,第一个优化包括重用这些值的结果。 另请注意(等式 2):

不需要计算三角形面积,因为三角形 ABP 和三角形 ABC 之间的比率与平行四边形 ABP(是三角形 ABP 面积的两倍)和平行四边形 ABC(是三角形 ABP 面积的两倍)之间的比率相同,因此我们也可以避免除以 2。 代码变为:
bool rayTriangleIntersect(
    const Vec3f &orig, const Vec3f &dir,
    const Vec3f &v0, const Vec3f &v1, const Vec3f &v2,
    float &t, float &u, float &v)
{
    // compute the plane's normal
    Vec3f v0v1 = v1 - v0;
    Vec3f v0v2 = v2 - v0;
    // no need to normalize
    Vec3f N = v0v1.crossProduct(v0v2); // N
    float area2 = N.length();

    // Step 1: finding P

    // check if the ray and plane are parallel.
    float NdotRayDirection = N.dotProduct(dir);
    if (fabs(NdotRayDirection) < kEpsilon) // almost 0
        return false; // they are parallel so they don't intersect!

    // compute d parameter using equation 2
    float d = -N.dotProduct(v0);

    // compute t (equation 3)
    t = -(N.dotProduct(orig) + d) / NdotRayDirection;
    // check if the triangle is behind the ray
    if (t < 0) return false; // the triangle is behind

    // compute the intersection point using equation 1
    Vec3f P = orig + t * dir;

    // Step 2: inside-outside test
    Vec3f C; // vector perpendicular to triangle's plane

    // edge 0
    Vec3f edge0 = v1 - v0;
    Vec3f vp0 = P - v0;
    C = edge0.crossProduct(vp0);
    if (N.dotProduct(C) < 0) return false; // P is on the right side

    // edge 1
    Vec3f edge1 = v2 - v1;
    Vec3f vp1 = P - v1;
    C = edge1.crossProduct(vp1);
    u = C.length() / area2;
    if (N.dotProduct(C) < 0)  return false; // P is on the right side

    // edge 2
    Vec3f edge2 = v0 - v2;
    Vec3f vp2 = P - v2;
    C = edge2.crossProduct(vp2);
    v = C.length() / area2;
    if (N.dotProduct(C) < 0) return false; // P is on the right side;

    return true; // this ray hits the triangle
}
最后,我们可以证明(方程3):

首先注意N=ABxAC,因此上式可重写为:

我们现在需要证明这个方程是正确的。 请记住几何课程中,两个向量的点积向量可以解释为:

其中角度theta是两个向量 A 和 B 的夹角,||A|| 和||B|| 分别是向量 A 和 B 的长度。 我们还知道,当两个向量 A 和 B 共线(它们指向同一方向)时,对角为 0,因此cos(0)=1。 我们可以将分子重写为:

由于ABxAP=A并且ABxAC=N=B,那么:

在这种情况下,A 和 B 也是共线的,因为它们是由共面向量构造的。 最后,我们可以将结果替换为等式 3 中的分子和分母:

如果我们将A替换回ABxAP同时将B替换回ABxAC,就得到:

这是我们例程代码的最终版本,其中包括计算重心坐标的优化方法:
bool rayTriangleIntersect(
    const Vec3f &orig, const Vec3f &dir,
    const Vec3f &v0, const Vec3f &v1, const Vec3f &v2,
    float &t, float &u, float &v)
{
    // compute the plane's normal
    Vec3f v0v1 = v1 - v0;
    Vec3f v0v2 = v2 - v0;
    // no need to normalize
    Vec3f N = v0v1.crossProduct(v0v2); // N
    float denom = N.dotProduct(N);

    // Step 1: finding P

    // check if the ray and plane are parallel.
    float NdotRayDirection = N.dotProduct(dir);
    if (fabs(NdotRayDirection) < kEpsilon) // almost 0
        return false; // they are parallel so they don't intersect!

    // compute d parameter using equation 2
    float d = -N.dotProduct(v0);

    // compute t (equation 3)
    t = -(N.dotProduct(orig) + d) / NdotRayDirection;
    // check if the triangle is behind the ray
    if (t < 0) return false; // the triangle is behind

    // compute the intersection point using equation 1
    Vec3f P = orig + t * dir;

    // Step 2: inside-outside test
    Vec3f C; // vector perpendicular to triangle's plane

    // edge 0
    Vec3f edge0 = v1 - v0;
    Vec3f vp0 = P - v0;
    C = edge0.crossProduct(vp0);
    if (N.dotProduct(C) < 0) return false; // P is on the right side

    // edge 1
    Vec3f edge1 = v2 - v1;
    Vec3f vp1 = P - v1;
    C = edge1.crossProduct(vp1);
    if ((u = N.dotProduct(C)) < 0)  return false; // P is on the right side

    // edge 2
    Vec3f edge2 = v0 - v2;
    Vec3f vp2 = P - v2;
    C = edge2.crossProduct(vp2);
    if ((v = N.dotProduct(C)) < 0) return false; // P is on the right side;

    u /= denom;
    v /= denom;

    return true; // this ray hits the triangle
}
5、源代码
在这个版本的射线-三角形相交方法中,我们实现了第 3 章中描述的技术来计算命中点坐标,以及本章中描述的方法来计算相交点的重心坐标。 当射线击中三角形时,可以选择使用重心坐标插值三种颜色或直接可视化原始坐标(第 94/95 行)。
...
constexpr float kEpsilon = 1e-8;

inline
float deg2rad(const float °)
{ return deg * M_PI / 180; }

inline
float clamp(const float &lo, const float &hi, const float &v)
{ return std::max(lo, std::min(hi, v)); }

bool rayTriangleIntersect(
    const Vec3f &orig, const Vec3f &dir,
    const Vec3f &v0, const Vec3f &v1, const Vec3f &v2,
    float &t, float &u, float &v)
{
    // compute the plane's normal
    Vec3f v0v1 = v1 - v0;
    Vec3f v0v2 = v2 - v0;
    // no need to normalize
    Vec3f N = v0v1.crossProduct(v0v2); // N
    float denom = N.dotProduct(N);

    // Step 1: finding P

    // check if the ray and plane are parallel.
    float NdotRayDirection = N.dotProduct(dir);
    if (fabs(NdotRayDirection) < kEpsilon) // almost 0
        return false; // they are parallel so they don't intersect!

    // compute d parameter using equation 2
    float d = -N.dotProduct(v0);

    // compute t (equation 3)
    t = -(N.dotProduct(orig) + d) / NdotRayDirection;
    // check if the triangle is behind the ray
    if (t < 0) return false; // the triangle is behind

    // compute the intersection point using equation 1
    Vec3f P = orig + t * dir;

    // Step 2: inside-outside test
    Vec3f C; // vector perpendicular to triangle's plane

    // edge 0
    Vec3f edge0 = v1 - v0;
    Vec3f vp0 = P - v0;
    C = edge0.crossProduct(vp0);
    if (N.dotProduct(C) < 0) return false; // P is on the right side

    // edge 1
    Vec3f edge1 = v2 - v1;
    Vec3f vp1 = P - v1;
    C = edge1.crossProduct(vp1);
    if ((u = N.dotProduct(C)) < 0)  return false; // P is on the right side

    // edge 2
    Vec3f edge2 = v0 - v2;
    Vec3f vp2 = P - v2;
    C = edge2.crossProduct(vp2);
    if ((v = N.dotProduct(C)) < 0) return false; // P is on the right side;

    u /= denom;
    v /= denom;

    return true; // this ray hits the triangle
}

int main(int argc, char **argv)
{
    Vec3f v0(-1, -1, -5);
    Vec3f v1( 1, -1, -5);
    Vec3f v2( 0,  1, -5);

    const uint32_t width = 640;
    const uint32_t height = 480;
    Vec3f cols[3] = {

   {0.6, 0.4, 0.1}, {0.1, 0.5, 0.3}, {0.1, 0.3, 0.7}};
    Vec3f *framebuffer = new Vec3f[width * height];
    Vec3f *pix = framebuffer;
    float fov = 51.52;
    float scale = tan(deg2rad(fov * 0.5));
    float imageAspectRatio = width / (float)height;
    Vec3f orig(0);
    for (uint32_t j = 0; j < height; ++j) {
        for (uint32_t i = 0; i < width; ++i) {
            // compute primary ray
            float x = (2 * (i + 0.5) / (float)width - 1) * imageAspectRatio * scale;
            float y = (1 - 2 * (j + 0.5) / (float)height) * scale;
            Vec3f dir(x, y, -1);
            //cameraToWorld.multDirMatrix(Vec3f(x, y, -1), dir);
            dir.normalize();
            float t, u, v;
            if (rayTriangleIntersect(orig, dir, v0, v1, v2, t, u, v)) {
                *pix = u * cols[0] + v * cols[1] + (1 - u - v) * cols[2];
                //*pix = Vec3f(u, v, 1 - u - v);
            }
            pix++;
        }
    }

    // Save the result to a PPM image (keep these flags if you are on Windows)
    ...

    return 0;
}
下图显示了程序的输出:
原文链接:重心坐标简明教程 - BimAnt