一、需求说明
Ubuntu系统默认使用的是Ubuntu官网镜像源http://archive.ubuntu.com,网站位于境外,我们使用apt安装软件包的时候经常出现无法连接的情况,如下图所示。所以建议将系统apt安装的镜像源切换为国内镜像源。

二、更新apt镜像源步骤
1、查看当前镜像源配置
root@c4b4e6b8e891:/# cat /etc/apt/sources.list |grep -Ev “$|#”
deb http://archive.ubuntu.com/ubuntu/ jammy main restricted
deb http://archive.ubuntu.com/ubuntu/ jammy-updates main restricted
deb http://archive.ubuntu.com/ubuntu/ jammy universe
deb http://archive.ubuntu.com/ubuntu/ jammy-updates universe
deb http://archive.ubuntu.com/ubuntu/ jammy multiverse
deb http://archive.ubuntu.com/ubuntu/ jammy-updates multiverse
deb http://archive.ubuntu.com/ubuntu/ jammy-backports main restricted universe multiverse
deb http://security.ubuntu.com/ubuntu/ jammy-security main restricted
deb http://security.ubuntu.com/ubuntu/ jammy-security universe
deb http://security.ubuntu.com/ubuntu/ jammy-security multiverse
2、备份当前镜像源文件
root@c4b4e6b8e891:/# cp /etc/apt/sources.list /etc/apt/sources.list.bak
3、查看Ubuntu系统版本
查看系统版本是为了设置与版本号对于的镜像源,我们可以看到Ubuntu22.04版本的版本代码为jammy。细心的朋友可能已经发现了步骤1中链接地址后面都有jammy关键字,这个jammy代表当前配置的是22.04版本的镜像。
| 版本号 | 名称 |
|---|---|
| 22.04 | jammy |
| 20.04 | focal |
| 18.04 | bionic |
| 16.04 | xenial |
| 14.04 | trusty |
root@c4b4e6b8e891:/# cat /etc/os-release
PRETTY_NAME=“Ubuntu 22.04.2 LTS”
NAME=“Ubuntu”
VERSION_ID=“22.04”
VERSION=“22.04.2 LTS (Jammy Jellyfish)”
VERSION_CODENAME=jammy
ID=ubuntu
ID_LIKE=debian
HOME_URL=“https://www.ubuntu.com/”
SUPPORT_URL=“https://help.ubuntu.com/”
BUG_REPORT_URL=“https://bugs.launchpad.net/ubuntu/”
PRIVACY_POLICY_URL=“https://www.ubuntu.com/legal/terms-and-policies/privacy-policy”
UBUNTU_CODENAME=jammy
4、方式一:更换为清华大学镜像源
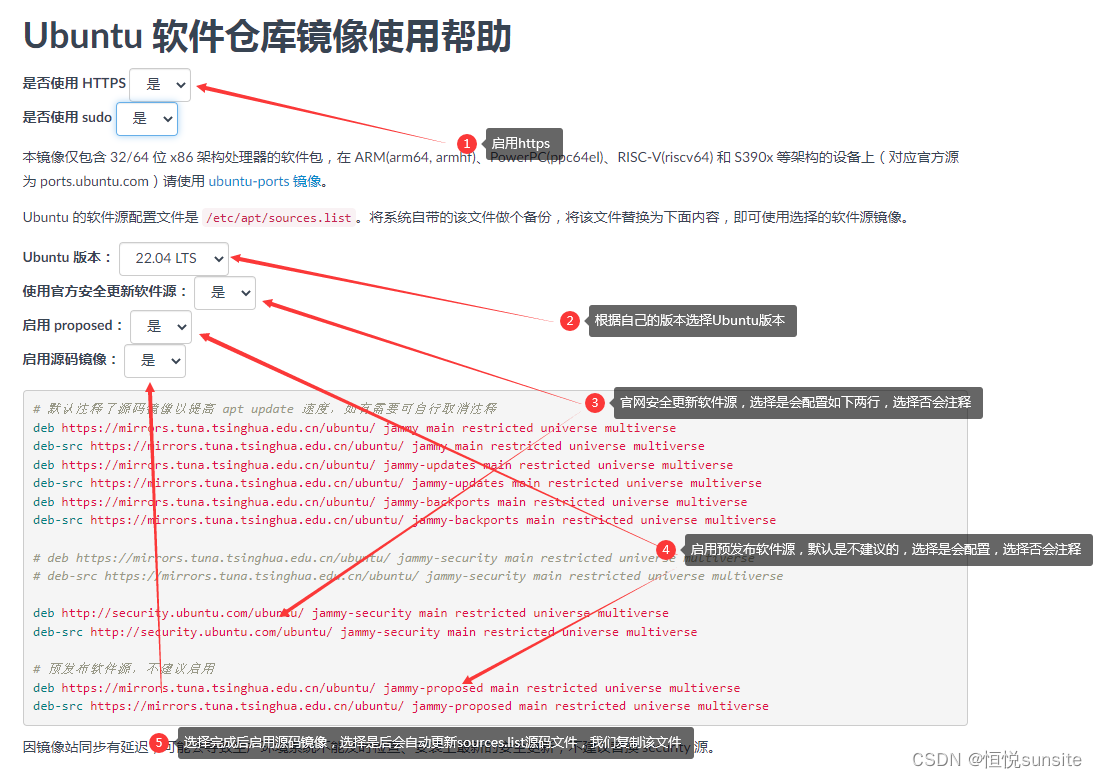
访问清华大学Ubuntu镜像源网站https://mirror.tuna.tsinghua.edu.cn/help/ubuntu/,根据版本情况选择配置。
root@c4b4e6b8e891:/etc/apt# vim /etc/apt/sources.list
#编辑sources.list文件,将复制内容黏贴到sources.list文件中并保存
root@c4b4e6b8e891:/etc/apt# cat /etc/apt/sources.list |grep -Ev “$|#”
deb https://mirrors.tuna.tsinghua.edu.cn/ubuntu/ jammy main restricted universe multiverse
deb-src https://mirrors.tuna.tsinghua.edu.cn/ubuntu/ jammy main restricted universe multiverse
deb https://mirrors.tuna.tsinghua.edu.cn/ubuntu/ jammy-updates main restricted universe multiverse
deb-src https://mirrors.tuna.tsinghua.edu.cn/ubuntu/ jammy-updates main restricted universe multiverse
deb https://mirrors.tuna.tsinghua.edu.cn/ubuntu/ jammy-backports main restricted universe multiverse
deb-src https://mirrors.tuna.tsinghua.edu.cn/ubuntu/ jammy-backports main restricted universe multiverse
deb http://security.ubuntu.com/ubuntu/ jammy-security main restricted universe multiverse
deb-src http://security.ubuntu.com/ubuntu/ jammy-security main restricted universe multiverse
deb https://mirrors.tuna.tsinghua.edu.cn/ubuntu/ jammy-proposed main restricted universe multiverse
deb-src https://mirrors.tuna.tsinghua.edu.cn/ubuntu/ jammy-proposed main restricted universe multiverse
5、更新apt源及sources.list文件
更新apt源发现速度显著提升,使用的是清华的镜像源地址。
root@c4b4e6b8e891:/etc/apt# apt-get update
Get:1 https://mirrors.tuna.tsinghua.edu.cn/ubuntu jammy InRelease [270 kB]
Get:2 https://mirrors.tuna.tsinghua.edu.cn/ubuntu jammy-updates InRelease [119 kB]
Get:3 http://security.ubuntu.com/ubuntu jammy-security InRelease [110 kB]
Get:4 https://mirrors.tuna.tsinghua.edu.cn/ubuntu jammy-backports InRelease [109 kB]
…
6、再次安装ssh软件包
再次安装ssh服务很快就完成了安装。
root@c4b4e6b8e891:/etc/apt# apt-get install ssh
…
Created symlink /etc/systemd/system/sshd.service → /lib/systemd/system/ssh.service.
Created symlink /etc/systemd/system/multi-user.target.wants/ssh.service → /lib/systemd/system/ssh.service.
Setting up ssh-import-id (5.11-0ubuntu1) …
Setting up python3-gi (3.42.1-0ubuntu1) …
Setting up networkd-dispatcher (2.1-2ubuntu0.22.04.2) …
Created symlink /etc/systemd/system/multi-user.target.wants/networkd-dispatcher.service → /lib/systemd/system/networkd-dispatcher.service.
Setting up ssh (1:8.9p1-3ubuntu0.4) …
Processing triggers for libc-bin (2.35-0ubuntu3.1) …
7、方式二:更新为中国科学技术大学镜像源
先将配置sources.list配置文件还原,然后使用sed替换方式将镜像源更换为中国科学技术大学镜像源地址。
root@c4b4e6b8e891:/etc/apt# mv sources.list sources.list.tuna.bak
root@c4b4e6b8e891:/etc/apt# cp sources.list.bak sources.list
root@c4b4e6b8e891:/etc/apt# sed -i ‘s@//.*archive.ubuntu.com@//mirrors.ustc.edu.cn@g’ /etc/apt/sources.list
root@c4b4e6b8e891:/etc/apt# cat sources.list |grep -Ev “$|#”
deb http://mirrors.ustc.edu.cn/ubuntu/ jammy main restricted
deb http://mirrors.ustc.edu.cn/ubuntu/ jammy-updates main restricted
deb http://mirrors.ustc.edu.cn/ubuntu/ jammy universe
deb http://mirrors.ustc.edu.cn/ubuntu/ jammy-updates universe
deb http://mirrors.ustc.edu.cn/ubuntu/ jammy multiverse
deb http://mirrors.ustc.edu.cn/ubuntu/ jammy-updates multiverse
deb http://mirrors.ustc.edu.cn/ubuntu/ jammy-backports main restricted universe multiverse
deb http://security.ubuntu.com/ubuntu/ jammy-security main restricted
deb http://security.ubuntu.com/ubuntu/ jammy-security universe
deb http://security.ubuntu.com/ubuntu/ jammy-security multiverse
8、更新apt源
root@c4b4e6b8e891:/etc/apt# apt-get update
9、安装vim软件验证
再次apt-get install安装验证,发现速度非常快的完成了安装。
root@c4b4e6b8e891:/etc/apt# apt-get install -y vim
10、方式三:更新为阿里云镜像源地址
再次还原sources.list文件后使用sed命令将镜像源地址更换为阿里云地址。
root@c4b4e6b8e891:/etc/apt# cp sources.list.bak sources.list
root@c4b4e6b8e891:/etc/apt# sed -i ‘s@//.*archive.ubuntu.com@//mirrors.aliyun.com@g’ /etc/apt/sources.list
root@c4b4e6b8e891:/etc/apt# apt-get update
11、更新apt源及已安装软件包
再次apt源并更新已安装软件包,更新成功且速度非常快。
root@c4b4e6b8e891:/etc/apt# apt-get update
root@c4b4e6b8e891:/etc/apt# apt-get upgrade
三、总结
如果我们只是需要修改当前版本的镜像源地址为国内地址,我们可以使用sed命令替换镜像源网站地址的方式替换,即方式二和方式三,将官网地址替换为任意维护更新的国内镜像源网站地址即可。如果我们是需要根据版本创建sources.list文件,我们可以使用清华大学的镜像源官网地址,选择版本和内容的方式,复制内容到sources.list文件即可完成指定版本的镜像源文件创建。