前言
现在的android开发提出的需求是越来越接近现实真实感,提高用户体验感。就拿动画效果来说,之前设计给的需求大都比较直接,缩放、旋转、移动等动画效果都执行完就结束了。现在的话,为了追求现实生活中的那种真实感,往往都会有一个回弹的效果,称之为弹性动画。
非弹性动画体验
非弹性动画的效果图:
我们来看一下实现该效果的代码:
private void onScaleAnimation(){
        ObjectAnimator animatorX = ObjectAnimator.ofFloat(imageView,"scaleX",1.0f,1.8f);
        ObjectAnimator animatorY = ObjectAnimator.ofFloat(imageView,"scaleY",1.0f,1.8f);
        AnimatorSet set =new AnimatorSet();
        set.setDuration(1000);
        set.playTogether(animatorX,animatorY);
        set.start();
    }
通过效果图,我们会觉得不real,我们想让他Q一点,有弹性效果
那该怎么实现呢?往下看。
弹性动画的三种实现方式
way 1
通过interpolator(差值器)实现弹性效果。
这里给大家安利一个关于差值器网站:选择你所需要的差值器
在这个网站上可以在线看每种interpolator的效果,从而选择 所需要的interpolator,这里我们选择scaling,library选 择spring。如下图:
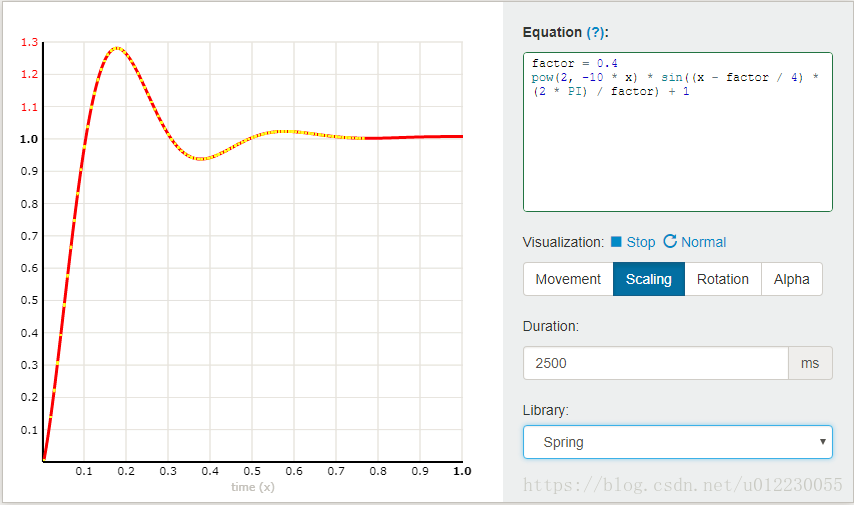
然后重写interpolator类,代码如下:
public class SpringScaleInterpolator implements Interpolator {
    //弹性因数
    private float factor;

    public SpringScaleInterpolator(float factor) {
        this.factor = factor;
    }

    @Override
    public float getInterpolation(float input) {
        return (float) (Math.pow(2, -10 * input) * Math.sin((input - factor / 4) * (2 * Math.PI) / factor) + 1);
    }
}
接下来就是把我们重写的差值器设置进去,看代码:
private void onScaleAnimationBySpringWayOne(){
//        ScaleAnimation animation =new ScaleAnimation(1.0f,1.8f,1.0f,1.8f);
//        animation.setDuration(1000);
//        animation.setInterpolator(new SpringScaleInterpolator(0.4f));
//        imageView.startAnimation(animation);
        ObjectAnimator animatorX = ObjectAnimator.ofFloat(imageView,"scaleX",1.0f,1.8f);
        ObjectAnimator animatorY = ObjectAnimator.ofFloat(imageView,"scaleY",1.0f,1.8f);
        AnimatorSet set =new AnimatorSet();
        set.setDuration(1000);
        set.setInterpolator(new SpringScaleInterpolator(0.4f));
        set.playTogether(animatorX,animatorY);
        set.start();
    }
这里重写的interpolator的构造方法中我穿的参数是因子, 它的值越大,它回弹效果越慢。让我们来看看效果吧。
确实达到了我们要的弹性效果,如果觉得弹性不够的话,可以修改 弹性因数即可。这里我用的是属性动画,用补间动画设置自己 重写的interpolator也是同样可以的。
way 2
第二种实现弹性动画的方式是使用Facebook推出的rebound
如何使用的呢?首先我们要在build.gradle中引入如下依赖:
compile 'com.facebook.rebound:rebound:0.3.8' 然后我们先上代码,根据代码来讲解使用:
private void onScaleAnimationBySpringWayTwo(){
        SpringSystem springSystem = SpringSystem.create();
        Spring spring = springSystem.createSpring();
        spring.setCurrentValue(1.0f);
        spring.setSpringConfig(new SpringConfig(50,5));
        spring.addListener(new SimpleSpringListener(){
            @Override
            public void onSpringUpdate(Spring spring) {
                super.onSpringUpdate(spring);
                float currentValue = (float) spring.getCurrentValue();
                imageView.setScaleX(currentValue);
                imageView.setScaleY(currentValue);
            }
        });
        spring.setEndValue(1.8f);
 }
使用rebound我们需要初始化SpringSystem对象和Spring对象。
通过Spring我们可以设置动画属性的初始值、结束值。
Spring需要添加一个SpringListener接口,代码中我用的SimpleSpringListener
是Springlistener的实现类。(ps:addListener这里如果new 一个SpringListener的话
要重写全部的方法,没必要,需要哪个写哪个)。
我们看下SpringListener接口的定义 :
public interface SpringListener {
  /**
   * called whenever the spring is updated
   * @param spring the Spring sending the update
   */
  void onSpringUpdate(Spring spring);

  /**
   * called whenever the spring achieves a resting state
   * @param spring the spring that's now resting
   */
  void onSpringAtRest(Spring spring);

  /**
   * called whenever the spring leaves its resting state
   * @param spring the spring that has left its resting state
   */
  void onSpringActivate(Spring spring);

  /**
   * called whenever the spring notifies of displacement state changes
   * @param spring the spring whose end state has changed
   */
  void onSpringEndStateChange(Spring spring);
}
我们需要什么样的需求就重写对应方法就好。
上面的代码中有SpringConfig这个对象,通过看源码发现 他的构造函数接受两个变量:
1.tension(拉力)、2.friction(摩擦力)。
作用是什么呢?
很好理解tension:拉力越大,弹性越大;friction 摩擦力越大,弹性效果越小。默认的tension值,friction值如下:
public static SpringConfig defaultConfig = SpringConfig.fromOrigamiTensionAndFriction(40, 7);下面让我们看下通过rebound实现的弹性效果是什么样的.
弹性效果可以通过修改tension和friction的值来改变,大家可以试试。
way 3
下面我们说一说最后一种实现方式。通过引入官方提供的SpringAnimation来实现。上面第二种方式我们是用的Facebook推出的框架,现在 我们看看Google官方的效果吧。
首先我们在build.gradle文件中引入依赖:
compile 'com.android.support:support-dynamic-animation:25.3.1'接下来上代码:
private void onScaleAnimationBySpringWayThree(){
        SpringAnimation animationX = new SpringAnimation(imageView, SpringAnimation.SCALE_X,1.8f);
        SpringAnimation animationY = new SpringAnimation(imageView, SpringAnimation.SCALE_Y,1.8f);
        animationX.getSpring().setStiffness(SpringForce.STIFFNESS_LOW);
        animationX.getSpring().setDampingRatio(SpringForce.DAMPING_RATIO_MEDIUM_BOUNCY);
        animationX.setStartValue(1.0f);

        animationY.getSpring().setStiffness(SpringForce.STIFFNESS_LOW);
        animationY.getSpring().setDampingRatio(SpringForce.DAMPING_RATIO_MEDIUM_BOUNCY);
        animationY.setStartValue(1.0f);

        animationX.start();
        animationY.start();
}
这里面具体的一些用法,我就不细说了,可以参考:
SpringAnimation的使用
这个链接里面说的还挺详细的。那我们看下通过SpringAnimation
实现的效果是怎么样的。
同rebound,这边如果你对弹性动画的弹性效果不满意可以通过 setStiffness()和setDampingRatio()方法来实现你想要的效果。
注意哦:
stiffness的值越小,弹性效果越好,弹时间越长。
DampingRatio的值越大,弹性效果越差。
区别
这三种方式都可以实现弹性效果,那到底选择什么方式呢,这里说一下rebound和SpringAnimation。SpringAnimation的话在对一个控件 多个属性的动画效果设置比如一个view我既设置缩放动画又设置 平移动画。就会会出现代码量多的问题,而rebound则相对好些。
下面附上一张完整的效果图:
最后附上项目的demo,有需要的可以看看。
弹性动画demo
原文地址:http://blog.csdn.net/qq_34902522/article/details/77651799