大家好,小编来为大家解答以下问题,python自动化运维需要掌握的技能,python自动化运维快速入门 pdf,今天让我们一起来看看吧!

Ansible介绍
Ansible是基于Python开发的自动化运维工具,它汇集了众多运维工具(puppet、cfengine、chef、func、fabric、salt等)的优点,实现批量系统配置、批量程序部署、批量执行命令等功能。Ansible本身只是提供一种框架,内部组织了众多具有批量部署/运行能力的模块,通过这些模块来完成实际的工作python知识点思维导图。
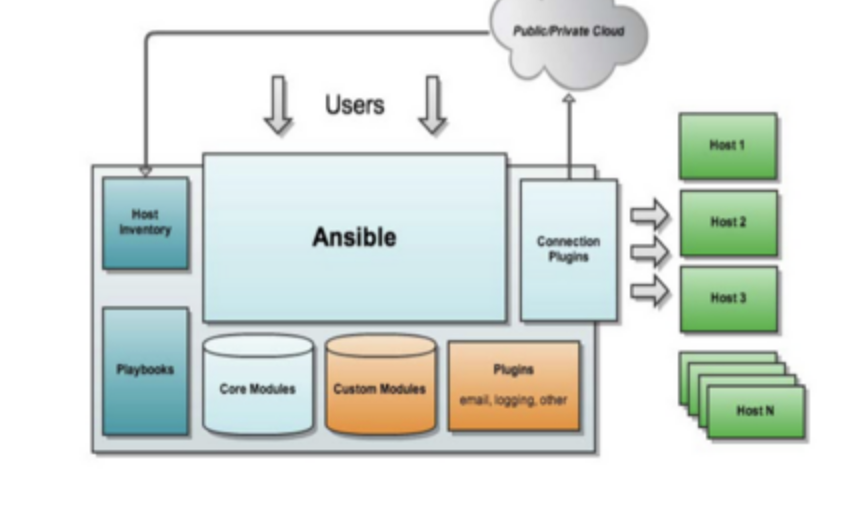
Ansible总体架构
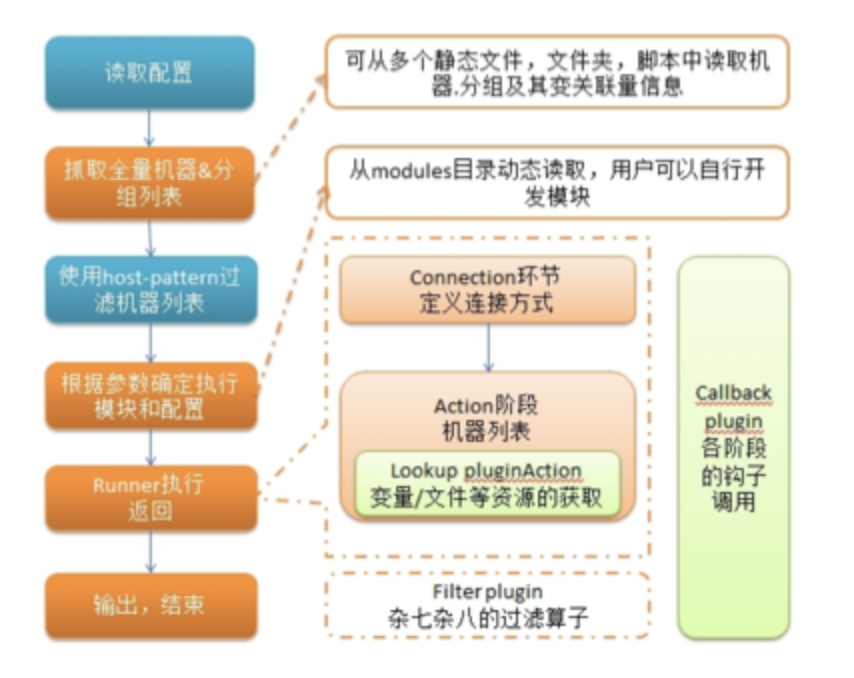
Ansible任务执行流程

Ansible特性
no agents:不需要在被管控主机上安装任何客户端,但需要客户端上都安装python-simplejson包
no server:无服务器端,使用时直接运行命令即可
modules in any languages:基于模块工作,可使用任意语言开发模块
yaml,not code:使用yaml语言定制playbook任务
ssh by default:基于SSH工作
strong multi-tier solution:可实现多级解决方案
Ansible部署环境说明
配管中心服务器IP:10.210.24.1 和 10.210.24.2(二者互备)
操作系统版本:Centos5.4
Ansible版本:stable-2.1
Ansible部署目录:/usr/local/ansible
Ansible安装部署
(注意:为了兼容最新版本ansible,下面部分包采用编译安装)
安装Python2.7包
yum install sinasrv2-python27.x86_64
2.安装setuptools包
yum install sinasrv2-python27-setuptools.x86_64
3. 安装pycrypto包
yum install sinasrv2-python27-pycrypto.x86_64
4. 安装python-simplejson包
yum install python-simplejson.x86_64
5. 安装PyYAML包
wget http://pyyaml.org/download/libyaml/yaml-0.1.5.tar.gz
tar xvzf yaml-0.1.5.tar.gz
cd yaml-0.1.5
./configure --prefix=/usr/local
make --jobs=grep processor/proc/cpuinfo | wc -l
make install
wget https://pypi.python.org/packages/source/P/PyYAML/PyYAML-3.11.tar.gz
tar xvzf PyYAML-3.11.tar.gz
cd PyYAML-3.11
python2.7 setup.py install
6. 安装Jinja2包
tar xvzf MarkupSafe-0.9.3.tar.gz
cd MarkupSafe-0.9.3
python2.7 setup.py install
tar xvzf Jinja2-2.7.3.tar.gz
cd Jinja2-2.7.3
python2.7 setup.py install
7. 安装paramiko包
wget https://pypi.python.org/packages/source/e/ecdsa/ecdsa-0.11.tar.gz
tar xvzf ecdsa-0.11.tar.gz
cd ecdsa-0.11
python2.7 setup.py install
wget https://pypi.python.org/packages/source/p/paramiko/paramiko-1.15.1.tar.gz
tar xvzf paramiko-1.15.1.tar.gz
cd paramiko-1.15.1
python2.7 setup.py install
8. 安装ansible
wget https://github.com/ansible/ansible/archive/stable-2.1.zip
unzip stable-2.1.zip
cd ansible-2.1
python2.7 setup.py install
9. 安装dialog
yum install dialog ncurses-devel ncurses
Ansible安装目录说明
/usr/local/ansible 安装目录
/usr/local/ansible/ansible.cfg 主配置文件
/usr/local/ansible/group_vars 全局变量目录
/usr/local/ansible/inventory Ansible节点配置目录,定义主机列表
/usr/local/ansible/lib Ansible模块安装目录
/usr/local/ansible/plugins Ansible插件目录
/usr/local/ansible/roles Ansible状态管理playbook集合目录
/usr/local/ansible/site.yml Ansible-playbook执行任务入口文件
Ansible配置
SSH免密钥认证配置(需推送到被管理的客户端机器)
ssh-keygen -t rsa -P ”
cat /root/.ssh/id_rsa.pub >> /root/.ssh/authorized_keys
chmod 600 /root/.ssh/authorized_keys
2. Ansible配置
vim /usr/local/ansible/ansible.cfg
[defaults]
# some basic default values…
inventory = /usr/local/ansible/inventory/hosts
library = /uer/local/ansible/lib
remote_tmp = $HOME/.ansible/tmp
pattern = *
forks = 20
poll_interval = 15
sudo_user = root
transport = smart
remote_port = 26387
module_lang = C
roles_path = /usr/local/ansible/roles
private_key_file = /root/.ssh/id_rsa
display_skipped_hosts = True
# set plugin path directories here, separate with colons
action_plugins = /usr/local/ansible/plugins/action
callback_plugins = /usr/local/ansible/plugins/callback
connection_plugins = /usr/local/ansible/plugins/connection
lookup_plugins = /usr/local/ansible/plugins/lookup
vars_plugins = /usr/local/ansible/plugins/vars
filter_plugins = /usr/local/ansible/plugins/filter
test_plugins = /usr/local/ansible/plugins/test
strategy_plugins = /usr/local/ansible/plugins/strategy
[ssh_connection]
ssh_args = -o ControlMaster=auto -o ControlPersist=4h -o Compression=yes -o ServerAliveInterval=30 -o ServerAliveCountMax=5
……
.......
Ansible重要概念
1. YAML
数据交换格式,类似json或xml,但比它们更具有可读性,通常用于作为程序的配置文件。Ansible的playbook配置使用yaml格式来表达。
必须了解的几条简单规则:
1) 文档以---开头
2) - 代表列表,也可以写成[a,b]
3) : 代表字典,也可以写成{a:b}
如果字符冲突用双引号把对应字符串引起来。
2. Ad-Hoc
ad hoc -临时的,在ansible中是指需要快速执行,并且不需要保存的命令。通常是指一些简单的命令,对于复杂的命令,需要使用ansible-playbook来完成。更多参考:http://docs.ansible.com/ansible/intro_adhoc.html
[举例] 查询hosts文件中所有主机的hostname: ansible -i inventory/hosts all -m command -a "hostname"
[举例] 查看ansible 模块copy的用法:ansible-doc copy
playbook
playbook(剧本),是ansible配置,部署和协调语言,它们描述了你想要在远程系统上强制执行的一个政策,或者是一个一般IT流程的一个步骤集合。简单说就是定义一组task的集合,然后ansible会自上而下调用相应的模块来顺序执行。更多介绍参考:http://docs.ansible.com/ansible/playbooks.html
task
由模块来完成的一个单位任务
5.handler
task可以触发一定的事件,而处理该事件的task即为handler
6.host
设置应用playbook的主机范围
7.user
在这些主机上以什么用户运行playbook
8. role
角色,一组playbook以及和其配合的元素(vars, files等)的集合
Ansible重要指令
本小节举例讲解ansible常用重要指令,示例如:
---hosts: webservers
vars:
http_port: 80
max_clients: 200
remote_user: root
tasks:
name: ensure apache is at the latest version
yum: pkg=httpd state=latest
name: write the apache config file
template: src=/srv/httpd.j2 dest=/etc/httpd.conf
notify:
restart apache
name: ensure apache is running
service: name=httpd state=started
handlers:
name: restart apache
service: name=httpd state=restarted
hosts
定义playbook的执行主机范围,与命令模式下的ansible匹配规则一样。
例如:
[webservers]
10.20.10.5
10.20.[2-9]0.*
remote_user
定义playbook的执行用户,也可以在具体的tasks任务级别中定义,如:
tasks:name: test connection
ping:
remote_user: yourname
sudo: yes
注意:也可以用sudo指令来说明所有或者部分任务以sudo方式执行
vars
定义变量
vars_files
定义变量文件
tasks
定义任务列表,由模块来执行完成
name
定义playbook或者task的名称
notify
任务执行结果如果是发生更改了的则触发定义在handler的任务执行
handlers
定义被触发的任务列表,由模块来执行完成
include
能包含的包括task,handler和playbook
可以在include的时候传递变量
示例:
tasks:include: wordpress.yml
vars:
remote_user: timmy
some_list_variable:
alpha
beta
gamma
roles
定义主机对应的角色,角色是一组按照目录组合的配置,ansible自动完成文件搜索,去找对应目录下的main.yml文件来执行,具体目录结构如下:
defaults/ 默认的变量保存在这个目录下
files/ 文件
templates/ 模板
tasks/ 任务
handlers/ 处理器
vars/ 变量
meta/ 角色本身的信息,如通过dependencies指令指定依赖
library/ 私有模块
另外,你也可以给role传递变量。
Ansible 变量及其用法
变量本来是个很简单的东西,但是变量在Playbook里是个很复杂的,其复杂的原因在于你不知道它从哪里来到哪里去了,下面我们也从这两个方面来剖析它。
从哪里来
inventory
在group和host中都可以定义变量,示例如下:
[atlanta]
host1 http_port=80 maxRequestsPerChild=808
host2 http_port=303 maxRequestsPerChild=909
[southeast:vars]
some_server=foo.southeast.example.com
halon_system_timeout=30
self_destruct_countdown=60
escape_pods=2
vars和vars_files
在playbook的开头可以用这俩指令来定义一些初始变量,这个可以参考上文中的playbook的demo
include
通过在playbook的include指令可以其他task的时候,可以给文件传递变量,示例如下:
tasks:
- include: donghong.yml user=root
role
当给一个主机应用角色的时候可以传递变量,然后在角色内使用这些变量,示例如下:
- hosts: webservers
roles:common
{ role: foo_app_instance, dir: '/opt/a', port: 5000 }
facts
默认在每次执行playbook前都获取设备信息,所有这些信息都可以作为变量应用到playbook中,要查看这些变量可以执行:
ansible localhost -m setup
register
把任务的输出定义为变量,然后用于其他任务,示例如下:
tasks:
- shell: /usr/bin/foo
register: foo_result
ignore_errors: True
内置变量
ansible内置了一些变量以方便主机之间相互调用各自的变量。这些变量包括:
* hostvars允许你访问另一个主机的变量,当然前提是ansible已经收集到这个主机的变量了:
group_names是当前主机所在的group列表
groups是所有inventory的group列表
inventory_hostname是在inventory里定义的主机名
play_hosts是当前的playbook范围内的主机列表
inventory_dir和inventory_file是定义inventory的目录和文件
命令行
在运行playbook的时候也可以传递一些变量供playbook使用,示例如下:
ansible-playbook release.yml –extra-vars "hosts=vipers user=starbuck"
也可以从json文件里读取变量,示例如下;
ansible-playbook main.yml -e "@vars.json"
用到哪里
所有变量都可以在playbook或者jinja2模板中通过{ { varname }}中使用。另外,当变量和jinja2的管道配合起来的时候能提供各种灵活的条件判断和变量处理。具体看下边两个例子。
如果第一个任务执行失败了才会执行第二个任务,可以这么写:
tasks:shell: /usr/bin/foo
register: result
ignore_errors: True
debug: msg="it failed"
when: result|failed
去重一个列表,可以这么写:
{ { list | uniq }}
变量的优先级
-e 命令行指定的最高
inventory文件定义的变量次之,其实inventory文件也分全局,group级别的和hosts级别的变量定义
fact变量次之
角色的default变量优先级最低
Ansible 条件及其用法
when
可用于task,role和include,在满足条件时task才会被执行。至于when指令后跟的逻辑表达式也是标准的逻辑表达式,示例如下:
tasks:shell: echo "only on Red Hat 6, derivatives, and later"
when: ansible_os_family == "RedHat" and ansible_lsb.major_release|int >= 6
shell: echo "This certainly is epic!"
when: epic is defined
循环
标准遍历
用with_items可以遍历一个列表,注意这里只会遍历一层。示例如下:
– name: add several users
user: name={ { item }}state=present groups=wheel
with_items:
- testuser1
- testuser2
嵌套遍历
用with_nested可以遍历一个列表,注意这里会遍历多层,直到最内层。示例如下:
– name: give users access to multiple databases
mysql_user: name={ { item[0] }}priv={ { item[1] }}.*:ALL append_privs=yes password=foo
with_nested:
- [ 'alice', 'bob', 'eve' ]
- [ 'clientdb', 'employeedb', 'providerdb' ]
遍历字典
用with_dict可以遍历一个字典,用key和value来表示。示例如下:
变量文件
—
users:
alice:
name: Alice Appleworth
telephone: 123-456-7890
bob:
name: Bob Bananarama
telephone: 987-654-3210
playbook文件
tasks:
- name: Print phone records
debug: msg="User{ { item.key }}is{ { item.value.name }}({ { item.value.telephone }})"
with_dict: users
文件通配符循环
用with_fileglob可以获取本地文件列表。示例如下:
# copy each file over that matches the given pattern
- copy: src={ { item }}dest=/etc/fooapp/ owner=root mode=600
with_fileglob:
- /playbooks/files/fooapp/*
对齐的列表
用with_together可以达到类似python里的zip函数的功能。示例如下:
变量文件:
—
alpha: [ 'a', 'b', 'c', 'd' ]
numbers: [ 1, 2, 3, 4 ]
playbook文件
tasks:
- debug: msg="{ { item.0 }}and{ { item.1 }}"
with_together:
- alpha
- numbers
子元素循环
with_subelements这个使用比较少。
数字序列循环
可以通过with_sequence来生成一个数字序列,其参数包括:
start起始数字
end结束数字
stride步长
count个数
format输出的字符串
示例如下:
---
- hosts: all
tasks:
# create groups
- group: name=evens state=present
- group: name=odds state=present
# create some test users
- user: name={ { item }}state=present groups=evens
with_sequence: start=0 end=32 format=testuser%02x
# create a series of directories with even numbers for some reason
- file: dest=/var/stuff/{ { item }}state=directory
with_sequence: start=4 end=16 stride=2
# a simpler way to use the sequence plugin
# create 4 groups
- group: name=group{ { item }}state=present
with_sequence: count=4
随机循环
通过with_random_choice从一个序列里随机取一个元素。示例如下:
– debug: msg={ {item}}
with_random_choice:
- "go through the door"
- "drink from the goblet"
- "press the red button"
- "do nothing"
until循环
这种循环由三个指令完成:
until是一个条件表达式,如果满足条件循环结束
retry是重试的次数 delay是延迟时间
示例如下:
– action: shell /usr/bin/foo
register: result
until: result.stdout.find("all systems go") != -1
retries: 5
delay: 10
循环直到找到文件
与with_items类似,只是with_first_found找到列表里的第一个文件就会终止循环。示例如下:
– name: INTERFACES | Create Ansible header for /etc/network/interfaces
template: src={ { item }}dest=/etc/foo.conf
with_first_found:
- "{ {ansible_virtualization_type}}_foo.conf"
- "default_foo.conf"
循环一个task的输出
with_lines指令后跟一个命令,ansible会遍历命令的输出。示例如下:
– name: Example of looping over a command result
shell: /usr/bin/frobnicate{ { item }}
with_lines: /usr/bin/frobnications_per_host --param{ { inventory_hostname }}
带索引地循环列表
与with_items类似,with_indexed_items会把列表索引和对应元素放到一个列表里。示例如下:
– name: indexed loop demo
debug: msg="at array position{ { item.0 }}there is a value{ { item.1 }}"
with_indexed_items: some_list
扁平化循环列表
with_flattened会先拍扁一个列表,然后执行with_items。示例如下:
– name: flattened loop demo
yum: name={ { item }}state=installed
with_flattened:
- ['nc','git', ['nmap', 'vim']]
配合register循环列表
register注册一个变量后,可以配合with_items来遍历变量结果。示例如下:
– shell: echo "{ {item}}"
with_items:
- one
- two
register: echo
- name: Fail if return code is not 0
fail:
msg: "The command ({ { item.cmd }}) did not have a 0 return code"
when: item.rc != 0
with_items: echo.results
喜欢 (0)or分享 (0)