<!doctype html>
<html>
	<head>
		<meta charset="utf-8">
		<style>
			.test{
				width:150px;
				height:300px;
				border:1px solid #ccc;
				margin-top:100px;
				float:left;
			}
		</style>
	</head>
	<body>
		<div class="test">1</div>
		<div class="test">2</div>
		<div class="test">3</div>
		<div class="test">4</div>
		<div class="test">5</div>
	</body>
</html>
上段代码生成如下图所示的效果,盒子盒子之前的边框加粗:

加上margin-left:-1px;后,就是我们想要的布局效果了

此时,我们需要的最终效果是鼠标一放到盒子上面,盒子的边框高亮显示,代码如下:
<!doctype html>
<html>
	<head>
		<meta charset="utf-8">
		<style>
			.test{
				width:150px;
				height:300px;
				border:1px solid #ccc;
				margin-top:100px;
				float:left;
				margin-left:-1px;
			}
			.test:hover{
				border:1px solid #f40;
			}
		</style>
	</head>
	<body>
		<div class="test">1</div>
		<div class="test">2</div>
		<div class="test">3</div>
		<div class="test">4</div>
		<div class="test">5</div>
	</body>
</html>

这时候就需要提高该盒子的显示层级,用定位可以实现
<!doctype html>
<html>
	<head>
		<meta charset="utf-8">
		<style>
			.test{
				width:150px;
				height:300px;
				border:1px solid #ccc;
				margin-top:100px;
				float:left;
				margin-left:-1px;
			}
			.test:hover{
				border:1px solid #f40;
				position:relative;
			}
		</style>
	</head>
	<body>
		<div class="test">1</div>
		<div class="test">2</div>
		<div class="test">3</div>
		<div class="test">4</div>
		<div class="test">5</div>
	</body>
</html>
效果如下:
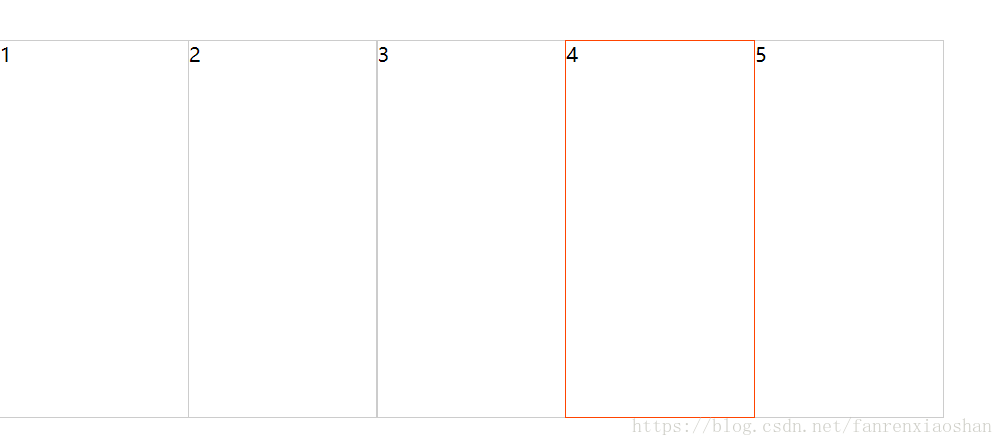
有时候盒子已经有相对定位了,这时候就需要设置z-index属性来提高显示的层级
<!doctype html>
<html>
	<head>
		<meta charset="utf-8">
		<style>
			.test{
				width:150px;
				height:300px;
				border:1px solid #ccc;
				margin-top:100px;
				float:left;
				margin-left:-1px;
				position:relative;
			}
			.test:hover{
				border:1px solid #f40;
				z-index:1;
			}
		</style>
	</head>
	<body>
		<div class="test">1</div>
		<div class="test">2</div>
		<div class="test">3</div>
		<div class="test">4</div>
		<div class="test">5</div>
	</body>
</html>
z-index属性仅在定位的元素上生效