一、碎片虽然是嵌入在活动中显示的,但是碎片和活动都是各自存在不同的类当中的,并没有什么明显的方式来直接进行通信的。那么如果要在活动中调用碎片里的方法,在碎片里调用活动的方法,一个碎片调用另一碎片的方法,应该怎么实现呢?
1、活动中调用碎片的方法:
为了方便碎片与活动之间进行通信,FragmentManager提供了一个类似于findViewById()的方法,专门从布局文件中获取碎片的实例,代码如下:
Fragment2 fragment2=(Fragment2)getFragmentManager().findFragmentById(R.id.fragment2);- 1
调用 FragmentManager 的 findFragmentById()方法,可以在活动中得到相应碎片的实例,这样就可以调用碎片的方法了。
2、碎片中调用活动的方法:
在每个碎片中都可以通过调用 getActivity()方法来得到和当前碎片相关联
的活动实例,代码如下:
MainActivity activity=(MainActivity)getActivity();- 1
获得活动实例后,就可以在碎片中调用活动的方法。另外当碎片中需要
使用 Context 对象时,也可以使用 getActivity()方法,因为获取到的活动本身就是一个Context对象了。
3、一个碎片中调用另一碎片的方法:
首先,在一个碎片中得到与此碎片相关联的活动实例,然后可以通过这个活动实例去获取另外一个碎片的实例,这样就可以实现一个碎片中与另一碎片之间的通信功能,代码如下:
MainActivity activity=(MainActivity)getActivity();
Fragment2 fragment2=(Fragment2)activity.getFragmentManager().findFragmentById(R.id.fragment2);- 1
- 2
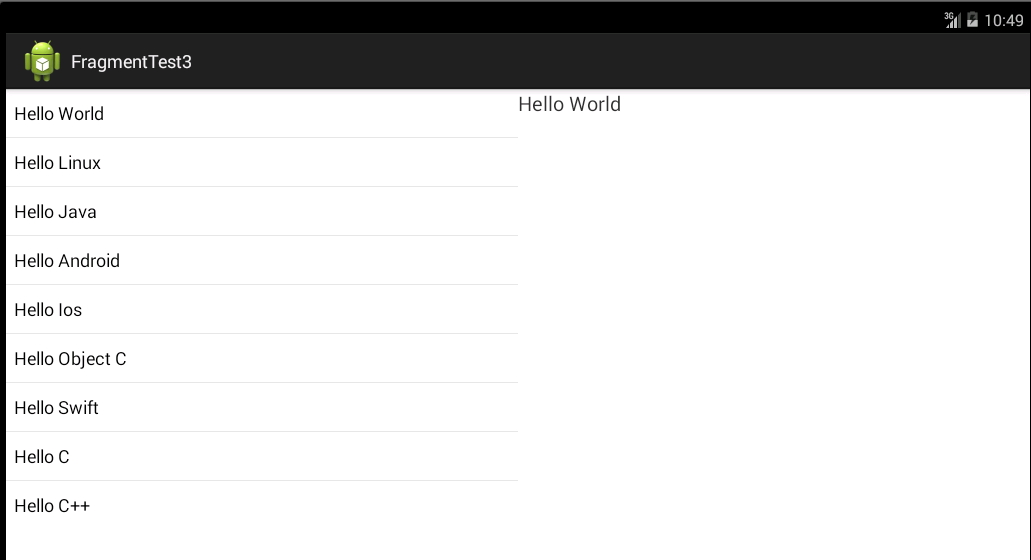
二、接下来附上一个简单的例子,该例子实现了一个碎片与另一个碎片通信的功能,实现效果如下: 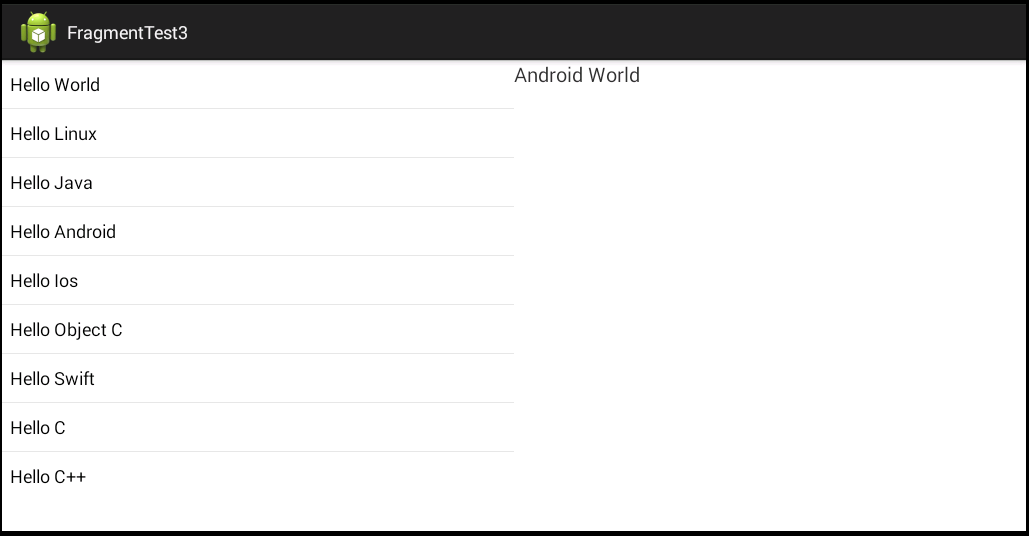
运行项目后的效果,然后点击左侧列表中的某一项,在右侧会显示你所点击的那一项的文本,如下图所示:
三、首先,新建一个android项目,项目名为Fragment3Test,项目结构图如下: 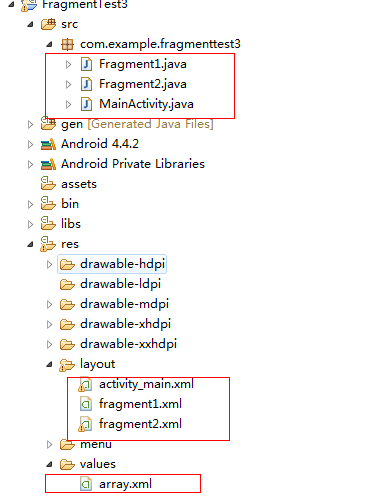
1、首先,在res目录下的values目录下新建一个array.xml文件,用来绑定左边碎片的列表数据,array.xml代码如下:
<?xml version="1.0" encoding="utf-8"?>
<resources>
    <string-array name="list">
        <item>Hello World</item>
        <item>Hello Linux</item>
        <item>Hello Java</item>
        <item>Hello Android</item>
        <item>Hello Ios</item>
        <item>Hello Object C</item>
        <item>Hello Swift</item>
        <item>Hello C</item>
        <item>Hello C++</item>
    </string-array>
</resources>
- 1
- 2
- 3
- 4
- 5
- 6
- 7
- 8
- 9
- 10
- 11
- 12
- 13
- 14
- 15
2、在layout目录下新建两个布局文件,分别为fragment1.xml和fragment2.xml,代码分别如下:
fragment1.xml,用来在左边碎片展示一个列表:
<?xml version="1.0" encoding="utf-8"?>
<LinearLayout xmlns:android="http://schemas.android.com/apk/res/android"
    android:layout_width="match_parent"
    android:layout_height="match_parent"
    android:orientation="vertical" >

    <ListView
        android:id="@+id/listView"
        android:layout_width="match_parent"
        android:layout_height="wrap_content"
        android:entries="@array/list"/>

</LinearLayout>
- 1
- 2
- 3
- 4
- 5
- 6
- 7
- 8
- 9
- 10
- 11
- 12
- 13
- 14
fragment2.xml,用来显示右边碎片的内容:
<?xml version="1.0" encoding="utf-8"?>
<LinearLayout xmlns:android="http://schemas.android.com/apk/res/android"
    android:layout_width="match_parent"
    android:layout_height="match_parent"
    android:orientation="vertical" >

    <TextView
        android:id="@+id/textView"
        android:layout_width="match_parent"
        android:layout_height="wrap_content"
        android:text="Android World"
        android:textSize="20sp"/>

</LinearLayout>
- 1
- 2
- 3
- 4
- 5
- 6
- 7
- 8
- 9
- 10
- 11
- 12
- 13
- 14
- 15
3、在src目录下新建两个类,分别为Fragment1和Fragment2类,都继承于android.app.Fragment类,代码分别如下:
Fragment1.java,左边碎片,其中代码中实现了与右边碎片的通信,即实现点击左边碎片列表的哪个项,右边碎片的文本就为点击的哪个项的文本内容:
package com.example.fragmenttest3;

import android.app.Fragment;
import android.os.Bundle;
import android.view.LayoutInflater;
import android.view.View;
import android.view.ViewGroup;
import android.widget.AdapterView;
import android.widget.AdapterView.OnItemClickListener;
import android.widget.ListView;

public class Fragment1 extends Fragment {

    private ListView listView;//声明ListView对象
    @Override
    public View onCreateView(LayoutInflater inflater, ViewGroup container,
            Bundle savedInstanceState) {
        View view=inflater.inflate(R.layout.fragment1, container, false);//获得View对象
        listView=(ListView)view.findViewById(R.id.listView);//获得布局中的ListView控件实例
        //列表点击时的事件监听器
        listView.setOnItemClickListener(new OnItemClickListener() {

            @Override
            public void onItemClick(AdapterView<?> arg0, View arg1, int arg2,
                    long arg3) {
                // TODO Auto-generated method stub
                MainActivity activity=(MainActivity)getActivity();//获得MainActivity的实例
                Fragment2 fragment2=(Fragment2)activity.getFragmentManager().findFragmentById(R.id.fragment2);//获得Fragment2碎片对象
                //当选择列表的项,设置右边碎片中的TextView的内容
                switch (arg2) {
                case 0:
                    fragment2.textView.setText(listView.getItemAtPosition(0).toString());
                    break;
                case 1:
                    fragment2.textView.setText(listView.getItemAtPosition(1).toString());
                    break;
                case 2:
                    fragment2.textView.setText(listView.getItemAtPosition(2).toString());
                    break;
                case 3:
                    fragment2.textView.setText(listView.getItemAtPosition(3).toString());
                    break;
                case 4:
                    fragment2.textView.setText(listView.getItemAtPosition(4).toString());
                    break;
                case 5:
                    fragment2.textView.setText(listView.getItemAtPosition(5).toString());
                    break;
                case 6:
                    fragment2.textView.setText(listView.getItemAtPosition(6).toString());
                    break;
                case 7:
                    fragment2.textView.setText(listView.getItemAtPosition(7).toString());
                    break;
                case 8:
                    fragment2.textView.setText(listView.getItemAtPosition(8).toString());
                    break;
                default:
                    break;
                }
            }
        });
        return view;//返回此视图对象
    }

}
- 1
- 2
- 3
- 4
- 5
- 6
- 7
- 8
- 9
- 10
- 11
- 12
- 13
- 14
- 15
- 16
- 17
- 18
- 19
- 20
- 21
- 22
- 23
- 24
- 25
- 26
- 27
- 28
- 29
- 30
- 31
- 32
- 33
- 34
- 35
- 36
- 37
- 38
- 39
- 40
- 41
- 42
- 43
- 44
- 45
- 46
- 47
- 48
- 49
- 50
- 51
- 52
- 53
- 54
- 55
- 56
- 57
- 58
- 59
- 60
- 61
- 62
- 63
- 64
- 65
- 66
- 67
上述代码中的:
MainActivity activity=(MainActivity)getActivity();//获得MainActivity的实例
Fragment2 fragment2=(Fragment2)activity.getFragmentManager().findFragmentById(R.id.fragment2);//获得Fragment2碎片对象- 1
- 2
这两行代码可以获得Fragment2碎片的实例,便可以调用Fragment2碎片的方法和变量了。
Fragment2.java,右边碎片,代码如下:
package com.example.fragmenttest3;

import android.app.Fragment;
import android.os.Bundle;
import android.view.LayoutInflater;
import android.view.View;
import android.view.ViewGroup;
import android.widget.TextView;

public class Fragment2 extends Fragment {
    public TextView textView;//声明TextView对象

    @Override
    public View onCreateView(LayoutInflater inflater, ViewGroup container,
            Bundle savedInstanceState) {
        // TODO Auto-generated method stub
        View view=inflater.inflate(R.layout.fragment2, container,false);//获得View对象
        textView=(TextView)view.findViewById(R.id.textView);//获得右边碎片中的TextView控件实例
        return view;//返回此视图
    }

}
- 1
- 2
- 3
- 4
- 5
- 6
- 7
- 8
- 9
- 10
- 11
- 12
- 13
- 14
- 15
- 16
- 17
- 18
- 19
- 20
- 21
- 22
- 23
上述两个类都是加载了相应的碎片,但是我在其中加了一些逻辑。
4、修改默认的activity_main布局文件,用来添加两个碎片,代码如下:
<LinearLayout xmlns:android="http://schemas.android.com/apk/res/android"
    xmlns:tools="http://schemas.android.com/tools"
    android:layout_width="match_parent"
    android:layout_height="match_parent" >

    <fragment
        android:id="@+id/fragment1"
        android:name="com.example.fragmenttest3.Fragment1"
        android:layout_width="0dp"
        android:layout_height="match_parent"
        android:layout_weight="1" />

    <fragment
        android:id="@+id/fragment2"
        android:name="com.example.fragmenttest3.Fragment2"
        android:layout_width="0dp"
        android:layout_height="match_parent"
        android:layout_weight="1" />

</LinearLayout>- 1
- 2
- 3
- 4
- 5
- 6
- 7
- 8
- 9
- 10
- 11
- 12
- 13
- 14
- 15
- 16
- 17
- 18
- 19
- 20
5、默认的MainActivity不需要修改,部署此项目便得到上面第二点的效果了。
四、以上内容仅供大家参考学习,谢谢!
源码下载地址:http://download.csdn.net/download/u012561176/9262143