背景
为什么要做自动化测试?
节省测试时间,项目有一定体量后回归测试等场景需要耗费大量时间和人力
为什么要做接口自动化测试?
相对于ui,接口较稳定,实现自动化比较方便,代码成型后,用例和代码维护也比较方便
一、拆解接口测试的过程和场景
1.分析接口请求有哪些内容
- l 请求方法 method
- l 请求地址url
- l 环境配置 ip
- l 前置操作
- l Request Body (数据类型)
- l 状态码
- l Response body
- l 断言
- l 后置操作
2. 两种接口测试场景
- 对单个接口进行校验
接口字段的数据类型/长度/空值等检查点做校验,此场景大量不同数据请求同一个接口,适合做数据驱动(DDT),此场景主要解决批量读取用例数据,加载DDT,记录执行结果(使用异常处理)三个问题。
- 对接口进行业务流的测试
此场景会涉及多个接口及数据的插入及清洗等
1分析业务关系
可从流程图,4+1视图,设计文档等入手
2梳理
例:启动指标
启动指标的条件,该指标应存在(delete_flag=0)且指标状态为inactive
为确保用例的独立性(解耦),测试流程应为:
1新建指标并返回指标id
2请求指标启动接口,启动新建的指标;断言接口返回success/数据库内指标状态刷新为active;由于指标启动过程平台建任务有耗时,此处需要设置等待。
3数据的清理,请求指标停止接口停止该指标任务,删除此指标相关数据(指标表/指标表达式表)
二、分析接口自动化测试活动
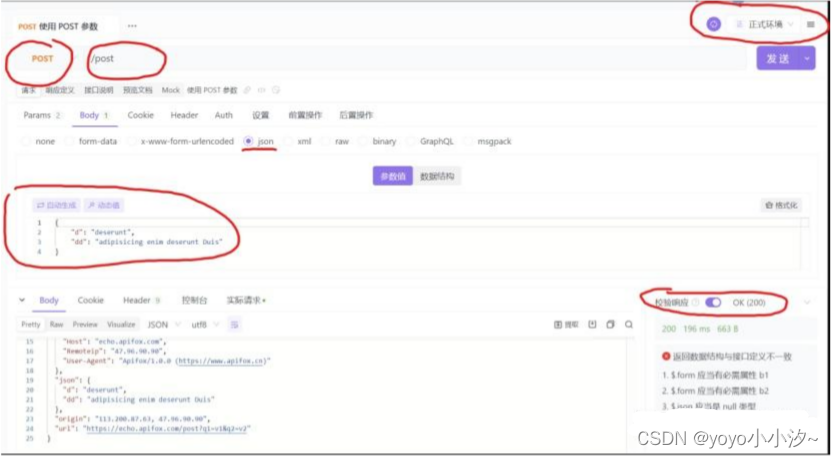
1.接口拉通--编写用例的准备
接口文档
Postman(灵活运用postman生成代码的功能)
参照文档使用postman请求,拉通接口
2.测试过程相关数据的管理和组织
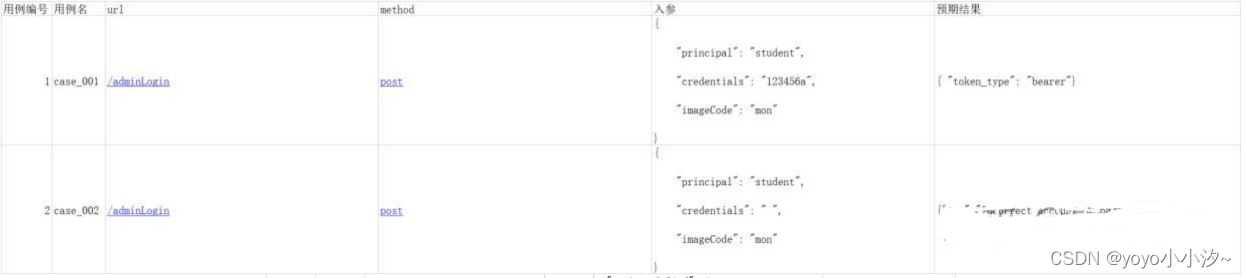
1.用例编写
用例数据 用例编号,用例名,url,method,入参,预期结果
2.用例文件的格式,组织方式 excel / python文件/yaml
1使用excel表格编写用例,注意用例表字段的设计
优点:维护简单,修改方便,不需要会编程
缺点:程序需要使用相关模块(openpyxl/xlrd等)支持才可以读取,需要编写相关代码
例:
适用于单接口校验做数据驱动

适用于业务场景测试,配合正则表达式和反射
2使用python文件编写用例
使用面向对象和继承的方法编写用例数据
优点:python可直接读取,不需要中间层,可直接在开发环境编写
缺点:编写人员需要会python语法,理解面向对象和继承等,跨语言较麻烦
例
class Case:
    #此处可使用类属性放置所有用例实例共有的属性,如IP,但是IP这种环境配置还是建议放在config里,不然用例改环境太麻烦
    host_ip=""
    def __init__(self,num,name,url,method,req_body,exp_result):
        self.num=""
        self.name=""
        self.url=""
        self.method=""
        self.req_body=""
        self.exp_result=""
#将用例属性进行实例化传入,因为整个框架设计数据传递主要使用json,所以建议所有字符串都用双引号
#实例化用例后导入到其他模块使用就可以了
case_01=Case("01","case_01","/abc","post","{"user":"001"}","{"status":"success"}")
#多个用例时,可使用list传递,适用DDT
case_02=Case("01","case_01","/abc","post","{"user":"001"}","{"status":"success"}")
case_03=Case("01","case_01","/abc","post","{"user":"001"}","{"status":"success"}")
case_box=[case_01,case_02,case_03]
#当然,也可以写个循环生成用例,case_box.append()循环往里加

class New_case(Case):

    def __init__(self,num,name,url,method,req_body,exp_result,exp_code):      super().__init__(num,name,url,method,req_body,exp_result)      self.exp_code = exp_code
#使用继承可以方便添加新的用例属性
3使用yaml文件编写用例
优点:跨语言优势强
缺点:编写人员需要会yaml语法,需要使用第三方模块支持才能读取数据
例
# yaml语法
# key: {key1: value1,key2: value2} 注意:冒号后有空格,字符串建议使用双引号
case_data_workbook:
  workbook: "../data_of_cases/case2.xlsx"
  worksheet: "Sheet1"

# 用例编写
case_01:
  num: "01"
  name: "case_01"
  url: "/abc/o1"
  req_body : '{"credentials": "123456","account":"admin"}'
3.环境配置config
1使用python类编写配置文件
优缺点同上,我们直接看例子
"""
建立一个类
配置项用类属性来写,方便其他模块导入使用
路径可以使用pathlib拼接

"""


class CONFIG:  #环境host
    HOST = "http://www.xxx.com:8108"  #用例excel文件
    WORKBOOK = "../data_of_cases/case2.xlsx"  #用例sheet
    WORKSHEET = "Sheet1"  #日志输出路径
    LOG_PATH = "../test_logs/runlog_.text"  #打印日志等级
    LOG_LEVEL = "ERROR"  #测试报告输出路径
    REPORT_PATH = "../test_report/report.html"
2使用yaml编写配置文件
优缺点也同上,我们直接看例子
#使用yaml作为配置文件,比较通用,跨语言有优势
#用例存储文件路径,及sheet页名
#建议采用相对路径

case_data_workbook:
  workbook: "../data_of_cases/case2.xlsx"
  worksheet: "Sheet1"

#log日志输出位置
#打印日志的等级
#日志切分   可按时间切分,也可按大小,如 1 MB切分

log_path: "../test_logs/runlog.log"
log_level: "ERROR"
log_rotation: "12:00"

#测试报告输出位置

report_path: "../test_report/report.html"

#后台域名,结合环境
host: "http://www.xxx.com:8108"
#前台域名
front_host: "http://www.xxx.com:8107"
3测试过程中的需求
- 框架
- 请求方法
- 读取用例数据
- 读取环境配置
- 数据预处理和清洗
- 执行结果记录
- 测试报告输出
- ...
三、 编写自动化框架需要的模块及包,技术点
1框架:
unittest
优点:python自带,使用比较方便
缺点:定制化自由度较pytest低
关于unittest的使用和规则,请参考大神的博客 unittest - 断浪狂刀忆年少 - 博客园 (cnblogs.com)
Pytest
优点:定制化自由度比较高,兼容unittest,提供了大量装饰器
缺点:需要下载才能使用
关于pytest的使用和规则,请参考大神的博客 pytest - 断浪狂刀忆年少 - 博客园 (cnblogs.com)
2请求方法 request
3读取用例数据 openpyxl python-操作excel之openpyxl - 断浪狂刀忆年少 - 博客园 (cnblogs.com)
4读取环境配置 yaml/python文件,具体看前文
5日志记录 loguru / logging
loging
优点:可完全根据自己需求编写功能
缺点:功能基础,需要开发的地方比较多
关于logging的使用和内容,可以参考大神的博客python 日志 logging模块(详细解析)_天健胡马灵越鸟的博客-CSDN博客
loguru
优点:高度封装,省心
缺点:给你什么用什么,不过已经满足需求
关于loguru的使用和容,可以参考大神的博客Loguru — 最强大的 Python 日志记录器-Python 实用宝典 (pythondict.com)
6MySQL数据处理
这个没什么可说的,pymysql好用,需要注意的点时数据库的事务conn.commit()
基本的使用方法
- 1连接数据库
- conn = pymysql.connect()获取连接对象
- 2获取游标
- cursor = conn.cursor()
- 3使用sql语句
- cursor.excute(sql语句)
- 4获取查询结果
- cursor.fetchall(),,,元组套元组,一条数据就是一个元素
- cursor.fetchone(),,,取出元组
- 每次查询前初始化一个游标
- connect中的cursorclass参数,相当于conn.cursor中的cursor参数,读出一个列表嵌套字典结构数据
- conn = pymysql.connect(cursorclass=pymysql.cursors.DictCursor)[图片上传失败...(image-d27d50-1686663646198)]
pymysql - 断浪狂刀忆年少 - 博客园 (cnblogs.com)
7测试报告
unittestreport
适用于unittest 一、安装和介绍 - unittestreport 使用文档
allure
适用于pytest Pytest测试框架(五):pytest + allure生成测试报告 - 测试开发小记 - 博客园 (cnblogs.com)
8技术点
python函数、面向对象、继承、反射、json、正则表达式、封装等、sql语法、unittest框架、requests、装饰器等
四、框架目录结构
下面我们来看整个项目的目录结构
使用unittest框架 excel表格管理用例 yaml配置文件
├─common                             #公共包
│ │ tool_of_log.py                     #日志模块
│ │ tool_of_mysql.py                   #数据库模块
│ │ tool_of_read_config.py             #读取配置模块
│ │ tool_of_read_excel.py              #表格数据处理
│ │ tool_of_requests.py                #通用请求方法
│ │ __init__.py
│
├─data_of_cases                     #用例数据包
│ │ case1.xlsx                           #用例表格
│ │ case2.xlsx
│
├─data_of_config                    #配置文件包
│ │ config.py                            #python类型的配置文件
│ │ config.yaml                          #yaml类型配置文件
│
├─run                               #测试框架主入口
│ │ main.py                             #主入口
│ │ __init__.py
│
├─setup                 #前置处理包,一些前置处理可以单抽出来,如获取cookie
│ │ 000345.png
│ │ new_account.py
│ │ put_product.py
│ │ uuid_imagecode.py
│ │ __init__.py
│
├─test_logs                               #测试日志包
│ │ runlog.log                              #测试日志文件
│
├─test_mainclass                          #测试主类
│ │ test_cla_and_meth.py                    #被测类和被测方法
│ │ test_new_account.py                      #场景测试 新增用户
│ │ test_product_upload.py                  #场景测试 上传产品
│ │ __init__.py
│
└─test_report                                #测试报告
│ │history.json                                  #测试报告相关json文件,自动生成的
│ │report_2022-09-06_23-57-26.html               #测试报告文件
五、代码实例
common
日志模块
"""
记录日志模块
sink为日志输出目录
level为写入日志等级
建议日志使用log文件记录
"""

from loguru import logger
from common.tool_of_read_config import read_config_yaml

# 这里是读取配置文件的日志输出位置
config = read_config_yaml("../data_of_config/config.yaml")
logger.add(sink=config["log_path"], level="ERROR", encoding="utf-8")
数据库模块
"""
连接数据库模块
提供了三个方法
1游标的初始化
2执行查询sql语句并销毁游标,返回查询到的数据
3关闭数据库连接
"""
import pymysql


class Tool_of_mysql:

    def __init__(self, host, port, user, password, dbname):
        # connect中的cursorclass参数,相当于conn.cursor中的cursor参数,读出一个列表嵌套字典结构数据
        self.conn = pymysql.connect(host=host, port=port, user=user, password=password, db=dbname,cursorclass=pymysql.cursors.DictCursor)
        self.cursor = self.conn.cursor()

    def cursor_init(self):
        # 执行一次SQL,游标会销毁,所以提供游标初始化方法
        self.cursor = self.conn.cursor()

    def run_sql(self, sql):
        # 这里建议只使用select语句
        self.cursor.execute(sql)
        # 提交事务
        self.conn.commit()

        db_data = self.cursor.fetchone()

        self.cursor.close()
        # self.conn.close()
        return db_data

    def mysql_close(self):
        self.conn.close()


if __name__ == '__main__':
    mon = Tool_of_mysql(host="47.113.xxx.81", port=3306, user="mon", password="mon123", dbname="yami_sops")
    # mon.cursor_init()

    data = lemon.run_sql("select user_phone,mobile_code from tz_sms_log limit 5")
    print(data)
读取配置文件模块
"""
读取yaml配置文件模块
"""
import yaml


def read_config_yaml(filepath):
    with open(filepath, encoding="utf-8") as f:
        config_data = yaml.safe_load(f)
    return config_data


if __name__ == '__main__':
    print(read_config_yaml("../data_of_config/config.yaml"))
表格数据处理模块
"""
读取excel表格的模块
"""

import openpyxl
from openpyxl.worksheet.worksheet import Worksheet


def read_xlsx_tool(filename, sheetname):
    workbook = openpyxl.load_workbook(filename)
    # 这里做了类型注解,方便ide给出代码联想提示
    sheet: Worksheet = workbook[sheetname]

    data = list(sheet.values)

    title = data[0]

    lines = data[1:]

    cases = [dict(zip(title, row)) for row in lines] #循环 并通过zip组装字段名和字段值并放进一个dict里
    # for row in lines:
    #     cases.append(dict(zip(title, row)))

    return cases

if __name__ == '__main__':

    s = read_xlsx_tool("../data_of_cases/case2.xlsx", "Sheet2")
    print(type(s))
    print(s[0])
    print(type(s[0]))
通用请求方法,这个不一定能用到
"""
封装了请求方法的模块
默认请求方法post
其实该模块可以不封装,直接写代码并不是很多,处理比较方便,封装后加了一层导入
"""


import requests


def request_api(method='post', url=None, headers=None, json_data=None, body_data=None):
    res = requests.request(method=method, url=url, headers=headers, json=json_data, data=body_data)

    return res
data_of_config
yaml环境配置文件
#使用yaml作为配置文件,比较通用,跨语言有优势
#用例存储文件路径,及sheet页名
#建议采用相对路径

case_data_workbook:
  workbook: "../data_of_cases/case2.xlsx"
  worksheet: "Sheet1"

#log日志输出位置
#打印日志的等级
#日志切分   可按时间切分,也可按大小,如 1 MB切分

log_path: "../test_logs/runlog.log"
log_level: "ERROR"
log_rotation: "12:00"

#测试报告输出位置

report_path: "../test_report/report.html"

#后台域名,结合环境
host: "http://www.xxx.com:8108"
#前台域名
front_host: "http://www.xxx.com:8107"
run
测试框架主入口
"""
运行测试的主模块,同时生成日志,和测试报告
"""
import unittest
import time
import unittestreport
suit = unittest.defaultTestLoader.discover("../test_mainclass")
runner = unittestreport.TestRunner(suit,
filename=f"report_{time.strftime('%Y-%m-%d_%H-%M-%S')}.html",
report_dir="../test_report",
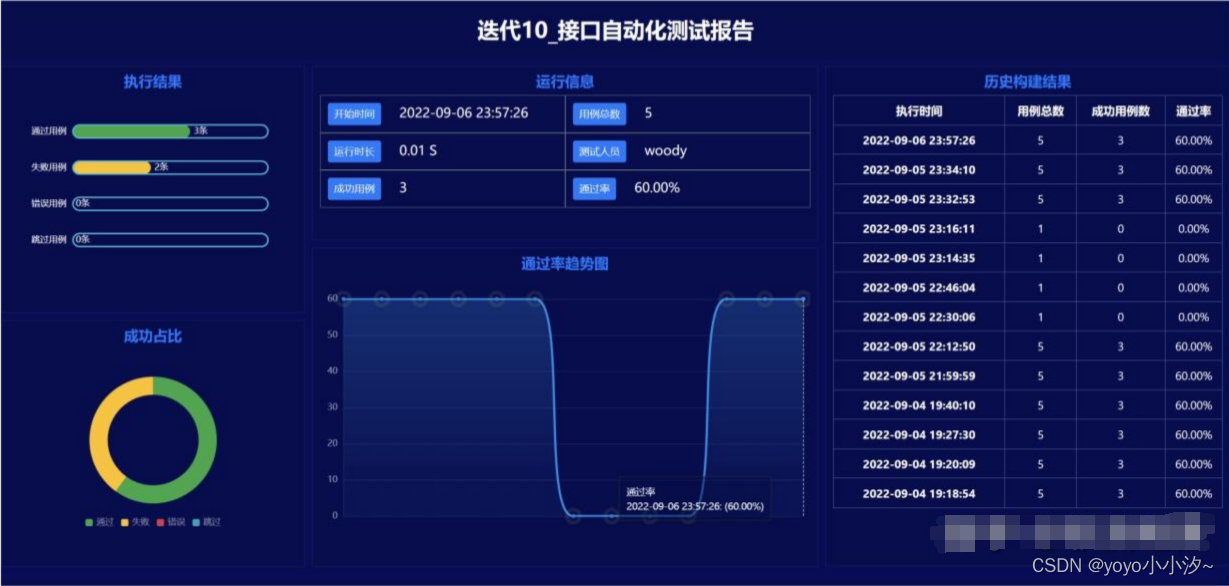
title="迭代10_接口自动化测试报告",
tester="woody",
desc="XX项目迭代10------",
templates=2)
#文件名拼接时间,每次运行都会生成一个报告文件
runner.run()test_logs
生成的测试日志
建议安装插件 ideolog,pycharm可直接高亮显示日志
2022-09-06 23:57:26.096 | ERROR    | test_cla_and_meth:test_:36 - 用例---case_004--->执行失败   ====>{'code': 200, 'message': '登录成功', 'token': 'good-token'} != {'code': 200, 'message': '登录失败', 'token': 'none'}
- {'code': 200, 'message': '登录成功', 'token': 'good-token'}
?                             ^^             ^ ^^^^^^ -

+ {'code': 200, 'message': '登录失败', 'token': 'none'}
?                             ^^             ^ ^

2022-09-06 23:57:26.107 | ERROR    | test_cla_and_meth:test_:36 - 用例---case_005--->执行失败   ====>{'code': 200, 'message': '登录成功', 'token': 'good-token'} != {'code': 200, 'message': '登录失败', 'token': 'none'}
- {'code': 200, 'message': '登录成功', 'token': 'good-token'}
?                             ^^             ^ ^^^^^^ -

+ {'code': 200, 'message': '登录失败', 'token': 'none'}
?                             ^^             ^ ^

2022-09-19 23:53:30.900 | ERROR    | test_cla_and_meth:test_:39 - 用例---case_001--->执行失败   ====>'{"code":200,"message":"登录成功","token":"good-token"}' != <Request [post]>
test_mainclass
被测类和被测方法
"""
编写测试类和测试方法
使用unittest框架,导入ddt和list_data两个装饰器,分别装饰测试类和测试方法
导入公共层表格读取模块,读取用例数据
导入公共层配置文件读取模块,读取配置文件
导入公共层日志记录器
导入被测方法/函数
导入json模块处理数据
"""

import unittest

import requests
from unittestreport import ddt, list_data  #特别注意!使用的ddt list_ddt是unittestreport这个模块提供的,不是我们常说的ddt模块 这里看五、数据驱动的使用 - unittestreport 使用文档 功能十分强大!

from common.tool_of_read_config import read_config_yaml
from common.tool_of_read_excel import read_xlsx_tool
from common.tool_of_log import logger
import json

config = read_config_yaml("../data_of_config/config.yaml")
host = config["host"]
cases = read_xlsx_tool(filename=config["case_data_workbook"]["workbook"],
                       sheetname=config["case_data_workbook"]["worksheet"])


# cases = read_xlsx_tool()

@ddt
class Test_cases(unittest.TestCase):
    @list_data(cases[0:1])  # 这里必须传入一个列表,所以定位单个用例,不能直接用索引,要用切片[{}],切出一个只有一个元素的列表
    def test_(self, case):
        # 注意这里的“json=“参数,表格读出来是字符串,要转成Json才能做请求入参
        # 这里的url是拼接的
        response = requests.request(method=case["method"], url=host + case["url"], json=json.loads(case["入参"]))

        # 这里使用try尝试取结果,返回类型不同使用不同的方法
        try:
            act_res = response.json()
        except Exception as e:

            res = response.text
            act_res = {"msg": res}

        expect = json.loads(case["预期结果"])

        # try进行断言是为了写日志,再手动抛出异常
        for k, v in expect.items():
            try:
                self.assertEqual(v, act_res[k])
            except AssertionError as e:
                logger.error(f'{e}')
                raise e
            # self.assertIn(case["预期结果"], res)
        # print(res)
        # expect_res = json.loads(case["预期结果"])  # 转成字典
        # try:
        #
        #     self.assertEqual(expect_res, res)
        # except AssertionError as e:
        #     # logger.error(f"用例---{case['用例名']}--->执行失败")
        #     logger.error(f"用例---{case['用例名']}--->执行失败   ====>{e}")
        #     raise e
使用反射和正则表达式匹配测试业务场景
"""
编写测试类和测试方法
使用unittest框架,导入ddt和list_data两个装饰器,分别装饰测试类和测试方法
导入公共层表格读取模块,读取用例数据
导入公共层配置文件读取模块,读取配置文件
导入公共层日志记录器
导入被测方法/函数
导入json模块处理数据
"""
import re
import unittest

import requests
from unittestreport import ddt, list_data

from common.tool_of_read_config import read_config_yaml
from common.tool_of_read_excel import read_xlsx_tool
from common.tool_of_log import logger
import json
import time
from setup.put_product import login, img_put

config = read_config_yaml("../data_of_config/config.yaml")
host = config["host"]
cases = read_xlsx_tool(filename=config["case_data_workbook"]["workbook"],
                       sheetname="Sheet2")


# cases = read_xlsx_tool()

@ddt
class Test_cases(unittest.TestCase):
    def setUp(self) -> None:
        self.token = login()['access_token']
        self.img_id = img_put(self.token, "../setup/000345.png")
        print(self.token, self.img_id)
        self.time = f"{time.time()}"

    @list_data(cases[0:1])  # 这里必须传入一个列表,所以定位单个用例,不能直接用索引,要用切片[{}],切出一个只有一个元素的列表
    def test_(self, case):

        data = ""
        header = {"Authorization": f"bearer{self.token}"}
        # 法1:这里先使用replace替换,注意,相同的,一行代码全部会替换掉
        # data = case["入参"].replace("#time#", f"{time.time()}")
        # data = case["入参"].replace("#img_id#", self.img_id)

        # 法2:使用正则表达式替换,搜索出用#——#标记的字段,切掉#后,用反射读取类属性,然后使用replace方法替换
        flag = re.finditer("#(.+?)#", case["入参"])# 正则搜索匹配后返回一个迭代器 ,元素是"#___#"
        for i in flag:
            old = i.group()  # 用group方法从迭代器取值
            old_ = old.strip("#") # 切掉两头的#号,剩下的就是"token",这种用例入参里的某个键
            new = getattr(self, old_)# 使用反射,getattr拿到属性的值并用变量保存起来
            data = case["入参"].replace(old_, new)# 使用replace方法把属性再替换到入参字符串里
        # 注意这里的“json=“参数,表格读出来是字符串,要转成字典才能做请求入参
        data = json.loads(data)

        # 这里的url是拼接的
        response = requests.request(method=case["method"], url=host + case["url"], json=data, headers=header)

        # response = product_put(self.token,self.img_id)

        # 这里使用try尝试取结果,返回类型不同使用不同的方法
        try:
            act_res = response.json()
        except Exception as e:

            res = response.text
            act_res = {"msg": res}
        print(act_res)
        expect = json.loads(case["预期结果"])

        # try进行断言是为了写日志,再手动抛出异常
        for k, v in expect.items():
            try:
                self.assertEqual(v, act_res[k])
            except AssertionError as e:
                logger.error(f'{e}')
                raise e
            # self.assertIn(case["预期结果"], res)
        # print(res)
        # expect_res = json.loads(case["预期结果"])  # 转成字典
        # try:
        #
        #     self.assertEqual(expect_res, res)
        # except AssertionError as e:
        #     # logger.error(f"用例---{case['用例名']}--->执行失败")
        #     logger.error(f"用例---{case['用例名']}--->执行失败   ====>{e}")
        #     raise e
对反射在接口自动化中应用的思考
如前代码,说明反射是十分有用的,因为不可以 对象."属性" 这样跟一个字符串去调,所以就必须用到反射 ,hasattr判断有没有,getattr可取到属性值,如果是方法,用变量保存后加()可调用,setattr设置新属性。
如果把反射放到ui自动化中呢?
将高频的ui操作,如点击,输入等,封装
class Action:    def __init__():  '''  初始化浏览器对象等  '''  def mouse_click(元素定位: string):
        '''
        例,将鼠标点击的操作,封装,传入元素定位,如id或者xpath,进行鼠标点击
        '''
        pass

    def keyboard_input(元素定位: string ,输入内容: string ):     '''     键盘输入操作需要定位元素并有输入的内容     先定位  v[0]     输入    v[1]     '''
        pass
我们传入入参的格式可为
{
"mouse_click":元素定位,
"keyboard_input":[元素定位,输入内容],
...
}
将我们的ui操作编排进json中传入,通过循环去取并操作ui
action = Action()for k,v in case['ui操作'].items:
    move = getattr(action,k)   if type(v) is list:
      move(*v)  # 调用解包,传入一个序列打散后当位置参数传进去  else:     move(v)
本人研究ui自动化比较少,但是建议看看playwright
Python Playwright 基本使用(步骤详细) - 掘金 (juejin.cn)
Installation | Playwright Python
Python如何爬虫?玩转新一代爬虫神器Playwright! - 知乎 (zhihu.com)
相对于selenium,playwright执行效率好,有强大的脚本录制能力,代码难度较低
test_report
测试报告
最后:下面是配套学习资料,对于做【软件测试】的朋友来说应该是最全面最完整的备战仓库,这个仓库也陪伴我走过了最艰难的路程,希望也能帮助到你!【100%无套路免费领取】

软件测试面试小程序
被百万人刷爆的软件测试题库!!!谁用谁知道!!!全网最全面试刷题小程序,手机就可以刷题,地铁上公交上,卷起来!
涵盖以下这些面试题板块:
1、软件测试基础理论 ,2、web,app,接口功能测试 ,3、网络 ,4、数据库 ,5、linux
6、web,app,接口自动化 ,7、性能测试 ,8、编程基础,9、hr面试题 ,10、开放性测试题,11、安全测试,12、计算机基础