一、Vue-Router基础回顾
(一)基础使用
- 注册路由插件
- 创建路由实例
router/index.ts
// 1. 注册路由插件
Vue.use(VueRouter)

const routes: Array<RouteConfig> = [
  {


    path: '/',
    name: 'home',
    component: HomeView
  },
  {


    path: '/about',
    name: 'about',
    // 使用import动态懒加载组件,提升首页渲染效率
    component: () => import(/* webpackChunkName: "about" */ '../views/AboutView.vue')
  }
]

// 2. 创建路由实例
const router = new VueRouter({


  routes
})
- 创建
Vue实例的同时挂在路由实例
main.ts
// 3. 创建 Vue 实例并挂载路由实例
new Vue({


  router,
  render: h => h(App)
}).$mount('#app')
将router传递给Vue实例的构造函数这一行为,会给Vue实例挂在上两个对象
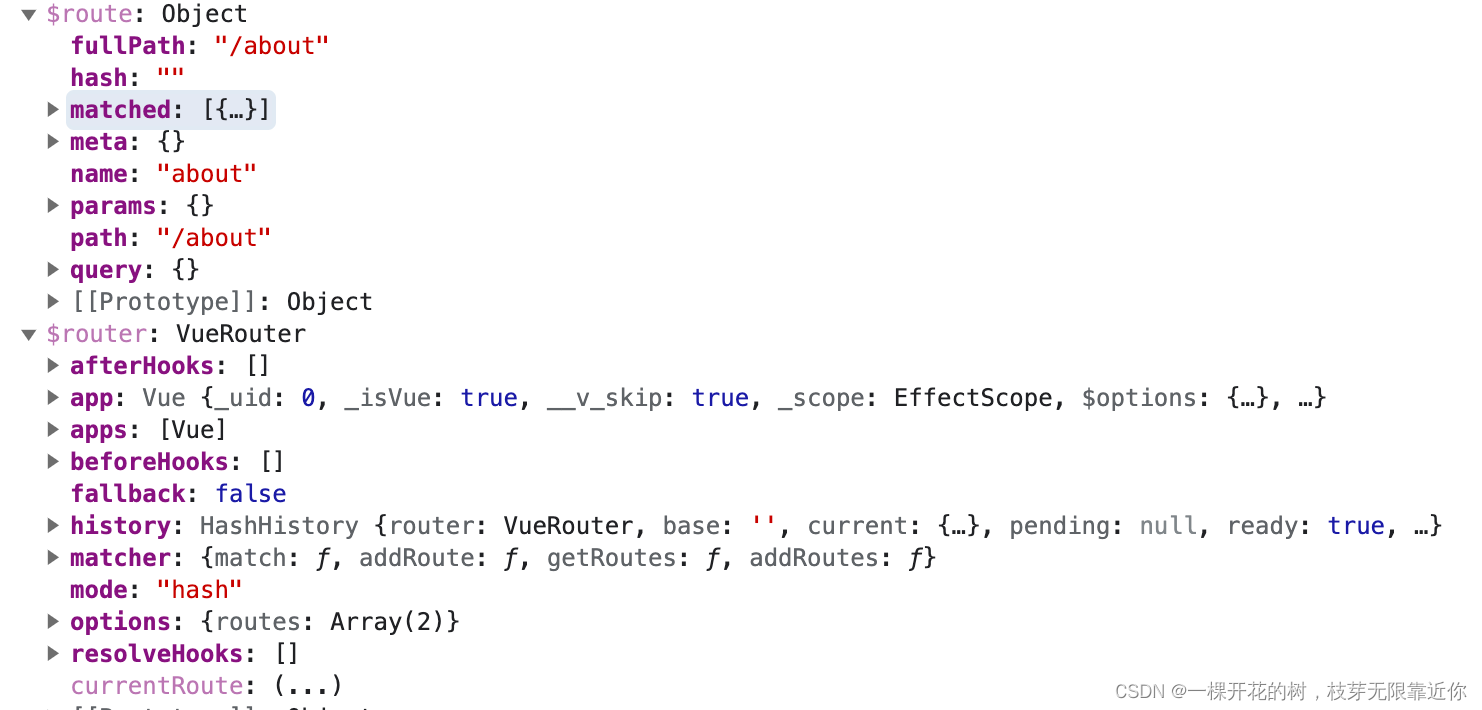
$route:路由匹配规则$router:路由实例对象,可以调用push、go等方法,改变当前路由。$router.currentRoute属性指向当前路由匹配规则:
console.log(myVue.$route===myVue.$router.currentRoute) // true
- 创建路由占位符
- 创建路由跳转链接
APP.vue
<nav>
  <!--5.创建路由跳转链接-->
  <router-link to="/">Home</router-link> |
  <router-link to="/about">About</router-link>
</nav>
<!--4.创建路由占位符-->
<router-view/>
(二)动态路由
Vue中的动态路由指的是在路由路径中可以使用动态传参的方式实现url跳转,此时的路由的url路径不是写死的,是可变的。动态路由的定义和传值:
router/index.ts
{


	 path: '/about/:id', // :id起占位符的作用
	 name: 'about',
	 component: () => import(/* webpackChunkName: "about" */ '../views/AboutView.vue')
}
APP.vue
<router-link to="/about/89">About</router-link>
在路由内部接收动态参数有两种方式:
- 使用
$router.params
view/About.vue
<h2>id: {

   { $route.params.id }}</h2>

这种方式有一个缺点,就是会过度依赖$route。
2. 使用props接收
router/index.ts
{


  path: '/about/:id',
  name: 'about',
  props: true,
  component: () => import(/* webpackChunkName: "about" */ '../views/AboutView.vue')
}
views/About.vue
<h2>id: {

   { id }}</h2>
<script>
export default {


  name: 'AboutView',
  props: {


    id: String,
  },
};
</script>

此时不传递动态参数会导致页面是空白的。
在:id后面增加?表示此属性可选,这样的话不传这个参数,路由组件其他部分也能够正常渲染
router/index.ts
path: '/about/:id?',
(三)嵌套路由
嵌套路由用于组件多层嵌套的场景。如下图所示,/user/johnny对应一个组件,其内部还包含了两个可以切换展示的组件,这两个组件对应的路由就可以定义为/user/johnny的子路由

子路由使用路由的children属性定义,children属性指向一个数组,数组中的对象拥有path、component等属性,path表示子路由的路径,有两种写法:
- 一种是绝对路径,即从根目录开始定义,开头需要加
/; - 一种是相对路径,即定义相对于父级路由的路径,最终会拼接父级路由的路径和相对路径作为当前子组件的路径,开头不能加
/。
router/index.ts
{


    path: '/about',
    name: 'about',
    component: () => import(/* webpackChunkName: "about" */ '../views/AboutView.vue'),
    children: [
        {


            path: '/about/company', // 绝对路径
            // path: 'company' // 相对路径
            name: 'company',
            component: () => import(/* webpackChunkName: "about" */ '../views/CompanyView.vue')
        }
    ]
}
在父组件的组件模版中定义路由跳转链接和占位符
views/AboutView.vue
<router-link to="/about/company">company</router-link>
<router-view></router-view>

(四)编程式导航
除了使用a链接实现路由跳转,还可以使用$router对象上的方法实现路由跳转。主要使用到的有三个方法:
push()。接受两个参数,参数一有两种写法,第一种是路径,第二种是对象,对象包含路由的path属性或者命名路由的name属性。参数二用于为路由传递参数。replace()。与push()方法用法类似,但是不会记录本次历史,会将跳转后的路由历史代替当前路由历史,也就是说,跳转后,无法通过浏览器的回退按钮回退到当前路由。go()。该方法采用一个整数作为参数,表示在历史堆栈中前进或后退多少步,类似于window.history.go(n)。
App.vue
<template>
  <div id="app">
    <router-view/>
    <button @click="goHome()">go HomeView</button>
    <button @click="goAbout()">go AboutView</button>
    <button @click="back()">回退</button>
  </div>
</template>
<script>
export default {


  name: 'App',
  methods: {


    goHome() {


      this.$router.push('/');
    },
    goAbout() {


      this.$router.replace({

       name: 'about' });
    },
    back() {


      this.$router.go(-1);
    },
  },
};
</script>
二、History模式
(一)Hash模式与History模式的区别
两者都是前端路由,通过路径变化改变页面呈现内容
Hash模式是基于锚点和onhashchange事件,前端锚点可以通过HTML中的元素和链接href属性实现。当路径发生变化时,根据路径决定页面渲染内容。Hash模式中#后面的数据表示路由配置History模式是基于HTML5中的History API,主要用到pushState()方法和replaceState()方法。pushState()方法不会向服务端发送请求,只会改变url地址并且将地址记录到历史记录中。
<template>
  <div id="app">
    <router-view/>
    <button @click="goHome()">go HomeView</button>
    <button @click="goAbout()">go AboutView</button>
    <button @click="back()">回退</button>
  </div>
</template>
<script>
export default {


  name: 'App',
  methods: {


    goHome() {


      this.$router.push('/');
    },
    goAbout() {


      this.$router.replace({

       name: 'about' });
    },
    back() {


      this.$router.go(-1);
    },
  },
};
</script>
(二)History工作模式
History模式下,url路径是一个普通的地址:https://www.teambition.com/project。对于单页面应用,服务器端只保存了首页的html资源,如果服务器没有相应的配置,以这样的地址去访问服务器,是找不到资源的;所以服务器需要进行相应的配置来支持History模式,当服务器找不到所请求的资源时,将首页静态文件返回给客户端,客户端再根据当前路由地址解析页面,实现页面跳转。
- 对于
node服务器,需要配置history中间件 - 对于
nginx服务器,需要修改nginx.conf配置文件,在location /中增加一行代码:try_files $uri $uri/ /index.html;意思是试着去加载所请求的路径在服务器上对应的资源,如果找不到,就以地址为文件夹,往下找index.html;如果还找不到,就返回网站中的根index.html文件。
三、Vue Router实现
(一)Vue Router工作原理
Hash模式工作原理
- 地址栏中
#后面的字符串表示路由地址,当只有#后面的地址变化时,不会向服务器端发送请求,会将新的地址保存到历史记录中。 onhashchange方法会监听到路由地址的变化,- 在
onhashchange方法内部,会根据路由地址找对应的组件,进行页面渲染。
History工作原理
- 点击路由跳转链接时,通过
History API的pushState()方法向浏览器历史栈中添加一条新纪录,在不改变页面的情况下更改当前URL。 - 当用户点击浏览器的回退按钮,或者调用
go()方法的时候,会触发popState方法,修改当前地址,Vue-Router会监听popState方法的执行,获取当前路由信息。 - 根据当前路由信息找对应的组件进行页面渲染。
(二)Vue Router分析
- 先看一下
Vue Router的用法,分析一下Vue Router的类型
// 1. 注册路由插件
Vue.use(VueRouter)
// 2. 创建路由实例
const router = new VueRouter({


    routes
})
- 注册
Vue Router使用Vue.use()方法,这个方法用来注册插件,有两种可以接收的参数类型,一种是函数,会直接执行;一种是类,会执行类的静态install()方法。 Vue Router可以使用new关键字来创建实例对象,接受一个对象作为参数。- 所以
Vue Router是一个类,构造函数接收一个对象作为参数,对象有一个属性routes;并且Vue Router类有一个静态方法install。
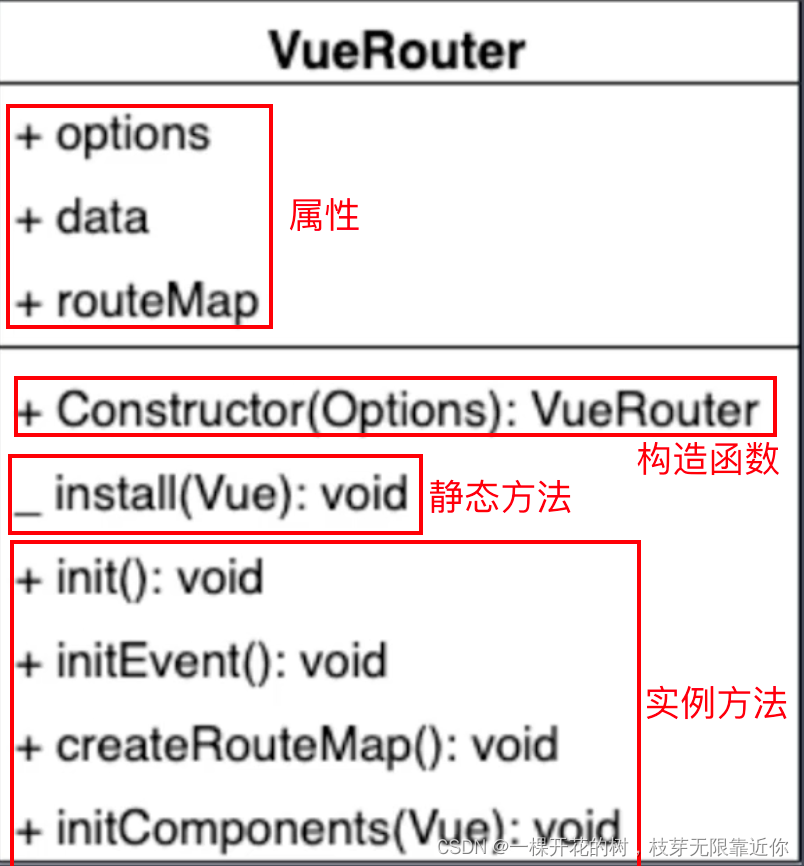
Vue Router对象需要有三个属性:
options保存传进来的路由规则routeMap将路由与组件的对应关系存为映射关系data使用Vue.observable实现数据双向更新,需要是一个定义成响应式对象
- 根据
Vue Router对象的功能,可以分为四个方法:
initEvent()注册popState事件监听器,进行路由变化时的后续处理createRouteMap()初始化routeMapinitComponents()初始化router-link和router-view组件init()执行上述这三个方法
(三)install()方法实现
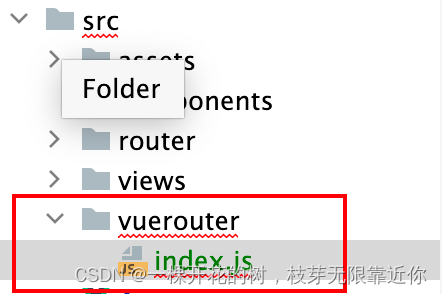
新建src/vuerouter/index.js文件,导出Vue Router类
export default class VueRouter {


	static install(){

    }
}
install()方法需要实现的功能:
- 判断当前插件是否已经被安装,所以需要给
install()方法一个属性来标识,当install()方法执行的时候,这个属性就会变为true。
if(VueRouter.install.installed) return;
VueRouter.install.installed = true;
- 接收
Vue构造函数作为参数,将Vue构造函数记录为全局变量,因为后续需要使用Vue类上的方法,比如Vue.component()
let _Vue = null;
export default class VueRouter {


    //接受Vue的构造函数作为参数
    static install(Vue) {


        // 1. 判断当前插件是否已经被安装,如果已经安装则不需要重复安装
        if(VueRouter.install.installed) return;
        VueRouter.install.installed = true;
        // 2. 把Vue构造函数记录到全局变量
        _Vue = Vue;
    }
}
为什么接收Vue构造函数作为参数呢?可以看一下install()方法的源码定义:
// router.d.ts
static install: PluginFunction<never>
// plugin.d.ts
export type PluginFunction<T> = (Vue: typeof _Vue, options?: T) => void
// vue.d.ts
export const Vue: VueConstructor
能够如此方便地知道一个函数长什么样子,这就是TypeScript一个非常强大的地方。
- 回顾一下创建
Vue实例的代码:
const myVue = new Vue({


  router,
  render: h => h(App)
}).$mount('#app')
此时给Vue构造函数传递了一个router对象,install()方法需要把router对象注入到Vue实例上。当前传进来的是Vue构造函数,要给Vue实例增加属性,就需要将属性挂载到原型链上,Vue实例对象就可以链式继承Vue构造函数上的属性。Vue实例构建过程中传递的参数保存在Vue实例的$options属性中。但是在install()执行的时候,我们还不知道Vue实例是谁,所以需要将这个操作滞后进行,在Vue实例的beforeCreate()的生命周期中进行。所以这里需要使用混入,将beforeCreate()方法混入到每一个Vue实例对象中。并且,这个方法只要执行一次,就可以在所有的Vue实例对象上访问了,所以只需要在应用myApp的beforeCreate()中,执行一次,后续Vue组件的生命周期中不需要再重复执行。混入的钩子函数会在实例本身的钩子函数之前执行。
_Vue.mixin({


    beforeCreate() {


    	// 实例创建过程即new Vue()的时候有传递router参数,证明当前Vue实例是应用
        if(this.$options.router) {


        	// this指向当前Vue实例对象
            _Vue.prototype.$router = this.$options.router;
        }
    }
})
(四)constructor构造函数
constructor构造函数需要对options、routeMap、data三个属性进行初始化。
回顾new VueRouter()的代码:
const router = new VueRouter({


    routes
})
constructor构造函数会接受一个对象作为参数,这个参数需要保存到options属性里面;routeMap是一个键值对对象,用来保存路径和组件之间的对应关系,在初始化阶段,只需要把它初始化成一个空对象,后续再进行赋值;data属性是一个响应式对象,里面有一个current属性指向当前路由地址,初始化阶段设置为'/',需要使用Vue构造函数提供的observable方法来创建响应式对象,当响应式对象发生变化时,会自动触发依赖这个响应式对象的组件中的render函数,从而实现视图自动更新。
constructor(options) {


    this.options = options;
    this.routeMap = {

    };
    this.data = _Vue.observable({


        current: '/'
    });
}
(五)createRouteMap()方法
createRouteMap()方法用来创建routeMap这个变量,这个变量是以键值对的形式存储路由路径和组件之间的关系,将路径作为键,组件作为值进行存储。
createRouteMap() {


    // 遍历所有路由规则,把路由规则解析成键值对的形式,存储到routeMap中
    this.options.routes.forEach(route => {


        this.routeMap[route.path] = route.component;
    })
}
(六)initComponent()方法
initComponent()方法是用来创建router-link组件和router-view组件的。组件注册使用Vue.component()方法。
1.router-link
我们先来回顾一下router-link的使用:<router-link to="/">Home</router-link>。routerLink组件接收一个参数to,最后会渲染成a标签的形式,所以模版就是一个a标签;a标签里面的内容就是组件使用的时候由父组件传递过来的内容,所以在定义的时候需要使用到插槽先对a标签的内容进行占位。由上述分析可以定义routerLink:
Vue.component('router-link', {


    props: {


        to: String
    },
    template: '<a :href="to"><slot></slot></a>'
})
但是这样的定义方式还有一些问题,问题在于Vue的构建版本。Vue的构建版本分为运行时版本和完整版本。
- 完整版包含编译器,可以在运行时对模板进行编译。因此,它支持在
Vue组件中使用template属性,并且适用于开发环境。 - 运行时版不包含编译器,不能使用
template属性。但是,它更轻量级,并且大多数情况下可以通过将模板放入HTML来工作,并在生产环境中使用。
Vue-cli默认使用的是运行时Vue,所以template属性是不被支持的。解决办法有两种
- 使用完整版
Vue。在vue.config.js文件的配置选项中增加runtimeCompiler: true, - 不使用
template,而是使用render函数。render函数接收一个h函数作为参数,返回h函数处理的结果。h函数的作用是创建虚拟DOM,接受三个参数- 参数一:虚拟
DOM的选择器(标签选择器a) - 参数二:虚拟
DOM的属性(href属性,指向this.to) - 参数三:由虚拟
DOM的子元素组成的数组(子元素只有一个:匿名插槽,使用vue实例的$slot.default获取。render函数是挂载到Vue实例上的方法,内部this指向Vue实例;如果使用箭头函数,this的指向与initComponent()中的this指向相同,即VueRouter实例)。这里不可以使用箭头函数,this指向创建出来的routerLink组件。
- 参数一:虚拟
Vue.component('router-link', {


    props: {


        to: String
    },
    render(h) {


        return h('a', {


            attrs: {


                href: this.to
            }
        }, [this.$slots.default])
    }
})
2.router-view
routerView组件要找到当前路由对应的组件,然后渲染这个组件。在routerMap属性中存储着路由和组件之间的对应关系,data属性存储着当前路由,所以需要通过this.routeMap[this.data.current]获取当前需要渲染的组件,并且将组件传递给h函数。
Vue.component('router-view', {


	// 注意使用箭头函数
    render:(h) =>{


        const component = this.routeMap[this.data.current];
        // h函数会帮我们把组件转化为虚拟DOM
        return h(component);
    }
})
在router-link中,我们还需要完善一下点击事件的处理函数。
- 点击
a链接的时候,默认会向服务端发送请求,请求a链接指向的资源,所以在点击事件的处理函数中,应该阻止默认行为; - 回顾一下
this.data属性,是一个响应式对象,其中current属性指向路由地址,当data.current属性修改的时候,会引起router-view的render函数的重新执行,因为routerView组件中依赖了this.data.current,从而触发视图更新,所以需要修改当前路由的data.current属性为this.to,让视图自动更新。 - 不仅需要修改视图,也需要修改地址栏地址,所以需要调用
window.history的pushState()方法,修改地址栏的地址。
Vue.component('router-link', {


    props: {


        to: String
    },
    render(h) {


        return h('a', {


            attrs: {


                href: this.to
            },
            on: {


                click: this.handleClick
            }
        }, [this.$slots.default])
    },
    methods: {


        handleClick(e) {


            // 改变current的值,触发组件的重新渲染
            // current是一个响应式的数据,所以会触发render函数的重新执行
            // render函数将会重新生成href指向this.to的a标签
            this.$router.data.current = this.to;
            // 通过pushState改变地址栏的地址,但是不会向后端发送请求
            // 参数一:state对象,可以在触发popstate事件时获取到
            // 参数二:title
            // 参数三:url
            history.pushState({

    }, '', this.to);
            // 点击a链接默认会向服务端发送请求去请求a链接对应的数据
            // 具体表现为页面会刷新,
            // 这里要阻止向服务端发送请求
            e.preventDefault();
        }
    }
})
这样已经大体实现点击路由链接实现路由跳转的功能,但还有一点问题,就是点击浏览器的前进和后退按钮时,只有地址栏路径改变,视图并没有刷新。
3.initEvent()
当点击浏览器的前进和后退按钮时,会触发popState()事件监听函数,所以需要在这个方法中,处理页面刷新。在popState()中,地址栏已经完成了更新,所以可以直接从地址栏的地址中拿到路由地址,赋值给this.data.current
window.location 是一个包含当前URL信息的对象,它是 Location 对象的实例。这个对象有很多属性和方法,以下是一些常用的:
location.href: 返回完整的 URL。location.protocol: 返回当前页面使用的协议(如:http, https)。location.host: 返回当前页面主机名(域名)及端口号。location.pathname: 返回当前页面路径部分。location.search: 返回当前页面查询字符串部分。location.hash: 返回当前页面锚点部分。
initEvent() {


    // 监听浏览器地址栏地址的变化
    window.addEventListener('popstate', () => {


        this.data.current = window.location.pathname;
    })
}
别忘了在init()函数中调用initEvent()函数
init() {


    this.createRouteMap();
    this.initComponents(_Vue);
    this.initEvent();
}
在引入VueRouter的地方引入自己的VueRouter
router/index.js
import VueRouter from '../vuerouter'
四、完整代码
vuerouter/index.js
let _Vue = null;
export default class VueRouter {


    //接受Vue的构造函数作为参数
    static install(Vue) {


        // 1. 判断当前插件是否已经被安装,如果已经安装则不需要重复安装
        if (VueRouter.install.installed) return;
        VueRouter.install.installed = true;
        // 2. 把Vue构造函数记录到全局变量
        _Vue = Vue;
        // 3. 把创建Vue实例时候传入的router对象注入到Vue实例上
        _Vue.mixin({


            beforeCreate() {


                // this是Vue实例
                if (this.$options.router) {


                    _Vue.prototype.$router = this.$options.router;
                    this.$options.router.init();
                }
            }
        })
    }

    // 构造函数
    constructor(options) {


        this.options = options;
        this.routeMap = {

    };
        this.data = _Vue.observable({


            current: '/'
        });
    }

    init() {


        this.createRouteMap();
        this.initComponents(_Vue);
        this.initEvent();
    }

    createRouteMap() {


        // 遍历所有路由规则,把路由规则解析成键值对的形式,存储到routeMap中
        this.options.routes.forEach(route => {


            this.routeMap[route.path] = route.component;
        })
    }

    initComponents(Vue) {


        // 将Vue实例传过来是为了减少方法与外部的依赖
        Vue.component('router-link', {


            props: {


                to: String
            },
            render(h) {


                return h('a', {


                    attrs: {


                        href: this.to
                    },
                    on: {


                        click: this.handleClick
                    }
                }, [this.$slots.default])
            },
            methods: {


                handleClick(e) {


                    // 改变current的值,触发组件的重新渲染
                    // current是一个响应式的数据,所以会触发render函数的重新执行
                    // render函数将会重新生成href指向this.to的a标签
                    this.$router.data.current = this.to;
                    // 通过pushState改变地址栏的地址,但是不会向后端发送请求
                    // 参数一:state对象,可以在触发popstate事件时获取到
                    // 参数二:title
                    // 参数三:url
                    history.pushState({

    }, '', this.to);
                    // 点击a链接默认会向服务端发送请求去请求a链接对应的数据
                    // 具体表现为页面会刷新,
                    // 这里要阻止向服务端发送请求
                    e.preventDefault();
                }
            }
        })
        // router-view起一个占位符的作用
        // 首先要在routeMap找到目标组件
        // 然后渲染组件
        Vue.component('router-view', {


            render:(h) =>{


                const component = this.routeMap[this.data.current];
                // h函数会帮我们把组件转化为虚拟DOM
                return h(component);
            }
        })

    }

    initEvent() {


        // 监听浏览器地址栏地址的变化
        window.addEventListener('popstate', () => {


            this.data.current = window.location.pathname;
        })
    }
}