vue实现支付密码设置+获取验证码效果
前言
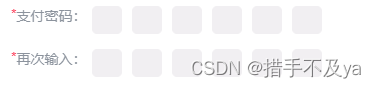
1.pc端实现支付密码设置功能,效果如下:
2.获取验证码实现:

一、支付密码框实现代码
1.将实现的密码框抽离成组件,命名为 paycodeApp
<template>
    <div class='am-payPwd' :id="`ids_${id}`">
        <input type="password"
               readonly
               onfocus="this.removeAttribute('readonly');"
               maxlength="1"
               autocomplete="new-password"
               @input="changeInput"
               @click="changePwd"
               v-model="pwdList[i]"
               @keyup="keyUp($event)"
               @keydown="oldPwdList = pwdList.length"
               class="shortInput"
               v-for="(v, i) in 6" :key="i">
    </div>
</template>

<script>
    export default {


        name: "paycodeApp",
        data () {


            return {


                pwdList: [],
                oldPwdList: [],
                isDelete: false,
                ipt: ''
            }
        },
        props:{


            id: {


                type: Number,
                default: 0 // ⭐⭐⭐当一个页面有多个密码输入框时,用id来区分 //id为1 是设置支付密码第一次输入 id为2 是再次输入
            },
        },
        mounted () {


            this.ipt = document.querySelectorAll(`#ids_${

    this.id} .shortInput`)
        },
        methods:{


            keyUp (ev) {


                let index = this.pwdList.length
                if (!index) return
                if (ev.keyCode === 8) {


                    this.isDelete = true
                    if (this.oldPwdList === this.pwdList.length) {


                        if (index === this.pwdList.length) {


                            this.pwdList.pop()
                        }
                        index--
                    } else {


                        index > 0 && index--
                    }
                    this.ipt[index].focus()
                } else if (this.isDelete && index === this.pwdList.length && /^\d$/.test(ev.key)) {


                    this.isDelete = false
                    this.pwdList.pop()
                    this.pwdList.push(ev.key)
                    this.ipt[this.pwdList.length] && this.ipt[this.pwdList.length].focus()
                }
                this.$emit('getPwd', this.pwdList.join(''))
            },
            changePwd () {


                let index = this.pwdList.length
                index === 6 && index--
                this.ipt[index].focus()
            },
            changeInput () {


                let index = this.pwdList.length
                let val = this.pwdList[index - 1]
                if (!/[0-9]/.test(val)) {


                    this.pwdList.pop()
                    return
                }
                if (!val) {


                    this.pwdList.pop()
                    index--
                    if (index > 0) this.ipt[index - 1].focus()
                } else {


                    if (index < 6) this.ipt[index].focus()
                }
                // 将字符串转成对应的格式 ⭐⭐⭐
                let arr = this.pwdList.join(',')
                let reg = new RegExp(',','g')//g代表全部
                let newMsg = arr.replace(reg,'');// 列如:123456
              	// 页面多次使用该组件 用id进行区分
                if(this.id == 1){

     // 第一次输入支付密码
                    this.$emit('getPassword',newMsg);
                }
                if(this.id == 2){

     // 再次输入支付密码
                    this.$emit('nextPassword',newMsg);
                }
            }
        }
    }
</script>

<style scoped lang="scss">
    .am-payPwd {


        display: inline-block;
        position: relative;
        margin-left: 1px;
    	.shortInput {


       	 	text-align: center;
        	font-size: 30px;
        	float: left;
        	width: 24px;
        	height: 24px !important;
        	color: #333;
        	outline: #ff0067;
        	border: 1px solid #f1eff2;
        	border-radius: 5px;
        	margin: 0 5px;
        	background-color: #f1eff2;
    	}
    }
</style>
2.对应页面引用
<template>
	<div style="display: flex">
         <span style="color: #8c939d">支付密码:</span>
         <paycode-app :id="1" @getPassword="getPassword"></paycode-app>
    </div>
</template>
<script>
	import paycodeApp from './paycodeApp';
	export default {


		   components:{


  			  paycodeApp
		   },
		   methods:{


		   		getPassword(val){


		   			// 得到输入的密码
		   			console.log(val,'val')
		   		}
		   }
	}
</script>
参考文章:http://events.jianshu.io/p/03d2a4744258
二、验证码实现
<template>
	<div>
         <div>
            <span style="color: #fc304d">*</span>
            <span style="color: #8c939d">验证码:</span>
            <el-input placeholder="请输入验证码" style="width: 150px;height: 28px;line-height: 28px" v-model="verificationCode"></el-input>
            <el-button style="margin-left: 20px;height: 28px;" size="small" class="external-btn-size green-color font-color" v-if="isShow == 1" @click="getCode">获取验证码</el-button>
            <el-button style="margin-left: 20px;height: 28px;" size="small" class="external-btn-size green-color font-color" v-else-if="isShow == 0" >{

    {

    countDown}}秒后再获取</el-button>
        </div>
    </div>
</template>
<script>
	export default {


		   data () {


            	return {


                	verificationCode:'',
                	isShow:1,
                	countDown:60,//倒计时
            	}
           },
		   methods:{


		   		getCode(){


      				let timer = null;
      				// ⭐⭐⭐倒计时减法实现 建议将这段代码写入获取验证码的接口中 成功之后走下面的代码
      				timer = setInterval(function (){


                    	countDown.value -= 1;
                    	isShow.value = 0;
                    	if(countDown.value == 0){


                       	 	clearInterval(timer);
                        	countDown.value = 60;
                        	isShow.value = 1;
                    	}
                	},1000)
   				}
		   }
	}
</script>
另外加密方式:
手机号:replace(/^(\d{3})\d{4}(\d+)/, “$1****$2”)
身份证:replace(/(\w{6})\w*(\w{4})/,‘$1********$2’)