一 模版的使用
模板引擎是一种可以让开发者把服务端数据填充到html网页中完成渲染效果的技术。它实现了 把前端代码和服务端代码分离 的作用,让项目中的业务逻辑代码和数据表现代码分离,让前端开发者和服务端开发者可以更好的完成协同开发。
- 静态网页:页面上的数据都是写死的,万年不变。
- 动态网页:页面上的数据是从后端动态获取的(比如后端获取当前时间;后端获取数据库数据然后传递给前端页面)。
要在django框架中使用模板引擎把视图中的数据更好的展示给客户端,需要完成3个步骤:
-
在项目配置文件中指定保存模板文件的模板目录。一般模板目录都是设置在项目根目录或者主应用目录下。
-
在视图中基于django提供的渲染函数绑定模板文件和需要展示的数据变量
-
在模板目录下创建对应的模板文件,并根据模板引擎内置的模板语法,填写输出视图传递过来的数据。
配置模板目录:在当前项目根目录下创建了模板目录templates. 然后在settings.py, 模板相关配置,找到TEMPLATES配置项,填写DIRS设置模板目录。
'DIRS': [BASE_DIR / "templates"]
# 模板引擎配置
TEMPLATES = [
    {
        'BACKEND': 'django.template.backends.django.DjangoTemplates',
        'DIRS': [
            BASE_DIR / "templates",  # 路径拼接
        ],
        'APP_DIRS': True,
        'OPTIONS': {
            'context_processors': [
                'django.template.context_processors.debug',
                'django.template.context_processors.request',
                'django.contrib.auth.context_processors.auth',
                'django.contrib.messages.context_processors.messages',
            ],
        },
    },
]
1.1 Render函数内部本质
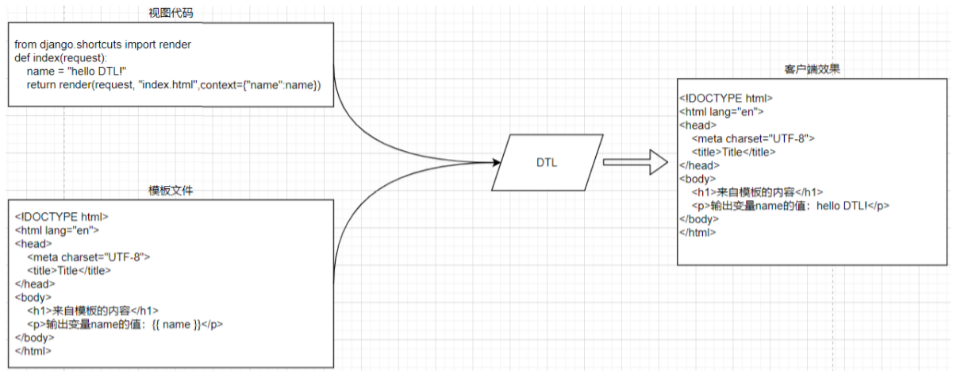
from django.shortcuts import render
from django.template.loader import get_template
from django.http.response import HttpResponse
def index(request):
    name = "hello world!"
    # 1. 初始化模板,读取模板内容,实例化模板对象
    # get_template会从项目配置中找到模板目录,我们需要填写的参数就是补全模板文件的路径
    template = get_template("index.html")
    # 2. 识别context内容, 和模板内容里面的标记[标签]替换,针对复杂的内容,进行正则的替换
    context = {"name": name}
    content = template.render(context, request) # render中完成了变量替换成变量值的过程,这个过程使用了正则。
    print(content)
    # 3. 通过response响应对象,把替换了数据的模板内容返回给客户端
    return HttpResponse(content)
    # 上面代码的简写,直接使用 django.shortcuts.render
    # return render(request, "index.html",context={"name":name})
    # return render(request,"index3.html", locals())
    # data = {}
    # data["name"] = "xiaoming"
    # data["message"] = "你好!"
    # return render(request,"index3.html", data)
DTL模板文件与普通html文件的区别在哪里?
DTL模板文件是一种带有特殊语法的HTML文件,这个HTML文件可以被Django编译,可以传递参数进去,实现数据动态化。在编译完成后,生成一个普通的HTML文件,然后发送给客户端。
开发中,我们一般把开发中的文件分2种,分别是静态文件和动态文件。
- 静态文件,数据保存在当前文件,不需要经过任何处理就可以展示出去。普通html文件,图片,视频,音频等这一类文件叫静态文件。
- 动态文件,数据并不在当前文件,而是要经过服务端或其他程序进行编译转换才可以展示出去。 编译转换的过程往往就是使用正则或其他技术把文件内部具有特殊格式的变量转换成真实数据。 动态文件,一般数据会保存在第三方存储设备,如数据库中。django的模板文件,就属于动态文件。
1.2 模板语法
1.2.1 变量渲染
深度查询、过滤器:
{

   {val}}  # 渲染数据
{

   {val|filter_name:参数}}
1.2.2 标签
{% tag_name %} # 渲染逻辑1.2.3 嵌套和继承
{% extends "base_generic.html" %}

{% block title %}{

   { section.title }}{% endblock %}

{% block content %}
5
<h1>{

   { section.title }}</h1>

{% for story in story_list %}
<h2>
  <a href="{

   { story.get_absolute_url }}">
    {

   { story.headline|upper }}
  </a>
</h2>
<p>{

   { story.tease|truncatewords:"100" }}</p>
{% endfor %}
{% endblock %}
1.2.4 变量渲染之深度查询
class Book(object):
    def __init__():
        self.title=title
        self.price=price

def index(request):
    name = "root"
    age = 13
    sex = True
    lve = ["swimming", "shopping", "coding", "game"]
    bookinfo = {"id": 1, "price": 9.90, "name": "python3天入门到挣扎", }
    book_list = [
        {"id": 10, "price": 9.90, "name": "python3天入门到挣扎", },
        {"id": 11, "price": 19.90, "name": "python7天入门到垂死挣扎", },
    ]

    book01 = Book("三体",199)
    book02 = Book("体",99)
    book03 = Book("三",299)
    book04 = Book("票",39)
    books = [book01,book02,book03,book04]

return render(request, 'index.html', locals())模板代码,templates/index.html:
<!DOCTYPE html>
<html lang="en">
<head>
    <meta charset="UTF-8">
    <title>Title</title>
</head>
<body>
    <p>name={

   { name }}</p>
    <p>{

   { age }}</p>
    <p>{

   { sex }}</p>
    <p>列表成员</p>
    <p>{

   { lve }}</p>
    <p>{

   { lve.0 }}</p>
    <p>{

   { lve | last }}</p>

    <p>字典成员</p>
    <p>id={

   { bookinfo.id }}</p>
    <p>price={

   { bookinfo.price }}</p>
    <p>name={

   { bookinfo.name }}</p>

    <p>复杂列表</p>
    <p>{

   { book_list.0.name }}</p>
    <p>{

   { book_list.1.name }}</p>

     <p>对象</p>
    <p>{

   { book01 }}</p>
    <p>{

   { book01.title }}</p>
    <p>第三部书的价格{

   { books.2.title }}</p>


</body>
</html>
<---通过句点符号深度查询----!>
tem.urls 代码:
"""子应用路由"""
from django.urls import path, re_path
from . import views

urlpatterns = [
    # ....
    path("index", views.index),
]
1.2.5 变量渲染之内置过滤器
语法:
{

   {obj|过滤器名称:过滤器参数}}
内置过滤器:

过滤器的使用视图代码 home.views.py;
def index(request):
    """过滤器 filters"""
    content = "<a href='http://www.luffycity.com'>路飞学城</a>"
    # content1 = '<script>alert(1);</script>'
    book2=[]
    from datetime import datetime
    now = datetime.now()
    content2= "hello wrold!"
  #locals() 函数会以字典类型返回当前位置的全部局部变量
    return render(request,"index.html",locals())
模板代码,templates/index.html:
{

   { content | safe }}
    {

   { content1 | safe }}

    {# 过滤器本质就是函数,但是模板语法不支持小括号调用,所以需要使用:号分割参数 #}
    <p>日期:{

   { now | date:"Y-m-d H:i:s" }}</p>
    {# conten1如果是True正常显示内容 如果为False显示default的默认值 #}
    <p>book2展示:{

   { conten1 | default:"暂时没有符合条件的书籍" }}</p>
    {# 一个数据可以连续调用多个过滤器 #}
    <p>{

   { content2 | truncatechars:6 | upper }}</p>
    {# safe 安全 django会把 <> 转义成特殊符号 避免js脚本恶意攻击 #}
    <p>链接:{

   { content }}</p>
    <p>链接:{

   { content|safe }}</p>  # 加上safe表明此链接安全 不会特殊处理
    {# 给书的价格加100 #}
    <p>链接:{

   { book01.price|add:100 }}</p>
1.2.6 自定义过滤器
虽然官方已经提供了许多内置的过滤器给开发者,但是很明显,还是会有存在不足的时候。例如:希望输出用户的手机号码时, 13912345678 ----> 139*****678,这时我们就需要自定义过滤器。要声明自定义过滤器并且能在模板中正常使用,需要完成2个前置的工作:
# 1. 当前使用和声明过滤器的子应用必须在setting.py配置文件中的INSTALLED_APPS中注册了!!!
INSTALLED_APPS = [
    'django.contrib.admin',
    'django.contrib.auth',
    'django.contrib.contenttypes',
    'django.contrib.sessions',
    'django.contrib.messages',
    'django.contrib.staticfiles',
    'home',
]
# --------------------------------------------------
# 2. 自定义过滤器函数必须被 template.register进行装饰使用.
#    而且过滤器函数所在的模块必须在templatetags包里面保存

# 在home子应用下创建templatetags包[必须包含__init__.py], 在包目录下创建任意py文件
# home.templatetags.my_filters.py代码:

from django import template
register = template.Library()

# 自定义过滤器
@register.filter("mobile")
def mobile(content):
    return content[:3]+"*****"+content[-3:]
# --------------------------------------------------
# 3. 在需要使用的模板文件中顶部使用load标签加载过滤器文件my_filters.py并调用自定义过滤器
# home.views.py,代码:

def index(request):
    """自定义过滤器 filters"""

    moblie_number = "13312345678"
    return render(request,"index2.html",locals())
templates/index2.html 代码:
# 将过滤器文件my_filters导入到模板里
{% load my_filters %}
<!DOCTYPE html>
<html lang="en">
<head>
    <meta charset="UTF-8">
    <title>Title</title>
</head>
<body>
    {

   { moblie_number| mobile }}
</body>
</html>
1.2.7 if 标签
视图代码, tem.views.py:
def index(request):
    name = "xiaoming"
    age = 19
    sex = True
    lve = ["swimming", "shopping", "coding", "game"]
    user_lve = "sleep"
    bookinfo = {"id": 1, "price": 9.90, "name": "python3天入门到挣扎", }
    book_list = [
        {"id": 10, "price": 9.90, "name": "python3天入门到挣扎", },
        {"id": 11, "price": 19.90, "name": "python7天入门到垂死挣扎", },
    ]
    return render(request, 'index.html', locals())
模板代码, templates/index.html,代码:
<!DOCTYPE html>
<html lang="en">
<head>
    <meta charset="UTF-8">
    <title>Title</title>
</head>
<body>
{# 来自django模板引擎的注释~~~~ #}
{% comment %}
多行注释,comment中的所有内容全部都不会被显示出去
{% endcomment %}

    # 条件成立会被渲染出来
{#    {% if age < 18 %}#}
{#        <p>你还没成年,不能访问我的网站!</p>#}
{#    {% endif %}#}
{##}
{#    {% if name == "root" %}#}
{#        <p>超级用户,欢迎回家!</p>#}
{#    {% else %}#}
{#        <p>{

   { name }},你好,欢迎来到xx网站!</p>#}
{#    {% endif %}#}


    {% if user_lve == lve.0 %}
        <p>那么巧,你喜欢游泳,海里也能见到你~</p>
    {% elif user_lve == lve.1 %}
        <p>那么巧,你也来收快递呀?~</p>
    {% elif user_lve == lve.2 %}
        <p>那么巧,你也在老男孩?</p>
    {% else %}
        <p>看来我们没有缘分~</p>
    {% endif %}
</body>
</html>
路由代码:
"""子应用路由"""
from django.urls import path, re_path
from . import views

urlpatterns = [
    # ....
    path("index", views.index),
]
1.2.8 for 标签
视图代码, home.views.py:
def index7(request):
    book_list1 = [
        {"id": 11, "name": "python基础入门", "price": 130.00},
        {"id": 17, "name": "Go基础入门", "price": 230.00},
        {"id": 23, "name": "PHP基础入门", "price": 330.00},
        {"id": 44, "name": "Java基础入门", "price": 730.00},
        {"id": 51, "name": "C++基础入门", "price": 300.00},
        {"id": 56, "name": "C#基础入门", "price": 100.00},
        {"id": 57, "name": "前端基础入门", "price": 380.00},
    ]
return render(request, 'index.html', locals())template/index.html,代码:
<!DOCTYPE html>
<html lang="en">
<head>
    <meta charset="UTF-8">
    <title>Title</title>
</head>
<body>
    <table width="800" align="center" border="1">
        <tr>
            <td>序号</td>
            <td>id</td>
            <td>标题</td>
            <td>价格</td>
        </tr>
{# 多行编辑,alt+鼠标键,alt不要松开,左键点击要编辑的每一行 #}
{#        {% for book in book_list1 %}#}
{#            <tr>#}
{#                <td>{

   { book.id }}</td>#}
{#                <td>{

   { book.name }}</td>#}
{#                <td>{

   { book.price }}</td>#}
{#            </tr>#}
{#        {% endfor %}#}

{# 建议不要直接使用for循环一维字典,此处使用仅仅展示for嵌套for而已 #}
{#        {% for book in book_list1 %}#}
{#            <tr>#}
{#                {% for field,value in book.items %}#}
{#                <td>{

   { field }} == {

   { value }}</td>#}
{#                {% endfor %}#}
{#            </tr>#}
{#        {% endfor %}#}

{#        {% for book in book_list1 %}#}
{#            <tr>#}
{#                <td>{

   { book.id }}</td>#}
{#                <td>{

   { book.name }}</td>#}
{#                {% if book.price > 200 %}#}
{#                    <td bgcolor="#ff7f50">{

   { book.price }}</td>#}
{#                {% else %}#}
{#                    <td>{

   { book.price }}</td>#}
{#                {% endif %}#}
{#            </tr>#}
{#        {% endfor %}#}


        {# 逆向循环数据 #}
{#        {% for book in book_list1 reversed %}#}
{#            <tr>#}
{#                <td>{

   { book.id }}</td>#}
{#                <td>{

   { book.name }}</td>#}
{#                {% if book.price > 200 %}#}
{#                    <td bgcolor="#ff7f50">{

   { book.price }}</td>#}
{#                {% else %}#}
{#                    <td>{

   { book.price }}</td>#}
{#                {% endif %}#}
{#            </tr>#}
{#        {% endfor %}#}

        {% for book in book_list1 %}
            <tr>
{#                <td>{

   { forloop.counter }}</td>#}  # forloop循环器 只能在for循环里使用  counter计数器
{#                <td>{

   { forloop.counter0 }}</td>#} # counter0 从0开始计数
{#                <td>{

   { forloop.revcounter }}</td>#}
{#                <td>{

   { forloop.revcounter0 }}</td>#}
{#                <td>{

   { forloop.first }}</td>#} # 是否是循环的第一个  返回布尔值
                <td>{

   { forloop.last }}</td>
                <td>{

   { book.id }}</td>
                <td>{

   { book.name }}</td>
                {% if book.price > 200 %}
                    <td bgcolor="#ff7f50">{

   { book.price }}</td>
                {% else %}
                    <td>{

   { book.price }}</td>
                {% endif %}
            </tr>
        {% endfor %}

    </table>
</body>
</html>路由代码:
"""子应用路由"""
from django.urls import path, re_path
from . import views
urlpatterns = [
# ....
path("index", views.index),
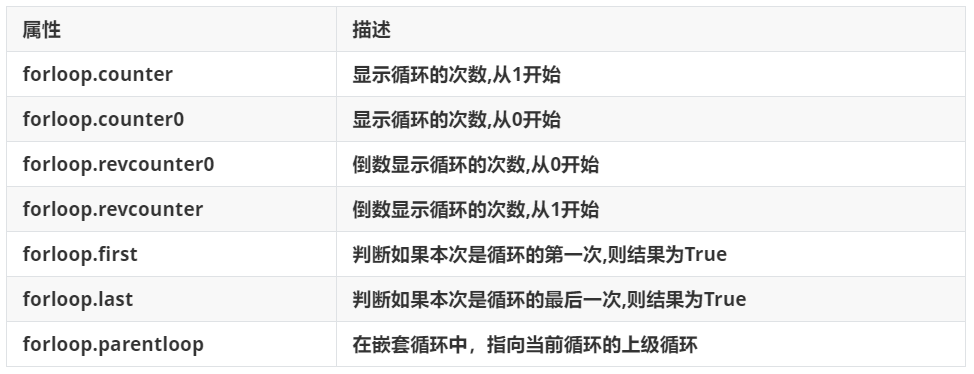
]循环中, 模板引擎提供的forloop对象,用于给开发者获取循环次数或者判断循环过程的.
1.2.9 模板嵌套继承
传统的模板分离技术,依靠 {% include "模板文件名"%} 实现,这种方式,虽然达到了页面代码复用的效果,但是由此也会带来大量的碎片化模板(一直include),导致维护模板的成本上升.因此, Django框架中除了提供这种模板分离技术以外,还并行的提供了 模板继承给开发者.
视图, home.views.py代码:
def index(request):
    """模板继承"""
return render(request,"index.html",locals())templates/index.html:
<!DOCTYPE html>
<html lang="en">
<head>
    <meta charset="UTF-8">
    <title>Title</title>
</head>
<body>
    <h1>base.html的头部</h1>
    <h1>base.html的内容</h1>
    <h1>base.html的脚部</h1>
{% include "ad.html"%}
</body>
</html>新建ad.html (不需要构建新的页面 只需要子页面 提取出公共部分)
<style>
    .advertise{
        width:200px
        height:150px
    }
</style>

<div class='advertise'>广告</div>
{% include "模板文件名"%} # 模板嵌入
{% extends "base.html" %} # 模板继承 (1) 继承父模板的公共内容
{% extends "base.html" %}

# 视图, home.views.py代码:

def index(request):
    """模板继承"""
    return render(request,"index.html",locals())
子模板, templates/index.html

{% extends "base.html" %}
父模板, templates/base.html

<!DOCTYPE html>
<html lang="en">
<head>
    <meta charset="UTF-8">
    <title>Title</title>
</head>
<body>
    <h1>base.html的头部</h1>
    <h1>base.html的内容</h1>
    <h1>base.html的脚部</h1>
</body>
</html>
(2) 个性展示不同于父模板的内容
{%block %} 独立内容 {%endblock%}

{

   {block.super}}

视图home.views.py, 代码:

def index(request):
    """模板继承"""

    return render(request,"index.html",locals())

def home(request):
    """模板继承"""
    return render(request,"home.html",locals())
路由 home.urls.py,代码:

from django.urls import path
from . import views
urlpatterns = [
    path("", views.index),
    path("home/", views.home),
]
子模板index.html,代码:

{% extends "base.html" %}
{% block title %}index3的标题{% endblock  %}
{% block content %}
    {

   { block.super }} {# 父级模板同名block标签的内容 #}
    <h1>index3.html的独立内容</h1>
    {

   { block.super }}
{% endblock %}
子模板home.html,代码:

{% extends "base.html" %}  # 继承父模板
{% block title %}home的标题{% endblock %} # 重写父模板的盒子内容
父模板base.html,代码:

<!DOCTYPE html>
<html lang="en">
<head>
    <meta charset="UTF-8">
    <title>{% block title %}{% endblock  %}</title>
</head>
<body>
    <h1>base.html的头部</h1>
    {% block content %}
    <h1>base.html的内容</h1>
    {% endblock %}
    <h1>base.html的脚部</h1>
</body>
</html>-
如果你在模版中使用 {% extends %} 标签,它必须是模版中的第一个标签。其他的任何情况下,模版继承都将无法工作。
-
在base模版中设置越多的 {% block %} 盒子标签越好。请记住,子模版不必定义全部父模版中的blocks,所以,你可以在大多数blocks中填充合理的默认内容,然后,子模板只定义重写你需要的那一个盒子,没定义使用父模板的默认内容。多一点钩子总比少一点好。
-
为了更好的可读性,你也可以给你的 {% endblock %} 标签一个 名字 。例如:{
% block content%}...{% endblock content%},在大型模版中,这个方法帮你清楚的看到哪一个 {% block %} 标签被关闭了。 -
不能在一个模版中定义多个相同名字的 block 标签。
-
子模板里的{ { block.super }} # 表示父模板的默认内容展示出来 不会被重写内容覆盖
1.3 静态文件
开发中在开启了debug模式时,django可以通过配置,允许用户通过对应的url地址访问django的静态文件。
setting.py,代码:

# 可以访问静态资源的配置
STATIC_URL = '/static/'
STATICFILES_DIRS = [
    BASE_DIR / "static",
]注意:项目上线以后,关闭debug模式时,django默认是不提供静态文件的访问支持,项目部署的时候,我们会通过收集静态文件使用nginx这种web服务器来提供静态文件的访问支持。