目录
一、概述
写完微信登录的小程序前端后,再来实现后端逻辑。
后端主要有两个接口:
- /wxlogin 负责处理登录逻辑,比如返回用户token、初次登录自动注册该用户。
- /checkwxlogin 负责处理登录校验,检查一下当前用户是否已登录。
二、后端代码
1、依赖
项目的核心依赖如下:
        <dependency>
            <groupId>org.springframework.boot</groupId>
            <artifactId>spring-boot-starter-web</artifactId>
        </dependency>
        <dependency>
            <groupId>org.projectlombok</groupId>
            <artifactId>lombok</artifactId>
            <optional>true</optional>
        </dependency>
        <!-- http请求工具包依赖 -->
        <dependency>
            <groupId>org.apache.httpcomponents</groupId>
            <artifactId>httpclient</artifactId>
            <version>4.5.2</version>
        </dependency>
        <dependency>
            <groupId>com.alibaba</groupId>
            <artifactId>fastjson</artifactId>
            <version>1.2.75</version>
        </dependency>
        <dependency>
            <groupId>org.springframework.boot</groupId>
            <artifactId>spring-boot-starter-data-redis</artifactId>
        </dependency>
        <dependency>
            <groupId>org.springframework.data</groupId>
            <artifactId>spring-data-redis</artifactId>
            <version>2.7.2</version>
        </dependency>
        <dependency>
            <groupId>org.springframework.boot</groupId>
            <artifactId>spring-boot-starter-validation</artifactId>
        </dependency>
        <dependency>
            <groupId>org.springframework.boot</groupId>
            <artifactId>spring-boot-starter-test</artifactId>
            <scope>test</scope>
        </dependency>
2、工具类
(1) HttpClientUtil
HttpClientUtil 是调用微信外部接口的工具类。看别人大部分都是这么写的,但是个人感觉如何是小项目、或者是项目中很少调用外部API的话,好像直接字符串拼接好像效率更高。封装成一个工具类应该是为了保证可读性、可维护性和安全。
public class HttpClientUtil {

    final static int TIMEOUT = 1000;

    final static int TIMEOUT_MSEC = 5 * 1000;

    public static String doPost(String url, Map<String, String> paramMap) throws IOException {
        // 创建Httpclient对象
        CloseableHttpClient httpClient = HttpClients.createDefault();
        //创建响应对象
        CloseableHttpResponse response = null;
        String resultString = "";
        try {
            // 创建Http Post请求
            HttpPost httpPost = new HttpPost(url);
            // 创建参数列表
            if (paramMap != null) {
                List<NameValuePair> paramList = new ArrayList<>();
                for (Map.Entry<String, String> param : paramMap.entrySet()) {
                    paramList.add(new BasicNameValuePair(param.getKey(), param.getValue()));
                }
                // 模拟表单
                UrlEncodedFormEntity entity = new UrlEncodedFormEntity(paramList);
                httpPost.setEntity(entity);
            }
            httpPost.setConfig(builderRequestConfig());
            // 执行请求
            response = httpClient.execute(httpPost);

            resultString = EntityUtils.toString(response.getEntity(), "UTF-8");
        } catch (Exception e) {
            throw new IOException("HttpClientUtil工具类执行请求失败---" + e);
        } finally {
            try {
                response.close();
            } catch (IOException e) {
                throw new IOException("HttpClientUtil工具类关闭响应资源失败---" + e);
            }
        }
        return resultString;
    }

    private static RequestConfig builderRequestConfig() {
        return RequestConfig.custom()
                .setConnectTimeout(TIMEOUT_MSEC)
                .setConnectionRequestTimeout(TIMEOUT_MSEC)
                .setSocketTimeout(TIMEOUT_MSEC).build();
    }
}
(2) R<T>
R<T>是自定义的响应类型。
@Getter
@Setter
public class R<T> {
    private Integer code;
    private String msg;
    private T data;
    public R(Integer code, String msg) {
        this.code = code;
        this.msg = msg;
    }
    public R(StatusCode statusCode) {
        this.code = statusCode.getCode();
        this.msg = statusCode.getMsg();
    }
    public R(Integer code, String msg, T data) {
        this.code = code;
        this.msg = msg;
        this.data = data;
    }
(3) StatusCode
StatusCode是自定义的响应状态码。
public enum StatusCode {
    Success(0,"成功"),
    Fail(-1,"失败"),
    InvalidParams(201,"非法参数"),
    InvalidGrantType(202,"非法授权");

    private Integer code;

    private String msg;

    StatusCode(Integer code, String msg) {
        this.code = code;
        this.msg = msg;
    }

    public Integer getCode() {
        return code;
    }

    public void setCode(Integer code) {
        this.code = code;
    }

    public String getMsg() {
        return msg;
    }

    public void setMsg(String msg) {
        this.msg = msg;
    }
}
3、前端请求接收对象
@Getter
@Setter
public class WechatLoginRequestDTO {
    @NotNull(message = "code不能为空")
    private String code;  //微信code
}
4、服务层
接口:
public interface WechatService {
    String getToken(WechatLoginRequestDTO loginRequest) throws Exception;

    void checkToken(String token) throws Exception;
}
实现:
注意这里的 token 我是使用时间戳和 SHA-256 哈希算法生成的。主要为了演示微信登录流程,这里简单地将 token 存在了redis里,没有存储数据库的逻辑,也没有实现首次登录进行注册的处理,读者可自行增加。
@Service
public class WechatServiceImpl implements WechatService {
    private static final String REQUEST_URL = "https://api.weixin.qq.com/sns/jscode2session";
    private static final String APPID = "xxxx"; //前面获取的appid
    private static final String SECRET = "xxxx"; //前面获取的小程序密钥,注意要和appid同属于一个项目
    private static final String GRANT_TYPE = "authorization_code";

    @Resource
    private RedisTemplate redisTemplate;

    @Override
    public String getToken(WechatLoginRequestDTO loginRequest) throws Exception {
        JSONObject sessionKeyOpenId = getSessionKeyOrOpenId(loginRequest.getCode());
        System.out.println("微信返还的openid"+sessionKeyOpenId);
        // 获取openId && sessionKey
        String openId = sessionKeyOpenId.getString("openid");
        //String sessionKey = sessionKeyOpenId.getString("session_key");
        // 获取当前时间戳
        long timestamp = Instant.now().getEpochSecond();
        // 拼接openid和时间戳
        String tokenData = openId + timestamp;
        // 使用SHA-256哈希算法对数据进行加密
        String token = getSHA256(tokenData);
        redisTemplate.opsForValue().set(token, 1);

        return token;
    }

    @Override
    public void checkToken(String token) throws Exception {
        if(redisTemplate.opsForValue().get(token)==null){
            throw new Exception("用户令牌不存在");
        }
    }

    //调用微信接口服务获取openId && sessionKey
    private JSONObject getSessionKeyOrOpenId(String code) throws Exception {
        Map<String, String> requestUrlParam = new HashMap<>();
        // 小程序appId,自己补充
        requestUrlParam.put("appid", APPID);
        // 小程序secret,自己补充
        requestUrlParam.put("secret", SECRET);
        // 小程序端返回的code
        requestUrlParam.put("js_code", code);
        // 默认参数
        requestUrlParam.put("grant_type", GRANT_TYPE);
        // post请求读取调用微信接口获取openid用户唯一标识
        String result = HttpClientUtil.doPost(REQUEST_URL, requestUrlParam);
        return JSON.parseObject(result);
    }

    private static String getSHA256(String data) throws NoSuchAlgorithmException {
        MessageDigest digest = MessageDigest.getInstance("SHA-256");
        byte[] hash = digest.digest(data.getBytes());
        StringBuilder hexString = new StringBuilder();

        for (byte b : hash) {
            String hex = Integer.toHexString(0xff & b);
            if (hex.length() == 1) {
                hexString.append('0');
            }
            hexString.append(hex);
        }
        return hexString.toString();
    }
}
5、控制层
@RestController
public class LoginController {

    @Resource
    WechatService wechatService;

    @PostMapping("/wxlogin")
    public R login(@Valid @RequestBody WechatLoginRequestDTO loginRequest) {
        System.out.println("收到微信code:"+loginRequest.getCode());
        R response = new R(StatusCode.Success);
        try {
            String token = wechatService.getToken(loginRequest);
            response.setData(token);
        } catch (Exception e) {
            response = new R(StatusCode.Fail.getCode(), e.getMessage());
        }
        return response;
    }

    @GetMapping("/checkwxlogin")
    public R checkLogin(@NotNull @RequestParam String token) {
        System.out.println("收到待校验token:"+token);
        R response = new R(StatusCode.Success);
        try {
            wechatService.checkToken(token);
        } catch (Exception e) {
            response = new R(StatusCode.Fail.getCode(), e.getMessage());
        }
        return response;
    }
}
三、测试
启动项目

前端测试
前端第一次登录,is_login为false, 打印出新获得的 token ;
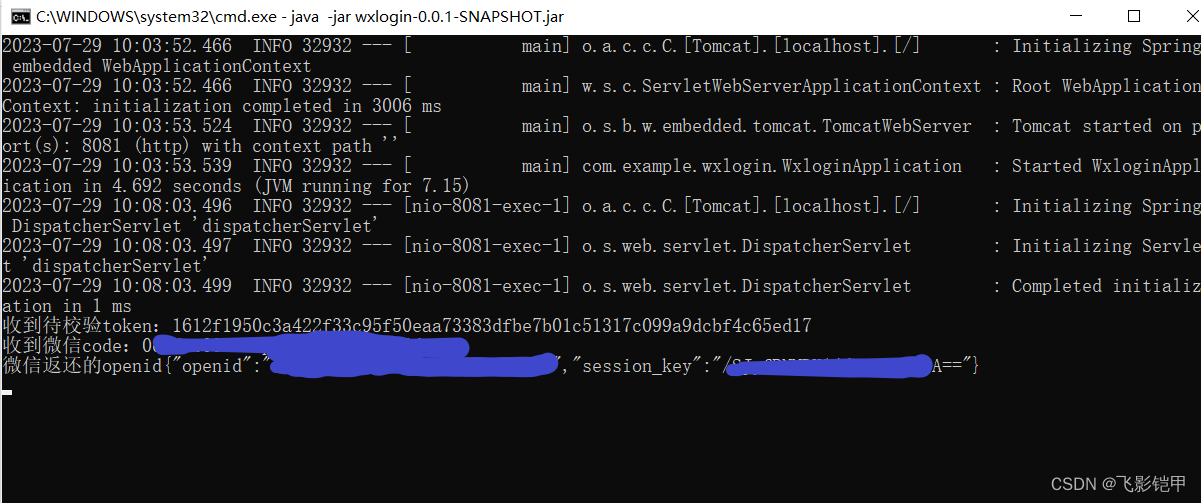
后端已经打印出相关信息,包括从微信服务接口获得的 openid 和 sessionKey。
前端再次登录, 保存在缓存的 token 起作用了,显示 is_login为 true 。

同时查看 Storage 也可以看到,token 已经存入。
测试成功!!!
四、小结
现在我们已经成功实现了微信登录的基本功能,将微信用户信息存入数据库、获取微信用户头像昵称等功能,后续有时间会继续介绍。
未完待续……