It’s trivial to use a web form which is made by HTML code for uploading files from web browser to a server. This is commonly referred as
form based file upload, and typically suitable for web-based applications. How about standalone or command line-based applications – which sometimes need to upload files to a web server but cannot use an upload form in HTML? Well, this article is going to answer that question by implementing the following solution:
This servlet handles HTTP POST requests in its
doPost()
method. There are some important points here in this code:
Following is code of the client program:
 From this log, we can examine values of all HTTP headers sent from the client. Almost of values are set by Java automatically, except the
filename is set from the client manually. And here is the output from the client program:
From this log, we can examine values of all HTTP headers sent from the client. Almost of values are set by Java automatically, except the
filename is set from the client manually. And here is the output from the client program:
 NOTE:
NOTE:
-
- Server: uses a Java servlet for receiving file uploaded from client and saves it into a file on server’s disk.
- Client: is a command line based program that sends an HTTP POST request along with file’s binary data to the servlet.
Coding the servlet
Write a Java servlet as follows:|
1
2
3
4
5
6
7
8
9
10
11
12
13
14
15
16
17
18
19
20
21
22
23
24
25
26
27
28
29
30
31
32
33
34
35
36
37
38
39
40
41
42
43
44
45
46
47
48
49
50
51
52
53
54
55
56
57
58
59
60
61
62
|
package
net.codejava.servlet;
import
java.io.File;
import
java.io.FileOutputStream;
import
java.io.IOException;
import
java.io.InputStream;
import
java.util.Enumeration;
import
javax.servlet.ServletException;
import
javax.servlet.http.HttpServlet;
import
javax.servlet.http.HttpServletRequest;
import
javax.servlet.http.HttpServletResponse;
/**
* This servlet demonstrates how to receive file uploaded from the client
* without using third-party upload library such as Commons File Upload.
* @author www.codejava.net
*/
public
class
ReceiveFileServlet
extends
HttpServlet {
static
final
String SAVE_DIR =
"E:/Test/Upload/"
;
static
final
int
BUFFER_SIZE =
4096
;
protected
void
doPost(HttpServletRequest request,
HttpServletResponse response)
throws
ServletException, IOException {
// Gets file name for HTTP header
String fileName = request.getHeader(
"fileName"
);
File saveFile =
new
File(SAVE_DIR + fileName);
// prints out all header values
System.out.println(
"===== Begin headers ====="
);
Enumeration<String> names = request.getHeaderNames();
while
(names.hasMoreElements()) {
String headerName = names.nextElement();
System.out.println(headerName +
" = "
+ request.getHeader(headerName));
}
System.out.println(
"===== End headers =====\n"
);
// opens input stream of the request for reading data
InputStream inputStream = request.getInputStream();
// opens an output stream for writing file
FileOutputStream outputStream =
new
FileOutputStream(saveFile);
byte
[] buffer =
new
byte
[BUFFER_SIZE];
int
bytesRead = -
1
;
System.out.println(
"Receiving data..."
);
while
((bytesRead = inputStream.read(buffer)) != -
1
) {
outputStream.write(buffer,
0
, bytesRead);
}
System.out.println(
"Data received."
);
outputStream.close();
inputStream.close();
System.out.println(
"File written to: "
+ saveFile.getAbsolutePath());
// sends response to client
response.getWriter().print(
"UPLOAD DONE"
);
}
}
|
-
- Name of the upload file is retrieved from a HTTP header named as “fileName” – this header is set by the client.
- We create a saveFile object in order to save the upload file into disk. Its path is constructed from the SAVE_DIR constant and the fileName header. A FileOutputStream object wraps this saveFile to write byte arrays into the file.
- The most important point is to open an InputStream from the HttpServletRequest in order to read bytes transferred from the client.
- We use a while loop to repeatedly read byte arrays from the request’s input stream and write them into the saveFile’s output stream. This is trivial.
- And finally, always close the opened input stream and output stream, then send a response to the client (in this case, a simple text message “UPLOAD DONE”).
Head First Servlets and JSP [Kindle version] - This book does not only help you interact with Servlets and JSPs quickly and deeply, it also helps you have a good preparation for the SCWCD/OCPJWCD. Read this book if you want to get certified.
Coding the client program
Following is code of the client program:
|
1
2
3
4
5
6
7
8
9
10
11
12
13
14
15
16
17
18
19
20
21
22
23
24
25
26
27
28
29
30
31
32
33
34
35
36
37
38
39
40
41
42
43
44
45
46
47
48
49
50
51
52
53
54
55
56
57
58
59
60
61
62
63
64
65
66
67
|
import
java.io.BufferedReader;
import
java.io.File;
import
java.io.FileInputStream;
import
java.io.IOException;
import
java.io.InputStreamReader;
import
java.io.OutputStream;
import
java.net.HttpURLConnection;
import
java.net.URL;
/**
* This program demonstrates how to upload files to a web server
* using HTTP POST request without any HTML form.
* @author www.codejava.net
*
*/
public
class
NonFormFileUploader {
static
final
String UPLOAD_URL =
"http://localhost:8080/CodeWeb/ReceiveFileServlet"
;
static
final
int
BUFFER_SIZE =
4096
;
public
static
void
main(String[] args)
throws
IOException {
// takes file path from first program's argument
String filePath = args[
0
];
File uploadFile =
new
File(filePath);
System.out.println(
"File to upload: "
+ filePath);
// creates a HTTP connection
URL url =
new
URL(UPLOAD_URL);
HttpURLConnection httpConn = (HttpURLConnection) url.openConnection();
httpConn.setUseCaches(
false
);
httpConn.setDoOutput(
true
);
httpConn.setRequestMethod(
"POST"
);
// sets file name as a HTTP header
httpConn.setRequestProperty(
"fileName"
, uploadFile.getName());
// opens output stream of the HTTP connection for writing data
OutputStream outputStream = httpConn.getOutputStream();
// Opens input stream of the file for reading data
FileInputStream inputStream =
new
FileInputStream(uploadFile);
byte
[] buffer =
new
byte
[BUFFER_SIZE];
int
bytesRead = -
1
;
System.out.println(
"Start writing data..."
);
while
((bytesRead = inputStream.read(buffer)) != -
1
) {
outputStream.write(buffer,
0
, bytesRead);
}
System.out.println(
"Data was written."
);
outputStream.close();
inputStream.close();
// always check HTTP response code from server
int
responseCode = httpConn.getResponseCode();
if
(responseCode == HttpURLConnection.HTTP_OK) {
// reads server's response
BufferedReader reader =
new
BufferedReader(
new
InputStreamReader(
httpConn.getInputStream()));
String response = reader.readLine();
System.out.println(
"Server's response: "
+ response);
}
else
{
System.out.println(
"Server returned non-OK code: "
+ responseCode);
}
}
}
|
The important point here is we use an HttpURLConnection object to send an HTTP POST request to the server at URL of the servlet (identified by the constant UPLOAD_URL) and open the OutputStream of this connection to write byte arrays of the upload file. Path of this file is passed as the first argument of the program. Similarly to the servlet, we use a while loop to read/write byte arrays from/to the file’s input stream/request’s output stream. Finally, we read response from the server after closing both input/output streams by using the input stream of the request.
Testing the application
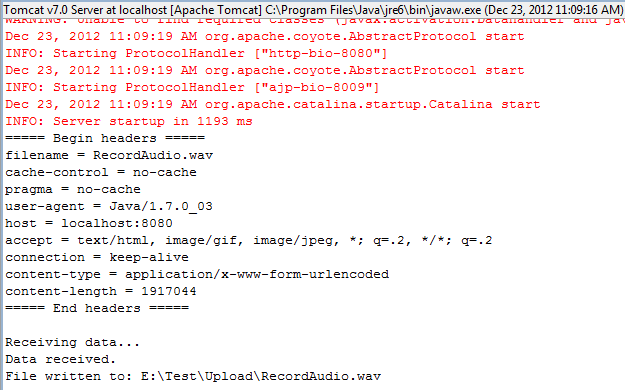
Deploy the ReceiveFileServlet on a servlet container like Tomcat and start the server. Then run the client program by executing the following command:java NonFormFileUploader e:\Test\RecordAudio.wav
Here we pass a WAV audio file to be uploaded. The server will produce some output as the following screenshot: From this log, we can examine values of all HTTP headers sent from the client. Almost of values are set by Java automatically, except the
filename is set from the client manually. And here is the output from the client program:
NOTE:
-
- Neither the server nor the client is playing with multipart request (which is standard for form-based upload). Note that the request’s content type is set to application/x-www-form-urlencoded instead of multipart/form-data.
- Thus the client program cannot be applied for the server which accepts multipart request. The server side must be implemented like the ReceiveFileServletdoes.