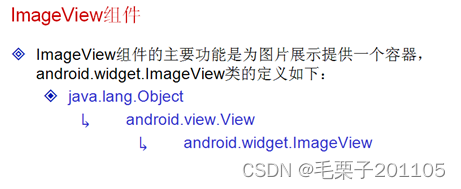
1. 图片视图:ImageView
1.1 知识点
(1)掌握ImageView组件的使用;
(2)掌握图片的保存;
1.2 具体内容
之前我们讲过了RadioGroup是提供了一个存放RadioButton的一个容器,ImageView也是提供了一个放置图片的容器,在android工程中,所有的图片都保存在res/drawable文件夹中。
我们都知道将图片放置drawable文件夹后会在R.java文件中进行注册,生成一个ID。
  <ImageView
        android:id="@+id/img1"
        android:layout_width="wrap_content"
        android:layout_height="wrap_content"
        android:src="@drawable/psb"/>
    <ImageView
        android:id="@+id/img1"
        android:layout_width="wrap_content"
        android:layout_height="wrap_content"
        android:src="@drawable/psb"/>
	 <ImageView
        android:id="@+id/img2"
        android:layout_width="wrap_content"
        android:layout_height="wrap_content"
        android:src="@drawable/abc"/>
1.3 小结
所有的图片要求保存在:drawable-xx 文件夹之中;
2. 图片按钮:ImageButton
2.1 知识点
(1)掌握ImageButton的使用;
2.2 具体内容
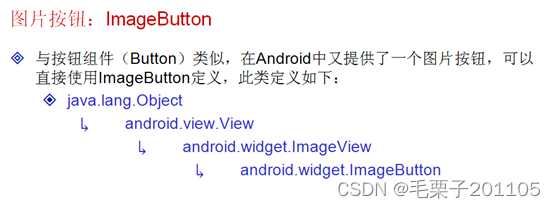
对于ImageButton的定义,可以发现是一个特殊的图片视图,和Button一样,是一个特殊的文本显示组件,ImageButton是ImageView的子类,表示是对图片视图进行了功能的扩充,而且所有在ImageView中的定义都可以在ImageButton中使用。
<ImageButton
        android:layout_width="wrap_content"
        android:layout_height="wrap_content"
        android:src="@drawable/ic_launcher" />
2.3 小结
ImageButton可以以图片的形式设置按钮的风格。
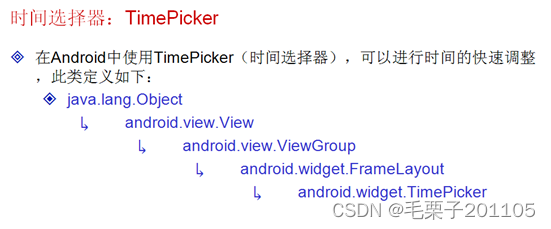
3. 时间选择器:TimePicker
3.1 知识点
(1)掌握时间选择器的使用;
(2)可以通过程序配置显示的时间;
3.2 具体内容
范例:使用时间选择器选择时间
<TimePicker
        android:id="@+id/tp1"
        android:layout_width="wrap_content"
        android:layout_height="wrap_content" />
此种时间选择器在不同的语言环境下,显示的效果是不一样的,意思就是说这个组件是一个国际化的组件。默认情况下,采用的是12小时制的时间,我们可以通过程序设置为24小时制。
public class TimePickerActivity extends Activity {
	private TimePicker tp1 = null;
    @Override
    protected void onCreate(Bundle savedInstanceState) {
        super.onCreate(savedInstanceState);
        setContentView(R.layout.activity_time_picker);
        this.tp1 = (TimePicker) super.findViewById(R.id.tp1);
        this.tp1.setIs24HourView(true);//设置为24小时
        this.tp1.setCurrentHour(18);//设置小时
        this.tp1.setCurrentMinute(20);//设置分钟
        this.tp1.setEnabled(false);//设置不能调整
    }
3.3 小结
时间选择器可以直接进行时间的显示调整;
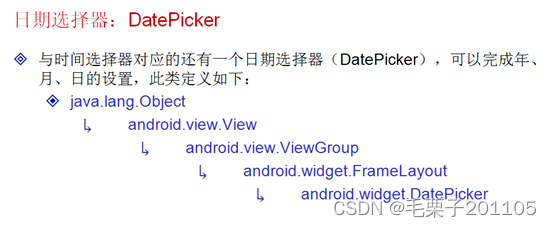
4. 日期选择器:DatePicker
4.1 知识点
(1)掌握日期选择器的配置及使用。
4.2 具体内容
<DatePicker
        android:id="@+id/dp1"
        android:layout_width="wrap_content"
        android:layout_height="wrap_content"/>
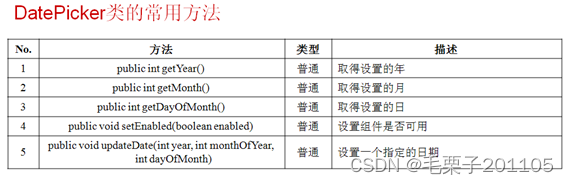
此日期选择器显示的年月日,如果是其他的语言环境,显示的内容不同,说明也是一个国际化的组件,上面的程序只是显示了当前的日期,我们也可以设置其显示的日期。
public class DatePickerActivity extends Activity {
	private DatePicker dp1 = null;
    @Override
    protected void onCreate(Bundle savedInstanceState) {
        super.onCreate(savedInstanceState);
        super.setContentView(R.layout.activity_date_picker);
        this.dp1 = (DatePicker) super.findViewById(R.id.dp1);
        this.dp1.setEnabled(false);//设置不可编辑
        this.dp1.updateDate(2008, 7, 8);//设置显示的时间 在Java中,月是从0-11的。
    }
}
4.3 小结
(1)日期选择器可以进行日期的配置;
(2)可以通过设置进行不同的显示风格配置。