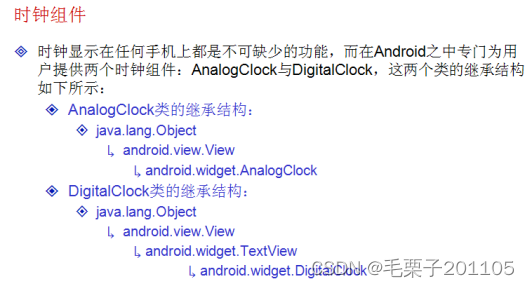
1. 时钟组件:AnalogClock与DigitalClock
1.1 知识点
(1)掌握AnalogClock与DigitalClock的使用;
1.2 具体内容
package com.example.clockproject;

import android.os.Bundle;
import android.app.Activity;
import android.view.Menu;

public class ClockActivity extends Activity {

	@Override
	protected void onCreate(Bundle savedInstanceState) {
		super.onCreate(savedInstanceState);
		setContentView(R.layout.activity_clock);
	}

	@Override
	public boolean onCreateOptionsMenu(Menu menu) {
		// Inflate the menu; this adds items to the action bar if it is present.
		getMenuInflater().inflate(R.menu.clock, menu);
		return true;
	}

}
时钟组件没有什么太复杂的操作,不过在后面讲解线程操作的时候,会用的此种组件。
1.3 小结
(1)AnalogClock可以完成指针时钟的显示;
(2)DigitalClock可以完成数字时钟的显示。
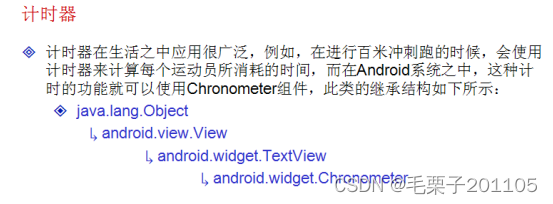
2. 计时器:Chronometer
2.1 知识点
(1)掌握Chronometer组件的使用及操作;
(2)可以在手机开发中使用震动服务;
2.2 具体内容

<LinearLayout xmlns:android="http://schemas.android.com/apk/res/android"
    xmlns:tools="http://schemas.android.com/tools"
    android:layout_width="match_parent"
    android:layout_height="match_parent"
    android:paddingBottom="@dimen/activity_vertical_margin"
    android:paddingLeft="@dimen/activity_horizontal_margin"
    android:paddingRight="@dimen/activity_horizontal_margin"
    android:paddingTop="@dimen/activity_vertical_margin"
    android:orientation="vertical"
    tools:context=".ChronometerActivity" >

    <Chronometer
        android:id="@+id/myChronometer"
        android:layout_width="match_parent"
        android:layout_height="wrap_content"
        />
    <LinearLayout
        android:layout_width="match_parent"
        android:layout_height="wrap_content"
        android:orientation="horizontal"
        >
        <Button
            android:id="@+id/butStart"
            android:layout_width="wrap_content"
            android:layout_height="wrap_content"
            android:text="开始计时"
            />
        <Button
            android:id="@+id/butStop"
            android:layout_width="wrap_content"
            android:layout_height="wrap_content"
            android:text="停止计时"
            />
        <Button
            android:id="@+id/butReset"
            android:layout_width="wrap_content"
            android:layout_height="wrap_content"
            android:text="复位"
            />
        <Button
            android:id="@+id/butFormat"
            android:layout_width="wrap_content"
            android:layout_height="wrap_content"
            android:text="格式化显示"
            />


    </LinearLayout>

</LinearLayout>
package com.example.chronometerproject;

import android.app.Activity;
import android.os.Bundle;
import android.os.SystemClock;
import android.view.Menu;
import android.view.View;
import android.view.View.OnClickListener;
import android.widget.Button;
import android.widget.Chronometer;

public class ChronometerActivity extends Activity {
    Button butStart,butStop,butReset,butFormat = null;
    Chronometer  myChronometer = null;
	@Override
	protected void onCreate(Bundle savedInstanceState) {
		super.onCreate(savedInstanceState);
		setContentView(R.layout.activity_chronometer);
		butStart = (Button) super.findViewById(R.id.butStart);
		butStop = (Button) super.findViewById(R.id.butStop);
		butReset = (Button) super.findViewById(R.id.butReset);
		butFormat = (Button) super.findViewById(R.id.butFormat);
		myChronometer = (Chronometer) super.findViewById(R.id.myChronometer);
		butStart.setOnClickListener(new OnClickListenerImpl());
		butStop.setOnClickListener(new OnClickListenerImpl());
		butReset.setOnClickListener(new OnClickListenerImpl());
		butFormat.setOnClickListener(new OnClickListenerImpl());
	}

	private class OnClickListenerImpl implements OnClickListener{

		@Override
		public void onClick(View v) {
			switch(v.getId()){
			  case R.id.butStart:
				  ChronometerActivity.this.myChronometer.start();
				  break;
			  case R.id.butStop:
				  ChronometerActivity.this.myChronometer.stop();
				  break;
			  case R.id.butReset:
				  ChronometerActivity.this.myChronometer.setBase(SystemClock.elapsedRealtime());//设置基准时间
			      break;
			  case R.id.butFormat:
				  ChronometerActivity.this.myChronometer.setFormat("新的格式:%s");//格式化
			}

		  }
		}

}
计时器的功能并不复杂,但是可以结合一些系统服务,实现一些有意思的操作。
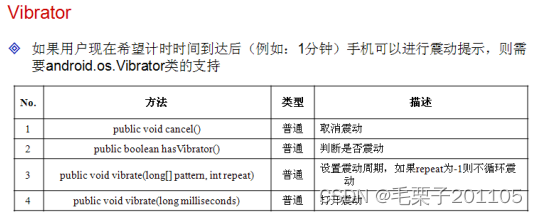
震动必须用真机进行测试。
package com.example.chronometerproject;

import android.app.Activity;
import android.app.Service;
import android.os.Bundle;
import android.os.SystemClock;
import android.os.Vibrator;
import android.view.View;
import android.view.View.OnClickListener;
import android.widget.Button;
import android.widget.Chronometer;
import android.widget.Chronometer.OnChronometerTickListener;

public class ChronometerActivity extends Activity {
    Button butStart,butStop,butReset,butFormat = null;
    Chronometer  myChronometer = null;
    Vibrator vb = null;
	@Override
	protected void onCreate(Bundle savedInstanceState) {
		super.onCreate(savedInstanceState);
		setContentView(R.layout.activity_chronometer);
		butStart = (Button) super.findViewById(R.id.butStart);
		butStop = (Button) super.findViewById(R.id.butStop);
		butReset = (Button) super.findViewById(R.id.butReset);
		butFormat = (Button) super.findViewById(R.id.butFormat);
		myChronometer = (Chronometer) super.findViewById(R.id.myChronometer);
		butStart.setOnClickListener(new OnClickListenerImpl());
		butStop.setOnClickListener(new OnClickListenerImpl());
		butReset.setOnClickListener(new OnClickListenerImpl());
		butFormat.setOnClickListener(new OnClickListenerImpl());
		myChronometer.setOnChronometerTickListener(new OnChronometerTickListener() {

			@Override
			public void onChronometerTick(Chronometer chronometer) {
                      String time = chronometer.getText().toString();
                      if("0:30".equals(time)){
                    	  ChronometerActivity.this.vb.vibrate(new long[]{1000,10,1000,100}, 0);//设置震动周期震动的形式
                      }
			}
		});

		vb = (Vibrator) super.getApplication().getSystemService(Service.VIBRATOR_SERVICE);
	}

	private class OnClickListenerImpl implements OnClickListener{

		@Override
		public void onClick(View v) {
			switch(v.getId()){
			  case R.id.butStart:
				  ChronometerActivity.this.myChronometer.start();
				  break;
			  case R.id.butStop:
				  ChronometerActivity.this.myChronometer.stop();
				  ChronometerActivity.this.vb.cancel();
				  break;
			  case R.id.butReset:
				  ChronometerActivity.this.myChronometer.setBase(SystemClock.elapsedRealtime());//设置基准时间
			      break;
			  case R.id.butFormat:
				  ChronometerActivity.this.myChronometer.setFormat("新的格式:%s");//格式化
			}

		  }
		}

}
手机震动为系统服务,需要获取权限
<uses-permission
        android:name="android.permission.VIBRATE"
        />
2.3 小结
(1)Chronometer可以完成计时器的操作;
(2)如果手机要想完成震动的操作,则可以使用“Service.VIBRATOR_SERVICE ”服务。
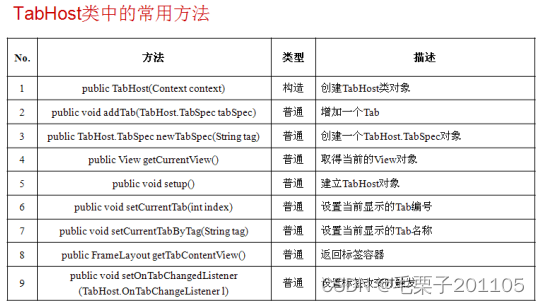
3. 标签:TabHost
3.1 知识点
(1)掌握标签组件的使用,并可以使用标签组件进行程序界面分割;
(2)可以通过配置文件完成标签组件的显示;
(3)可以通过程序完成标签组件的显示。
3.2 具体内容

有了标签之后,在一定的屏幕空间就可以显示更多的内容,在这样的界面中,有多个Tab,多个Tab就组成了一个TabHost。
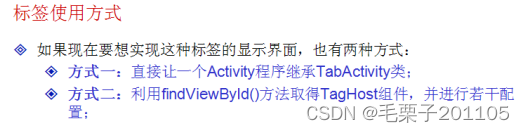
我们先使用第一种方式来完成,注意观察操作形式。
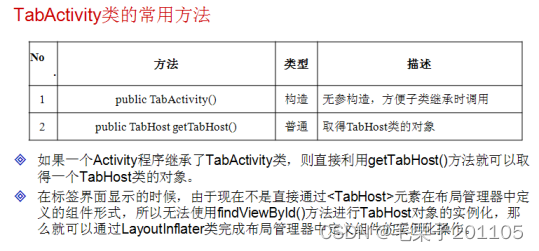
要继TabActivity的原因在于这种Activity提供两个关键的方法可以让我们完成标签页的创建。
<LinearLayout xmlns:android="http://schemas.android.com/apk/res/android"
    xmlns:tools="http://schemas.android.com/tools"
    android:layout_width="match_parent"
    android:layout_height="match_parent"
    android:paddingBottom="@dimen/activity_vertical_margin"
    android:paddingLeft="@dimen/activity_horizontal_margin"
    android:paddingRight="@dimen/activity_horizontal_margin"
    android:paddingTop="@dimen/activity_vertical_margin"
    android:orientation="vertical"
    tools:context=".TabHostActivity" >

    <LinearLayout
        android:id="@+id/tab_edit"
        android:layout_width="match_parent"
        android:layout_height="match_parent"
        android:orientation="vertical"
        >
        <EditText
            android:id="@+id/edt"
            android:layout_width="match_parent"
            android:layout_height="wrap_content"
            android:text="input here..."
            />
        <Button
            android:id="@+id/but"
            android:layout_width="match_parent"
            android:layout_height="wrap_content"
            android:text="Serach"
            />
    </LinearLayout>
    <LinearLayout
        android:id="@+id/tab_clock"
        android:layout_width="match_parent"
        android:layout_height="match_parent"
        android:orientation="vertical"
        >
        <AnalogClock
            android:id="@+id/clock"
            android:layout_width="match_parent"
            android:layout_height="wrap_content"
            />
    </LinearLayout>
    <LinearLayout
        android:id="@+id/tab_sex"
        android:layout_width="match_parent"
        android:layout_height="match_parent"
        android:orientation="vertical"
        >
        <RadioGroup
            android:id="@+id/sex"
            android:layout_width="match_parent"
            android:layout_height="wrap_content"
            android:orientation="vertical"
            android:checkedButton="@+id/woman"
            >
            <RadioButton
                android:id="@+id/man"
                android:layout_width="match_parent"
                android:layout_height="wrap_content"
                android:text="MAN"
                />
             <RadioButton
                android:id="@+id/woman"
                android:layout_width="match_parent"
                android:layout_height="wrap_content"
                android:text="WOMAN"
                />
        </RadioGroup>
    </LinearLayout>
</LinearLayout>
package com.example.tabhostproject;
import android.app.TabActivity;
import android.os.Bundle;
import android.view.LayoutInflater;
import android.view.Menu;
import android.widget.TabHost;
public class TabHostActivity extends TabActivity {
TabHost tabHost = null;
int layRes[]={R.id.tab_edit,R.id.tab_clock,R.id.tab_sex};
@Override
protected void onCreate(Bundle savedInstanceState) {
super.onCreate(savedInstanceState);
this.tabHost = super.getTabHost();
LayoutInflater.from(this).inflate(R.layout.activity_tab_host, //定义要转换的布局管理局
this.tabHost.getTabContentView(),//指定标签添加的容器
true);//实例化布局管理器中的组件
for(int i = 0;i<layRes.length;i++){
TabHost.TabSpec myTab = this.tabHost.newTabSpec("tab"+i);
myTab.setIndicator("标签"+i);//标签文字
myTab.setContent(layRes[i]);
this.tabHost.addTab(myTab);//添加标签
}
}
@Override
public boolean onCreateOptionsMenu(Menu menu) {
// Inflate the menu; this adds items to the action bar if it is present.
getMenuInflater().inflate(R.menu.tab_host, menu);
return true;
}
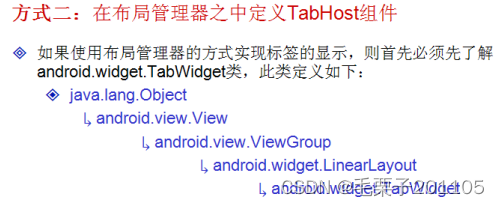
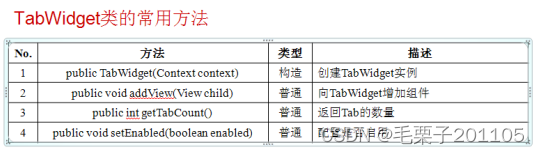
}以上的代码是采用直接集成TabActivity来实现的标签页效果,如果你还继承Activity同时还能实现标签页,那么就需要第二种形式。
package com.example.tabhostproject;

import android.app.Activity;
import android.os.Bundle;
import android.widget.TabHost;

public class TabHostActivity extends Activity {
    TabHost tabHost = null;
    int layRes[]={R.id.tab_edit,R.id.tab_clock,R.id.tab_sex};
	@Override
	protected void onCreate(Bundle savedInstanceState) {
	      super.onCreate(savedInstanceState);
	      super.setContentView(R.layout.tab_host_widget);
	      tabHost = (TabHost) super.findViewById(R.id.tabhost);
	      this.tabHost.setup();//创建TabHost对象
	      for(int i=0;i<layRes.length;i++){
	    	  TabHost.TabSpec myTab = this.tabHost.newTabSpec("tab"+i);
	    	  myTab.setIndicator("标签"+(i+1));//设置标签文字
	    	  myTab.setContent(layRes[i]);
	    	  this.tabHost.addTab(myTab);
	      }
	      this.tabHost.setCurrentTab(0);//设置开始索引
	}
}
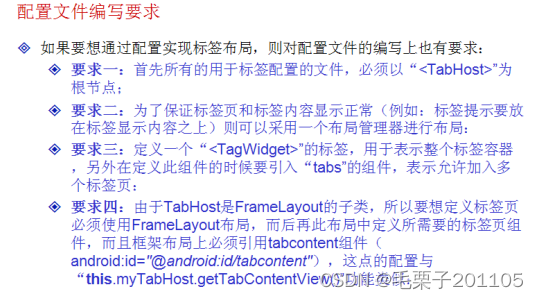
<TabHost
    xmlns:android="http://schemas.android.com/apk/res/android"
    android:id="@+id/tabhost"
    android:layout_width="match_parent"
    android:layout_height="match_parent"
    android:orientation="vertical" >

    <LinearLayout
        android:layout_width="match_parent"
        android:layout_height="match_parent"
        android:orientation="vertical" >

        <TabWidget
            android:id="@android:id/tabs"
            android:layout_width="match_parent"
            android:layout_height="wrap_content" />
            <FrameLayout
                android:id="@android:id/tabcontent"
                android:layout_width="match_parent"
                android:layout_height="match_parent" >

                <LinearLayout
                    android:id="@+id/tab_edit"
                    android:layout_width="match_parent"
                    android:layout_height="wrap_content"
                    android:orientation="vertical" >

                    <EditText
                        android:id="@+id/edt"
                        android:layout_width="match_parent"
                        android:layout_height="wrap_content"
                        android:text="input here..." />

                    <Button
                        android:id="@+id/but"
                        android:layout_width="match_parent"
                        android:layout_height="wrap_content"
                        android:text="Serach" />
                </LinearLayout>

                <LinearLayout
                    android:id="@+id/tab_clock"
                    android:layout_width="match_parent"
                    android:layout_height="wrap_content"
                    android:orientation="vertical" >

                    <AnalogClock
                        android:id="@+id/clock"
                        android:layout_width="match_parent"
                        android:layout_height="wrap_content" />
                </LinearLayout>

                <LinearLayout
                    android:id="@+id/tab_sex"
                    android:layout_width="match_parent"
                    android:layout_height="wrap_content"
                    android:orientation="vertical" >

                    <RadioGroup
                        android:id="@+id/sex"
                        android:layout_width="match_parent"
                        android:layout_height="wrap_content"
                        android:checkedButton="@+id/woman"
                        android:orientation="vertical" >

                        <RadioButton
                            android:id="@+id/man"
                            android:layout_width="match_parent"
                            android:layout_height="wrap_content"
                            android:text="MAN" />

                        <RadioButton
                            android:id="@+id/woman"
                            android:layout_width="match_parent"
                            android:layout_height="wrap_content"
                            android:text="WOMAN" />
                    </RadioGroup>
                </LinearLayout>
            </FrameLayout>
    </LinearLayout>

</TabHost>
我们现在实现了和第一种方式同样的显示效果,现在呢我们想要把标签放到屏幕的下方,那么只需要修改两个地方。
<TabHost
    xmlns:android="http://schemas.android.com/apk/res/android"
    android:id="@+id/tabhost"
    android:layout_width="match_parent"
    android:layout_height="match_parent"
    android:orientation="vertical" >

    <RelativeLayout
        android:layout_width="match_parent"
        android:layout_height="match_parent"
        android:orientation="vertical" >

        <TabWidget
            android:id="@android:id/tabs"
            android:layout_width="match_parent"
            android:layout_height="wrap_content"
            android:layout_alignParentBottom="true"
            />
            <FrameLayout
                android:id="@android:id/tabcontent"
                android:layout_width="match_parent"
                android:layout_height="match_parent" >

                <LinearLayout
                    android:id="@+id/tab_edit"
                    android:layout_width="match_parent"
                    android:layout_height="wrap_content"
                    android:orientation="vertical" >

                    <EditText
                        android:id="@+id/edt"
                        android:layout_width="match_parent"
                        android:layout_height="wrap_content"
                        android:text="input here..." />

                    <Button
                        android:id="@+id/but"
                        android:layout_width="match_parent"
                        android:layout_height="wrap_content"
                        android:text="Serach" />
                </LinearLayout>

                <LinearLayout
                    android:id="@+id/tab_clock"
                    android:layout_width="match_parent"
                    android:layout_height="wrap_content"
                    android:orientation="vertical" >

                    <AnalogClock
                        android:id="@+id/clock"
                        android:layout_width="match_parent"
                        android:layout_height="wrap_content" />
                </LinearLayout>

                <LinearLayout
                    android:id="@+id/tab_sex"
                    android:layout_width="match_parent"
                    android:layout_height="wrap_content"
                    android:orientation="vertical" >

                    <RadioGroup
                        android:id="@+id/sex"
                        android:layout_width="match_parent"
                        android:layout_height="wrap_content"
                        android:checkedButton="@+id/woman"
                        android:orientation="vertical" >

                        <RadioButton
                            android:id="@+id/man"
                            android:layout_width="match_parent"
                            android:layout_height="wrap_content"
                            android:text="MAN" />

                        <RadioButton
                            android:id="@+id/woman"
                            android:layout_width="match_parent"
                            android:layout_height="wrap_content"
                            android:text="WOMAN" />
                    </RadioGroup>
                </LinearLayout>
            </FrameLayout>
    </RelativeLayout>

</TabHost>
3.3 小结
(1)使用Tab标签可以实现程序的分栏显示;
(2)Tab的实现可以通过继承TabActivity类实现也可以通过配置实现;
(3)通过配置实现的Tab较为麻烦。