介绍
本文将探讨生成对抗网络(GANs)及其在图像生成方面的卓越能力。GANs已经彻底改变了生成建模领域,通过对抗性学习为通过创造性的方法来创建新内容提供了创新性的途径。
在本指南中,我们将带你踏上一段迷人的旅程,从 GAN 的基本概念开始,逐步深入研究时尚图像生成的复杂性。通过实际项目和逐步说明,我们将引导你使用TensorFlow和Keras构建和训练自己的GAN模型。
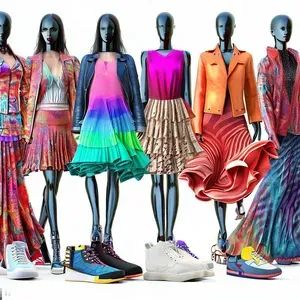
准备好发掘GAN的潜力,见证人工智能在时尚界的魔力。无论你是经验丰富的AI从业者还是好奇的爱好者,“时尚GAN”都将为你提供技能和知识,创造令人惊叹的时尚设计,推动生成艺术的界限。让我们深入探索GANs的迷人世界,释放内心的创造力!
目录
介绍
了解生成对抗网络 (GAN)
项目概述:使用 GAN 生成时尚图像
构建 GAN
构建训练循环
检查性能并测试生成器
其他改进和未来方向
结论
常见问题
了解生成对抗网络 (GAN)
什么是 GAN?
生成对抗网络(GAN)由两个神经网络组成:生成器和判别器。生成器负责创建新的数据样本,而判别器的任务是区分生成器生成的真实数据和假数据。这两个网络通过竞争过程同时进行训练,生成器提高了创建真实样本的能力,而判别器则能够更好地识别真假。
GAN 是如何工作的?
GAN 基于类似游戏的场景,其中生成器和判别器相互对抗。生成器试图创建类似于真实数据的数据,而判别器旨在区分真实数据和虚假数据。生成器通过这种对抗性训练过程学习创建更真实的样本。
GAN 的关键组成部分
为了构建 GAN,我们需要几个基本组件:
生成器:生成新数据样本的神经网络。
判别器:将数据分类为真或假的神经网络。
潜在空间:生成器用作输入来生成样本的随机向量空间。
训练循环:以交替步骤训练生成器和判别器的迭代过程。
GAN 中的损失函数
GAN 训练过程依赖于特定的损失函数。生成器尝试最小化生成器损失,鼓励其创建更真实的数据。同时,判别器的目标是最小化判别器损失,从而更好地区分真实数据和虚假数据。
项目概述:使用 GAN 生成时尚图像
项目目标
在这个项目中,我们的目标是构建一个 GAN 来生成与 Fashion MNIST 数据集中的图像相似的新时尚图像。生成的图像应捕捉各种时尚单品的基本特征,例如连衣裙、衬衫、裤子和鞋子。
数据集:时尚 MNIST
我们将使用 Fashion MNIST 数据集:https://www.tensorflow.org/datasets/catalog/fashion_mnist
这是一个包含时尚商品灰度图像的流行基准数据集。每张图像为 28×28 像素,总共有 10 个类别。
设置项目环境
首先,我们必须设置 Python 环境并安装必要的库,包括 TensorFlow、Matplotlib 和 TensorFlow 数据集。
构建 GAN
导入依赖项和数据
首先,我们必须安装并导入必要的库,并加载包含时尚图像集合的 Fashion MNIST 数据集。我们将使用这个数据集来训练我们的人工智能模型来生成新的时尚图像。
# Install required packages (only need to do this once)
!pip install tensorflow tensorflow-gpu matplotlib tensorflow-datasets ipywidgets
!pip list

# Import necessary libraries
import tensorflow as tf
from tensorflow.keras.models import Sequential
from tensorflow.keras.layers import Conv2D, Dense, Flatten, Reshape, LeakyReLU, Dropout, UpSampling2D
import tensorflow_datasets as tfds
from matplotlib import pyplot as plt

# Configure TensorFlow to use GPU for faster computation
gpus = tf.config.experimental.list_physical_devices('GPU')
for gpu in gpus:
    tf.config.experimental.set_memory_growth(gpu, True)

# Load the Fashion MNIST dataset
ds = tfds.load('fashion_mnist', split='train')
可视化数据并构建数据集
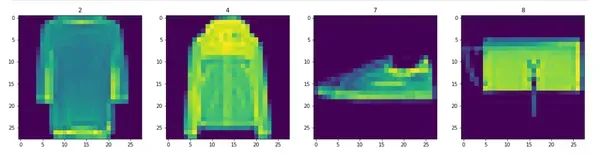
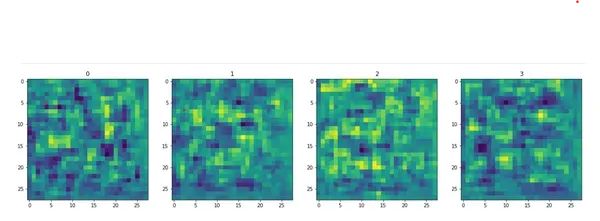
接下来,我们将可视化 Fashion MNIST 数据集中的示例图像并准备数据管道。我们将执行数据转换并创建批量图像来训练 GAN。
# Data Transformation: Scale and Vizualize Images
import numpy as np

# Setup data iterator
dataiterator = ds.as_numpy_iterator()

# Visualize some images from the dataset
fig, ax = plt.subplots(ncols=4, figsize=(20, 20))

# Loop four times and get images
for idx in range(4):
    # Grab an image and its label
    sample = dataiterator.next()
    image = np.squeeze(sample['image'])  # Remove the single-dimensional entries
    label = sample['label']

    # Plot the image using a specific subplot
    ax[idx].imshow(image)
    ax[idx].title.set_text(label)

# Data Preprocessing: Scale and Batch the Images
def scale_images(data):
    # Scale the pixel values of the images between 0 and 1
    image = data['image']
    return image / 255.0

# Reload the dataset
ds = tfds.load('fashion_mnist', split='train')

# Apply the scale_images preprocessing step to the dataset
ds = ds.map(scale_images)

# Cache the dataset for faster processing during training
ds = ds.cache()

# Shuffle the dataset to add randomness to the training process
ds = ds.shuffle(60000)

# Batch the dataset into smaller groups (128 images per batch)
ds = ds.batch(128)

# Prefetch the dataset to improve performance during training
ds = ds.prefetch(64)

# Check the shape of a batch of images
ds.as_numpy_iterator().next().shape
在这一步中,我们首先使用matplotlib库可视化数据集中的四张随机时尚图像。这有助于我们了解图像的外观,以及我们希望我们的AI模型学习到什么样的内容。
在可视化图像之后,我们进行数据预处理。我们将图像的像素值缩放到0和1之间,这有助于AI模型更好地学习。可以将其想象为调整图像的亮度以适合学习。
接下来,我们将图像分批成每组128张(一个批次),以训练我们的AI模型。可以将批次想象为将一个大任务分成更小、可管理的块。
我们还对数据集进行洗牌,添加一些随机性,这样AI模型就不会按固定顺序学习图像。
最后,我们预取数据,为AI模型的学习过程做准备,使其运行更快、更高效。
在这一步的最后,我们已经可视化了一些时尚图像,并且我们的数据集已经准备好并组织好,可以用来训练AI模型。现在,我们已经准备好进入下一步,即构建生成新时尚图像的神经网络。
构建生成器
生成器对于GAN非常重要,它负责创建新的时尚图像。我们将使用TensorFlow的Sequential API来设计生成器,其中包括Dense、LeakyReLU、Reshape和Conv2DTranspose等层。
# Import the Sequential API for building models
from tensorflow.keras.models import Sequential

# Import the layers required for the neural network
from tensorflow.keras.layers import (
    Conv2D, Dense, Flatten, Reshape, LeakyReLU, Dropout, UpSampling2D
)
def build_generator():
    model = Sequential()

    # First layer takes random noise and reshapes it to 7x7x128
    # This is the beginning of the generated image
    model.add(Dense(7 * 7 * 128, input_dim=128))
    model.add(LeakyReLU(0.2))
    model.add(Reshape((7, 7, 128)))

    # Upsampling block 1
    model.add(UpSampling2D())
    model.add(Conv2D(128, 5, padding='same'))
    model.add(LeakyReLU(0.2))

    # Upsampling block 2
    model.add(UpSampling2D())
    model.add(Conv2D(128, 5, padding='same'))
    model.add(LeakyReLU(0.2))

    # Convolutional block 1
    model.add(Conv2D(128, 4, padding='same'))
    model.add(LeakyReLU(0.2))

    # Convolutional block 2
    model.add(Conv2D(128, 4, padding='same'))
    model.add(LeakyReLU(0.2))

    # Convolutional layer to get to one channel
    model.add(Conv2D(1, 4, padding='same', activation='sigmoid'))

    return model

# Build the generator model
generator = build_generator()
# Display the model summary
generator.summary()
生成器是一个深度神经网络,负责生成虚假的时尚图像。它以随机噪声作为输入,其输出是一个28×28的灰度图像,看起来像是一件时尚物品。目标是学习如何生成类似于真实时尚物品的图像。
模型的几个层次
该模型由几个层组成:
全连接层(Dense Layer):第一层接收大小为128的随机噪声,并将其重新调整为7x7x128的张量。这创造了生成图像的初始结构。
上采样块(Upsampling Blocks):这些块使用 UpSampling2D 层逐渐增加图像的分辨率,然后是卷积层和LeakyReLU激活函数。UpSampling2D层使图像在两个维度上的分辨率加倍。
卷积块(Convolutional Blocks):这些块进一步改进了生成的图像。它们由带有LeakyReLU激活函数的卷积层组成。
卷积层(Convolutional Layer):最后的卷积层将通道减少为一个,有效地创建了具有Sigmoid激活函数的输出图像,以将像素值缩放在0到1之间。
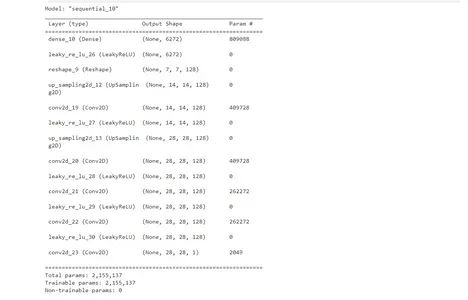
在此步骤结束时,我们将拥有一个能够生成假时尚图像的生成器模型。该模型现已准备好在流程的后续步骤中进行训练。
构建判别器
从生成对抗网络(GANs)的基本概念开始,逐渐深入探讨时尚图像生成的复杂性。通过实际项目和逐步说明,我们将引导你使用TensorFlow和Keras构建和训练自己的GAN模型。
判别器在区分真实图像和虚假图像方面起着关键作用。我们将使用TensorFlow的Sequential API设计判别器,其中包括Conv2D、LeakyReLU、Dropout和Dense等层。
def build_discriminator():
model = Sequential()
# First Convolutional Block
model.add(Conv2D(32, 5, input_shape=(28, 28, 1)))
model.add(LeakyReLU(0.2))
model.add(Dropout(0.4))
# Second Convolutional Block
model.add(Conv2D(64, 5))
model.add(LeakyReLU(0.2))
model.add(Dropout(0.4))
# Third Convolutional Block
model.add(Conv2D(128, 5))
model.add(LeakyReLU(0.2))
model.add(Dropout(0.4))
# Fourth Convolutional Block
model.add(Conv2D(256, 5))
model.add(LeakyReLU(0.2))
model.add(Dropout(0.4))
# Flatten the output and pass it through a dense layer
model.add(Flatten())
model.add(Dropout(0.4))
model.add(Dense(1, activation='sigmoid'))
return model
# Build the discriminator model
discriminator = build_discriminator()
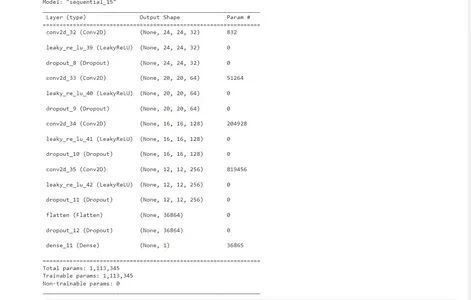
# Display the model summary
discriminator.summary()判别器也是一个深度神经网络,用于分类输入图像是真还是假。它输入一张28×28的灰度图像,输出一个二进制值(1为真,0为假)。
该模型由几个层组成:
卷积块:这些块使用卷积层处理输入图像,然后是 LeakyReLU 激活和 dropout 层。dropout 层通过在训练期间随机丢弃一些神经元来防止过度拟合。
扁平化和密集层:最后一个卷积块的输出被扁平化为一维向量,并通过具有 sigmoid 激活的密集层。sigmoid 激活将输出压缩在 0 和 1 之间,表示图像为真实图像的概率。
在此步骤结束时,我们将拥有一个能够对输入图像是真还是假进行分类的判别器模型。该模型现在已准备好集成到 GAN 架构中并在后续步骤中进行训练。
构建训练循环
设置损失和优化器
在构建训练循环之前,我们需要定义用于训练生成器和判别器的损失函数和优化器。
# Import the Adam optimizer and Binary Cross Entropy loss function
from tensorflow.keras.optimizers import Adam
from tensorflow.keras.losses import BinaryCrossentropy

# Define the optimizers for the generator and discriminator
g_opt = Adam(learning_rate=0.0001)  # Generator optimizer
d_opt = Adam(learning_rate=0.00001)  # Discriminator optimizer

# Define the loss functions for the generator and discriminator
g_loss = BinaryCrossentropy()  # Generator loss function
d_loss = BinaryCrossentropy()  # Discriminator loss function
我们对生成器和判别器都使用 Adam 优化器。Adam 是一种高效的优化算法,可以在训练期间调整学习率。
对于损失函数,我们使用二元交叉熵。这个损失函数通常用于二元分类问题,适合我们的判别器的二元分类任务(真实与假)。
构建子类模型
接下来,我们将构建一个子类模型,将生成器和判别器模型组合成单个 GAN 模型。这个子类模型将在训练循环中训练 GAN。
from tensorflow.keras.models import Model

class FashionGAN(Model):
    def __init__(self, generator, discriminator, *args, **kwargs):
        # Pass through args and kwargs to the base class
        super().__init__(*args, **kwargs)

        # Create attributes for generator and discriminator models
        self.generator = generator
        self.discriminator = discriminator

    def compile(self, g_opt, d_opt, g_loss, d_loss, *args, **kwargs):
        # Compile with the base class
        super().compile(*args, **kwargs)

        # Create attributes for optimizers and loss functions
        self.g_opt = g_opt
        self.d_opt = d_opt
        self.g_loss = g_loss
        self.d_loss = d_loss

    def train_step(self, batch):
        # Get the data for real images
        real_images = batch
        # Generate fake images using the generator with random noise as input
        fake_images = self.generator(tf.random.normal((128, 128, 1)), training=False)

        # Train the discriminator
        with tf.GradientTape() as d_tape:
            # Pass real and fake images through the discriminator model
            yhat_real = self.discriminator(real_images, training=True)
            yhat_fake = self.discriminator(fake_images, training=True)
            yhat_realfake = tf.concat([yhat_real, yhat_fake], axis=0)

            # Create labels for real and fake images
            y_realfake = tf.concat([tf.zeros_like(yhat_real), tf.ones_like(yhat_fake)], axis=0)

            # Add some noise to the true outputs to make training more robust
            noise_real = 0.15 * tf.random.uniform(tf.shape(yhat_real))
            noise_fake = -0.15 * tf.random.uniform(tf.shape(yhat_fake))
            y_realfake += tf.concat([noise_real, noise_fake], axis=0)

            # Calculate the total discriminator loss
            total_d_loss = self.d_loss(y_realfake, yhat_realfake)

        # Apply backpropagation and update discriminator weights
        dgrad = d_tape.gradient(total_d_loss, self.discriminator.trainable_variables)
        self.d_opt.apply_gradients(zip(dgrad, self.discriminator.trainable_variables))

        # Train the generator
        with tf.GradientTape() as g_tape:
            # Generate new images using the generator with random noise as input
            gen_images = self.generator(tf.random.normal((128, 128, 1)), training=True)

            # Create the predicted labels (should be close to 1 as they are fake images)
            predicted_labels = self.discriminator(gen_images, training=False)

            # Calculate the total generator loss (tricking the discriminator to classify the fake images as real)
            total_g_loss = self.g_loss(tf.zeros_like(predicted_labels), predicted_labels)

        # Apply backpropagation and update generator weights
        ggrad = g_tape.gradient(total_g_loss, self.generator.trainable_variables)
        self.g_opt.apply_gradients(zip(ggrad, self.generator.trainable_variables))

        return {"d_loss": total_d_loss, "g_loss": total_g_loss}

# Create an instance of the FashionGAN model
fashgan = FashionGAN(generator, discriminator)

# Compile the model with the optimizers and loss functions
fashgan.compile(g_opt, d_opt, g_loss, d_loss)
我们创建一个子类 FashionGAN 模型来扩展 tf.keras.models.Model 类。这个子类模型将处理 GAN 的训练过程。
在train_step方法中,我们定义了GAN的训练循环:
我们首先从批次中获取真实图像,并使用随机噪声作为输入的生成器模型生成假图像。
然后,我们训练判别器:
我们使用梯度带来计算判别器关于真实和虚假图像的损失。目标是让判别器将真实图像分类为 1,将假图像分类为 0。
我们在真实输出中添加一些噪声,以使训练更加稳健并且不容易过度拟合。
判别器总损失计算为预测标签和目标标签之间的二元交叉熵。
我们应用反向传播根据计算的损失来更新判别器的权重。
接下来,我们训练生成器:
我们使用生成器以随机噪声作为输入生成新的假图像。
我们将总生成器损失计算为预测标签(生成的图像)和目标标签(0,代表假图像)之间的二元交叉熵。
生成器的目的是通过生成判别器分类为真实的图像(标签接近 1)来“欺骗”判别器。
我们应用反向传播根据计算出的损失来更新生成器的权重。
最后,我们返回该训练步骤中判别器和生成器的总损失。
FashionGAN 模型现在已准备好在下一步中使用训练数据集进行训练。
构建回调函数
TensorFlow 中的回调是可以在训练期间的特定点(例如纪元结束)执行的函数。我们将创建一个名为 ModelMonitor 的自定义回调,以在每个 epoch 结束时生成并保存图像,以监控 GAN 的进度。
import os
from tensorflow.keras.preprocessing.image import array_to_img
from tensorflow.keras.callbacks import Callback

class ModelMonitor(Callback):
    def __init__(self, num_img=3, latent_dim=128):
        self.num_img = num_img
        self.latent_dim = latent_dim

    def on_epoch_end(self, epoch, logs=None):
        # Generate random latent vectors as input to the generator
        random_latent_vectors = tf.random.uniform((self.num_img, self.latent_dim, 1))
        # Generate fake images using the generator
        generated_images = self.model.generator(random_latent_vectors)
        generated_images *= 255
        generated_images.numpy()
        for i in range(self.num_img):
            # Save the generated images to disk
            img = array_to_img(generated_images[i])
            img.save(os.path.join('images', f'generated_img_{epoch}_{i}.png'))
ModelMonitor 回调采用两个参数:num_img(指定在每个 epoch 结束时生成和保存的图像数量)和 Latent_dim(用作生成器输入的随机噪声向量的维度)。
在 on_epoch_end 方法期间,回调生成 num_img 随机潜在向量并将它们作为输入传递给生成器。然后生成器根据这些随机向量生成假图像。
生成的图像缩放至 0-255 范围,并以 PNG 文件形式保存在“images”目录中。文件名包含epoch号,以跟踪一段时间内的进度。
训练 GAN
现在我们已经设置了 GAN 模型和自定义回调,我们可以使用 fit 方法开始训练过程。我们将训练 GAN 足够多的时期,以使生成器和判别器能够收敛并相互学习。
# Train the GAN model
hist = fashgan.fit(ds, epochs=20, callbacks=[ModelMonitor()])
我们使用FashionGAN模型的fit方法来训练GAN。
我们将 epoch 数设置为 20(你可能需要更多 epoch 才能获得更好的结果)。
我们通过 ModelMonitor 回调来保存每个时期结束时生成的图像。
训练过程将迭代数据集,并且对于每个批次,它将使用之前定义的训练循环来更新生成器和判别器模型的权重。
训练过程可能需要一些时间,具体取决于你的硬件和时期数。训练后,我们可以通过绘制判别器和生成器损失来回顾 GAN 的性能。这将帮助我们了解模型的训练情况以及是否存在任何收敛或模式崩溃的迹象。让我们继续下一步,检查一下 GAN 的性能。
检查性能并测试生成器
审查表现
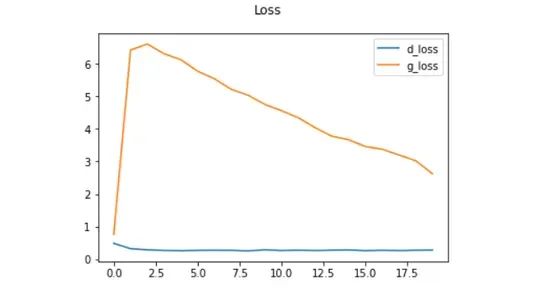
在训练完GAN之后,我们可以通过绘制鉴别器和生成器在训练时期内的损失来回顾其性能。这将帮助我们了解GAN学习得如何以及是否存在任何问题,比如模式崩溃或不稳定的训练。
import matplotlib.pyplot as plt

# Plot the discriminator and generator losses
plt.suptitle('Loss')
plt.plot(hist.history['d_loss'], label='d_loss')
plt.plot(hist.history['g_loss'], label='g_loss')
plt.legend()
plt.show()
我们使用 matplotlib 绘制训练时期的判别器和生成器损失。
x 轴代表 epoch 数,y 轴代表相应的损失。
理想情况下,随着 GAN 的学习,判别器损失 (d_loss) 和生成器损失 (g_loss) 应逐渐减少。
测试生成器
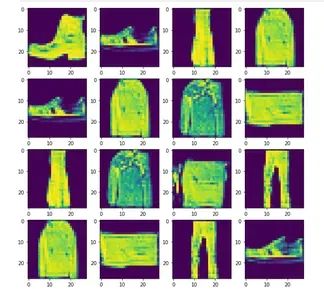
训练 GAN 并检查其性能后,我们可以通过生成和可视化新的时尚图像来测试生成器。首先,我们将加载经过训练的生成器的权重并使用它来生成新图像。
# Load the weights of the trained generator
generator.load_weights('generator.h5')

# Generate new fashion images
imgs = generator.predict(tf.random.normal((16, 128, 1)))

# Plot the generated images
fig, ax = plt.subplots(ncols=4, nrows=4, figsize=(10, 10))
for r in range(4):
    for c in range(4):
        ax[r][c].imshow(imgs[(r + 1) * (c + 1) - 1])
我们使用 generator.load_weights('generator.h5') 从保存的文件中加载经过训练的生成器的权重。
我们通过将随机潜在向量传递给生成器来生成新的时尚图像。生成器解释这些随机向量并生成相应的图像。
我们使用 matplotlib 在 4×4 网格中显示生成的图像。
保存模型
最后,如果你对 GAN 的性能感到满意,你可以保存生成器和判别器模型以供将来使用。
# Save the generator and discriminator models
generator.save('generator.h5')
discriminator.save('discriminator.h5')
我们使用 save 方法将生成器和判别器模型保存到磁盘。
模型将分别保存在当前工作目录中,文件名为“generator.h5”和“discriminator.h5”。
保存模型允许你稍后使用它们来生成更多时尚图像或继续训练过程。
使用 TensorFlow 和 Keras 构建和训练 GAN 以生成时尚图像的过程就到此结束了!GAN 是用于生成真实数据的强大模型,并且可以应用于其他任务。
请记住,生成图像的质量取决于 GAN 的架构、训练周期数、数据集大小和其他超参数。请随意尝试和微调 GAN 以取得更好的结果。
其他改进和未来方向
恭喜你完成了生成时尚图像的 GAN!现在,让我们探索一些你可以考虑的其他改进和未来方向,以增强 GAN 的性能并生成更加真实和多样化的时尚图像。
超参数调优
调整超参数可以显着影响 GAN 的性能。尝试不同的学习率、批量大小、训练周期数以及生成器和判别器的架构配置。超参数调整对于 GAN 训练至关重要,因为它可以带来更好的收敛性和更稳定的结果。
使用渐进式增长
渐进式增长技术开始使用低分辨率图像训练 GAN,并在训练过程中逐渐提高图像分辨率。这种方法有助于稳定训练并产生更高质量的图像。实施渐进式增长可能会更加复杂,但通常会带来更好的结果。
实施 Wasserstein GAN (WGAN)
考虑使用带有梯度惩罚的 Wasserstein GAN (WGAN),而不是标准 GAN 损失。WGAN 可以在优化过程中提供更稳定的训练和更好的梯度。这可以提高收敛性并减少模式崩溃。
数据增强
将数据增强技术应用于训练数据集。这可以包括随机旋转、翻转、平移和其他变换。数据增强有助于 GAN 更好地泛化,并可以防止过度拟合训练集。
包括标签信息
如果你的数据集包含标签信息(例如,服装类别),你可以尝试在训练期间根据标签信息调节 GAN。这意味着为生成器和判别器提供有关服装类型的附加信息,这可以帮助 GAN 生成更多特定类别的时尚图像。
使用预训练的判别器
使用预训练的判别器有助于加速训练并稳定 GAN。你可以独立使用时尚 MNIST 数据集在分类任务上训练判别器,然后使用此预训练判别器作为 GAN 训练的起点。
收集更大、更多样化的数据集
GAN 通常在更大、更多样化的数据集上表现更好。考虑收集或使用包含更多种时尚风格、颜色和图案的更大数据集。更多样化的数据集可以生成更多样化和更真实的图像。
探索不同的架构
尝试不同的生成器和判别器架构。GAN 有很多变体,例如 DCGAN(深度卷积 GAN)、CGAN(条件 GAN)和 StyleGAN。每种架构都有其优点和缺点,尝试不同的模型可以提供宝贵的见解,了解什么最适合你的特定任务。
使用迁移学习
如果你可以访问预先训练的 GAN 模型,则可以将它们用作时尚 GAN 的起点。微调预训练的 GAN 可以节省时间和计算资源,同时取得良好的结果。
监控模式崩溃
当生成器仅产生少数几种类型的图像时,就会发生模式崩溃。观察生成的样本以寻找模式崩溃的迹象,并根据需要调整训练过程。
构建和训练 GAN 是一个迭代过程,要获得令人印象深刻的结果通常需要进行实验和微调。不断探索、学习和调整你的 GAN,以生成更好的时尚图像!
我们使用 TensorFlow 和 Keras 创建时尚图像 GAN 的旅程到此结束。请随意探索其他 GAN 应用,例如生成艺术、人脸或 3D 对象。GAN 彻底改变了生成建模领域,并继续成为人工智能社区令人兴奋的研究和开发领域。祝你未来的 GAN 项目一切顺利!
结论
总之,生成对抗网络(GAN)代表了人工智能领域的一项尖端技术,彻底改变了合成数据样本的创建。通过本指南,我们对 GAN 有了深入的了解,并成功构建了一个非凡的项目:用于生成时尚图像的 GAN。
关键点
GAN:GAN 由两个神经网络(生成器和判别器)组成,它们使用对抗性训练来创建真实的数据样本。
项目目标:我们的目标是开发一个能够生成类似于时尚MNIST数据集中图像的GAN。
数据集:时尚MNIST数据集包含了时尚物品的灰度图像,为我们的时尚图像生成器提供了基础。
构建 GAN:我们使用 TensorFlow 的 Sequential API 构建了生成器和判别器,并结合了 Dense、Conv2D 和 LeakyReLU 等层。
GAN 训练循环:我们采用了精心设计的训练循环来迭代优化生成器和判别器。
改进:我们探索了几种增强 GAN 性能的技术,包括超参数调整、渐进式增长、Wasserstein GAN、数据增强和条件 GAN。
评估:我们讨论了 Inception Score 和 FID 等评估指标,以客观地评估生成的时尚图像的质量。
微调和迁移学习:通过微调生成器并利用预训练模型,我们的目标是实现更加多样化和真实的时尚图像生成。
未来方向:GAN 有无数的进一步改进和研究的机会,包括超参数优化、渐进式增长、Wasserstein GAN 等等。
总之,这份综合指南为理解 GAN、其训练的复杂性以及如何将其应用于时尚图像生成提供了坚实的基础。我们通过探索各种技术和进步展示了创建复杂且真实的人工数据的潜力。随着 GAN 的发展,它们有望改变各个行业,包括艺术、设计、医疗保健等。拥抱 GAN 的创新力量,并探索其无限的可能性,是令人兴奋的,无疑将塑造人工智能的未来。
常见问题
Q1. 什么是 GAN,它们是如何工作的?
A1. GAN(生成对抗网络)是一类人工智能模型,由两个神经网络(生成器和判别器)组成。生成器的目的是产生真实的数据样本,而判别器的任务是区分真实数据和生成器生成的合成数据。两个网络都参与对抗性训练过程,从彼此的错误中学习,从而使生成器随着时间的推移提高其创建更真实数据的能力。
Q2. 你如何评估 GAN 生成的数据的质量?
A2. 评估 GAN 生成的数据的质量可能具有挑战性。两个标准指标是:
Inception 分数(IS):衡量生成图像的质量和多样性。
Fréchet Inception Distance (FID):量化生成数据与真实数据分布之间的相似度。
Q3. GAN 有哪些挑战?
A3. 由于以下原因,GAN 训练可能不稳定且具有挑战性:
模式崩溃:生成器可能会产生有限的变化,重点关注目标分布的几种模式。
梯度消失:当生成器和判别器相差太大时,梯度可能会消失,从而阻碍学习。
超参数敏感性:微调超参数至关重要,微小的变化可能会显着影响结果。
Q4. GAN 可以用于数据隐私或数据增强吗?
A4. 是的,GAN 可以生成合成数据来扩充数据集,从而减少对大量准确数据的需求。GAN 生成的数据还可以通过为敏感数据提供合成替代方案来保护隐私。
☆ END ☆
如果看到这里,说明你喜欢这篇文章,请转发、点赞。微信搜索「uncle_pn」,欢迎添加小编微信「 woshicver」,每日朋友圈更新一篇高质量博文。
↓扫描二维码添加小编↓