一、背景
顾名思义,插件化开发就是将某个功能代码封装为一个插件模块,通过插件中心的配置来下载、激活、禁用、或者卸载,主程序无需再次重启即可获取新的功能,从而实现快速集成。当然,实现这样的效果,必须遵守一些插件接口的标准,不能与已有的功能冲突。目前能支持插件化开发的成熟框架很多,但本文仅从思路的实现角度,从0到1实现简单的插件化开发框架。


二、实现思路
思路:定义插件接口 -> 实现插件接口 -> 通过反射机制加载插件 -> 调用插件方法。
开发语言:支持反射机制的所有高级语言均可实现插件式开发,或有 FFI 调用 Native 函数的编程语言。
三、Java 通过反射机制实现插件化开发
1、创建插件接口

定义插件接口:一个执行方法
package service;

/**
 * 通用插件接口
 *
 * @author yushanma
 * @since 2023/3/5 16:36
 */
public interface IPluginService {
    /**
     * 执行插件
     */
    public void run();
}
2、实现插件接口
package impl;
import service.IPluginService;

/**
 * 打印插件
 *
 * @author yushanma
 * @since 2023/3/5 16:37
 */
public class MyPrinterPlugin implements IPluginService {

    @Override
    public void run() {
        System.out.println("执行插件方法...");
    }
}

3、插件中心
管理与加载插件。
Step 1、插件实体类封装
package entity;

import lombok.Data;

/**
 * 插件实体类
 *
 * @author yushanma
 * @since 2023/3/5 16:44
 */
@Data
public class PluginEntity {
    /**
     * 插件名
     */
    private String pluginName;

    /**
     * 插件路径
     */
    private String jarPath;

    /**
     * 字节码名字
     */
    private String className;
}
需要获取插件名、插件实现的Jar包路径、字节码路径

Step 2、通过反射机制实现插件实例化
package loader;

import entity.PluginEntity;
import exception.PluginException;
import lombok.Data;
import lombok.NoArgsConstructor;
import service.IPluginService;

import java.io.File;
import java.net.URL;
import java.net.URLClassLoader;
import java.util.HashMap;
import java.util.List;
import java.util.Map;

/**
 * 插件管理器
 *
 * @author yushanma
 * @since 2023/3/5 16:44
 */
@Data
@NoArgsConstructor
public class PluginManager {
    private Map<String, Class<?>> clazzMap = new HashMap<>();

    public PluginManager(List<PluginEntity> plugins) throws PluginException {
        initPlugins(plugins);
    }

    public void initPlugin(PluginEntity plugin) throws PluginException {
        try {
            //URL url = new URL("file:" + plugin.getJarPath());
            URL url = new File(plugin.getJarPath()).toURI().toURL();
            URLClassLoader classLoader = new URLClassLoader(new URL[]{url});
            Class<?> clazz = classLoader.loadClass(plugin.getClassName());
            clazzMap.put(plugin.getClassName(), clazz);
        } catch (Exception e) {
            throw new PluginException("plugin " + plugin.getPluginName() + " init error: >>> " + e.getMessage());
        }
    }

    public void initPlugins(List<PluginEntity> plugins) throws PluginException {
        for (PluginEntity plugin : plugins) {
            initPlugin(plugin);
        }
    }

    public IPluginService getInstance(String className) throws PluginException {
        Class<?> clazz = clazzMap.get(className);
        Object instance = null;
        try {
            instance = clazz.newInstance();
        } catch (Exception e) {
            throw new PluginException("plugin " + className + " instantiate error," + e.getMessage());
        }
        return (IPluginService) instance;
    }
}
Step 3、通过 XML 文件来配置管理插件
        <dependency>
            <groupId>org.dom4j</groupId>
            <artifactId>dom4j</artifactId>
            <version>2.1.1</version>
        </dependency>
package conf;
import entity.PluginEntity;
import exception.PluginException;
import org.dom4j.Document;
import org.dom4j.Element;
import org.dom4j.io.SAXReader;
import java.io.File;
import java.util.ArrayList;
import java.util.List;
/**
* 解析 XML 插件配置
*
* @author yushanma
* @since 2023/3/5 16:44
*/
public class PluginXmlParser {
public static List<PluginEntity> getPluginList() throws PluginException {
List<PluginEntity> list = new ArrayList<>();
SAXReader saxReader = new SAXReader();
Document document = null;
try {
document = saxReader.read(new File("src/main/resources/plugin.xml"));
} catch (Exception e) {
throw new PluginException("read plugin.xml error," + e.getMessage());
}
Element root = document.getRootElement();
List<?> plugins = root.elements("plugin");
for (Object pluginObj : plugins) {
Element pluginEle = (Element) pluginObj;
PluginEntity plugin = new PluginEntity();
plugin.setPluginName(pluginEle.elementText("name"));
plugin.setJarPath(pluginEle.elementText("jar"));
plugin.setClassName(pluginEle.elementText("class"));
list.add(plugin);
}
return list;
}
}
<!-- plugin.xml -->
<?xml version="1.0" encoding="UTF-8"?>
<plugins>
    <plugin>
        <name>测试插件</name>
        <jar>plugins/PrinterPlugin-1.0-SNAPSHOT.jar</jar>
        <class>impl.MyPrinterPlugin</class>
    </plugin>
    <plugin>
        <name>测试插件</name>
        <jar>plugins/PrinterPlugin-1.0-SNAPSHOT.jar</jar>
        <class>impl.MyPrinterPlugin</class>
    </plugin>
</plugins>
Step 4、解析 XML 文件并加载插件
package loader;

import conf.PluginXmlParser;
import entity.PluginEntity;
import exception.PluginException;
import service.IPluginService;

import java.util.List;

/**
 * 插件加载器
 *
 * @author yushanma
 * @since 2023/3/5 16:44
 */
public class PluginLoader {

    public void run() throws PluginException {
        // 从配置文件加载插件
        List<PluginEntity> pluginList = PluginXmlParser.getPluginList();
        PluginManager pluginManager = new PluginManager(pluginList);

        for (PluginEntity plugin : pluginList) {
            IPluginService pluginService = pluginManager.getInstance(plugin.getClassName());
            System.out.println("开始执行[" + plugin.getPluginName() + "]插件...");
            // 调用插件
            pluginService.run();
            System.out.println("[" + plugin.getPluginName() + "]插件执行完成");
        }

        // 动态加载插件
//        PluginEntity plugin = new PluginEntity();
//        plugin.setPluginName("");
//        plugin.setJarPath("");
//        plugin.setClassName("");
//        pluginManager.initPlugin(plugin);
//        IPluginService pluginService = pluginManager.getInstance("");
//        pluginService.run();
    }
}
4、测试效果
import exception.PluginException;
import loader.PluginLoader;

/**
 * desc
 *
 * @author yushanma
 * @since 2023/3/5 16:44
 */
public class DemoMain {
    public static void main(String[] args) throws PluginException {
        PluginLoader loader = new PluginLoader();
        loader.run();
    }
}

四、Rust 通过 libloader 库实现插件化开发
通过 libloader 库可以调用动态链接库函数,需要 FFI 支持。
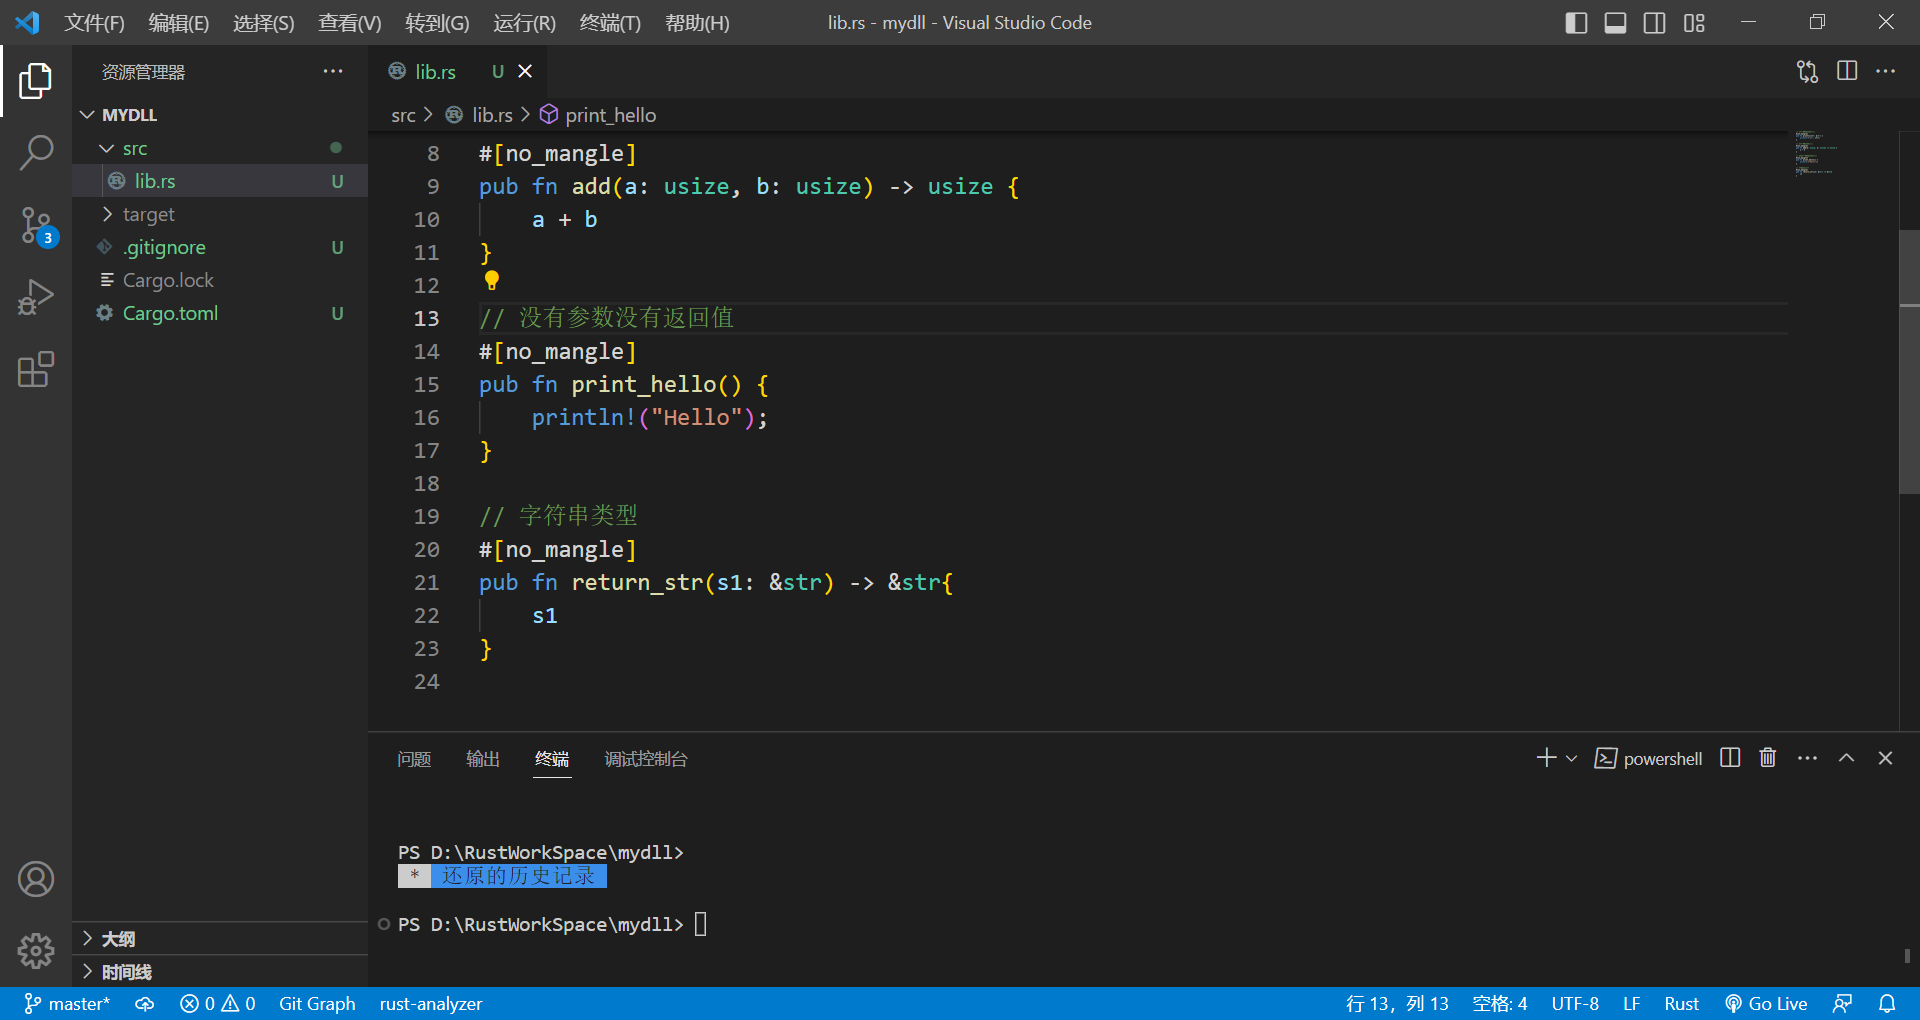
Step 1、创建 lib
cargo new --lib mydll// 有参数没有返回值
#[no_mangle]
pub fn println(str: &str) {
println!("{}", str);
}
// 有参数有返回值
#[no_mangle]
pub fn add(a: usize, b: usize) -> usize {
a + b
}
// 没有参数没有返回值
#[no_mangle]
pub fn print_hello() {
println!("Hello");
}
// 字符串类型
#[no_mangle]
pub fn return_str(s1: &str) -> &str{
s1
}
Step 2、toml 配置编译类型
[package]
name = "mydll"
version = "0.1.0"
edition = "2021"

# See more keys and their definitions at https://doc.rust-lang.org/cargo/reference/manifest.html

[dependencies]


# rlib:Rust库,这是cargo new默认的种类,只能被Rust调用;
# dylib:Rust规范的动态链接库,windows上编译成.dll,linux上编译成.so,也只能被Rust调用;
# cdylib:满足C语言规范的动态链接库,windows上编译成.dll,linux上编译成.so,可以被其他语言调用
# staticlib:静态库,windows上编译成.lib,linux上编译成.a,可以被其他语言调用

[lib]
crate-type = ["cdylib"]
Step 3、编译为 dll
cargo build
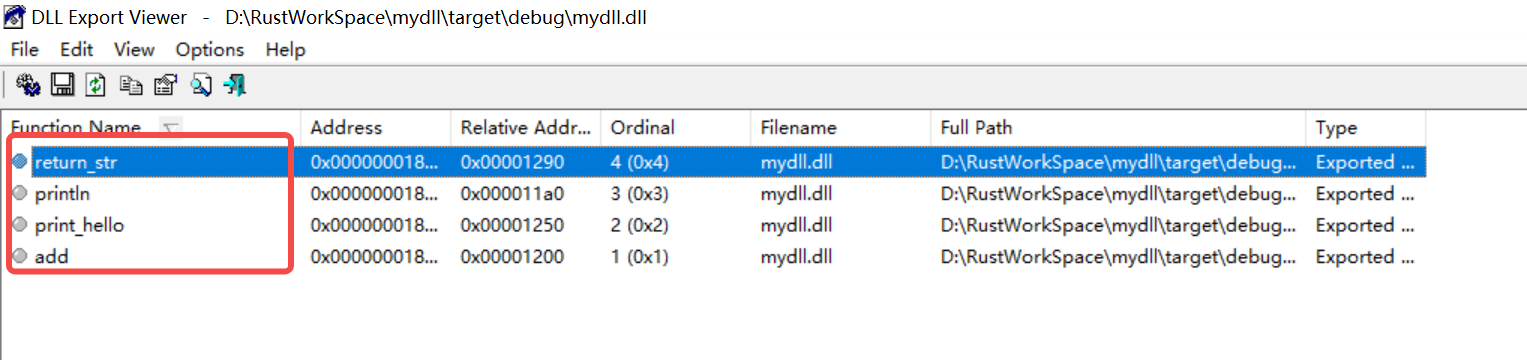
可以看到,所有的函数都被正常导出,具体原理请参考:https://fasterthanli.me/articles/so-you-want-to-live-reload-rust
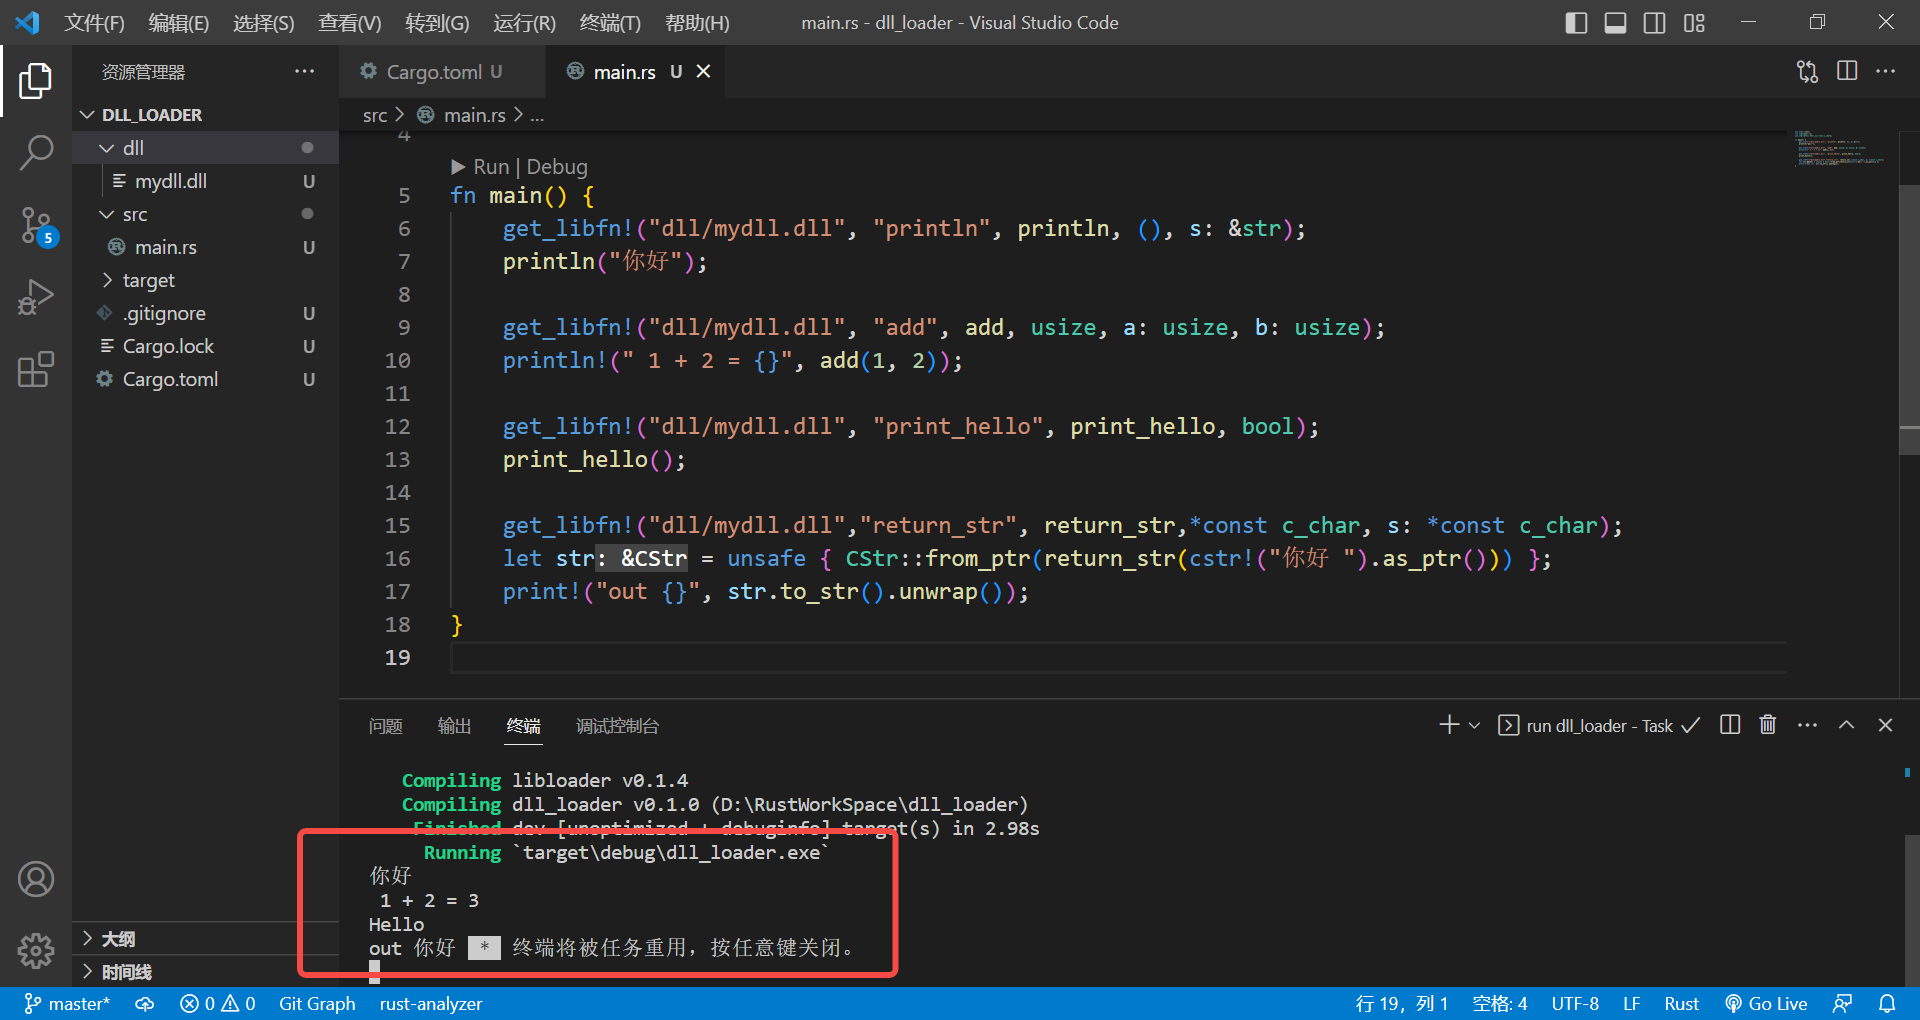
Step 4、动态加载 dll
use cstr::cstr;
use libloader::*;
use std::{ffi::CStr,os::raw::c_char};

fn main() {
    get_libfn!("dll/mydll.dll", "println", println, (), s: &str);
    println("你好");

    get_libfn!("dll/mydll.dll", "add", add, usize, a: usize, b: usize);
    println!(" 1 + 2 = {}", add(1, 2));

    get_libfn!("dll/mydll.dll", "print_hello", print_hello, bool);
    print_hello();

    get_libfn!("dll/mydll.dll","return_str", return_str,*const c_char, s: *const c_char);
    let str = unsafe { CStr::from_ptr(return_str(cstr!("你好 ").as_ptr())) };
    print!("out {}", str.to_str().unwrap());
}
五、C# 通过反射机制实现插件化开发
Step 1、定义插件接口
namespace PluginInterface
{

    public interface IPlugin
    {
        // 获取插件名字
        public string GetName();

        // 获取插件所提供的功能列表
        public string[] GetFunction();

        // 执行插件某个功能
        public bool Execute(string fn);
    }

}
Step 2、实现插件接口
using PluginInterface;
using System;
using System.Linq;

namespace MyPlugin
{

    public class PrinterPlugin : IPlugin
    {
        private static readonly string PLUGIN_NAME = "PrinterPlugin";

        // 获取插件名字
        public string GetName()
        {
            return PLUGIN_NAME;
        }

        // 获取插件所提供的功能列表
        public string[] GetFunction()
        {
            return PrinterFunc.FuncDics.Keys.ToArray();
        }

        // 执行插件某个功能
        public bool Execute(string fn)
        {
            return PrinterFunc.Run(fn);
        }

        // 传参功能
        public static object PrintLabel(string sn)
        {
            Console.WriteLine($"打印标签{sn}...DONE");
            return true;
        }
    }
}
using System;
using System.Collections.Generic;

namespace MyPlugin
{
    // 封装打印机支持的功能
    internal class PrinterFunc
    {
        // 功能字典
        public static Dictionary<string, Func<bool>> FuncDics = new Dictionary<string, Func<bool>>
        {
            {"PrintPhoto",PrintPhoto },
            {"PrintDoc",PrintDoc }
        };
        // 执行某个功能
        public static bool Run(string name)
        {
            if (!FuncDics.ContainsKey(name))
            {
                return false;
            }

            return (bool)FuncDics[name].Invoke();
        }
        // 打印照片
        public static bool PrintPhoto()
        {
            Console.WriteLine("打印照片...DONE");
            return true;
        }
        // 打印文档
        public static bool PrintDoc()
        {
            Console.WriteLine("打印文档...DONE");
            return true;
        }
    }

}
Step 3、通过反射实例化插件
using PluginInterface;
using System;
using System.Collections.Generic;
using System.IO;
using System.Reflection;
namespace CLI.Loader
{
public class PluginLoader
{
// 初始化时加载插件
public PluginLoader()
{
LoadPlugin();
}
public Dictionary<string, IPlugin> ListName = new Dictionary<string, IPlugin>();
// 加载所有插件
public void LoadPlugin()
{
try
{
// 清除所有插件缓存
ListName.Clear();
// 插件文件夹
string fileName = "D:\\AwsomeWorkSpace\\CLI\\Plugins\\net5.0\\";
// 获取所有插件文件
DirectoryInfo info = new DirectoryInfo(fileName);
FileInfo[] files = info.GetFiles();
foreach (FileInfo file in files)
{
if (!file.FullName.EndsWith(".dll"))
{
continue;
}
// 通过反射机制创建插件实例
Assembly assembly = Assembly.LoadFile(file.FullName);
Type[] types = assembly.GetTypes();
foreach (Type type in types)
{
// 如果某些类实现了预定义的插件接口,则认为该类适配与主程序(是主程序的插件)
if (type.GetInterface("IPlugin") != null)
{
// 创建该类实例
IPlugin plugin = assembly.CreateInstance(type.FullName) as IPlugin;
if (plugin == null)
{
throw new Exception("插件错误");
}
ListName.Add(plugin.GetName(), plugin);
// 调用插件的某个传参方法
MethodInfo printLabel = type.GetMethod("PrintLabel");
object res = printLabel.Invoke(plugin, parameters: new object[] { "HQ31122222222222" });
Console.WriteLine(res?.ToString());
// 调用插件内部的 Execute 方法
MethodInfo execute = type.GetMethod("Execute");
res = execute.Invoke(plugin, parameters: new object[] { "PrintPhoto" });
Console.WriteLine(res?.ToString());
res = execute.Invoke(plugin, parameters: new object[] { "PrintDoc" });
Console.WriteLine(res?.ToString());
}
}
}
}
catch (Exception e)
{
Console.WriteLine(e.Message);
}
}
// 插件启动
public void Start()
{
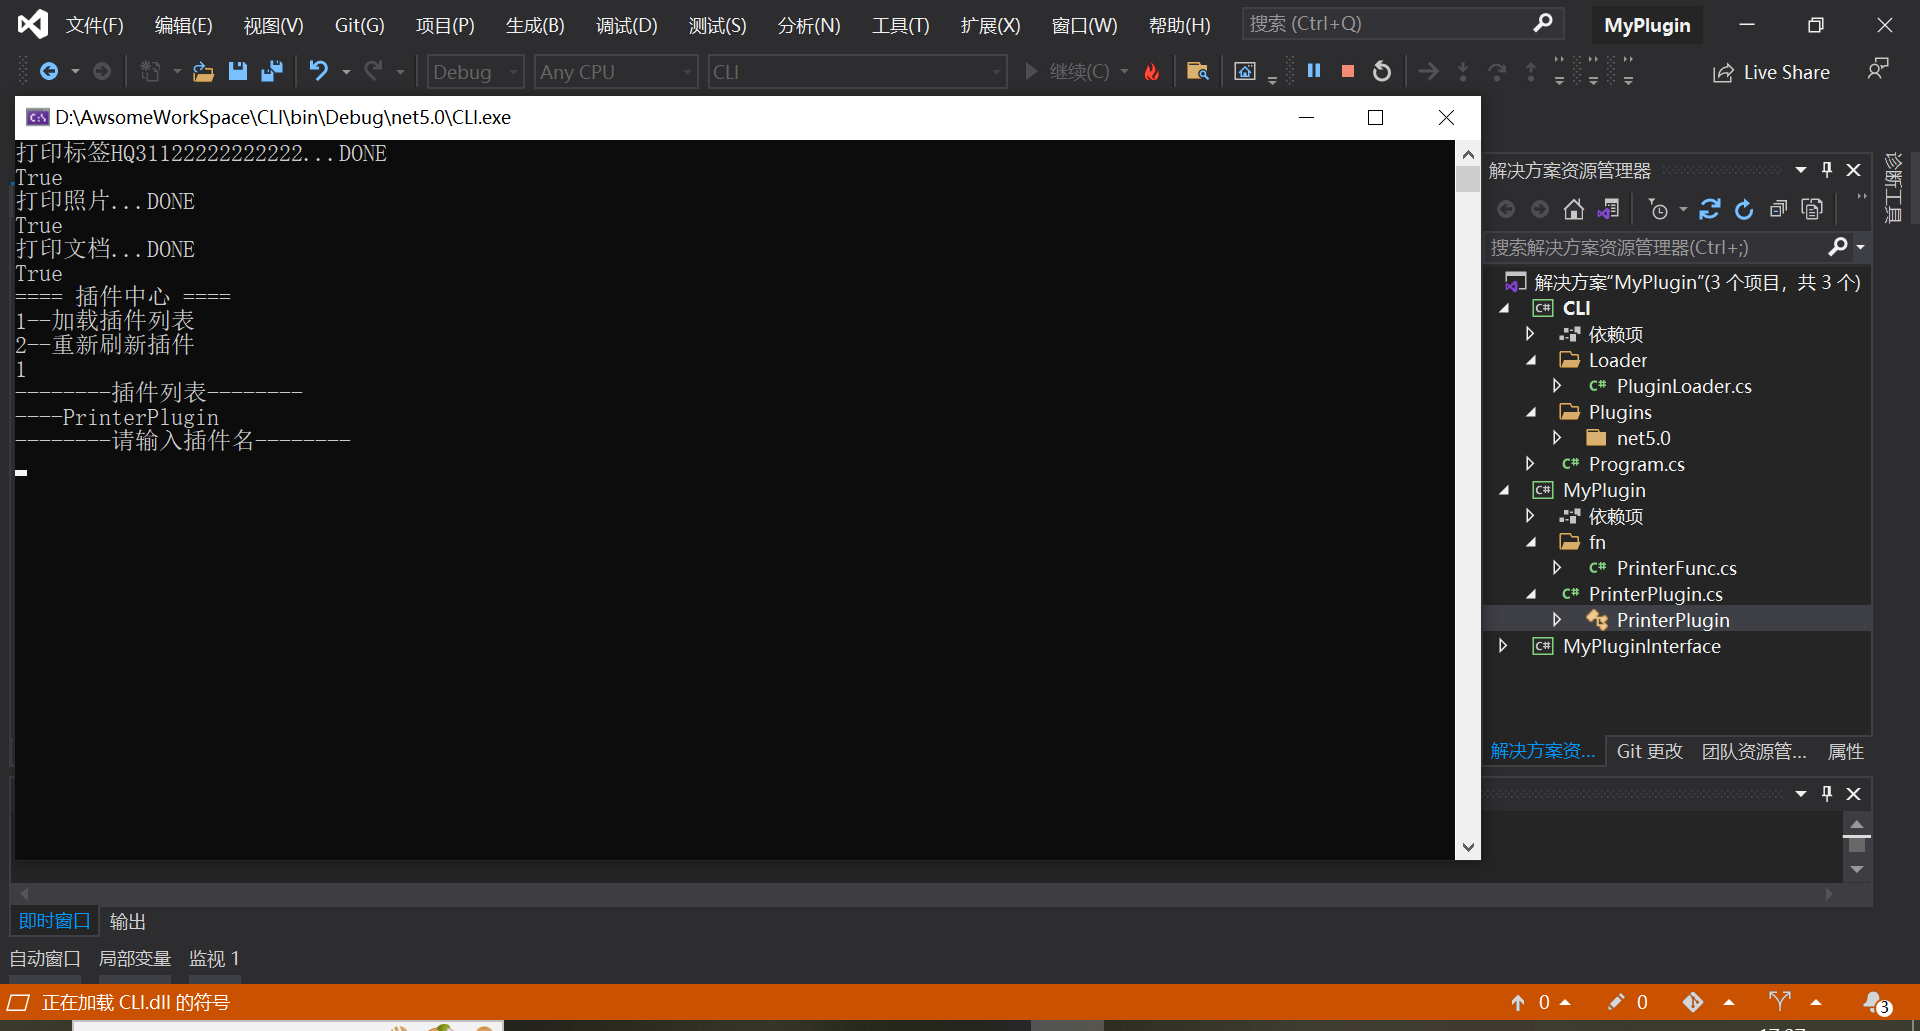
Console.WriteLine("==== 插件中心 ====");
Console.WriteLine("1--加载插件列表");
Console.WriteLine("2--重新刷新插件");
int switchVal = int.Parse(Console.ReadLine());
switch (switchVal)
{
case 1:
GetPluginList();
break;
case 2:
LoadPlugin();
break; ;
}
}
// 加载插件列表
public void GetPluginList()
{
Console.WriteLine("--------插件列表--------");
foreach (var VARIABLE in ListName.Keys)
{
Console.WriteLine($"----{VARIABLE}");
}
Console.WriteLine("--------请输入插件名--------");
GetPluginFunc(Console.ReadLine());
}
// 加载插件功能
public void GetPluginFunc(string pluginName)
{
if (!ListName.ContainsKey(pluginName))
{
return;
}
IPlugin plugin = ListName[pluginName];
string[] funcList = plugin.GetFunction();
for (int i = 0; i < funcList.Length; i++)
{
Console.WriteLine(funcList[i]);
plugin.Execute(funcList[i]);
}
}
}
}
ok,可以看到,插件化开发的实现并不复杂,但是其中用到的反射机制会消耗部分性能,并且 dll 也会存在一些逆向工程或者反向注入等信安问题,需要谨慎使用。当然,框架的完善更是任重道远的过程。
六、.NET 6/7 导出非托管函数能力
环境:Visual Studio 2022 / .NET7
参考:https://github.com/dotnet/runtime/tree/main/src/coreclr/nativeaot/docs
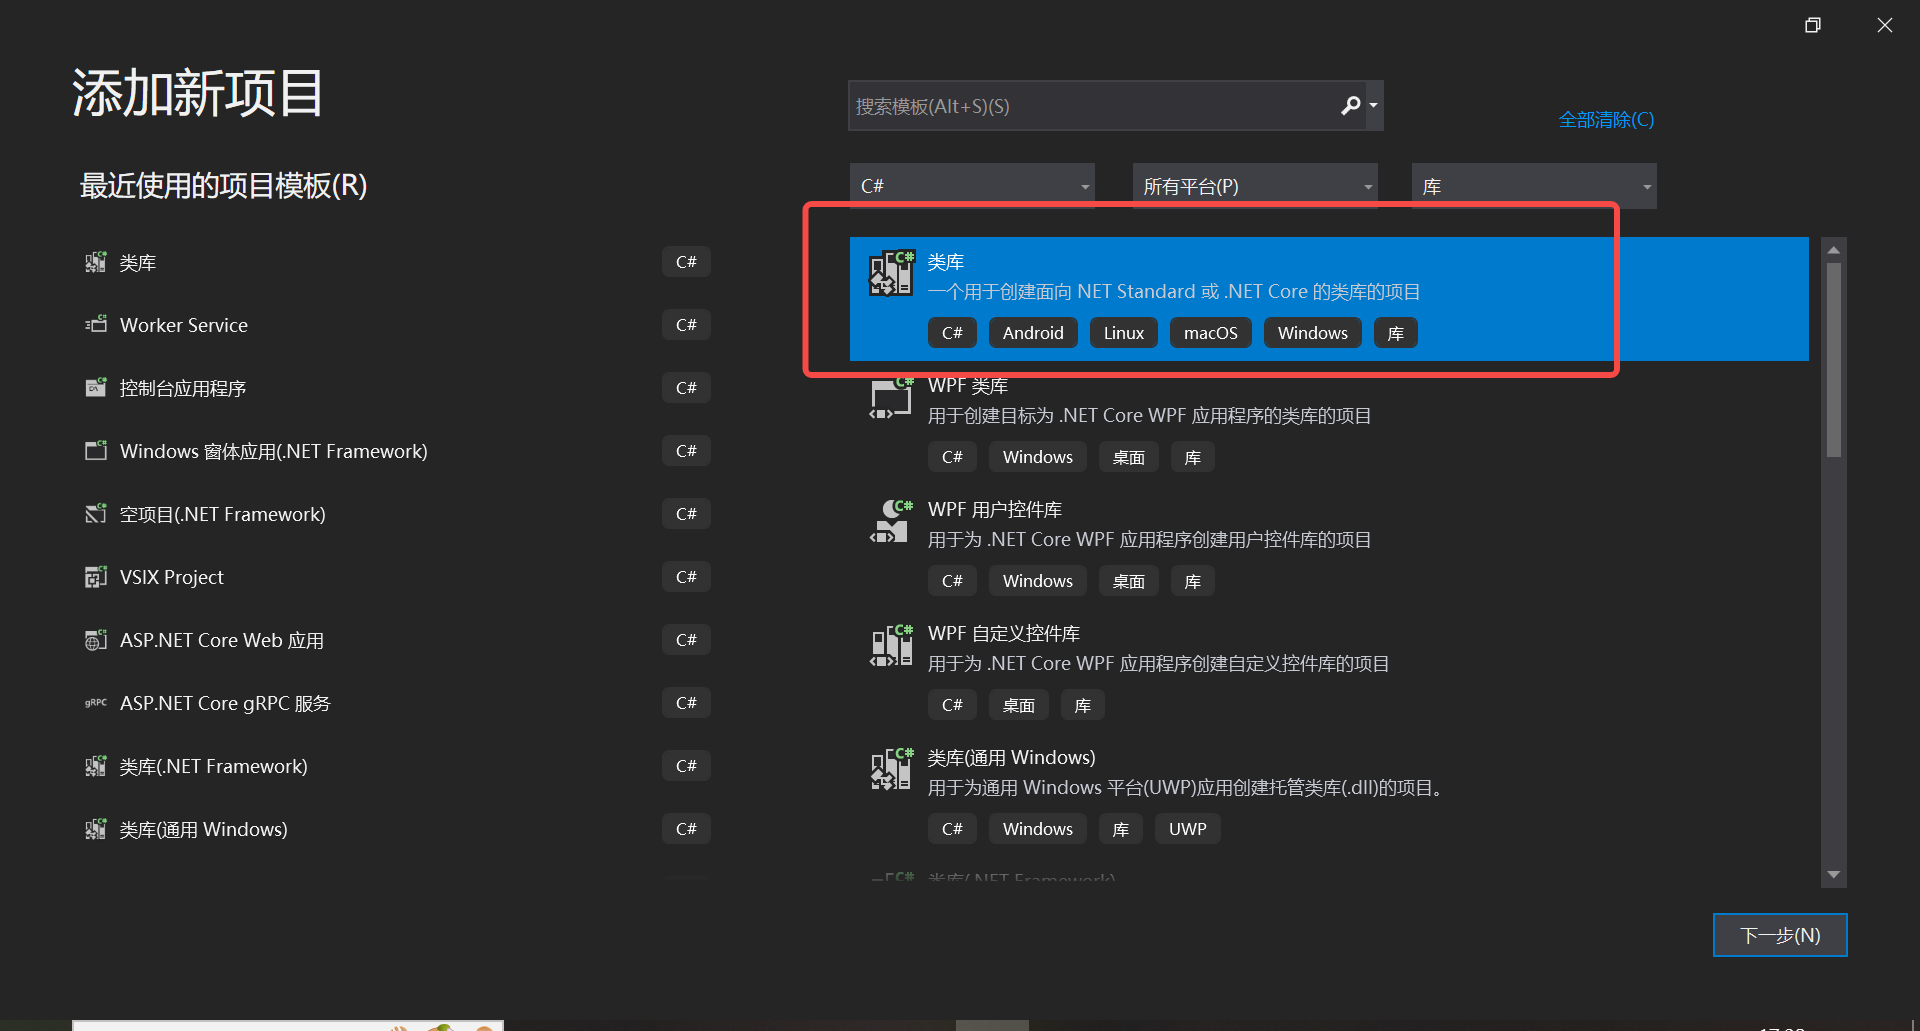
Step 1、创建类库项目
dotnet new classlib -o mydll -f net6.0Step 2、配置 AOT Native
<Project Sdk="Microsoft.NET.Sdk">

  <PropertyGroup>
    <TargetFramework>net7.0</TargetFramework>
    <ImplicitUsings>enable</ImplicitUsings>
    <Nullable>enable</Nullable>
    <PublishAot>true</PublishAot>
  </PropertyGroup>

</Project>
Step 3、导出非托管函数
using System.Runtime.InteropServices;
using Seagull.BarTender.Print;

namespace ClassLibrary1
{
    public class Class1
    {
        // 无参数有返回值
        [UnmanagedCallersOnly(EntryPoint = "IsOk")]
        public static bool IsOk()
        {
            return true;
        }
        // 有参数无返回值
        [UnmanagedCallersOnly(EntryPoint = "MyPrinter")]
        public static void MyPrinter(IntPtr pString)
        {

            try
            {
                if (pString != IntPtr.Zero)
                {
                    string str = new(Marshal.PtrToStringAnsi(pString));
                    Console.WriteLine(str);
                }
            }
            catch (Exception e)
            {
                Console.WriteLine(">>> Exception " + e.Message);
            }
        }
        // 有参数有返回值
        [UnmanagedCallersOnly(EntryPoint = "MyConcat")]
        public static IntPtr MyConcat(IntPtr pString1, IntPtr pString2)
        {
            string concat = "";

            try
            {
                if (pString1 != IntPtr.Zero && pString2 != IntPtr.Zero)
                {
                    string str1 = new(Marshal.PtrToStringAnsi(pString1));
                    string str2 = new(Marshal.PtrToStringAnsi(pString2));
                    concat = string.Concat(str1, str2);
                }
            }
            catch (Exception e)
            {
                concat = e.Message;
            }
            return Marshal.StringToHGlobalAnsi(concat);
        }
        // 无参数无返回值
        [UnmanagedCallersOnly(EntryPoint = "PrintHello")]
        public static void PrintHello()
        {
            Console.WriteLine(">>> Hello");
        }
    }
}
Step 4、查看导出结果
dotnet publish /p:NativeLib=Shared /p:SelfContained=true -r win-x64 -c release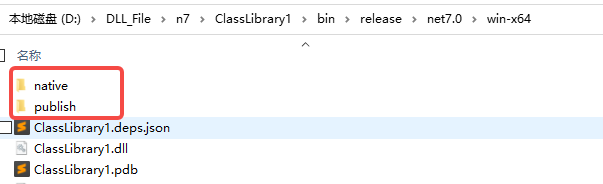
可以看到 native 、publish 文件夹,里面的 dll 文件
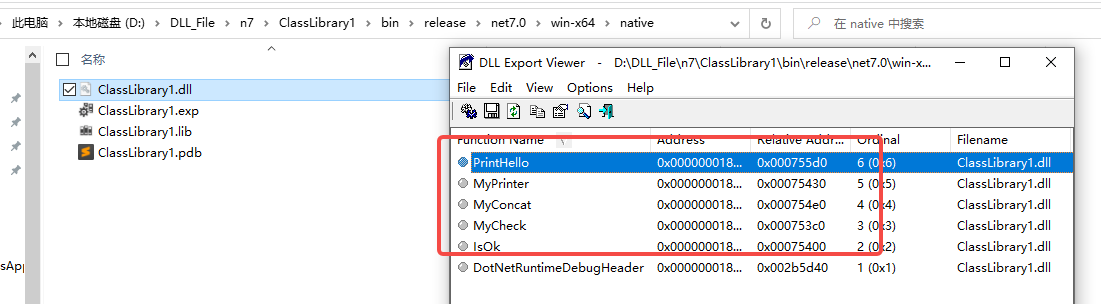
函数正常导出,最后一个是默认导出的函数。