Android 12 源码分析 —— 应用层 六(StatusBar的UI创建和初始化)
在前面的文章中,我们分别介绍了Layout整体布局,以及StatusBar类的初始化.前者介绍了整体上面的布局,后者介绍了三大窗口的创建的入口处,以及需要做的准备工作.现在我们分别来细化三大窗口的UI创建和初始化,首先从StatusBar窗口开始
前面的文章有:
- “Android 12 源码分析 —— 应用层 四(SystemUI的基本布局设计及其基本概念)http://t.csdn.cn/yYS80”
- “Android 12 源码分析 —— 应用层 五(SystemUI的StatusBar类的启动过程和三个窗口的创建)http://t.csdn.cn/n3gwH”
本篇,将介绍StatusBar窗口的创建和初始化过程,并查看StatusBar中图标出现时的动画.
StatusBar的UI开始处
在上一篇文章中(“Android 12 源码分析 —— 应用层 五(SystemUI的StatusBar类的启动过程和三个窗口的创建)http://t.csdn.cn/n3gwH”),我们提及,三大窗口的创建,首先createAndAddWindows()函数开始,然后调用makeStatusBar()函数进行创建,接着调用InflateStatusBarWindow()函数进行View的创建.而在创建View视图的时候,是通过SuperStatusBarViewFactory工厂类来获得对应的View.至此我们就没有再做进一步解释.接下来我们就从此处开始,详细介绍UI的创建和初始化.
先看看SuperStatusBarViewFactory的getStatusBarWindowView()函数,源码如下:
public StatusBarWindowView getStatusBarWindowView() {


	//如果有缓存View,则直接返回
   if (mStatusBarWindowView != null) {


       return mStatusBarWindowView;
   }
	//如果没有缓存,则创建View对象,并返回
   mStatusBarWindowView =
           (StatusBarWindowView) mInjectionInflationController.injectable(
           LayoutInflater.from(mContext)).inflate(R.layout.super_status_bar,
           /* root= */ null);
   //因为R.layout.super_status_bar文件很是关键,倘若创建不成功则会直接抛出异常
   if (mStatusBarWindowView == null) {


       throw new IllegalStateException(
               "R.layout.super_status_bar could not be properly inflated");
   }
   return mStatusBarWindowView;
}
上面的函数很简单,即:
- 先调用InjectionInflationController的injectable()函数,它返回一个LayoutInflater对象
- 并调用这个对象的inflate()函数.然后返回相应的View对象,这个对象就是整个StatusBar窗口的顶层View叫做StatusBarWindowView
从名字可以知道,这个类跟注入有关.那么我们来看看InjectionInflationController所要做的工作.
InjectionInflationController
InjectionInflationController的构造函数中,放入了@Inject,因此其创建由Dagger2负责.构造函数如下:
@Inject
public InjectionInflationController(ViewInstanceCreator.Factory viewInstanceCreatorFactory) {


    mViewInstanceCreatorFactory = viewInstanceCreatorFactory;
    initInjectionMap();
}

private void initInjectionMap() {


	//获取ViewInstanceCreator的方法
    for (Method method : ViewInstanceCreator.class.getDeclaredMethods()) {


    	//如果是返回类型是View的子类,且为Public,那么就将其加入一个Map中.
    	//可见,这个InjectionInflationControllerView,缓存了View类的对象的创建方法.
        if (View.class.isAssignableFrom(method.getReturnType())
                && (method.getModifiers() & Modifier.PUBLIC) != 0) {


            mInjectionMap.put(method.getReturnType().getName(), method);
        }
    }
}
在上面的函数中,InjectionInflationController对象,缓存了ViewInstanceCreator的创建View子类的方法.我们看看ViewInstanceCreator.如下:
ViewInstanceCreator
ViewInstanceCreator被定义在InjectionInflationController文件中,源码如下:
//定义为子组件,被放入Dagger2中
@Subcomponent
public interface ViewInstanceCreator {


    //定义其Factory方法
    @Subcomponent.Factory
    interface Factory {


        ViewInstanceCreator build(
                @BindsInstance @Named(VIEW_CONTEXT) Context context,
                @BindsInstance AttributeSet attributeSet);
    }

    //定义返回NotificationStackScrollLayout的对象
    //而这个对象是View的子类,这个对象的创建也由Dagger2创建
    NotificationStackScrollLayout createNotificationStackScrollLayout();
}
现在我们知道了InjectionInflationController的对象在创建的时候,缓存了谁了,即-------NotificationStackScrollLayout对象

现在就需要思考一下,为何只有一个View被这样定义了?难道其他的View就不能被定义吗?
这里涉及到一个历史问题,在早期的版本中还包括,QSPanel,QuickQSPanel,以及KeyguardMessageArea等等View的创建.但是随着SystemUI的复杂度增加,相应的Dagger图也被慢慢扩大,在测试的时候发现,存在于Dagger中的类和接口会以非常简单的形式存在,甚至是空对象.导致带来大量的测试工作无法完成.因此慢慢将这样的方式去掉.
所以,现在正确的做法是,对于View尽可能的不要走Dagger2的创建,而是创建另外一个xxxController对象,在xxxController对象中,通过Dagger2来注入需要的各种依赖.然后将这个View和对应的Controller进行连接(attach)
但是现在依然还存在一个View由Dagger2进行创建,那么我们看看SystemUI是如何实现这个流程的.也就是从InjectinInflationController的injectable函数开始的.
InjectionInflationController的injectable()函数
源码如下:
public LayoutInflater injectable(LayoutInflater inflater) {


	//首先从克隆一个LayoutInflater
    LayoutInflater ret = inflater.cloneInContext(inflater.getContext());
    //然后为克隆的LayoutInflater设置一个私有的工厂对象
    //这个对象在创建某个View之前,会触发这个私有的工厂对象,好让这个私有对象实现一些自定义创建
    ret.setPrivateFactory(mFactory);
    return ret;
}
函数较简单,见注释即可.
mFactory对象的实现是:InjectionInflationController文件中的InjectionFactory类,如下:
InjectionFactory
源码如下:
private class InjectionFactory implements LayoutInflater.Factory2 {


   @Override
    public View onCreateView(String name, Context context, AttributeSet attrs) {


       //首先查看当初在构造函数中保存的创建View的方法
        Method creationMethod = mInjectionMap.get(name);
        //如果创建方法存在,则调用创建方法来创建View对象,
        //到目前为止它只会创建NotificationStackScrollLayout
        if (creationMethod != null) {


            try {


                return (View) creationMethod.invoke(
                        mViewInstanceCreatorFactory.build(context, attrs));
            } catch (IllegalAccessException e) {


                throw new InflateException("Could not inflate " + name, e);
            } catch (InvocationTargetException e) {


                throw new InflateException("Could not inflate " + name, e);
            }
        }
        return null;
    }

    @Override
    public View onCreateView(View parent, String name, Context context, AttributeSet attrs) {


        return onCreateView(name, context, attrs);
    }
}
至此,InjectionInflationController的创建View的流程就清晰了.
- 先收集创建View的方法
- 如果Xml文件中的View刚好可以被1中收集的方法创建,则调用1中方法
从上面的阅读中,我们可以看到Dagger2并非适用于所有的情况.其实主要是因为测试的原因
至此,super_status_bar.xml文件的解析,分析完毕
前面,我们详细分析了super_status_bar.xml文件的解析,并知道了它如何一步一步被创建为View,接下来的事情,就是在这个UI上面的操作.
创建合适的CollapsedStatusBarFragment
从上一篇博文(“Android 12 源码分析 —— 应用层 五(SystemUI的StatusBar类的启动过程和三个窗口的创建)http://t.csdn.cn/n3gwH”)中知道,一旦成功创建窗口的顶层View,则会在这个顶层View中添加可以复用的Fragment.添加Fragment的代码就在makeStatusBarView()中.现在我们将有关StatusBar窗口的部分截取如下:
protected void makeStatusBarView(@Nullable RegisterStatusBarResult result) {


    final Context context = mContext;
//省略不相干的部分

//调用FragmaneHostManager得到对应的FragmentHostManager
//然后调用addTagListener设置Fragment创建完成之后的一个监听
//最后调用getFragmentManager()得到FragmentManager开始Fragment的事务
//Fragment事务中,只有replace,将对应的Framgment添加到status_bar_container中
    FragmentHostManager.get(mPhoneStatusBarWindow)
            .addTagListener(CollapsedStatusBarFragment.TAG, (tag, fragment) -> {


               /*上一篇博文中已经详细介绍过*/
            }).getFragmentManager()
            .beginTransaction()
            .replace(R.id.status_bar_container,
                    new CollapsedStatusBarFragment(
                            mOngoingCallController,
                            mAnimationScheduler,
                            mStatusBarLocationPublisher,
                            mNotificationIconAreaController,
                            mFeatureFlags,
                            mStatusBarIconController,
                            mKeyguardStateController,
                            mNetworkController,
                            mStatusBarStateController,
                            this,
                            mCommandQueue
                    ),
                    CollapsedStatusBarFragment.TAG)
            .commit();

//省略不相干的部分
}
由上面的内容可以知道.Fragment的创建是由如下的步骤完成的:
- 调用FragmaneHostManager得到对应的FragmentHostManager
- 然后调用addTagListener设置Fragment创建完成之后的一个监听,用于Fragment的View创建完成之后的准备工作
- 最后调用getFragmentManager()得到FragmentManager开始Fragment的事务
- Fragment事务中,只有replace,将对应的Framgment添加到status_bar_container中.
那么这里面的FragmentHostManager是做什么的呢?我们先来看看
FragmentHostManager的get()
源码如下:
public static FragmentHostManager get(View view) {


    try {


    	//调用FragmentService的getFragmentHostManager()方法
        return Dependency.get(FragmentService.class).getFragmentHostManager(view);
    } catch (ClassCastException e) {


        // TODO: Some auto handling here?
        throw e;
    }
}
而在FragmentService中,getFragmentHostManager如下:
FragmentService的getFragmentHostManager()
源码如下:
public FragmentHostManager getFragmentHostManager(View view) {


	//首先获取该View的根View
    View root = view.getRootView();
    //根据根View,得到对应的FragmengHostState.
    //FragmentHostState类是一个包装类,它将FragmentHostManager和View包装在一起.
    //而FragmentHostManager类负责View对应的Fragment的事务,后文详解.
    FragmentHostState state = mHosts.get(root);
    //在FragmentService中,将View和FragmentHostState进行缓存,一旦需要则直接返回
    if (state == null) {


    	//我们现在看到的是StatusBar的第一初始化过程,因此为空,则new一个FragmentHostState
        state = new FragmentHostState(root);
        mHosts.put(root, state);
    }
    //返回state的FragmentHostManager对象
    return state.getFragmentHostManager();
}
从上面的代码我们可以看到.
- FragmentService,按照View->FragmentHostState的键值对,缓存了相应的对象
- 如果没有这样的保存,则创建FragmentHostState对象.FragmenHostState中封装的一个重要对象是FragmentHostManager.每一个View都有一个FragmentHostManager对象被封装在FragmentHostState中.
FragmenHostState对象非常简单,只做封装,因此不再介绍
接下来我们看看FragmentHostManager对象
FragmentHostManager
FragmentHostManager的源码如下.FragmentHostManager中,只需要知道它的初始化即可,因为剩下的内容,全都在其初始化创建的对象上的简单操作.
public class FragmentHostManager {


	//省略不相干部分

	FragmentHostManager(FragmentService manager, View rootView) {


		//在构造函数中,初始化各个成员
	    mContext = rootView.getContext();
	    mManager = manager;
	    mRootView = rootView;
	    //在创建初期,需要先保存配置,通过applyNewConfig将配置更新到mConfigChanges对象中
	    mConfigChanges.applyNewConfig(mContext.getResources());
	    //调用下面的函数,为Fragment设置生命周期的管理
	    createFragmentHost(null);
	}

	private void createFragmentHost(Parcelable savedState) {


		//FragmentController负责协调Fragment的生命周期
		//首先,创建FragmentController对象mFragments
	    mFragments = FragmentController.createController(new HostCallbacks());
	    //必须先调用attach()方法,该方法负责内部的一些类的成员的初始化,否则无法使用
	    mFragments.attachHost(null);
	    //创建对应的生命周期监听对象
	    mLifecycleCallbacks = new FragmentLifecycleCallbacks() {


	        @Override
	        public void onFragmentViewCreated(FragmentManager fm, Fragment f, View v,
	                Bundle savedInstanceState) {


	                //调用FragmentHostManager中的listener(内容简单略)
	            FragmentHostManager.this.onFragmentViewCreated(f);
	        }

	        @Override
	        public void onFragmentViewDestroyed(FragmentManager fm, Fragment f) {


	        //调用FragmentHostManager中的listener(内容简单略)
	            FragmentHostManager.this.onFragmentViewDestroyed(f);
	        }

	        @Override
	        public void onFragmentDestroyed(FragmentManager fm, Fragment f) {


	        	//跟踪Fragment的回收情况
	            Dependency.get(LeakDetector.class).trackGarbage(f);
	        }
	    };
	    //设置监听
	    mFragments.getFragmentManager().registerFragmentLifecycleCallbacks(
	    mLifecycleCallbacks,true);
	    //如果有保存的状态,则负责恢复这个保存的状态
	    if (savedState != null) {


	        mFragments.restoreAllState(savedState, (FragmentManagerNonConfig) null);
	    }
	    //现在将状态保持在resume状态.
	    //关于Fragment的生命周期,见后文补充知识
	    mFragments.dispatchCreate();
	    mFragments.dispatchStart();
	    mFragments.dispatchResume();
	}

	public FragmentHostManager addTagListener(String tag, FragmentListener listener) {


		//根据tag选择对应的listener组
	    ArrayList<FragmentListener> listeners = mListeners.get(tag);
	    //如果没有listener组,则创建一个新的list,用于存放这些listener
	    if (listeners == null) {


	        listeners = new ArrayList<>();
	        mListeners.put(tag, listeners);
	    }
	    listeners.add(listener);
	    //如果当前已经存在Fragment,那么就直接触发listener的回调
	    //可以思考为什么非要在此处触发?
	    Fragment current = getFragmentManager().findFragmentByTag(tag);
	    if (current != null && current.getView() != null) {


	        listener.onFragmentViewCreated(tag, current);
	    }
	    return this;
	}
	//省略简单部分

	//省略不相干部分
}
FragmenHostManager主要就是负责如下:
- 管理Fragment的生命周期.
- 当触发相应的生命周期之后,会调用FragmentHostManager中的FragmentLifecycleCallbacks对象的相应回调
- 在这些回调方法中,会再次掉到FragmentHostManager中的相应方法,这些方法则会触发FragmentHostManager中的Listener.(也即makeStatusBarView()函数中调用addTagListener()设置的listener)
现在我们知道了FragmentHostManager.那么回到makeStatusBarView()函数中.在调用FragmentHostManager.get(mPhoneStatusBarWindow)之后,得到FragmentHostManager,然后调用addTagListener(TAG,listener)方法.该addTagListener在上面的FragmentHostManager中已经详细介绍过了.
现在我们来回答在listener中留下来的思考-----为什么要马上触发其回调?
答案:Listener的设置可能出现在View的创建之后,如果在其之后,那么就需要主动触发onFragmentViewCreated()方法.
但是这里面没有考虑到的一个问题是,触发线程可能在子线程,所以这里有设计不合理的地方.
有了前面的步骤,就能得到对应的FragmentManager对象了.为了进一步说明其步骤,现将前面的makeStatusBarView()中的过程加以概括:
- 调用FragmaneHostManager得到对应的FragmentHostManager
- 调用addTagListener设置Fragment创建完成之后的一个监听,用于Fragment的View创建完成之后的准备工作
- 最后调用getFragmentManager()得到FragmentManager开始Fragment的事务
- Fragment事务中,只有replace,将对应的Framgment添加到status_bar_container中.
其中,第一步和第二步,我们已经详细分析了.接下来的第三步和第四步,属于Android的Fragment的基本操作了,它先创建CollapsedStatusBarFragment,然后将其放置在id为status_bar_container的容器中.
那么接下来看看CollapsedStatusBarFragment的创建
CollapsedStatusBarFragment的创建
作为一个Fragment,我们按照其生命周期来进行查看,先看其构造函数,如下:
@Inject
//初始化函数乏善可陈,故略之
public CollapsedStatusBarFragment(
        OngoingCallController ongoingCallController,
        SystemStatusAnimationScheduler animationScheduler,
        StatusBarLocationPublisher locationPublisher,
        NotificationIconAreaController notificationIconAreaController,
        FeatureFlags featureFlags,
        StatusBarIconController statusBarIconController,
        KeyguardStateController keyguardStateController,
        NetworkController networkController,
        StatusBarStateController statusBarStateController,
        StatusBar statusBarComponent,
        CommandQueue commandQueue
) {


    //全是成员的赋值,没有什么好看的,略
}
在进行生命周期查看之前,我们先简单列出其生命周期的过程,如下:
Fragment的生命周期:
Fragment被创建:
	onAttach(): Fragment与Activity关联时调用。
	onCreate(): Fragment被创建时调用,通常用于初始化成员变量和数据。
	onCreateView(): 创建Fragment的用户界面视图(布局)。
	onActivityCreated(): 当Fragment所属的Activity完成其onCreate()方法后调用。
Fragment变得可见:
	onStart(): Fragment变得可见时调用,可以执行一些初始化或准备工作。
	onResume(): Fragment完全可见时调用,通常用于启动动画、定时任务等。
Fragment被暂停:
	onPause(): Fragment即将暂停,通常用于保存数据或释放资源。
Fragment不再可见:
	onStop(): Fragment不再可见,用于释放更多的资源。
Fragment销毁:
	onDestroyView(): Fragment的视图被销毁,用于清理视图相关的资源。
	onDestroy(): Fragment被销毁时调用,通常用于释放资源。
	onDetach(): Fragment与Activity解除关联时调用。
按照上面的生命周期,结合CollapsedStatusBarFragment的源码,首先查看onCreateView函数,如下:
onCreateView()
源码非常简单,解析status_bar.xml文件.该文件我们已经在"Android 12 源码分析 —— 应用层 四(SystemUI的基本布局设计及其基本概念)http://t.csdn.cn/PSqGS"中介绍过.因此不再继续介绍,接下来我们一步一步,通过图形来说明,图形为手动绘制,为了辅助理解和记忆
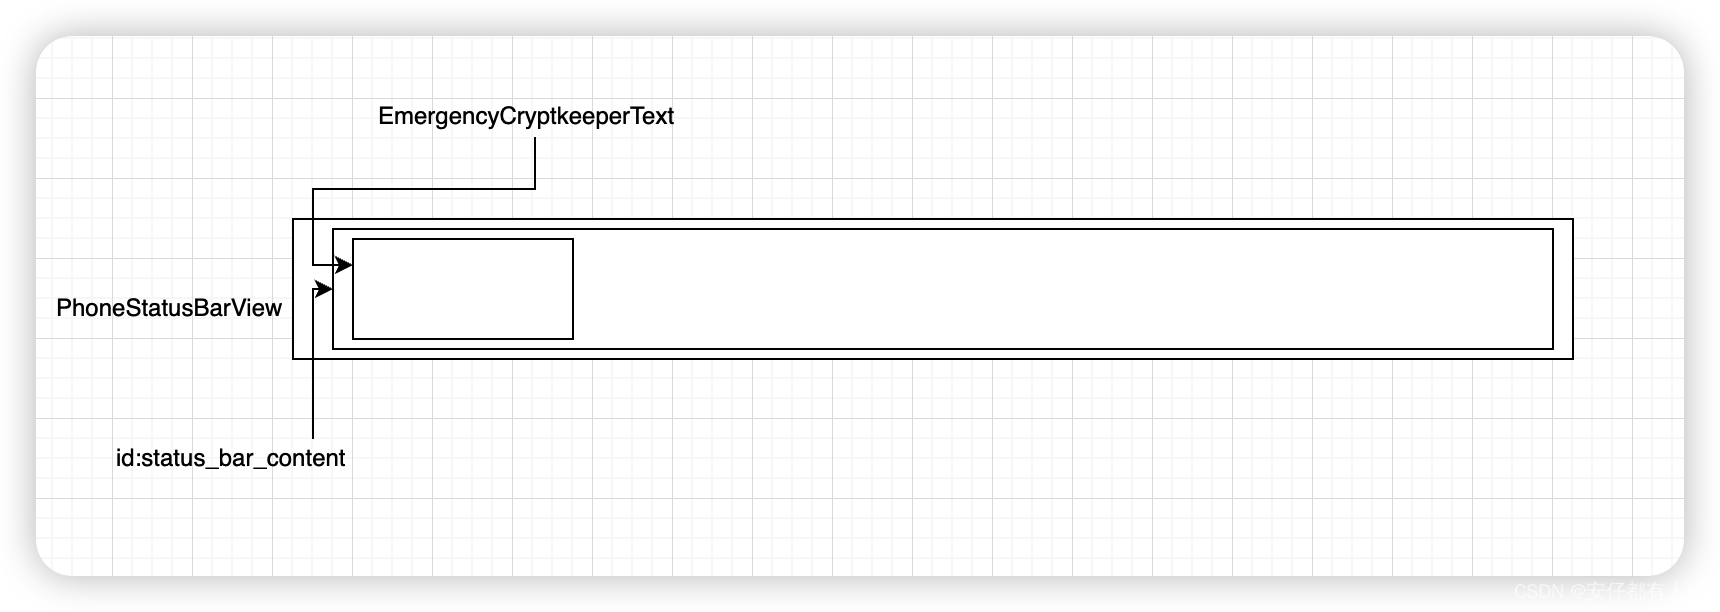
status_bar.xml文件中的内容,省略中间的status_bar_content,则如下;
<com.android.systemui.statusbar.phone.PhoneStatusBarView>

    <ImageView/><!--不会显示为gone-->

    <LinearLayout android:id="@+id/status_bar_contents">
    <!--省略中间内容,便于说明-->
    </LinearLayout>

    <ViewStub
        android:id="@+id/emergency_cryptkeeper_text"
        android:layout_width="wrap_content"
        android:layout_height="match_parent"
        android:layout="@layout/emergency_cryptkeeper_text"
    />

</com.android.systemui.statusbar.phone.PhoneStatusBarView>
画个辅助图如下:
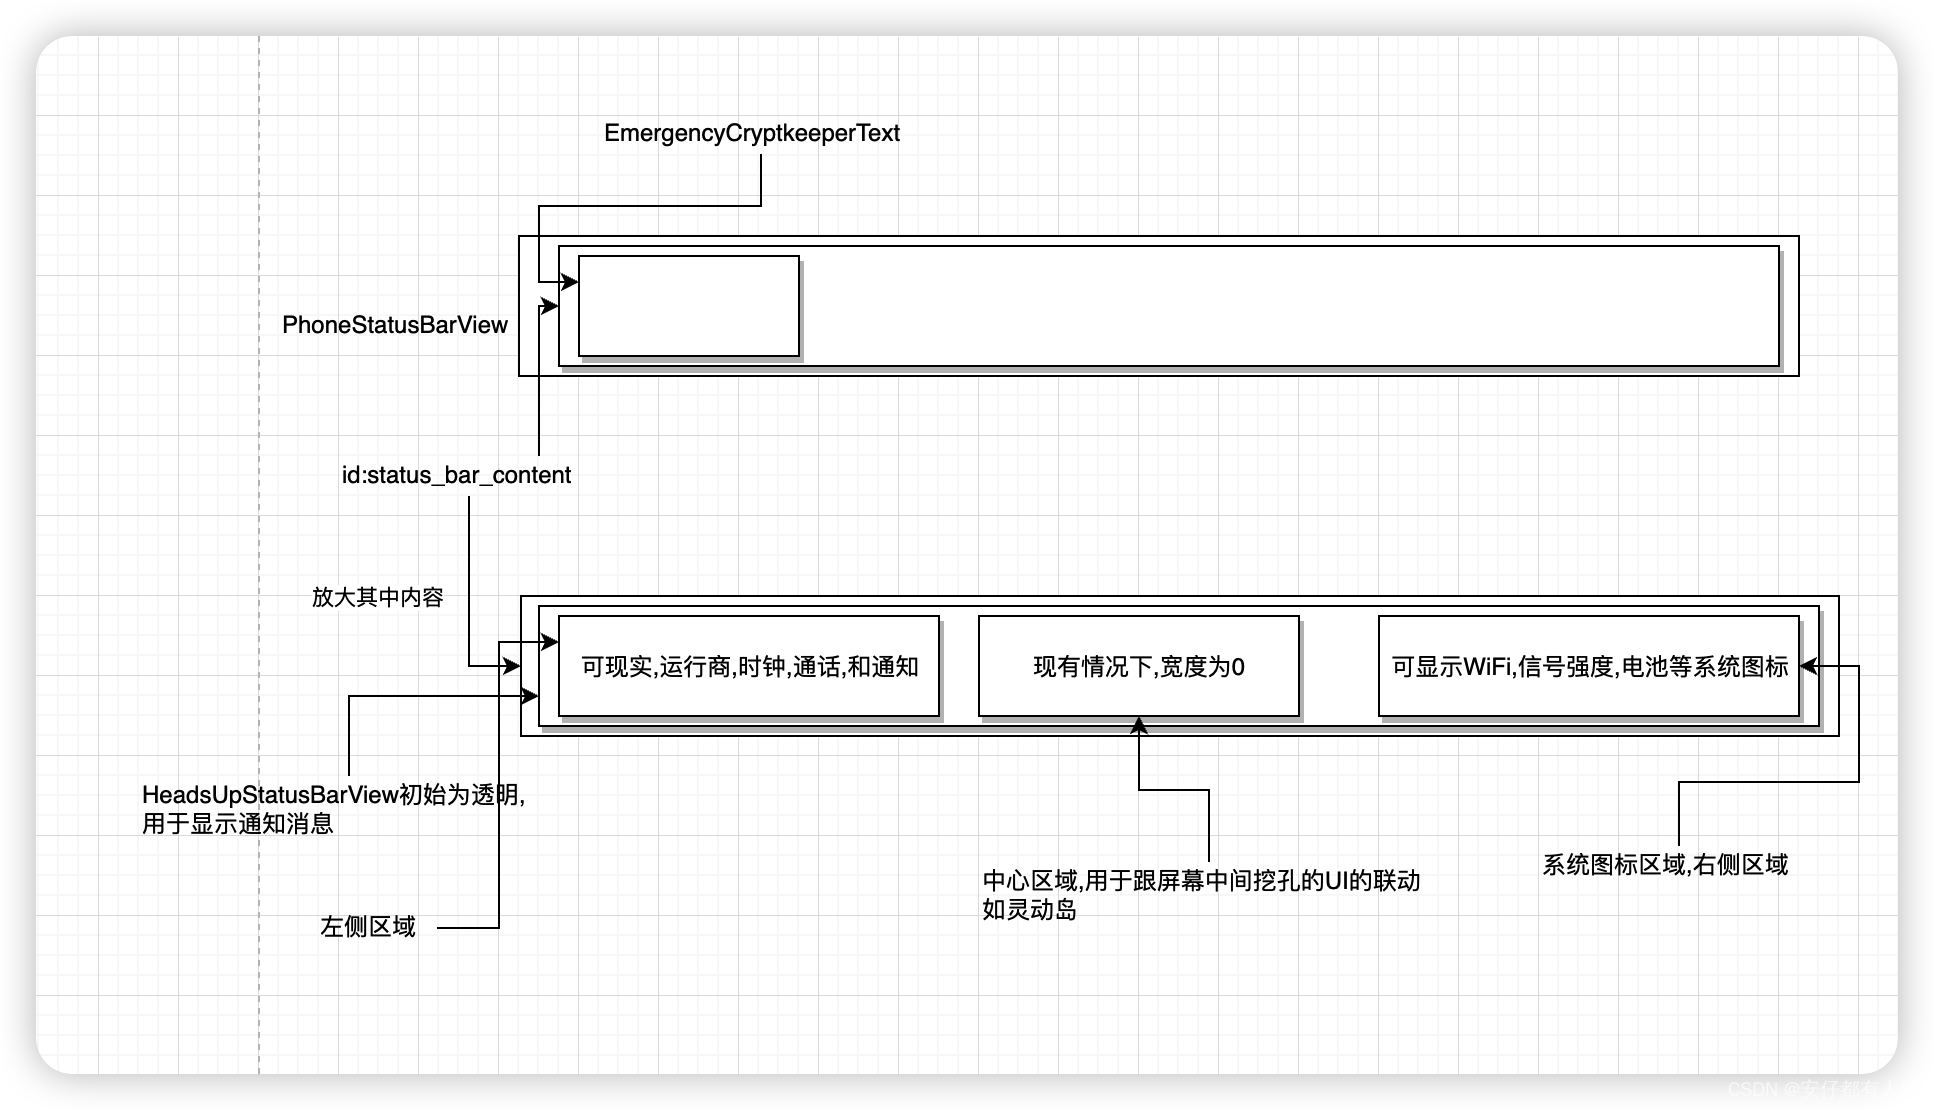
接着,加上中间的status_bar_contents内容变成如下的情况,xml中只列出status_bar_content中的内容
<LinearLayout android:id="@+id/status_bar_contents">
    <!--左边区域-->
    <FrameLayout>
        <!--左边区域的heads-up区域-->
        <include layout="@layout/heads_up_status_bar_layout" />
        <!--左边区域的主体内容-->
        <LinearLayout android:id="@+id/status_bar_left_side">
            <!--左边区域显示运营商名字-->
            <ViewStub android:id="@+id/operator_name" />
            <!--左边区域显示时钟-->
            <com.android.systemui.statusbar.policy.Clock
                android:id="@+id/clock"/>
            <!--左边区域显示通话-->
            <include layout="@layout/ongoing_call_chip" />
			<!--左边区域显示通知图标-->
            <com.android.systemui.statusbar.AlphaOptimizedFrameLayout
                android:id="@+id/notification_icon_area"/>
        </LinearLayout>
    </FrameLayout>

    <!--用于填充空白-->
    <android.widget.Space
        android:id="@+id/cutout_space_view"/>
    <!--中心区域-->
    <com.android.systemui.statusbar.AlphaOptimizedFrameLayout
        android:id="@+id/centered_icon_area"/>
	<!--系统图标区域,也即是右边区域-->
    <com.android.keyguard.AlphaOptimizedLinearLayout android:id="@+id/system_icon_area">

        <include layout="@layout/system_icons" />
    </com.android.keyguard.AlphaOptimizedLinearLayout>
</LinearLayout>
辅助理解,画图如下:
一旦View创建完成,接下来会触发onViewCreated()函数,如下:
onViewCreated()
onViewCreated()源码如下:
@Override
public void onViewCreated(View view, @Nullable Bundle savedInstanceState) {


    super.onViewCreated(view, savedInstanceState);
    //view即为onCreateView()函数中解析的status_bar.xml中的顶层View----PhoneStatusBarView
    mStatusBar = (PhoneStatusBarView) view;
    //status_bar_contents内容,负责显示主要的statusbar内容,见上面的示意图
    View contents = mStatusBar.findViewById(R.id.status_bar_contents);
    //监听,Layout的改变,一旦发生改变,就调用updateStatusBarLocation()
    contents.addOnLayoutChangeListener(mStatusBarLayoutListener);
    //因此需要先调用updateStatusBarLocation()已进行某些值的初始设置
    updateStatusBarLocation(contents.getLeft(), contents.getRight());
    //如果需要恢复,则调用restoreHierarchyState进行恢复(此处我们将暂时跳过,因为其内部直接
    //调用Android View提供标准操作.如果在后面有关于AndroidView的分析,将会进行介绍)
    if (savedInstanceState != null && savedInstanceState.containsKey(EXTRA_PANEL_STATE)) {


        mStatusBar.restoreHierarchyState(
                savedInstanceState.getSparseParcelableArray(EXTRA_PANEL_STATE));
    }
    //创建DarkIconManager,负责接收DarkIconDispatcher中的状态变化
    mDarkIconManager = new DarkIconManager(view.findViewById(R.id.statusIcons), mFeatureFlags);
    //再设置,不应该被显示的图标
    mBlockedIcons.add(getString(com.android.internal.R.string.status_bar_volume));
    mBlockedIcons.add(getString(com.android.internal.R.string.status_bar_alarm_clock));
    mBlockedIcons.add(getString(com.android.internal.R.string.status_bar_call_strength));
    //将不应该显示的图标,传递给DarkIconManager
    mDarkIconManager.setBlockList(mBlockedIcons);
    //StatusBarIconController负责接收CommandQueue中的回调,同时也跟踪icon的状态
    //将这些状态分发给需要的类(IconManager)
    //DarkIconManager继承于IconManager,它需要得到StatusBarIconController中的各种通知.
    //因此调用addIconGroup将mDarkIconManager传递进去
    mStatusBarIconController.addIconGroup(mDarkIconManager);
    //获取系统图标的区域,它在状态栏的最右边,见上面的示意图
    mSystemIconArea = mStatusBar.findViewById(R.id.system_icon_area);
    //获取对应的UI,这个是时间图标,见上面示意图
    mClockView = mStatusBar.findViewById(R.id.clock);
    //获取对应的通话图标,见上面的示意图
    mOngoingCallChip = mStatusBar.findViewById(R.id.ongoing_call_chip);
    //显示系统图标区域,不带动画
    showSystemIconArea(false);
    //显示时钟,不带动画
    showClock(false);
    //初始化,用于显示电话的状态,如,只能用于紧急呼救
    initEmergencyCryptkeeperText();
    //初始化运营商名字,如CMCC中国移动
    initOperatorName();
    //初始化通知图标区域
    initNotificationIconArea();
    //增加动画的回调,这部分在后面文章中会介绍
    mAnimationScheduler.addCallback(this);
}
上面的函数主要功能如下:
- 根据id找到View
- 初始化DarkIconManager
- 显示系统图标区域,显示时钟区域,显示通知图标区域
接下来我们看看initEmergencyCryptkeeperText的内容
initEmergencyCryptkeeperText的初始化
源码如下:
private void initEmergencyCryptkeeperText() {


	//得到对应的ViewStub,见上面的示意图
    View emergencyViewStub = mStatusBar.findViewById(R.id.emergency_cryptkeeper_text);
    //判断是否要显示:紧急通话,sim卡状态的文本
    if (mNetworkController.hasEmergencyCryptKeeperText()) {


    	//如果要,且有对应的View,则inflate它
    	//inflate的内容,即为emergency_cryptkeeper_text.xml,该文件内容简单只有一个类
    	//不做介绍
        if (emergencyViewStub != null) {


            ((ViewStub) emergencyViewStub).inflate();
        }
        //监听网络相关变化,如信号强度,sim卡的更改,飞行模式等等
        mNetworkController.addCallback(mSignalCallback);
    } else if (emergencyViewStub != null) {


    	//如果没有,则删除对应的view
        ViewGroup parent = (ViewGroup) emergencyViewStub.getParent();
        parent.removeView(emergencyViewStub);
    }
}
内容简单,见注释,接下来看另外一个初始化函数initOperatorName,如下
initOperatorName的初始化
源码如下:
private void initOperatorName() {


	//根据配置是否要显示,运营商名字,如中国移动显示CMCC
    if (getResources().getBoolean(R.bool.config_showOperatorNameInStatusBar)) {


    	//如果需要显示,则inflate其中的Layout,见上面的示意图
    	//当inflate时,解析的文件为:operator_name.xml文件,该文件也只有一个类
    	//相对简单,不再展开
        ViewStub stub = mStatusBar.findViewById(R.id.operator_name);
        mOperatorNameFrame = stub.inflate();
    }
}
内容简单,见注释,接下来看另外一个初始化函数initNotificationIconArea,如下
initNotificationIconArea的初始化
源码如下:
public void initNotificationIconArea() {


	//获得显示通知图标的父容器(StatusBar的左边区域,见上面的示意图)
    ViewGroup notificationIconArea = mStatusBar.findViewById(R.id.notification_icon_area);
    //获取显示通知图标的具体的View,通过mNotificationIconAreaController内部inflate
    //notification_icon_area.xml文件得到
    mNotificationIconAreaInner =
            mNotificationIconAreaController.getNotificationInnerAreaView();
    //如果通知图标的View有父View,则从中删除,并将其加入notificatonIconArea即左边区域
    if (mNotificationIconAreaInner.getParent() != null) {


        ((ViewGroup) mNotificationIconAreaInner.getParent())
                .removeView(mNotificationIconAreaInner);
    }
    //加入左边区域
    notificationIconArea.addView(mNotificationIconAreaInner);

	//获得显示中心图标的区域的父容器(StatusBar的中心区域)
    ViewGroup statusBarCenteredIconArea = mStatusBar.findViewById(R.id.centered_icon_area);
    //获取显示中心图标的具体的View,通过mNotificationIconAreaController内部inflate文件
    //center_icon_area.xml得到
    mCenteredIconArea = mNotificationIconAreaController.getCenteredNotificationAreaView();
    //如果具体的View有父View,则从中删除,并将其加入中心区域
    if (mCenteredIconArea.getParent() != null) {


        ((ViewGroup) mCenteredIconArea.getParent())
                .removeView(mCenteredIconArea);
    }
    //加入中心区域
    statusBarCenteredIconArea.addView(mCenteredIconArea);

    //一切OK之后,还需要根据disable来处理,哪些图标不要显示,关于disable的说明,见上一篇博文
    updateNotificationIconAreaAndCallChip(mDisabled1, false);
}
在上面的代码中,用于获取具体显示View的代码是通过mNotificationIconAreaController得到,在这个controller内部,它分别inflate两个文件:notification_icon_area.xml和center_icon_area.xml.将他们的顶层View返回给CollapsedStatusBarFragment
注意:为了行文流畅,不再对NotificationIconAreaController的内容inflate做展开,我们将在后面文章中通过分析UI交互(如icon的颜色更改)对其详细介绍.
有了这些准备之后,我们就需要根据disableFlag来判断,哪些需要显示,哪些不需要显示,将会调用updateNotificationIconAreaAndCallChip()函数,如下:
updateNotificationIconAreaAndCallChip决定需要显示的图标
调用updateNotificationIconAreaAndCallChip()函数的参数:mDsiabled1.是通过disbale()接口回调得到,关于这部分内容见上一篇博文中的disabaleFlag内容"Android 12 源码分析 —— 应用层 五(SystemUI的StatusBar类的启动过程和三个窗口的创建)http://t.csdn.cn/YTh8c"
注意:上一篇博文中的disableFlag的分发,会出现在本函数调用之后.但是它并不影响我们对该函数的分析
源码如下:
private void updateNotificationIconAreaAndCallChip(int state1, boolean animate) {


	//是否要禁止通知图标
    boolean disableNotifications = (state1 & DISABLE_NOTIFICATION_ICONS) != 0;
    //是否要禁止通话图标
    boolean hasOngoingCall = (state1 & DISABLE_ONGOING_CALL_CHIP) == 0;

    //根据设置,调用showxxx或者hidexxx函数,进行显示或者隐藏
    //这两个函数,内部通过调用animateShow()或者调用animateHide()进行显示或者隐藏
    if (disableNotifications || hasOngoingCall) {


        hideNotificationIconArea(animate);
    } else {


        showNotificationIconArea(animate);
    }

    //逻辑同通知图标一样
    boolean showOngoingCallChip = hasOngoingCall && !disableNotifications;
    if (showOngoingCallChip) {


        showOngoingCallChip(animate);
    } else {


        hideOngoingCallChip(animate);
    }
    //通知状态变化
    mOngoingCallController.notifyChipVisibilityChanged(showOngoingCallChip);
}
上面函数只做了两件事:
- 根据disableFlag来决定要不要显示通知图标
- 根据disableFlag来决定要不要显示通话图标
注意:其中关于动画的显示,会在后文再探disableFlag中进行详细的调用.
至此CollapsedStatusBarFragment的View创建完成,它主要完成例如下的工作:
- 通过id找到对应的View
- 初始化DarkIconManager
- 初始化各种View,如运行商,系统图标区域,通知图标区域,中间图标区域.
总之,该函数负责初始化本Fragment内部的View.而一旦这些View创建完成,就需要进行外部其他Controller之间的初始化.因此,它将会触发另外Fragmenet的另外一个生命周期的回到.也即前文中FragmentHostManager的FragmentLifecycleCallbacks的回调.
CollapsedStatusBarFragment的UI创建完成之后的监听负责进一步的初始化
当所有的UI创建完成之后,将会触发makeStatusBarView()函数中设置的FragmentHostManager的Listener.这部分内容已经在上一篇博文中,详细介绍过了,现在摘录如下:
FragmentHostManager.get(mPhoneStatusBarWindow)
  .addTagListener(CollapsedStatusBarFragment.TAG, (tag, fragment) -> {


      //将Fragment转换成CollapsedStatusBarFragment
      CollapsedStatusBarFragment statusBarFragment =
              (CollapsedStatusBarFragment) fragment;

      //先保存以前的PhoneStatusBarView
      PhoneStatusBarView oldStatusBarView = mStatusBarView;
      //再获取新的PhoneStatusBarView
      mStatusBarView = (PhoneStatusBarView) statusBarFragment.getView();
      //对PhoneStatusBarView进行设置,包括注册监听,传递需要的对象等
      mStatusBarView.setBar(this);
      mStatusBarView.setPanel(mNotificationPanelViewController);
      mStatusBarView.setScrimController(mScrimController);
      mStatusBarView.setExpansionChangedListeners(mExpansionChangedListeners);

      //如果有一个heads up在顶部,则需要调整为正确的状态
      if (mHeadsUpManager.hasPinnedHeadsUp()) {


          //主要是通知各个监听器,更新各自的状态
          mNotificationPanelViewController.notifyBarPanelExpansionChanged();
      }
      //初始化PhoneStatusBarView中的Bouncer
      //Bouncer界面就是,解锁时要求输入pin,密码等的界面
      //新创建的PhoneStatusBarView中的Bouncer默认是没有打开的。因此要根据
      //当前实际进行更新
      mStatusBarView.setBouncerShowing(mBouncerShowing);
      //如果以前的StatusBar已经展开了一部分,则要求新的StatusBar也展开同样的大小
      //因为新创建的PhoneStatusBar,默认展开是0
      if (oldStatusBarView != null) {


          float fraction = oldStatusBarView.getExpansionFraction();
          boolean expanded = oldStatusBarView.isExpanded();
          mStatusBarView.panelExpansionChanged(fraction, expanded);
      }

      //重新创建HeadsUpAppearanceController
      //它负责控制在StatusBar中要显示的headsup的图标,主要是heads_up_status_bar_view
      //的操作,见上文示意图
      HeadsUpAppearanceController oldController = mHeadsUpAppearanceController;
      if (mHeadsUpAppearanceController != null) {


          mHeadsUpAppearanceController.destroy();
      }
      //重新创建一个新的HeadsUpAppearanceController对象
      mHeadsUpAppearanceController = new HeadsUpAppearanceController(
              mNotificationIconAreaController, mHeadsUpManager,
              mStackScroller.getController(),
              mStatusBarStateController, mKeyguardBypassController,
              mKeyguardStateController, mWakeUpCoordinator, mCommandQueue,
              mNotificationPanelViewController, mStatusBarView);
      //从旧对象中读取值赋值给新对象
      mHeadsUpAppearanceController.readFrom(oldController);

      //建立LightsOutNotificationController和对应View的关系
      //LightsOutNotificationController负责处理SYSTEM_UI_FLAG_LOW_PROFILE中的
      //图标的消失和隐藏,负责显示小圆点
      //SYSTEM_UI_FLAG_LOW_PROFILE:这个属性的能力是让SystemBar在视觉上变得模糊,
      //具体表现是状态栏图标仅保留电量时间关键图标,并且变暗。导航栏图标变成三个点或者变暗
      mLightsOutNotifController.setLightsOutNotifView(
              mStatusBarView.findViewById(R.id.notification_lights_out));
      //将StatusBar窗口的view,放入NotificationShade窗口的控制器中
      mNotificationShadeWindowViewController.setStatusBarView(mStatusBarView);
      //检查是否要进行StatusBar的模式切换,如果要切换则会形成一个过渡动画
      //关于StatusBar模式切换的细节,我们在介绍完StatusBarWindow的整个初始化过程之后,
      //另外的文章进一步介绍.此处我们关注整个启动过程
      checkBarModes();
  }).getFragmentManager()
  .beginTransaction()
  .replace(R.id.status_bar_container,
          new CollapsedStatusBarFragment(
                  mOngoingCallController,
                  mAnimationScheduler,
                  mStatusBarLocationPublisher,
                  mNotificationIconAreaController,
                  mFeatureFlags,
                  mStatusBarIconController,
                  mKeyguardStateController,
                  mNetworkController,
                  mStatusBarStateController,
                  this,
                  mCommandQueue
          ),
          CollapsedStatusBarFragment.TAG)
  .commit();
上面的代码,是View创建完成之后,进行相应对象的创建和初始化.这些对象的创建和初始化,主要是为了分离CollapsedStatusBarFragment本身,因此将其放在一个独立的Listener中.
注意:对于上面的Listener回调中的内容不能理解,也没有关系,我们将会在后面慢慢介绍到各个类的时候,详细介绍其功能.其中涉及到具体的UI交互
同时,为了能够理解这个Listener的触发,此处贴上一个调用栈图片.之所以不对其进行进一步的分析是因为这部分不属于SystemUI中的内容,而是Android Fragment中的内容.
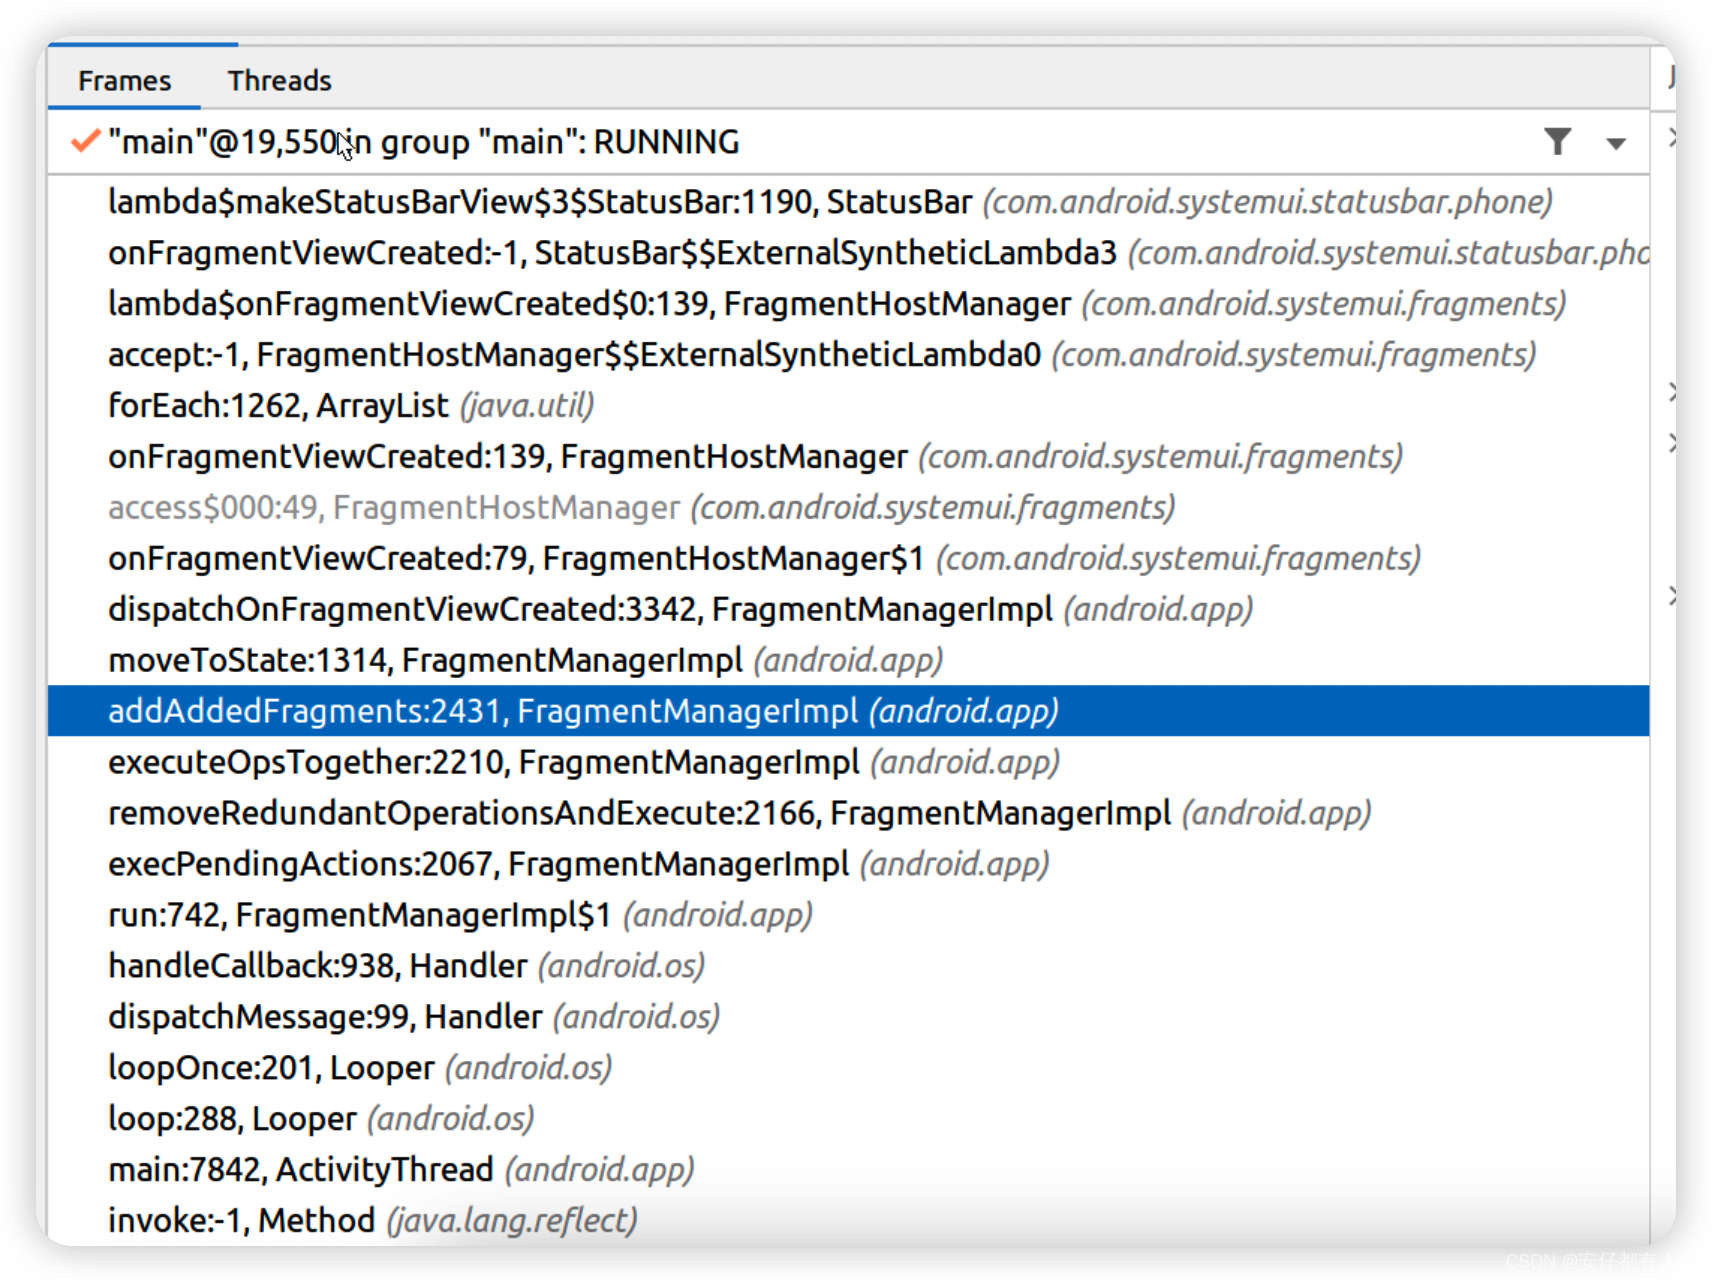
那么一切准备妥当,整个UI显示,将会是下面这个样子:

至此,将会进入下一个生命周期函数onResume中.
onResume
在完成了整个View之后,接下里就会触发其onResume函数()如下:
@Override
public void onResume() {


    super.onResume();
    //接收CommandQueue中的命令,CommandQueue,见上一篇博文
    mCommandQueue.addCallback(this);
    //接收StatusBarState的改变,StatusBarState,见上一篇博文的介绍
    mStatusBarStateController.addCallback(this);
    //初始化化通话图标
    initOngoingCallChip();
}
mCommandQueue.addCallback()需要注意的细节
在addCallback()中,做了一个非常不起眼但却很重要的操作,如下:
@Override
public void addCallback(@NonNull Callbacks callbacks) {


    mCallbacks.add(callbacks);
    //主动调用disable(),其实此处调用disable()跟前文中,主动调用onFragmentViewCreated一样.
    for (int i = 0; i < mDisplayDisabled.size(); i++) {


        int displayId = mDisplayDisabled.keyAt(i);
        int disabled1 = getDisabled1(displayId);
        int disabled2 = getDisabled2(displayId);
        //这将触发CollapsedStatusBarFragment的disable函数被调用
        callbacks.disable(displayId, disabled1, disabled2, false /* animate */);
    }
}
上面函数很简单:
- 保存回调
- 触发回调的disable
他将触发CollapsedStatusBarFragment的disable()函数,如下:
在探disableFlags的处理
disable()函数源码如下:
//其中的state1就是disable1Flag
//state2就是disable2Flag
@Override
public void disable(int displayId, int state1, int state2, boolean animate) {


	//是否是同一个逻辑屏幕,如果不是则会返回
    if (displayId != getContext().getDisplayId()) {


        return;
    }
    //需要对传入的state1做一下调整,在这个调整函数中,它会主动调用各个Controller判断
    //要不要显示某些UI,然后将相应的标志位设置好,最终将其返回.该函数较简单,不再展开
    state1 = adjustDisableFlags(state1);
    //下面是一些位操作,用于得到哪些位被改变了
    final int old1 = mDisabled1;
    final int diff1 = state1 ^ old1;
    final int old2 = mDisabled2;
    final int diff2 = state2 ^ old2;
    mDisabled1 = state1;
    mDisabled2 = state2;
    if ((diff1 & DISABLE_SYSTEM_INFO) != 0 || ((diff2 & DISABLE2_SYSTEM_ICONS) != 0)) {


        if ((state1 & DISABLE_SYSTEM_INFO) != 0 || ((state2 & DISABLE2_SYSTEM_ICONS) != 0)) {


        	//隐藏,animate表示是否使用动画,此处传递过来为false
            hideSystemIconArea(animate);
            hideOperatorName(animate);
        } else {


            showSystemIconArea(animate);
            showOperatorName(animate);
        }
    }

   //依然更新相应的图标要不要显示,他们依然是调用show/hidexxxx()完成,其中xxx表示的是某个View
    if (((diff1 & DISABLE_ONGOING_CALL_CHIP) != 0)
            || ((diff1 & DISABLE_NOTIFICATION_ICONS) != 0)) {


        updateNotificationIconAreaAndCallChip(state1, animate);
    }

    //下面的代码,依然使用show/hidexxx()函数完成,其中xxx表示的是某个View
    if ((diff1 & DISABLE_CLOCK) != 0 || mClockView.getVisibility() != clockHiddenMode()) {


        if ((state1 & DISABLE_CLOCK) != 0) {


            hideClock(animate);
        } else {


            showClock(animate);
        }
    }
}
上面的函数也很简单:
- 从diableFlag中得到对应的位
- 根据位判断是否要显示或者隐藏某个View
- 显示或者隐藏全部通过show/hidexxx()函数完成
接下来我们看看show/hidexxx()函数的具体过程.我们以onVIewCreated()函数中的第一个showSystemIconArea()为例.如下:
showSystemIconArea()
源码如下:
private void showSystemIconArea(boolean animate) {


     //先判断动画的状态,现在还在初始的流程中,state为IDEL
     //在下一篇文章中,将会介绍AnimationScheduler的作用
     int state = mAnimationScheduler.getAnimationState();
     if (state == IDLE || state == SHOWING_PERSISTENT_DOT) {


         //调用animateShow()函数,是否要通过动画显示,此处为传递的值为false
         animateShow(mSystemIconArea, animate);
     }
 }
上面的函数完成:
- 是否要调用animateShow()函数,该函数会负责动画
在接着看animateShow()函数之前,有必要检查一下其他的show/hidexxx()函数是不是也是一样的.幸运的是,几乎所有的show/hidexxx()函数,最终都会调用到animateShow()或者animateHiddenStatte().
接下来我们看看animateShow()函数
animateShow()
animateShow()函数负责在show一个View的时候,是否要配合动画
private void animateShow(View v, boolean animate) {


	//先取消View中的动画
	v.animate().cancel();
	//再设置View位可见
	v.setVisibility(View.VISIBLE);
	//如果不需要动画,则直接将透明度设置为1,并返回
	if (!animate) {


	   v.setAlpha(1f);
	   return;
	}
	//如果需要动画
	v.animate()
	       .alpha(1f)//设置最终透明度为1
	       .setDuration(FADE_IN_DURATION)//动画运行时间
	       .setInterpolator(Interpolators.ALPHA_IN)//设置插值器
	       .setStartDelay(FADE_IN_DELAY)//延迟多久开始动画
	       .withEndAction(null);//动画结束完成执行的动作,此处为空,历史原因才有这句话

	//如果锁屏的消失动画正在运行,则可以将两个动画,联合起来
	//重新设置对应的duration,startdelay
	//然后start()
	if (mKeyguardStateController.isKeyguardFadingAway()) {


	   v.animate()
	           .setDuration(mKeyguardStateController.getKeyguardFadingAwayDuration())
	           .setInterpolator(Interpolators.LINEAR_OUT_SLOW_IN)
	           .setStartDelay(mKeyguardStateController.getKeyguardFadingAwayDelay())
	           .start();
	}
}
上面的函数也非常简单,只做一件事:
- 设置透明度的属性动画.
同样的animateHiddenState()函数则为这个函数的逆过程,它也是设置透明度的属性动画,再此就不做展开.
我们继续接着onResume()剩下的内容查看,对于增加mStatusBarStateController的回调非常简单,因此我们接着看下一句,initOngoingCallChip.如下:
initOngoingCallChip的初始化
源码如下,整个源码非常简单.给对应的控制器增加监听和View
private void initOngoingCallChip() {


    mOngoingCallController.addCallback(mOngoingCallListener);
    mOngoingCallController.setChipView(mOngoingCallChip);
}
该函数也很简单,没有什么可以详细介绍的.
至此,整个Fragment的创建和初始化的生命周期走完.
接下来就是将相应的Window加入屏幕中
将UI加入屏幕中
在前面的分析中,我们只是创建了整个UI体系,但是还没有将其加入屏幕中,加入屏幕,也是在StatusBar的createAndAddWindwos()函数中,如下
public void createAndAddWindows(@Nullable RegisterStatusBarResult result) {


    //创建对应的UI
    makeStatusBarView(result);
    //将NotificationShadeWindow加入屏幕
    mNotificationShadeWindowController.attach();
    //将StatusBarWinidow加入屏幕
    mStatusBarWindowController.attach();
}
对于StatusBar窗口,在是调用mStatusBarWindowController.attach();将其加入屏幕上.其代码内容为:
public void attach() {


    //创建对应的WindowManager.LayoutParams对象
    //该对象用于描述窗口的属性和参数
    //在这里,我们要求其宽度为:MATCH_PARENT
    //高度,为一个固定值:即mBarHeight
    //Window类型为:TYPE_STATUS_BAR,这是抓们为StatusBar设计的窗口类型
    //window的标志有:不能被聚焦,支持窗口之外的触摸,支持自己绘制SystemBar背景
    //像素格式为:PixelFormat.TRANSLUCENT它有更多的bit用来存放透明信息
    mLp = new WindowManager.LayoutParams(
            ViewGroup.LayoutParams.MATCH_PARENT,
            mBarHeight,
            WindowManager.LayoutParams.TYPE_STATUS_BAR,
            WindowManager.LayoutParams.FLAG_NOT_FOCUSABLE
                    | WindowManager.LayoutParams.FLAG_SPLIT_TOUCH
                    | WindowManager.LayoutParams.FLAG_DRAWS_SYSTEM_BAR_BACKGROUNDS,
            PixelFormat.TRANSLUCENT);
    mLp.privateFlags |= PRIVATE_FLAG_COLOR_SPACE_AGNOSTIC;
    //然后一个窗口都需要一个Binder作为token
    mLp.token = new Binder();
    mLp.gravity = Gravity.TOP;
    mLp.setFitInsetsTypes(0 /* types */);
    //窗口的名字
    mLp.setTitle("StatusBar");
    mLp.packageName = mContext.getPackageName();
    mLp.layoutInDisplayCutoutMode = LAYOUT_IN_DISPLAY_CUTOUT_MODE_ALWAYS;

	//调用WindowManager的addView从此刻开始,就能在屏幕中看到对应的UI了
    mWindowManager.addView(mStatusBarView, mLp);
    //保存旧的Window参数,用于在后面参数更改之后,进行对比
    mLpChanged.copyFrom(mLp);
	//下面两句的内容,我们将会在下一篇文章的StatusBar的UI交互中进行介绍,现在不需要知道
    mContentInsetsProvider.addCallback(this::calculateStatusBarLocationsForAllRotations);
    calculateStatusBarLocationsForAllRotations();
}
上面的函数也很简单,完成一件事情:
- 将对应的View添加到屏幕中.
至此,整个StatusBar的UI的创建过程介绍完毕.对于StatusBar的UI的逆过程,也即StatusBar的销毁,或者重建,几乎就是上面内容的逆过程,或者说是重复过程,没有再次介绍的必要.
下一篇文章将会介绍StatusBar中UI的交互
PS:文中,难免有错误之处,如果发现,请批评指正