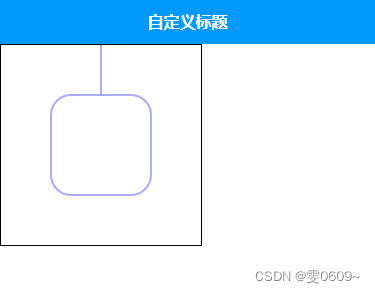
效果
代码
<template>
	<view>
		<!-- 创建了一个宽度为300像素,高度为200像素的canvas元素。canvas-id属性被设置为"firstCanvas",可以用来在JavaScript中获取该canvas元素的上下文对象。 -->
		<canvas style="width:200px; height: 200px; border: 1px solid black;" canvas-id="firstCanvas" id="firstCanvas"></canvas>
	</view>
</template>
<script>
export default {
	onReady: function (e) {
		//创建一个画布上下文对象,用于进行绘图操作。'firstCanvas'是一个指定的画布标识符,表示在页面上的哪个 <canvas> 元素上进行绘制。
		var context = uni.createCanvasContext('firstCanvas')
		//绘制路径中的线条。
		context.setStrokeStyle("#aaaaff")
		// 设置线条的宽度为2个像素。
		context.setLineWidth(2)
		// 绘制竖线
		context.beginPath(); // 开始路径绘制
		context.moveTo(100, 0); // 将起点移动到 (0, 100)
		context.lineTo(100, 50);
		context.stroke(); // 绘制线条
		var x = 50; // 矩形左上角的 x 坐标
		var y = 50; // 矩形左上角的 y 坐标
		var width = 100; // 矩形的宽度
		var height = 100; // 矩形的高度
		var radius = 20; // 圆角半径

		// context.beginPath();
		context.moveTo(x + radius, y); // 移动到圆角起点
		context.arcTo(x + width, y, x + width, y + height, radius); // 绘制右上角的圆弧
		context.arcTo(x + width, y + height, x, y + height, radius); // 绘制右下角的圆弧
		context.arcTo(x, y + height, x, y, radius); // 绘制左下角的圆弧
		context.arcTo(x, y, x + width, y, radius); // 绘制左上角的圆弧
		context.stroke(); // 绘制线条
		// 将之前的绘图操作渲染到画布上。
		context.draw()
	},
	methods: {
	}
}
</script>